This page shows how to create a forecast using your trained forecast model.
To create a forecast, make a batch inference request directly to your forecast model. Specify an input source and an output location to store the forecast results.
Forecasting with AutoML is not compatible with endpoint deployment or online inferences. To request online inferences from your forecast model, use Tabular Workflow for Forecasting.
You can request an inference with explanations (also called feature attributions) to see how your model arrived at an inference. The local feature importance values tell you how much each feature contributed to the inference result. For a conceptual overview, see Feature attributions for forecasting.
Before you begin
Before you can create a forecast, train a forecast model. For more information, see Train a forecast model.
Input data
The input data for batch inference requests is the data that your model uses to create forecasts. You can provide input data in one of two formats:
- CSV objects in Cloud Storage
- BigQuery tables
We recommend that you use the same format for your input data as you used for training the model. For example, if you trained your model using data in BigQuery, it is best to use a BigQuery table as the input for your batch inference. Because Vertex AI treats all CSV input fields as strings, mixing training and input data formats may cause errors.
Your data source must contain tabular data that includes all of the columns, in any order, that were used to train the model. You can include columns that were not in the training data, or that were in the training data but excluded from use for training. These extra columns are included in the output but don't affect forecast results.
Input data requirements
Input for forecast models must adhere to the following requirements:
- All values in the time column must be present and valid.
- All columns that are used in your inference request must be present in the input data. When columns are empty or don't exist, Vertex AI pads the data automatically.
- The data frequency for the input data and the training data must match. If there are missing rows in the time series, you must manually insert them according to the proper domain knowledge.
- Time series with duplicate timestamps are removed from inferences. To include them, remove any duplicate timestamps.
- Provide historical data for each time series to forecast. For the most accurate forecasts, the amount of data should equal the context window, which is set during model training. For example, if the context window is 14 days, provide at least 14 days of historical data. If you provide less data, Vertex AI pads the data with empty values.
- The forecast starts on the first row of a time series (ordered by time)
with a null value in the target column. The null value must be continuous
within the time series. For example, if the target column is ordered by
time, you cannot have something like
1,2,null,3,4,null,nullfor a single time series. For CSV files, Vertex AI treats an empty string as null, and for BigQuery, null values are natively supported.
BigQuery table
If you choose a BigQuery table as the input, you must ensure the following:
- BigQuery data source tables must be no larger than 100 GB.
- If the table is in a different project, you must grant the
BigQuery Data Editorrole to the Vertex AI service account in that project.
CSV file
If you choose a CSV object in Cloud Storage as the input, you must ensure the following:
- The data source must begin with a header row with the column names.
- Each data source object must not be larger than 10 GB. You can include multiple files, up to a maximum amount of 100 GB.
- If the Cloud Storage bucket is in a different project, you must grant the
Storage Object Creatorrole to the Vertex AI service account in that project. - You must enclose all strings in double quotation marks (").
Output format
The output format of your batch inference request doesn't need to be the same as the input format. For example, if you use a BigQuery table as the input, you can output forecasting results to a CSV object in Cloud Storage.
Make a batch inference request to your model
To make batch inference requests, you can use the Google Cloud console or the Vertex AI API. The input data source can be CSV objects stored in a Cloud Storage bucket or BigQuery tables. Depending on the amount of data that you submit as input, a batch inference task can take some time to complete.
Google Cloud console
Use the Google Cloud console to request a batch inference.
- In the Google Cloud console, in the Vertex AI section, go to the Batch inferences page.
- Click Create to open the New batch inference window.
- For Define your batch inference, complete the following steps:
- Enter a name for the batch inference.
- For Model name, select the name of the model to use for this batch inference.
- For Version, select the version of the model.
- For Select source, select whether your source input data is a CSV
file on Cloud Storage or a table in BigQuery.
- For CSV files, specify the Cloud Storage location where your CSV input file is located.
- For BigQuery tables, specify the project ID where the table is located, the BigQuery dataset ID, and the BigQuery table or view ID.
- For Batch inference output, select CSV or BigQuery.
- For CSV, specify the Cloud Storage bucket where Vertex AI stores your output.
- For BigQuery, you can specify a project ID or an existing
dataset:
- To specify the project ID, enter the project ID in the Google Cloud project ID field. Vertex AI creates a new output dataset for you.
- To specify an existing dataset, enter its BigQuery path
in the Google Cloud project ID field, such as
bq://projectid.datasetid.
- Optional. If your output destination is BigQuery or JSONL on Cloud Storage, you can enable feature attributions in addition to inferences. To do this, select Enable feature attributions for this model. Feature attributions are not supported for CSV on Cloud Storage. Learn more.
- Optional: Model Monitoring
analysis for batch inferences is available in Preview. See the
Prerequisites
for adding skew detection configuration to your batch
inference job.
- Click to toggle on Enable model monitoring for this batch inference.
- Select a Training data source. Enter the data path or location for the training data source that you selected.
- Optional: Under Alert thresholds, specify thresholds at which to trigger alerts.
- For Notification emails, enter one or more comma-separated email addresses to receive alerts when a model exceeds an alerting threshold.
- Optional: For Notification channels, add Cloud Monitoring channels to receive alerts when a model exceeds an alerting threshold. You can select existing Cloud Monitoring channels or create a new one by clicking Manage notification channels. The Console supports PagerDuty, Slack, and Pub/Sub notification channels.
- Click Create.
API : BigQuery
REST
You use the batchPredictionJobs.create method to request a batch inference.
Before using any of the request data, make the following replacements:
- LOCATION_ID: Region where Model is stored and batch inference job is executed. For
example,
us-central1. - PROJECT_ID: Your project ID
- BATCH_JOB_NAME: Display name for the batch job
- MODEL_ID: The ID for the model to use for making inferences
-
INPUT_URI: Reference to the BigQuery data source. In the form:
bq://bqprojectId.bqDatasetId.bqTableId
-
OUTPUT_URI: Reference to the BigQuery destination (where the
inferences are written). Specify the project ID and, optionally,
an existing dataset ID. Use the following form:
bq://bqprojectId.bqDatasetId
bq://bqprojectId
- GENERATE_EXPLANATION: Default value is false. Set to true to enable feature attributions. To learn more, see Feature attributions for forecasting.
HTTP method and URL:
POST https://LOCATION_ID-aiplatform.googleapis.com/v1/projects/PROJECT_ID/locations/LOCATION_ID/batchPredictionJobs
Request JSON body:
{
  "displayName": "BATCH_JOB_NAME",
  "model": "projects/PROJECT_ID/locations/LOCATION_ID/models/MODEL_ID",
  "inputConfig": {
    "instancesFormat": "bigquery",
    "bigquerySource": {
      "inputUri": "INPUT_URI"
    }
  },
  "outputConfig": {
    "predictionsFormat": "bigquery",
    "bigqueryDestination": {
      "outputUri": "OUTPUT_URI"
    }
  },
  "generate_explanation": GENERATE_EXPLANATION
}
To send your request, choose one of these options:
curl
Save the request body in a file named request.json,
and execute the following command:
curl -X POST \
     -H "Authorization: Bearer $(gcloud auth print-access-token)" \
     -H "Content-Type: application/json; charset=utf-8" \
     -d @request.json \
     "https://LOCATION_ID-aiplatform.googleapis.com/v1/projects/PROJECT_ID/locations/LOCATION_ID/batchPredictionJobs"
PowerShell
Save the request body in a file named request.json,
and execute the following command:
$cred = gcloud auth print-access-token
$headers = @{ "Authorization" = "Bearer $cred" }

Invoke-WebRequest `
    -Method POST `
    -Headers $headers `
    -ContentType: "application/json; charset=utf-8" `
    -InFile request.json `
    -Uri "https://LOCATION_ID-aiplatform.googleapis.com/v1/projects/PROJECT_ID/locations/LOCATION_ID/batchPredictionJobs" | Select-Object -Expand Content
You should receive a JSON response similar to the following:
{
  "name": "projects/PROJECT_ID/locations/LOCATION_ID/batchPredictionJobs/67890",
  "displayName": "batch_job_1 202005291958",
  "model": "projects/12345/locations/us-central1/models/5678",
  "state": "JOB_STATE_PENDING",
  "inputConfig": {
    "instancesFormat": "bigquery",
    "bigquerySource": {
      "inputUri": "INPUT_URI"
    }
  },
  "outputConfig": {
    "predictionsFormat": "bigquery",
    "bigqueryDestination": {
        "outputUri": bq://12345
    }
  },
  "dedicatedResources": {
    "machineSpec": {
      "machineType": "n1-standard-32",
      "acceleratorCount": "0"
    },
    "startingReplicaCount": 2,
    "maxReplicaCount": 6
  },
  "manualBatchTuningParameters": {
    "batchSize": 4
  },
  "outputInfo": {
    "bigqueryOutputDataset": "bq://12345.reg_model_2020_10_02_06_04
  }
  "state": "JOB_STATE_PENDING",
  "createTime": "2020-09-30T02:58:44.341643Z",
  "updateTime": "2020-09-30T02:58:44.341643Z",
}
Java
Before trying this sample, follow the Java setup instructions in the Vertex AI quickstart using client libraries. For more information, see the Vertex AI Java API reference documentation.
To authenticate to Vertex AI, set up Application Default Credentials. For more information, see Set up authentication for a local development environment.
In the following sample, replace INSTANCES_FORMAT and PREDICTIONS_FORMAT with `bigquery`. To learn how to replace the other placeholders, see the `REST & CMD LINE` tab of this section.Python
To learn how to install or update the Vertex AI SDK for Python, see Install the Vertex AI SDK for Python. For more information, see the Python API reference documentation.
API : Cloud Storage
REST
You use the batchPredictionJobs.create method to request a batch inference.
Before using any of the request data, make the following replacements:
- LOCATION_ID: Region where Model is stored and batch inference job is executed. For
example,
us-central1. - PROJECT_ID:
- BATCH_JOB_NAME: Display name for the batch job
- MODEL_ID: The ID for the model to use for making inferences
-
URI: Paths (URIs) to the Cloud Storage buckets containing the training data.
There can be more than one. Each URI has the form:
gs://bucketName/pathToFileName
-
OUTPUT_URI_PREFIX: Path to a Cloud Storage destination where the
inferences will be written. Vertex AI writes batch inferences to a timestamped
subdirectory of this path. Set this value to a string with the following format:
gs://bucketName/pathToOutputDirectory
- GENERATE_EXPLANATION: Default value is false. Set to true to enable feature attributions. This option is available only if your output destination is JSONL. Feature attributions are not supported for CSV on Cloud Storage. To learn more, see Feature attributions for forecasting.
HTTP method and URL:
POST https://LOCATION_ID-aiplatform.googleapis.com/v1/projects/PROJECT_ID/locations/LOCATION_ID/batchPredictionJobs
Request JSON body:
{
  "displayName": "BATCH_JOB_NAME",
  "model": "projects/PROJECT_ID/locations/LOCATION_ID/models/MODEL_ID",
  "inputConfig": {
    "instancesFormat": "csv",
    "gcsSource": {
      "uris": [
        URI1,...
      ]
    },
  },
  "outputConfig": {
    "predictionsFormat": "csv",
    "gcsDestination": {
      "outputUriPrefix": "OUTPUT_URI_PREFIX"
    }
  },
  "generate_explanation": GENERATE_EXPLANATION
}
To send your request, choose one of these options:
curl
Save the request body in a file named request.json,
and execute the following command:
curl -X POST \
     -H "Authorization: Bearer $(gcloud auth print-access-token)" \
     -H "Content-Type: application/json; charset=utf-8" \
     -d @request.json \
     "https://LOCATION_ID-aiplatform.googleapis.com/v1/projects/PROJECT_ID/locations/LOCATION_ID/batchPredictionJobs"
PowerShell
Save the request body in a file named request.json,
and execute the following command:
$cred = gcloud auth print-access-token
$headers = @{ "Authorization" = "Bearer $cred" }

Invoke-WebRequest `
    -Method POST `
    -Headers $headers `
    -ContentType: "application/json; charset=utf-8" `
    -InFile request.json `
    -Uri "https://LOCATION_ID-aiplatform.googleapis.com/v1/projects/PROJECT_ID/locations/LOCATION_ID/batchPredictionJobs" | Select-Object -Expand Content
You should receive a JSON response similar to the following:
{
  "name": "projects/PROJECT_ID/locations/LOCATION_ID/batchPredictionJobs/67890",
  "displayName": "batch_job_1 202005291958",
  "model": "projects/12345/locations/us-central1/models/5678",
  "state": "JOB_STATE_PENDING",
  "inputConfig": {
    "instancesFormat": "csv",
    "gcsSource": {
      "uris": [
        "gs://bp_bucket/reg_mode_test"
      ]
    }
  },
  "outputConfig": {
    "predictionsFormat": "csv",
    "gcsDestination": {
      "outputUriPrefix": "OUTPUT_URI_PREFIX"
    }
  },
  "dedicatedResources": {
    "machineSpec": {
      "machineType": "n1-standard-32",
      "acceleratorCount": "0"
    },
    "startingReplicaCount": 2,
    "maxReplicaCount": 6
  }
  "outputInfo": {
    "gcsOutputDataset": "OUTPUT_URI_PREFIX/prediction-batch_job_1 202005291958-2020-09-30T02:58:44.341643Z"
  }
  "state": "JOB_STATE_PENDING",
  "createTime": "2020-09-30T02:58:44.341643Z",
  "updateTime": "2020-09-30T02:58:44.341643Z",
}
Python
To learn how to install or update the Vertex AI SDK for Python, see Install the Vertex AI SDK for Python. For more information, see the Python API reference documentation.
Retrieve batch inference results
Vertex AI sends the output of batch inferences to the destination that you specified. This destination can be either BigQuery or Cloud Storage.
Cloud Storage output for feature attributions isn't supported.
BigQuery
Output dataset
If you are using BigQuery, the output of batch inference is stored in an output dataset. If you had provided a dataset to Vertex AI, the name of the dataset (BQ_DATASET_NAME) is the name you had provided earlier. If you did not provide an output dataset, Vertex AI created one for you. You can find its name (BQ_DATASET_NAME) with the following steps:
- In the Google Cloud console, go to the Vertex AI Batch inferences page.
- Select the inference you created.
-
The output dataset is given in Export location. The dataset name is
formatted as follows:
prediction_MODEL_NAME_TIMESTAMP
Output tables
The output dataset contains one or more of the following three output tables:
-
Inference table
This table contains a row for every row in your input data where an inference was requested (that is, where TARGET_COLUMN_NAME = null). For example, if your input included 14 null entries for the target column (such as sales for the next 14 days), your inference request returns 14 rows, the sales number for each day. If your inference request exceeds the model's forecast horizon, Vertex AI returns only inferences up to the forecast horizon.
-
Errors validation table
This table contains a row for each non-critical error encountered during the aggregation phase that takes place prior to batch inference. Each non-critical error corresponds with a row in the input data that Vertex AI could not return a forecast for.
-
Errors table
This table contains a row for each non-critical error encountered during batch inference. Each non-critical error corresponds with a row in the input data that Vertex AI could not return a forecast for.
Predictions table
The name of the table (BQ_PREDICTIONS_TABLE_NAME) is formed by
appending `predictions_` with the timestamp of when the batch inference
job started: predictions_TIMESTAMP
To retrieve the inferences table:
-
In the console, go to the BigQuery page.
Go to BigQuery -
Run the following query:
SELECT * FROM BQ_DATASET_NAME.BQ_PREDICTIONS_TABLE_NAME
Vertex AI stores inferences in the predicted_TARGET_COLUMN_NAME.value column.
If you trained a model
with Temporal Fusion Transformer (TFT), you can find TFT interpretability output in the
predicted_TARGET_COLUMN_NAME.tft_feature_importance column.
This column is further divided into the following:
context_columns: Forecasting features whose context window values serve as inputs to the TFT Long Short-Term Memory (LSTM) Encoder.context_weights: The feature importance weights associated with each of thecontext_columnsfor the predicted instance.horizon_columns: Forecasting features whose forecast horizon values serve as inputs to the TFT Long Short-Term Memory (LSTM) Decoder.horizon_weights: The feature importance weights associated with each of thehorizon_columnsfor the predicted instance.attribute_columns: Forecasting features which are time-invariant.attribute_weights: The weights associated with each of theattribute_columns.
If your model is
optimized for quantile loss and your set of quantiles includes the median,
predicted_TARGET_COLUMN_NAME.value is the inference value at the
median. Otherwise, predicted_TARGET_COLUMN_NAME.value is the
inference value at the lowest quantile in the set. For example, if your set of quantiles
is [0.1, 0.5, 0.9], value is the inference for quantile 0.5.
If your set of quantiles is [0.1, 0.9], value is the inference for
quantile 0.1.
Additionally, Vertex AI stores quantile values and inferences in the following columns:
-
predicted_TARGET_COLUMN_NAME.quantile_values: The values of the quantiles, which are set during model training. For example, these can be0.1,0.5, and0.9. -
predicted_TARGET_COLUMN_NAME.quantile_predictions: The inference values associated with the quantile values.
If your model uses probabilistic inference,
predicted_TARGET_COLUMN_NAME.value contains the minimizer of the
optimization objective. For example, if your optimization objective is minimize-rmse,
predicted_TARGET_COLUMN_NAME.value contains the mean value. If it
is minimize-mae, predicted_TARGET_COLUMN_NAME.value
contains the median value.
If your model uses probabilistic inference with quantiles, Vertex AI stores quantile values and inferences in the following columns:
-
predicted_TARGET_COLUMN_NAME.quantile_values: The values of the quantiles, which are set during model training. For example, these can be0.1,0.5, and0.9. -
predicted_TARGET_COLUMN_NAME.quantile_predictions: The inference values associated with the quantile values.
If you enabled feature attributions, you can find them in the inference table as well. To access attributions for a feature BQ_FEATURE_NAME, run the following query:
SELECT explanation.attributions[OFFSET(0)].featureAttributions.BQ_FEATURE_NAME FROM BQ_DATASET_NAME.BQ_PREDICTIONS_TABLE_NAME
To learn more, see Feature attributions for forecasting.
Errors validation table
The name of the table (BQ_ERRORS_VALIDATION_TABLE_NAME)
is formed by appending `errors_validation` with the timestamp of when the
batch inference job started: errors_validation_TIMESTAMP
-
In the console, go to the BigQuery page.
Go to BigQuery -
Run the following query:
SELECT * FROM BQ_DATASET_NAME.BQ_ERRORS_VALIDATION_TABLE_NAME
- errors_TARGET_COLUMN_NAME
Errors table
The name of the table (BQ_ERRORS_TABLE_NAME) is formed by
appending `errors_` with the timestamp of when the batch inference job
started: errors_TIMESTAMP
-
In the console, go to the BigQuery page.
Go to BigQuery -
Run the following query:
SELECT * FROM BQ_DATASET_NAME.BQ_ERRORS_TABLE_NAME
- errors_TARGET_COLUMN_NAME.code
- errors_TARGET_COLUMN_NAME.message
Cloud Storage
If you specified Cloud Storage as your output destination, the results of your batch inference request are returned as CSV objects in a new folder in the bucket you specified. The name of the folder is the name of your model, prepended with "prediction-" and appended with the timestamp of when the batch inference job started. You can find the Cloud Storage folder name in the Batch predictions tab for your model.
The Cloud Storage folder contains two kinds of objects:-
Inference objects
The inference objects are named `predictions_1.csv`, `predictions_2.csv`, and so on. They contain a header row with the column names, and a row for every forecast returned. The number of inference values depends on your inference input and forecast horizon. For example, if your input included 14 null entries for the target column (such as sales for the next 14 days), your inference request returns 14 rows, the sales number for each day. If your inference request exceeds the model's forecast horizon, Vertex AI returns only inferences up to the forecast horizon.
The forecast values are returned in a column named `predicted_TARGET_COLUMN_NAME`. For quantile forecasts, the output column contains the quantile inferences and quantile values in the JSON format.
-
Error objects
The error objects are named `errors_1.csv`, `errors_2.csv`, and so on. They contain a header row, and a row for every row in your input data that Vertex AI could not return a forecast (for example, if a non-nullable feature was null) for.
Note: If the results are large, it is split into multiple objects.
Sample feature attribution queries in BigQuery
Example 1: Determine attributions for a single inference
Consider the following question:
How much did an advertisement for a product increase predicted sales on November 24th at a given store?
The corresponding query is as follows:
SELECT
  * EXCEPT(explanation, predicted_sales),
  ROUND(predicted_sales.value, 2) AS predicted_sales,
  ROUND(
    explanation.attributions[OFFSET(0)].featureAttributions.advertisement,
    2
  ) AS attribution_advertisement
FROM
  `project.dataset.predictions`
WHERE
  product = 'product_0'
  AND store = 'store_0'
  AND date = '2019-11-24'
Example 2: Determine global feature importance
Consider the following question:
How much did each feature contribute to predicted sales overall?
You can manually compute global feature importance by aggregating the local feature importance attributions. The corresponding query is as follows:
WITH

/*
* Aggregate from (id, date) level attributions to global feature importance.
*/
attributions_aggregated AS (
 SELECT
   SUM(ABS(attributions.featureAttributions.date)) AS date,
   SUM(ABS(attributions.featureAttributions.advertisement)) AS advertisement,
   SUM(ABS(attributions.featureAttributions.holiday)) AS holiday,
   SUM(ABS(attributions.featureAttributions.sales)) AS sales,
   SUM(ABS(attributions.featureAttributions.store)) AS store,
   SUM(ABS(attributions.featureAttributions.product)) AS product,
 FROM
   project.dataset.predictions,
   UNNEST(explanation.attributions) AS attributions

),

/*
* Calculate the normalization constant for global feature importance.
*/
attributions_aggregated_with_total AS (
 SELECT
   *,
   date + advertisement + holiday + sales + store + product AS total
 FROM
   attributions_aggregated
)

/*
* Calculate the normalized global feature importance.
*/
SELECT
 ROUND(date / total, 2) AS date,
 ROUND(advertisement / total, 2) AS advertisement,
 ROUND(holiday / total, 2) AS holiday,
 ROUND(sales / total, 2) AS sales,
 ROUND(store / total, 2) AS store,
 ROUND(product / total, 2) AS product,
FROM
 attributions_aggregated_with_total
Example batch inference output in BigQuery
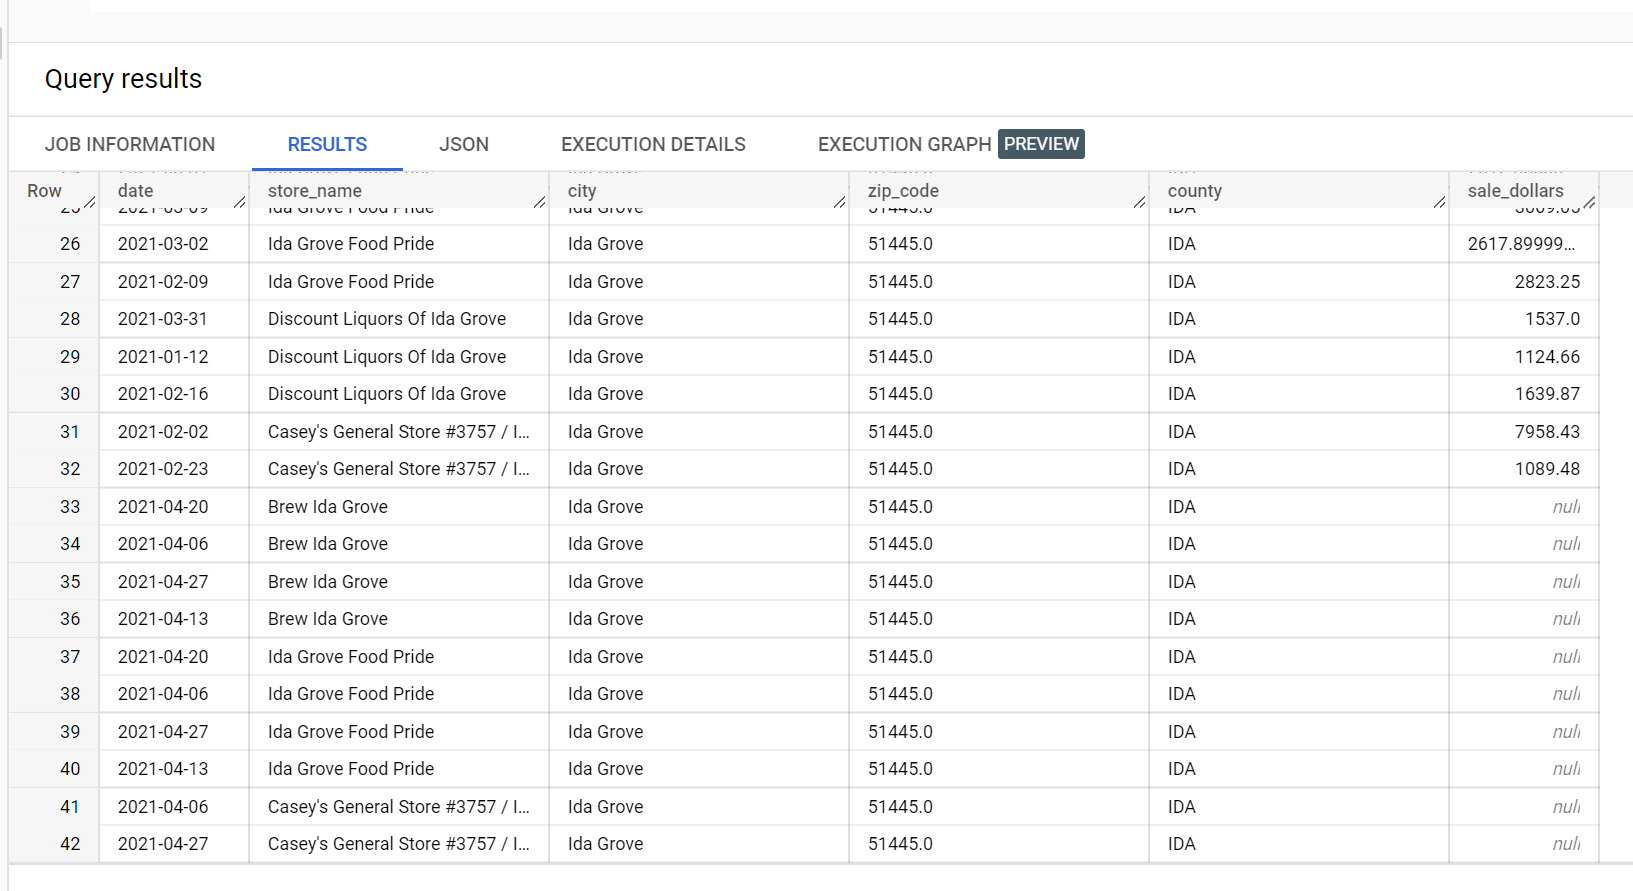
In an example dataset of liquor sales, there are four stores in the city of
"Ida Grove": "Ida Grove Food Pride", "Discount Liquors of Ida Grove",
"Casey's General Store #3757", and "Brew Ida Grove". store_name is the
series identifier and three of the four stores request inferences for the
target column sale_dollars. A validation error is generated because
no forecast was requested for "Discount Liquors of Ida Grove".
The following is an extract from the input dataset used for inference:
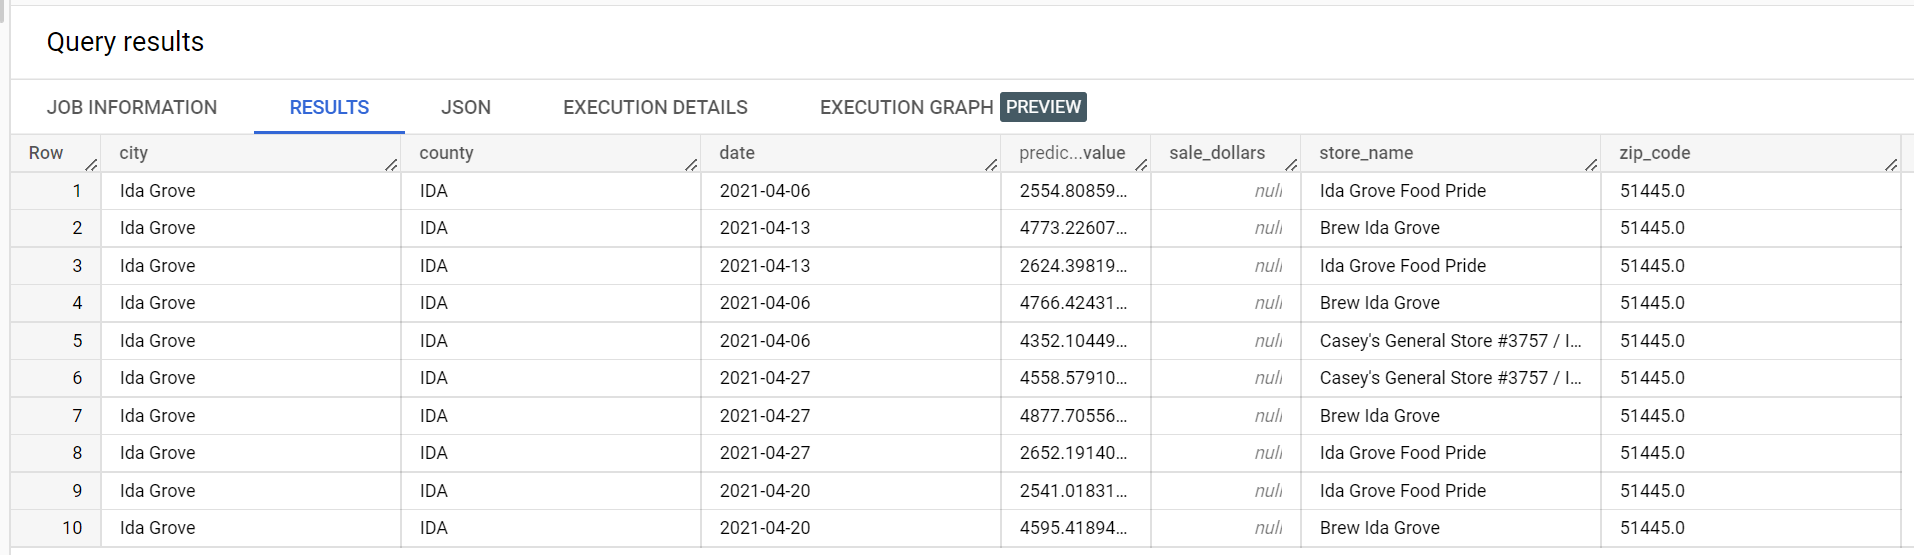
The following is an extract from the inference results:
The following is an extract from the validation errors:

Example batch inference output for a quantile-loss optimized model
The following example is batch inference output for a quantile-loss optimized model. In this scenario, the forecast model predicted sales for the next 14 days for each store.
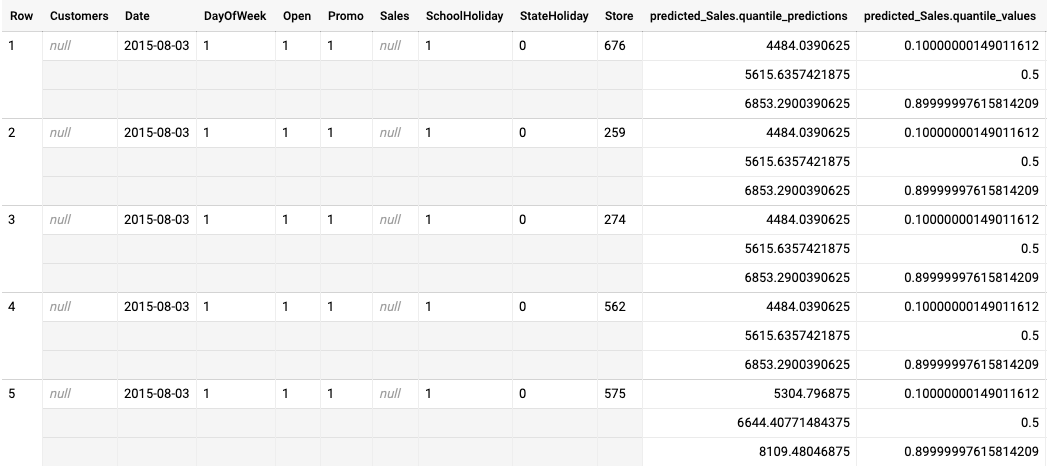
The quantile values are given in the predicted_Sales.quantile_values column. In this
example, the model predicted values at the 0.1, 0.5, and 0.9
quantiles.
The inference values are given in the predicted_Sales.quantile_predictions column.
This is an array of sales values, which map to the quantile values in the
predicted_Sales.quantile_values column. In the first row, we see that the probability
of the sales value being lower than 4484.04 is 10%. The probability of the sales value
being lower than 5615.64 is 50%. The probability of the sales value being lower than
6853.29 is 90%. The inference for the first row, represented as a single value, is
5615.64.