Sign in to your Google Cloud account. If you're new to
Google Cloud,
create an account to evaluate how our products perform in
real-world scenarios. New customers also get $300 in free credits to
run, test, and deploy workloads.
In the Google Cloud console, on the project selector page,
select or create a Google Cloud project.
In the Principal column, find all rows that identify you or a group that
you're included in. To learn which groups you're included in, contact your
administrator.
For all rows that specify or include you, check the Role column to see whether
the list of roles includes the required roles.
In the Principal column, find all rows that identify you or a group that
you're included in. To learn which groups you're included in, contact your
administrator.
For all rows that specify or include you, check the Role column to see whether
the list of roles includes the required roles.
Se non abiliti la fatturazione per il progetto Google Cloud che utilizzi in questo tutorial, esegui query sui dati pubblici nella sandbox di BigQuery. La
sandbox di BigQuery ti consente di scoprire BigQuery con un set limitato
di funzionalità BigQuery senza costi aggiuntivi.
Se hai creato un nuovo progetto, l'API BigQuery viene abilitata
automaticamente.
Visualizzare un set di dati pubblico
I set di dati pubblici di BigQuery sono disponibili per impostazione predefinita in BigQuery Studio in un progetto denominato bigquery-public-data. In questo
tutorial esegui una query sul set di dati NYC Citi Bike Trips. Citi Bike è un grande programma di bike sharing, con 10.000 biciclette e 600 stazioni a Manhattan, Brooklyn, Queens e Jersey City. Questo set di dati include i viaggi in Citi Bike dal lancio del servizio a settembre 2013.
Nella console Google Cloud , vai alla pagina BigQuery.
In BigQuery Studio, nel riquadro Explorer, fai clic su
addAggiungi dati.
Nella finestra di dialogo Aggiungi dati, nel riquadro Filtra per, fai clic su
Set di dati pubblici.
Nella pagina Marketplace, nel campo Cerca nel Marketplace, digita NYC
Citi Bike Trips per restringere la ricerca.
Nei risultati di ricerca, fai clic su Tratte Citi Bike di New York City.
Nella pagina Dettagli prodotto, fai clic su Visualizza set di dati. Puoi visualizzare
le informazioni sul set di dati nella scheda Dettagli.
Esegui una query su un set di dati pubblico
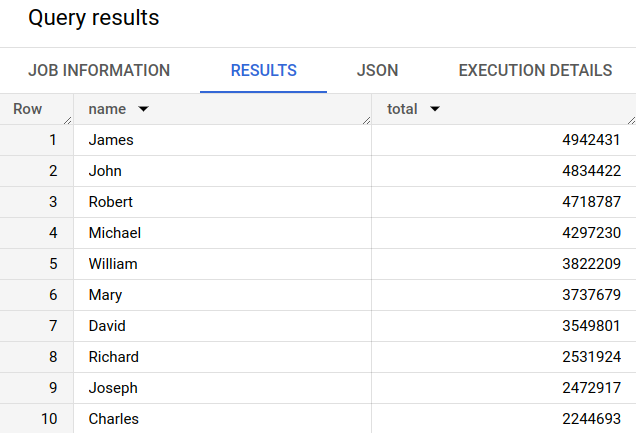
Nei seguenti passaggi, esegui una query sulla tabella citibike_trips per determinare le
100 stazioni Citi Bike più popolari nel set di dati pubblico NYC Citi Bike Trips.
La query recupera il nome e la posizione della stazione e il numero di
viaggi iniziati in quella stazione.
La query utilizza la funzione ST_GEOGPOINT
per creare un punto dai parametri di longitudine e latitudine di ogni stazione e
restituisce quel punto in una colonna GEOGRAPHY. La colonna GEOGRAPHY viene utilizzata per
generare una mappa termica nel visualizzatore di dati geografici integrato.
Nella console Google Cloud , apri la pagina
BigQuery.
Se la query è valida, viene visualizzato un segno di spunta insieme alla quantità di
dati elaborati dalla query. Se la query non è valida, viene visualizzato un punto esclamativo con un messaggio di errore.
Fai clic su
Esegui.
Le stazioni più popolari sono elencate nella sezione
Risultati query.
(Facoltativo) Per visualizzare la durata del job e la quantità di dati elaborati
dal job di query, fai clic sulla scheda Informazioni job nella sezione Risultati
delle query.
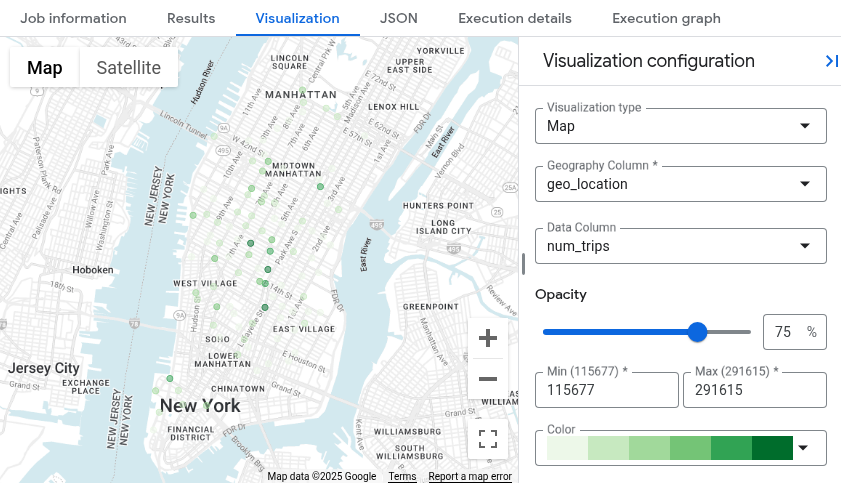
Passa alla scheda Visualizzazione. Questa scheda genera una mappa per visualizzare rapidamente i risultati.
Nel riquadro Configurazione visualizzazione:
Verifica che Tipo di visualizzazione sia impostato su Mappa.
Verifica che la colonna Geografica sia impostata su geo_location.
Per Colonna di dati, scegli num_trips.
Utilizza l'opzione addAumenta lo zoom per
visualizzare la mappa di Manhattan.
Esegui la pulizia
Per evitare che al tuo account Google Cloud vengano addebitati costi relativi alle risorse utilizzate in questa pagina, segui questi passaggi.
Elimina il progetto
Se hai utilizzato la sandbox di BigQuery per eseguire query sul set di dati pubblico, la fatturazione non è abilitata per il tuo progetto e non devi eliminare il progetto.
Il modo più semplice per eliminare la fatturazione è eliminare il progetto creato per il tutorial.
Per eliminare il progetto:
In the Google Cloud console, go to the Manage resources page.
[[["Facile da capire","easyToUnderstand","thumb-up"],["Il problema è stato risolto","solvedMyProblem","thumb-up"],["Altra","otherUp","thumb-up"]],[["Difficile da capire","hardToUnderstand","thumb-down"],["Informazioni o codice di esempio errati","incorrectInformationOrSampleCode","thumb-down"],["Mancano le informazioni o gli esempi di cui ho bisogno","missingTheInformationSamplesINeed","thumb-down"],["Problema di traduzione","translationIssue","thumb-down"],["Altra","otherDown","thumb-down"]],["Ultimo aggiornamento 2025-09-04 UTC."],[[["\u003cp\u003eThis guide explains how to locate and query public datasets in BigQuery using the Google Cloud console.\u003c/p\u003e\n"],["\u003cp\u003eBefore starting, you must enable billing for your Google Cloud project or use the BigQuery sandbox, which provides a limited, free environment.\u003c/p\u003e\n"],["\u003cp\u003eYou can access public datasets within the Google Cloud console by searching for "public datasets" in the \u003cstrong\u003eExplorer\u003c/strong\u003e pane.\u003c/p\u003e\n"],["\u003cp\u003eA step-by-step process is provided to run a SQL query against the "USA Names" public dataset to find the most common names between 1910 and 2013.\u003c/p\u003e\n"],["\u003cp\u003eThe tutorial covers how to delete the entire project to avoid incurring charges, as well as alternative options to preserve project IDs if necessary.\u003c/p\u003e\n"]]],[],null,["# Query a public dataset and visualize the results using BigQuery Studio\n======================================================================\n\nLearn how to query a public dataset and visualize the results by using\nBigQuery Studio.\n\n*** ** * ** ***\n\nTo follow step-by-step guidance for this task directly in the\nGoogle Cloud console, click **Guide me**:\n\n[Guide me](https://console.cloud.google.com/freetrial?redirectPath=/?walkthrough_id=bigquery--bigquery-quickstart-query-public-dataset)\n\n*** ** * ** ***\n\nBefore you begin\n----------------\n\n- Sign in to your Google Cloud account. If you're new to Google Cloud, [create an account](https://console.cloud.google.com/freetrial) to evaluate how our products perform in real-world scenarios. New customers also get $300 in free credits to run, test, and deploy workloads.\n- In the Google Cloud console, on the project selector page,\n select or create a Google Cloud project.\n\n | **Note**: If you don't plan to keep the resources that you create in this procedure, create a project instead of selecting an existing project. After you finish these steps, you can delete the project, removing all resources associated with the project.\n\n [Go to project selector](https://console.cloud.google.com/projectselector2/home/dashboard)\n-\n\n Make sure that you have the following role or roles on the project:\n\n BigQuery Job User, Service Usage Admin\n\n #### Check for the roles\n\n 1.\n In the Google Cloud console, go to the **IAM** page.\n\n [Go to IAM](https://console.cloud.google.com/projectselector/iam-admin/iam?supportedpurview=project)\n 2. Select the project.\n 3.\n In the **Principal** column, find all rows that identify you or a group that\n you're included in. To learn which groups you're included in, contact your\n administrator.\n\n 4. For all rows that specify or include you, check the **Role** column to see whether the list of roles includes the required roles.\n\n #### Grant the roles\n\n 1.\n In the Google Cloud console, go to the **IAM** page.\n\n [Go to IAM](https://console.cloud.google.com/projectselector/iam-admin/iam?supportedpurview=project)\n 2. Select the project.\n 3. Click person_add **Grant access**.\n 4.\n In the **New principals** field, enter your user identifier.\n\n This is typically the email address for a Google Account.\n\n 5. In the **Select a role** list, select a role.\n 6. To grant additional roles, click add **Add\n another role** and add each additional role.\n 7. Click **Save**.\n\n- In the Google Cloud console, on the project selector page,\n select or create a Google Cloud project.\n\n | **Note**: If you don't plan to keep the resources that you create in this procedure, create a project instead of selecting an existing project. After you finish these steps, you can delete the project, removing all resources associated with the project.\n\n [Go to project selector](https://console.cloud.google.com/projectselector2/home/dashboard)\n-\n\n Make sure that you have the following role or roles on the project:\n\n BigQuery Job User, Service Usage Admin\n\n #### Check for the roles\n\n 1.\n In the Google Cloud console, go to the **IAM** page.\n\n [Go to IAM](https://console.cloud.google.com/projectselector/iam-admin/iam?supportedpurview=project)\n 2. Select the project.\n 3.\n In the **Principal** column, find all rows that identify you or a group that\n you're included in. To learn which groups you're included in, contact your\n administrator.\n\n 4. For all rows that specify or include you, check the **Role** column to see whether the list of roles includes the required roles.\n\n #### Grant the roles\n\n 1.\n In the Google Cloud console, go to the **IAM** page.\n\n [Go to IAM](https://console.cloud.google.com/projectselector/iam-admin/iam?supportedpurview=project)\n 2. Select the project.\n 3. Click person_add **Grant access**.\n 4.\n In the **New principals** field, enter your user identifier.\n\n This is typically the email address for a Google Account.\n\n 5. In the **Select a role** list, select a role.\n 6. To grant additional roles, click add **Add\n another role** and add each additional role.\n 7. Click **Save**.\n\n1.\n [Verify that billing is enabled for your Google Cloud project](/billing/docs/how-to/verify-billing-enabled#confirm_billing_is_enabled_on_a_project).\n\n2. If you don't enable billing for the Google Cloud project that you use in this tutorial, then you query the public data in the BigQuery sandbox. The BigQuery sandbox lets you learn BigQuery with a limited set of BigQuery features at no charge.\n3. Ensure that the BigQuery API is enabled.\n\n [Enable the API](https://console.cloud.google.com/flows/enableapi?apiid=bigquery)\n\n If you created a new project, the BigQuery API is automatically\n enabled.\n\n\u003cbr /\u003e\n\nView a public dataset\n---------------------\n\nBigQuery public datasets are available by default in\nBigQuery Studio in a project named `bigquery-public-data`. In this\ntutorial you query the NYC Citi Bike Trips dataset. Citi Bike is a large bike\nshare program, with 10,000 bikes and 600 stations across Manhattan, Brooklyn,\nQueens, and Jersey City. This dataset includes Citi Bike trips since Citi Bike\nlaunched in September 2013.\n\n1. In the Google Cloud console, go to the **BigQuery Studio** page.\n\n [Go to BigQuery Studio](https://console.cloud.google.com/bigquery)\n2. In the **Explorer** pane, click\n **addAdd data**.\n\n3. In the **Add data** dialog, in the **Filter By** pane, click\n **Public datasets**.\n\n4. On the **Marketplace** page, in the **Search Marketplace** field, type `NYC\n Citi Bike Trips` to narrow your search.\n\n5. In the search results, click **NYC Citi Bike Trips**.\n\n6. On the **Product details** page, click **View dataset** . You can view\n information about the dataset on the **Details** tab.\n\nQuery a public dataset\n----------------------\n\nIn the following steps, you query the `citibike_trips` table to determine the\n100 most popular Citi Bike stations in the NYC Citi Bike Trips public dataset.\nThe query retrieves the station's name and location, and the number of\ntrips that started at that station.\n\nThe query uses the [ST_GEOGPOINT function](/bigquery/docs/reference/standard-sql/geography_functions#st_geogpoint)\nto create a point from each station's longitude and latitude parameters and\nreturns that point in a `GEOGRAPHY` column. The `GEOGRAPHY` column is used to\ngenerate a heatmap in the integrated geography data viewer.\n\n1. In the Google Cloud console, open the\n **BigQuery Studio** page.\n\n [Go to BigQuery Studio](https://console.cloud.google.com/bigquery)\n2. Click add_box\n **SQL query**.\n\n3. In the query editor, enter the following\n query:\n\n SELECT\n start_station_name,\n start_station_latitude,\n start_station_longitude,\n ST_GEOGPOINT(start_station_longitude, start_station_latitude) AS geo_location,\n COUNT(*) AS num_trips\n FROM\n `bigquery-public-data.new_york.citibike_trips`\n GROUP BY\n 1,\n 2,\n 3\n ORDER BY\n num_trips DESC\n LIMIT\n 100;\n\n If the query is valid, then a check mark appears along with the amount of\n data that the query processes. If the query is invalid, then an\n exclamation point appears along with an error message.\n\n\n4. Click\n **Run**.\n The most popular stations are listed in the\n **Query results**\n section.\n\n\n5. Optional: To display the duration of the job and the amount of data that the\n query job processed, click the **Job information** tab in the **Query\n results** section.\n\n6. Switch to the **Visualization**\n tab. This tab generates a map to quickly visualize your results.\n\n7. In the **Visualization configuration** panel:\n\n 1. Verify that **Visualization type** is set to **Map**.\n 2. Verify that **Geography column** is set to **`geo_location`**.\n 3. For **Data column** , choose **`num_trips`**.\n 4. Use the add **Zoom in** option to reveal the map of Manhattan.\n\n\nClean up\n--------\n\n\nTo avoid incurring charges to your Google Cloud account for\nthe resources used on this page, follow these steps.\n\n### Delete the project\n\nIf you used the [BigQuery sandbox](/bigquery/docs/sandbox) to query\nthe public dataset, then billing is not enabled for your project, and you don't\nneed to delete the project.\n\n\nThe easiest way to eliminate billing is to delete the project that you\ncreated for the tutorial.\n\nTo delete the project:\n\n| **Caution** : Deleting a project has the following effects:\n|\n| - **Everything in the project is deleted.** If you used an existing project for the tasks in this document, when you delete it, you also delete any other work you've done in the project.\n| - **Custom project IDs are lost.** When you created this project, you might have created a custom project ID that you want to use in the future. To preserve the URLs that use the project ID, such as an `appspot.com` URL, delete selected resources inside the project instead of deleting the whole project.\n|\n|\n| If you plan to explore multiple architectures, tutorials, or quickstarts, reusing projects\n| can help you avoid exceeding project quota limits.\n1. In the Google Cloud console, go to the **Manage resources** page.\n\n [Go to Manage resources](https://console.cloud.google.com/iam-admin/projects)\n2. In the project list, select the project that you want to delete, and then click **Delete**.\n3. In the dialog, type the project ID, and then click **Shut down** to delete the project.\n\n\u003cbr /\u003e\n\n\u003cbr /\u003e\n\nWhat's next\n-----------\n\n- Learn about the [BigQuery sandbox](/bigquery/docs/sandbox).\n- Learn [how to create a dataset, load data, and query tables in\n BigQuery Studio](/bigquery/docs/quickstarts/load-data-console)."]]
 Set di dati pubblici.