Sign in to your Google Cloud account. If you're new to
Google Cloud,
create an account to evaluate how our products perform in
real-world scenarios. New customers also get $300 in free credits to
run, test, and deploy workloads.
In the Google Cloud console, on the project selector page,
select or create a Google Cloud project.
In the Principal column, find all rows that identify you or a group that
you're included in. To learn which groups you're included in, contact your
administrator.
For all rows that specify or include you, check the Role column to see whether
the list of roles includes the required roles.
In the Principal column, find all rows that identify you or a group that
you're included in. To learn which groups you're included in, contact your
administrator.
For all rows that specify or include you, check the Role column to see whether
the list of roles includes the required roles.
Si vous n'activez pas la facturation pour le projet Google Cloud que vous utilisez dans ce tutoriel, vous interrogerez les données publiques dans le bac à sable BigQuery. Le bac à sable BigQuery vous permet d'apprendre à utiliser BigQuery avec un ensemble limité de fonctionnalités offertes.
Si vous avez créé un nouveau projet, l'API BigQuery est automatiquement activée.
Afficher un ensemble de données public
Les ensembles de données publics BigQuery sont disponibles par défaut dans BigQuery Studio, dans un projet nommé bigquery-public-data. Dans ce tutoriel, vous allez interroger l'ensemble de données "Trajets Citi Bike effectués dans la ville de New York". Citi Bike est un grand programme de partage de vélos, avec 10 000 vélos et 600 stations à Manhattan, Brooklyn, dans le Queens et à Jersey City. Cet ensemble de données inclut les trajets Citi Bike depuis le lancement du service en septembre 2013.
Dans la console Google Cloud , accédez à la page BigQuery.
Dans BigQuery Studio, dans le volet Explorateur, cliquez sur add Ajouter des données.
Dans la boîte de dialogue Ajouter des données, dans le volet Filtrer par, cliquez sur Ensembles de données publics.
Sur la page Marketplace, dans le champ Rechercher dans Marketplace, saisissez NYC
Citi Bike Trips pour affiner votre recherche.
Dans les résultats de recherche, cliquez sur NYC Citi Bike Trips.
Sur la page Informations détaillées sur le produit, cliquez sur Afficher l'ensemble de données. Vous pouvez afficher des informations sur l'ensemble de données dans l'onglet Détails.
Interroger un ensemble de données public
Dans les étapes suivantes, vous allez interroger la table citibike_trips pour déterminer les 100 stations Citi Bike les plus populaires dans l'ensemble de données public "NYC Citi Bike Trips".
La requête récupère le nom et l'emplacement de la station, ainsi que le nombre de trajets ayant commencé à cette station.
La requête utilise la fonction ST_GEOGPOINT pour créer un point à partir des paramètres de longitude et de latitude de chaque station, et renvoie ce point dans une colonne GEOGRAPHY. La colonne GEOGRAPHY permet de générer une carte de densité dans le lecteur de données géographiques intégré.
Dans la console Google Cloud , ouvrez la page BigQuery.
Si la requête est valide, une coche apparaît avec la quantité de données traitées par la requête. Si la requête n'est pas valide, un point d'exclamation apparaît avec un message d'erreur.
Cliquez sur Exécuter.
Les stations les plus populaires sont listées dans la section Résultats de la requête.
Facultatif : Pour afficher la durée du job et la quantité de données traitées par le job de requête, cliquez sur l'onglet Informations sur le job dans la section Résultats de la requête.
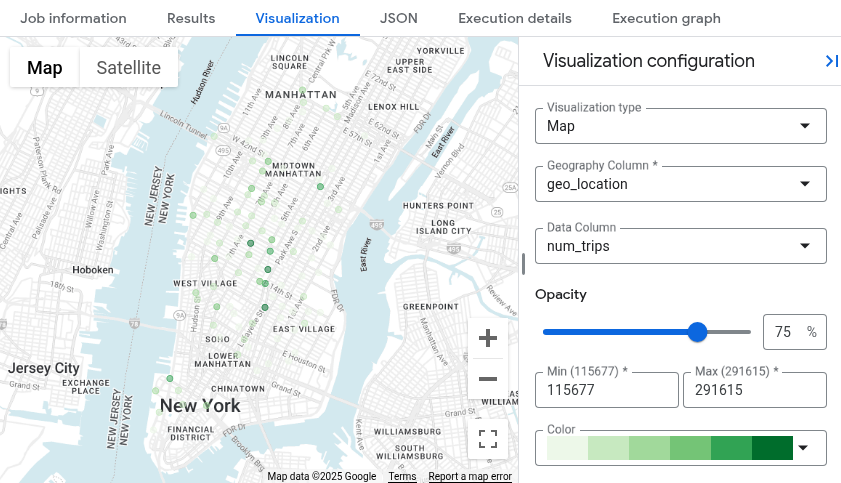
Passez à l'onglet Visualisation. Cet onglet génère une carte pour visualiser rapidement vos résultats.
Dans le panneau Configuration de la visualisation :
Vérifiez que Type de visualisation est défini sur Carte.
Vérifiez que Colonne "Zone géographique" est définie sur geo_location.
Pour Colonne de données, choisissez num_trips.
Utilisez l'option addZoom avant pour afficher la carte de Manhattan.
Effectuer un nettoyage
Pour éviter que les ressources utilisées dans cette démonstration soient facturées sur votre compte Google Cloud , procédez comme suit :
Supprimer le projet
Si vous avez utilisé le bac à sable BigQuery pour interroger l'ensemble de données public, la facturation n'est pas activée pour votre projet. Vous n'avez donc pas besoin de le supprimer.
Le moyen le plus simple d'empêcher la facturation est de supprimer le projet que vous avez créé pour ce tutoriel.
Pour supprimer le projet :
In the Google Cloud console, go to the Manage resources page.
Sauf indication contraire, le contenu de cette page est régi par une licence Creative Commons Attribution 4.0, et les échantillons de code sont régis par une licence Apache 2.0. Pour en savoir plus, consultez les Règles du site Google Developers. Java est une marque déposée d'Oracle et/ou de ses sociétés affiliées.
Dernière mise à jour le 2025/09/04 (UTC).
[[["Facile à comprendre","easyToUnderstand","thumb-up"],["J'ai pu résoudre mon problème","solvedMyProblem","thumb-up"],["Autre","otherUp","thumb-up"]],[["Difficile à comprendre","hardToUnderstand","thumb-down"],["Informations ou exemple de code incorrects","incorrectInformationOrSampleCode","thumb-down"],["Il n'y a pas l'information/les exemples dont j'ai besoin","missingTheInformationSamplesINeed","thumb-down"],["Problème de traduction","translationIssue","thumb-down"],["Autre","otherDown","thumb-down"]],["Dernière mise à jour le 2025/09/04 (UTC)."],[[["\u003cp\u003eThis guide explains how to locate and query public datasets in BigQuery using the Google Cloud console.\u003c/p\u003e\n"],["\u003cp\u003eBefore starting, you must enable billing for your Google Cloud project or use the BigQuery sandbox, which provides a limited, free environment.\u003c/p\u003e\n"],["\u003cp\u003eYou can access public datasets within the Google Cloud console by searching for "public datasets" in the \u003cstrong\u003eExplorer\u003c/strong\u003e pane.\u003c/p\u003e\n"],["\u003cp\u003eA step-by-step process is provided to run a SQL query against the "USA Names" public dataset to find the most common names between 1910 and 2013.\u003c/p\u003e\n"],["\u003cp\u003eThe tutorial covers how to delete the entire project to avoid incurring charges, as well as alternative options to preserve project IDs if necessary.\u003c/p\u003e\n"]]],[],null,["# Query a public dataset and visualize the results using BigQuery Studio\n======================================================================\n\nLearn how to query a public dataset and visualize the results by using\nBigQuery Studio.\n\n*** ** * ** ***\n\nTo follow step-by-step guidance for this task directly in the\nGoogle Cloud console, click **Guide me**:\n\n[Guide me](https://console.cloud.google.com/freetrial?redirectPath=/?walkthrough_id=bigquery--bigquery-quickstart-query-public-dataset)\n\n*** ** * ** ***\n\nBefore you begin\n----------------\n\n- Sign in to your Google Cloud account. If you're new to Google Cloud, [create an account](https://console.cloud.google.com/freetrial) to evaluate how our products perform in real-world scenarios. New customers also get $300 in free credits to run, test, and deploy workloads.\n- In the Google Cloud console, on the project selector page,\n select or create a Google Cloud project.\n\n | **Note**: If you don't plan to keep the resources that you create in this procedure, create a project instead of selecting an existing project. After you finish these steps, you can delete the project, removing all resources associated with the project.\n\n [Go to project selector](https://console.cloud.google.com/projectselector2/home/dashboard)\n-\n\n Make sure that you have the following role or roles on the project:\n\n BigQuery Job User, Service Usage Admin\n\n #### Check for the roles\n\n 1.\n In the Google Cloud console, go to the **IAM** page.\n\n [Go to IAM](https://console.cloud.google.com/projectselector/iam-admin/iam?supportedpurview=project)\n 2. Select the project.\n 3.\n In the **Principal** column, find all rows that identify you or a group that\n you're included in. To learn which groups you're included in, contact your\n administrator.\n\n 4. For all rows that specify or include you, check the **Role** column to see whether the list of roles includes the required roles.\n\n #### Grant the roles\n\n 1.\n In the Google Cloud console, go to the **IAM** page.\n\n [Go to IAM](https://console.cloud.google.com/projectselector/iam-admin/iam?supportedpurview=project)\n 2. Select the project.\n 3. Click person_add **Grant access**.\n 4.\n In the **New principals** field, enter your user identifier.\n\n This is typically the email address for a Google Account.\n\n 5. In the **Select a role** list, select a role.\n 6. To grant additional roles, click add **Add\n another role** and add each additional role.\n 7. Click **Save**.\n\n- In the Google Cloud console, on the project selector page,\n select or create a Google Cloud project.\n\n | **Note**: If you don't plan to keep the resources that you create in this procedure, create a project instead of selecting an existing project. After you finish these steps, you can delete the project, removing all resources associated with the project.\n\n [Go to project selector](https://console.cloud.google.com/projectselector2/home/dashboard)\n-\n\n Make sure that you have the following role or roles on the project:\n\n BigQuery Job User, Service Usage Admin\n\n #### Check for the roles\n\n 1.\n In the Google Cloud console, go to the **IAM** page.\n\n [Go to IAM](https://console.cloud.google.com/projectselector/iam-admin/iam?supportedpurview=project)\n 2. Select the project.\n 3.\n In the **Principal** column, find all rows that identify you or a group that\n you're included in. To learn which groups you're included in, contact your\n administrator.\n\n 4. For all rows that specify or include you, check the **Role** column to see whether the list of roles includes the required roles.\n\n #### Grant the roles\n\n 1.\n In the Google Cloud console, go to the **IAM** page.\n\n [Go to IAM](https://console.cloud.google.com/projectselector/iam-admin/iam?supportedpurview=project)\n 2. Select the project.\n 3. Click person_add **Grant access**.\n 4.\n In the **New principals** field, enter your user identifier.\n\n This is typically the email address for a Google Account.\n\n 5. In the **Select a role** list, select a role.\n 6. To grant additional roles, click add **Add\n another role** and add each additional role.\n 7. Click **Save**.\n\n1.\n [Verify that billing is enabled for your Google Cloud project](/billing/docs/how-to/verify-billing-enabled#confirm_billing_is_enabled_on_a_project).\n\n2. If you don't enable billing for the Google Cloud project that you use in this tutorial, then you query the public data in the BigQuery sandbox. The BigQuery sandbox lets you learn BigQuery with a limited set of BigQuery features at no charge.\n3. Ensure that the BigQuery API is enabled.\n\n [Enable the API](https://console.cloud.google.com/flows/enableapi?apiid=bigquery)\n\n If you created a new project, the BigQuery API is automatically\n enabled.\n\n\u003cbr /\u003e\n\nView a public dataset\n---------------------\n\nBigQuery public datasets are available by default in\nBigQuery Studio in a project named `bigquery-public-data`. In this\ntutorial you query the NYC Citi Bike Trips dataset. Citi Bike is a large bike\nshare program, with 10,000 bikes and 600 stations across Manhattan, Brooklyn,\nQueens, and Jersey City. This dataset includes Citi Bike trips since Citi Bike\nlaunched in September 2013.\n\n1. In the Google Cloud console, go to the **BigQuery Studio** page.\n\n [Go to BigQuery Studio](https://console.cloud.google.com/bigquery)\n2. In the **Explorer** pane, click\n **addAdd data**.\n\n3. In the **Add data** dialog, in the **Filter By** pane, click\n **Public datasets**.\n\n4. On the **Marketplace** page, in the **Search Marketplace** field, type `NYC\n Citi Bike Trips` to narrow your search.\n\n5. In the search results, click **NYC Citi Bike Trips**.\n\n6. On the **Product details** page, click **View dataset** . You can view\n information about the dataset on the **Details** tab.\n\nQuery a public dataset\n----------------------\n\nIn the following steps, you query the `citibike_trips` table to determine the\n100 most popular Citi Bike stations in the NYC Citi Bike Trips public dataset.\nThe query retrieves the station's name and location, and the number of\ntrips that started at that station.\n\nThe query uses the [ST_GEOGPOINT function](/bigquery/docs/reference/standard-sql/geography_functions#st_geogpoint)\nto create a point from each station's longitude and latitude parameters and\nreturns that point in a `GEOGRAPHY` column. The `GEOGRAPHY` column is used to\ngenerate a heatmap in the integrated geography data viewer.\n\n1. In the Google Cloud console, open the\n **BigQuery Studio** page.\n\n [Go to BigQuery Studio](https://console.cloud.google.com/bigquery)\n2. Click add_box\n **SQL query**.\n\n3. In the query editor, enter the following\n query:\n\n SELECT\n start_station_name,\n start_station_latitude,\n start_station_longitude,\n ST_GEOGPOINT(start_station_longitude, start_station_latitude) AS geo_location,\n COUNT(*) AS num_trips\n FROM\n `bigquery-public-data.new_york.citibike_trips`\n GROUP BY\n 1,\n 2,\n 3\n ORDER BY\n num_trips DESC\n LIMIT\n 100;\n\n If the query is valid, then a check mark appears along with the amount of\n data that the query processes. If the query is invalid, then an\n exclamation point appears along with an error message.\n\n\n4. Click\n **Run**.\n The most popular stations are listed in the\n **Query results**\n section.\n\n\n5. Optional: To display the duration of the job and the amount of data that the\n query job processed, click the **Job information** tab in the **Query\n results** section.\n\n6. Switch to the **Visualization**\n tab. This tab generates a map to quickly visualize your results.\n\n7. In the **Visualization configuration** panel:\n\n 1. Verify that **Visualization type** is set to **Map**.\n 2. Verify that **Geography column** is set to **`geo_location`**.\n 3. For **Data column** , choose **`num_trips`**.\n 4. Use the add **Zoom in** option to reveal the map of Manhattan.\n\n\nClean up\n--------\n\n\nTo avoid incurring charges to your Google Cloud account for\nthe resources used on this page, follow these steps.\n\n### Delete the project\n\nIf you used the [BigQuery sandbox](/bigquery/docs/sandbox) to query\nthe public dataset, then billing is not enabled for your project, and you don't\nneed to delete the project.\n\n\nThe easiest way to eliminate billing is to delete the project that you\ncreated for the tutorial.\n\nTo delete the project:\n\n| **Caution** : Deleting a project has the following effects:\n|\n| - **Everything in the project is deleted.** If you used an existing project for the tasks in this document, when you delete it, you also delete any other work you've done in the project.\n| - **Custom project IDs are lost.** When you created this project, you might have created a custom project ID that you want to use in the future. To preserve the URLs that use the project ID, such as an `appspot.com` URL, delete selected resources inside the project instead of deleting the whole project.\n|\n|\n| If you plan to explore multiple architectures, tutorials, or quickstarts, reusing projects\n| can help you avoid exceeding project quota limits.\n1. In the Google Cloud console, go to the **Manage resources** page.\n\n [Go to Manage resources](https://console.cloud.google.com/iam-admin/projects)\n2. In the project list, select the project that you want to delete, and then click **Delete**.\n3. In the dialog, type the project ID, and then click **Shut down** to delete the project.\n\n\u003cbr /\u003e\n\n\u003cbr /\u003e\n\nWhat's next\n-----------\n\n- Learn about the [BigQuery sandbox](/bigquery/docs/sandbox).\n- Learn [how to create a dataset, load data, and query tables in\n BigQuery Studio](/bigquery/docs/quickstarts/load-data-console)."]]
 Ensembles de données publics.