Memuat dan membuat kueri data
Mulai menggunakan BigQuery dengan membuat set data, memuat data ke dalam tabel, dan mengkueri tabel.
Untuk mengikuti panduan langkah demi langkah tugas ini langsung di Google Cloud konsol, klik Pandu saya:
Sebelum memulai
Sebelum dapat menjelajahi BigQuery, Anda harus login ke konsolGoogle Cloud dan membuat project. Jika Anda tidak mengaktifkan penagihan di project, semua data yang diupload akan berada di sandbox BigQuery. Dengan sandbox, Anda dapat mempelajari BigQuery tanpa biaya sambil menggunakan sekumpulan fitur BigQuery yang terbatas. Untuk informasi selengkapnya, lihat Mengaktifkan sandbox BigQuery.- Sign in to your Google Cloud account. If you're new to Google Cloud, create an account to evaluate how our products perform in real-world scenarios. New customers also get $300 in free credits to run, test, and deploy workloads.
-
In the Google Cloud console, on the project selector page, select or create a Google Cloud project.
Roles required to select or create a project
- Select a project: Selecting a project doesn't require a specific IAM role—you can select any project that you've been granted a role on.
-
Create a project: To create a project, you need the Project Creator
(
roles/resourcemanager.projectCreator), which contains theresourcemanager.projects.createpermission. Learn how to grant roles.
-
In the Google Cloud console, on the project selector page, select or create a Google Cloud project.
Roles required to select or create a project
- Select a project: Selecting a project doesn't require a specific IAM role—you can select any project that you've been granted a role on.
-
Create a project: To create a project, you need the Project Creator
(
roles/resourcemanager.projectCreator), which contains theresourcemanager.projects.createpermission. Learn how to grant roles.
- Opsional: Jika Anda memilih project yang sudah ada, pastikan Anda mengaktifkan BigQuery API. BigQuery API otomatis diaktifkan di project baru.
- Di konsol Google Cloud , buka halaman BigQuery. Buka BigQuery
- Di panel kiri, klik Explorer.
- Di panel
Explorer , klik nama project Anda. - Klik Lihat tindakan.
- Pilih Buat set data.
- Di halaman Create dataset, lakukan hal berikut:
- Untuk Dataset ID, masukkan
babynames. - Untuk Jenis lokasi, pilih Multi-region, lalu pilih
US (multiple regions in United States). Set data publik disimpan di lokasi multi-region
us. Agar lebih mudah, simpan set data Anda di lokasi yang sama. - Jangan ubah setelan default yang tersisa, lalu klik
Create dataset . Download data Administrasi Jaminan Sosial AS dengan membuka URL berikut di tab browser baru:
https://www.ssa.gov/OACT/babynames/names.zipEkstrak file.
Untuk informasi selengkapnya tentang skema set data, lihat file
NationalReadMe.pdffile ZIP.Untuk melihat tampilan data tersebut, buka file
yob2024.txt. File ini berisi nilai yang dipisahkan koma untuk nama, jenis kelamin yang ditetapkan saat lahir, dan jumlah anak dengan nama tersebut. File tidak memiliki baris header.Catat lokasi file
yob2024.txtagar Anda dapat menemukannya nanti.- Di panel kiri, klik Explorer.
- Di panel
Explorer , luaskan nama project Anda. - Klik Datasets, lalu di samping set data babynames, klik View actions, lalu pilih Open.
- Klik
Buat
tabel.
Kecuali jika dinyatakan lain, gunakan nilai default untuk semua setelan.
- Di halaman Create table, lakukan hal berikut:
- Di bagian Source, untuk
Create table from , pilih Upload dari daftar. - Di kolom Select file, klik Browse.
- Arahkan ke dan buka file
yob2024.txtlokal, lalu klik Open. - Dari daftar
File format , pilih CSV. - Di bagian Destination, di kolom
Table , masukkannames_2024. - Di bagian Schema, klik tombol
Edit as text , lalu tempelkan definisi skema berikut ke dalam kolom teks: - Klik
Create table .Tunggu hingga BigQuery membuat tabel dan memuat datanya.
- Di panel kiri, klik Explorer.
- Di panel
Explorer , luaskan project Anda dan klik Set Data. - Klik set data
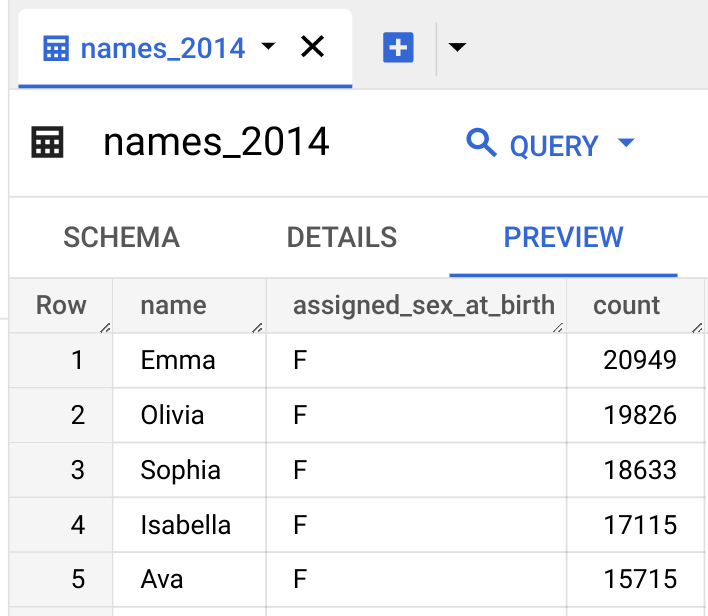
babynames, lalu pilih tabelnames_2024. - Klik tab
Pratinjau . BigQuery menampilkan beberapa baris pertama tabel. - Di samping tab names_2024, klik opsi SQL query. Tab editor baru akan terbuka.
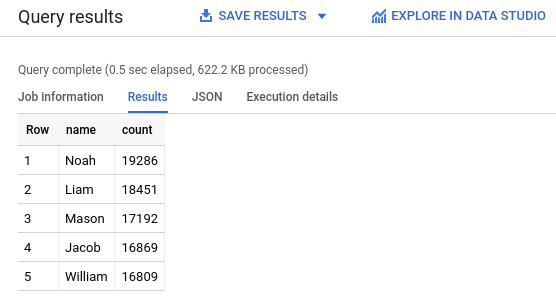
- Di editor kueri, tempel kueri berikut. Kueri ini mengambil
lima nama teratas untuk bayi yang lahir di AS yang ditetapkan sebagai laki-laki saat lahir pada
tahun 2024.
SELECT name, count FROM `babynames.names_2024` WHERE assigned_sex_at_birth = 'M' ORDER BY count DESC LIMIT 5; - Klik
Run . Hasilnya ditampilkan di bagian Query results.
- Di konsol Google Cloud , buka halaman BigQuery. Buka BigQuery
- Di panel kiri, klik Explorer.
- Di panel Explorer, klik Datasets, lalu klik set data
babynamesyang telah Anda buat. - Luaskan opsi View actions, lalu klik Delete.
- Pada dialog Delete dataset, konfirmasi perintah delete: ketik kata
delete, lalu klik Delete. - Untuk mempelajari lebih lanjut cara memuat data ke BigQuery, lihat Pengantar pemuatan data.
- Untuk mempelajari lebih lanjut cara membuat kueri data, lihat Ringkasan analisis BigQuery.
- Untuk mempelajari cara memuat file JSON dengan data bertingkat dan berulang, lihat Memuat data JSON bertingkat dan berulang.
- Untuk mempelajari lebih lanjut cara mengakses BigQuery secara terprogram, lihat referensi REST API atau halaman library klien BigQuery.
Membuat set data BigQuery
Gunakan konsol Google Cloud untuk membuat set data guna menyimpan data. Anda membuat set data di lokasi multi-region AS. Untuk mengetahui informasi tentang region dan multi-region BigQuery, lihat Lokasi.
Download file yang berisi data sumber
File yang Anda download berukuran sekitar 7 MB yang berisi data tentang nama bayi populer. Ini disediakan oleh Administrasi Jaminan Sosial AS.Untuk mengetahui informasi selengkapnya tentang data, lihat Informasi latar belakang untuk nama populer dari Administrasi Jaminan Sosial.
Memuat data ke dalam tabel
Selanjutnya, muat data ke dalam tabel baru.
name:string,assigned_sex_at_birth:string,count:integerPratinjau data tabel
Untuk melihat pratinjau data tabel, ikuti langkah-langkah berikut:
Membuat kueri data tabel
Selanjutnya, buat kueri tabel.
Anda telah berhasil membuat kueri tabel dalam set data publik, lalu memuat data sampel ke BigQuery menggunakan konsol Google Cloud .
Pembersihan
Agar akun Google Cloud Anda tidak dikenai biaya untuk resource yang digunakan pada halaman ini, ikuti langkah-langkah berikut.