Carica ed esegui query sui dati
Inizia a utilizzare BigQuery creando un set di dati, caricando dati in una tabella ed eseguendo query sulla tabella.
Per seguire le indicazioni dettagliate per questa attività direttamente nella Google Cloud console, fai clic su Procedura guidata:
Prima di iniziare
Prima di poter esplorare BigQuery, devi accedere alla consoleGoogle Cloud e creare un progetto. Se non abiliti la fatturazione nel progetto, tutti i dati caricati saranno nella sandbox di BigQuery. La sandbox ti consente di imparare a usare BigQuery senza costi mentre lavori con un insieme limitato di funzionalità di BigQuery. Per maggiori informazioni, vedi Attivare la sandbox di BigQuery.- Sign in to your Google Cloud account. If you're new to Google Cloud, create an account to evaluate how our products perform in real-world scenarios. New customers also get $300 in free credits to run, test, and deploy workloads.
-
In the Google Cloud console, on the project selector page, select or create a Google Cloud project.
Roles required to select or create a project
- Select a project: Selecting a project doesn't require a specific IAM role—you can select any project that you've been granted a role on.
-
Create a project: To create a project, you need the Project Creator
(
roles/resourcemanager.projectCreator), which contains theresourcemanager.projects.createpermission. Learn how to grant roles.
-
In the Google Cloud console, on the project selector page, select or create a Google Cloud project.
Roles required to select or create a project
- Select a project: Selecting a project doesn't require a specific IAM role—you can select any project that you've been granted a role on.
-
Create a project: To create a project, you need the Project Creator
(
roles/resourcemanager.projectCreator), which contains theresourcemanager.projects.createpermission. Learn how to grant roles.
- (Facoltativo) Se selezioni un progetto esistente, assicurati di abilitare l'API BigQuery. L'API BigQuery viene attivata automaticamente nei nuovi progetti.
- Nella console Google Cloud , apri la pagina BigQuery. Vai a BigQuery
- Nel riquadro a sinistra, fai clic su Esplora.
- Nel riquadro
Spazio di esplorazione , fai clic sul nome del progetto. - Fai clic su Visualizza azioni.
- Seleziona Crea set di dati.
- Nella pagina Crea set di dati:
- In ID set di dati, inserisci
babynames. - Per Tipo di località, seleziona Più regioni e poi scegli
Stati Uniti (più regioni negli Stati Uniti). I set di dati pubblici sono
archiviati nella località multiregionale
us. Per semplicità, archivia il set di dati nella stessa posizione. - Lascia invariate le restanti impostazioni predefinite e fai clic su
Crea set di dati . Per scaricare i dati della Social Security Administration degli Stati Uniti, apri il seguente URL in una nuova scheda del browser:
https://www.ssa.gov/OACT/babynames/names.zipEstrai il file.
Per ulteriori informazioni sullo schema del set di dati, consulta il file
NationalReadMe.pdfnel file ZIP.Per vedere i dati, apri il file
yob2024.txt. Questo file contiene valori separati da virgola relativi a nome, sesso assegnato alla nascita e numero di figli con quel nome. Il file non ha una riga di intestazione.Prendi nota della posizione del file
yob2024.txtin modo da poterlo trovare in seguito.- Nel riquadro a sinistra, fai clic su Esplora.
- Nel riquadro
Explorer , espandi il nome del progetto. - Fai clic su Set di dati e poi, accanto al set di dati babynames, fai clic su Visualizza azioni e seleziona Apri.
- Fai clic su
Crea
tabella.
Se non diversamente indicato, utilizza i valori predefiniti per tutte le impostazioni.
- Nella pagina Crea tabella:
- Nella sezione Origine, per
Crea tabella da , scegli Carica dall'elenco. - Nel campo Seleziona file, fai clic su Sfoglia.
- Individua e apri il file
yob2024.txtlocale, quindi fai clic su Apri. - Nell'elenco
Formato file , scegli CSV. - Nella sezione Destinazione, nel campo
Tabella , inseriscinames_2024. - Nella sezione Schema, fai clic sull'opzione di attivazione/disattivazione
Modifica come testo e incolla la seguente definizione di schema nella campo di testo: - Fai clic su
Crea tabella .Attendi che BigQuery crei la tabella e carichi i dati.
- Nel riquadro a sinistra, fai clic su Esplora.
- Nel riquadro
Explorer , espandi il progetto e fai clic su Set di dati. - Fai clic sul set di dati
babynames, quindi seleziona la tabellanames_2024. - Fai clic sulla scheda
Anteprima . BigQuery mostra le prime righe della tabella. - Accanto alla scheda names_2024, fai clic sull'opzione Query SQL. Si apre una nuova scheda dell'editor.
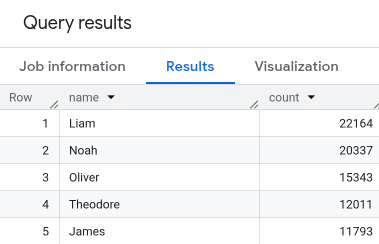
- Nell'editor di query, incolla la query seguente. Questa query recupera i primi cinque nomi dei neonati statunitensi registrati di sesso maschile alla nascita nel 2024.
SELECT name, count FROM `babynames.names_2024` WHERE assigned_sex_at_birth = 'M' ORDER BY count DESC LIMIT 5; - Fai clic su
Esegui . I risultati vengono visualizzati nella sezione Risultati delle query.
- Nella console Google Cloud , apri la pagina BigQuery. Vai a BigQuery
- Nel riquadro a sinistra, fai clic su Esplora.
- Nel riquadro Explorer, fai clic su Set di dati e poi sul set di dati
babynamesche hai creato. - Espandi l'opzione Visualizza azioni e fai clic su Elimina.
- Nella finestra di dialogo Elimina set di dati, conferma il comando di eliminazione: digita la parola
deletee fai clic su Elimina. - Per scoprire di più sul caricamento dei dati in BigQuery, consulta Introduzione al caricamento dei dati.
- Per scoprire di più sull'esecuzione di query sui dati, consulta Panoramica dell'analisi di BigQuery.
- Per scoprire come caricare un file JSON con dati nidificati e ripetuti, consulta Caricamento di dati JSON nidificati e ripetuti.
- Per scoprire di più sull'accesso programmatico a BigQuery, consulta il riferimento all'API REST o la pagina Librerie client BigQuery.
Crea un set di dati BigQuery
Utilizza la console Google Cloud per creare un set di dati in cui sono archiviati i dati. Crea il set di dati nella località Stati Uniti (più regioni). Per informazioni su regioni e multiregioni BigQuery, consulta Località.
Scaricare il file contenente i dati di origine
Il file che stai scaricando contiene circa 7 MB di dati relativi a nomi comuni di bambini. Viene fornito dalla Social Security Administration degli Stati Uniti.Per ulteriori informazioni sui dati, consulta le informazioni di base sui nomi comuni della Social Security Administration.
Carica i dati in una tabella
Carica i dati in una nuova tabella.
name:string,assigned_sex_at_birth:string,count:integerVisualizza l'anteprima dei dati della tabella
Per visualizzare l'anteprima dei dati della tabella:

Esegui query sui dati della tabella
Adesso esegui una query sulla tabella.
Hai eseguito la query su una tabella in un set di dati pubblico e hai caricato i dati di esempio in BigQuery utilizzando la console Google Cloud .
Esegui la pulizia
Per evitare che al tuo account Google Cloud vengano addebitati costi relativi alle risorse utilizzate in questa pagina, segui questi passaggi.