Manage notebooks
This document describes how to manage Colab Enterprise notebooks in BigQuery, including how to view, compare, restore, and delete notebooks.
This document also describes how to view and manage notebook metadata in Dataplex Universal Catalog.
Notebooks are BigQuery Studio code assets powered by Dataform.
Before you begin
- Create a notebook.
- To manage notebook metadata in Dataplex Universal Catalog, ensure that the Dataplex API is enabled in your Google Cloud project.
Required permissions
To share notebooks, you need the following Identity and Access Management (IAM) roles:
- BigQuery Job User (
roles/bigquery.jobUser) - BigQuery Read Session User (
roles/bigquery.readSessionUser) - Code Owner (
roles/dataform.codeOwner) at the resource level.
To save and delete notebooks, you need the following IAM roles:
- BigQuery Job User (
roles/bigquery.jobUser) - BigQuery Read Session User (
roles/bigquery.readSessionUser) - Code Owner (
roles/dataform.codeOwner) or Code Editor (roles/dataform.codeEditor)
To work with notebook revisions, you need the following IAM roles:
- BigQuery Job User (
roles/bigquery.jobUser) - BigQuery Read Session User (
roles/bigquery.readSessionUser) Any one of the following roles:
For more information about BigQuery IAM, see Access control with IAM.
To manage notebook metadata in Dataplex Universal Catalog, ensure that you have the required Dataplex Universal Catalog roles.
Grant access to notebooks
To grant other users access to a notebook, add those users to an appropriate IAM role.
In the Google Cloud console, go to the BigQuery page.
In the left pane, click Explorer:

If you don't see the left pane, click Expand left pane to open the pane.
In the Explorer pane, expand your project and click Notebooks.
Find the notebook that you want to grant access to.
Click Open actions next to the notebook, and then click Share.
In the Share permissions pane, click Add user/group.
In the New principals field, enter a principal.
In the Role list, select one of the following roles:
- Code Owner: Can perform any action on the notebook, including deleting or sharing it.
- Code Editor: Can edit the notebook.
- Code Viewer: Can view the notebook.
Optional: To view a complete list of roles and advanced sharing settings, click Advanced sharing.
Click Save.
To return to the notebook information page, click Close.
Share notebooks
To share a notebook with other users, you can generate and share a link to the notebook. For other users to see the notebook you share, you must first grant access to the notebook.
To run a notebook, users must have access to the data that the notebook accesses. For more information, see Grant access to a dataset.
In the Google Cloud console, go to the BigQuery page.
In the left pane, click Explorer:
If you don't see the left pane, click Expand left pane to open the pane.
In the Explorer pane, expand your project and click Notebooks.
Find the notebook that you want to share. You can use the search feature or filters to find your notebook.
Click View actions next to the notebook, and then click Share > Copy link.
Share the link with other users.
View all notebooks
To view a list of all notebooks in your project, do the following:
In the Google Cloud console, go to the BigQuery page.
In the left pane, click Explorer:
If you don't see the left pane, click Expand left pane to open the pane.
In the Explorer pane, click View actions next to Notebooks, and then do one of the following:
- To open the list in the current tab, click Show all.
- To open the list in a new tab, click Show all in > New tab.
- To open the list in a split tab, click Show all in > Split tab.
View notebook metadata
To view notebook metadata, follow these steps:
In the Google Cloud console, go to the BigQuery page.
In the left pane, click Explorer:
In the Explorer pane, expand your project and click Notebooks.
Click the name of the notebook that you want to view metadata for.
Look at the summary details to see information about the notebook such as the region it uses for data and the date it was last modified.
Work with notebook versions
You can choose to create a notebook either inside of or outside of a repository. Notebook versioning is handled differently based on where the notebook is located.
Notebook versioning in repositories
Repositories are Git repositories that reside either in BigQuery or with a third-party provider. You can use workspaces in repositories to perform version control on notebooks. For more information, see Use version control with a file.
Notebook versioning outside of repositories
Use the following sections to learn how to view, compare, and restore versions of a notebook.
View notebook versions
To view notebook versions, follow these steps:
In the Google Cloud console, go to the BigQuery page.
In the left pane, click Explorer:
In the Explorer pane, expand your project and click Notebooks. Click the name of the notebook you want to view version history for.
To see a list of the notebook versions in descending order by date, click Version history.
Compare notebook versions
To compare notebook versions, follow these steps:
In the Google Cloud console, go to the BigQuery page.
In the left pane, click Explorer:
In the Explorer pane, expand your project and click Notebooks.
Click the name of the notebook that you want to compare version information for.
Click Version history.
Click View actions next to a notebook version and then click Compare. The comparison pane opens, comparing the notebook version that you selected with the current notebook version.
Optional: To compare the versions inline instead of in separate panes, click Compare and then click Inline.
Optional: To compare the source code of versions, click Compare and then click Show raw source.
Optional: To hide the command output in the notebook, click Compare and then deselect Show output.
Restore a notebook version
Restoring a notebook version from the comparison pane lets you compare the current and previous versions of the notebook before choosing to restore the previous version. Restoring a notebook creates a new version of a notebook instead of overwriting the current version. No version history is lost.
In the Google Cloud console, go to the BigQuery page.
In the left pane, click Explorer:
In the Explorer pane, expand your project and click Notebooks.
Click the name of the notebook that you want to restore a previous version of.
Click Version history.
Click View actions next to the version and then click Compare. The comparison pane opens, comparing the notebook version that you selected with the most recent notebook version.
If you want to restore the previous notebook version after comparison, click Restore.
Click Confirm.
Download a notebook
To download a notebook, follow these steps:
In the Google Cloud console, go to the BigQuery page.
In the left pane, click Explorer:
In the Explorer pane, expand your project and click Notebooks.
Click the name of the notebook that you want to download. You can use the search feature or filters to find your notebook.
Expand the menu bar and go to the File menu:
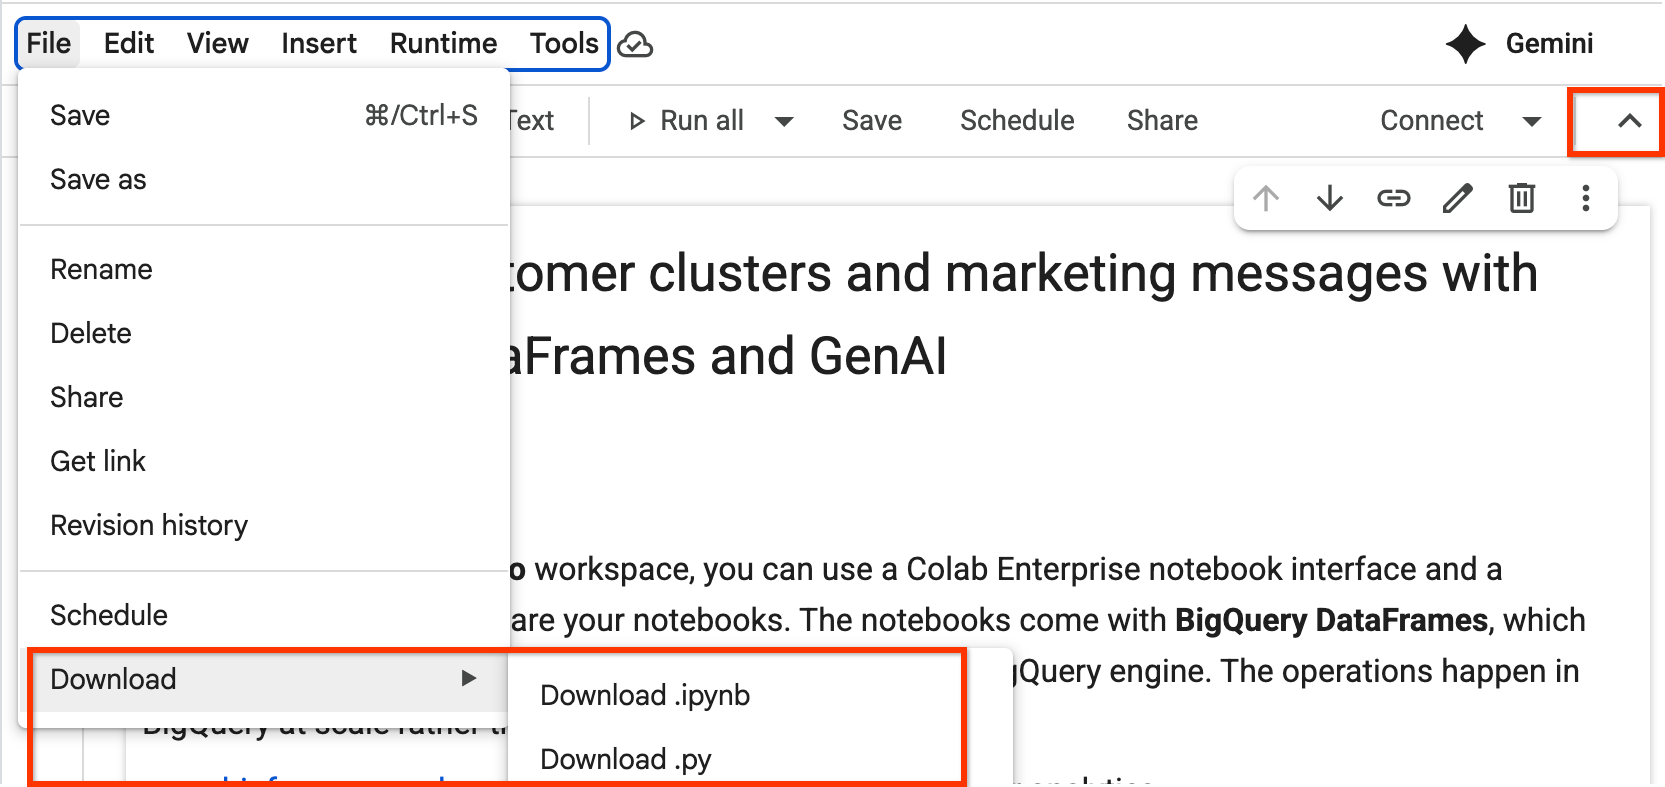
Select Download, and then select the file type in which you want to download the file.
Delete notebooks
To delete a notebook, follow these steps:
In the Google Cloud console, go to the BigQuery page.
In the left pane, click Explorer:
In the Explorer pane, expand your project and click Notebooks.
Find the notebook that you want to delete.
Click View actions next to the notebook and then click Delete.
To confirm deletion, type
deletein the dialog.Click Delete.
Manage metadata in Dataplex Universal Catalog
Dataplex Universal Catalog lets you store and manage metadata for notebooks. Notebooks are available in Dataplex Universal Catalog by default, without additional configuration.
You can use Dataplex Universal Catalog to manage notebooks in all BigQuery locations. Managing notebooks in Dataplex Universal Catalog is subject to Dataplex Universal Catalog quotas and limits and Dataplex Universal Catalog pricing.
Dataplex Universal Catalog automatically retrieves the following metadata from notebooks:
- Data asset name
- Data asset parent
- Data asset location
- Data asset type
- Corresponding Google Cloud project
Dataplex Universal Catalog logs notebooks as entries with the following entry values:
- System entry group
- The system entry group
for notebooks is
@dataform. To view details of notebook entries in Dataplex Universal Catalog, you need to view thedataformsystem entry group. For instructions about how to view a list of all entries in an entry group, see View details of an entry group in the Dataplex Universal Catalog documentation. - System entry type
- The system entry type
for notebooks is
dataform-code-asset. To view details of notebooks, you need to view thedataform-code-assetsystem entry type, filter the results with an aspect-based filter, and set thetypefield insidedataform-code-assetaspect toNOTEBOOK. Then, select an entry of the selected notebook. For instructions about how to view details of a selected entry type, see View details of an entry type in the Dataplex Universal Catalog documentation. For instructions about how to view details of a selected entry, see View details of an entry in the Dataplex Universal Catalog documentation. - System aspect type
- The system aspect type
for notebooks is
dataform-code-asset. To provide additional context to notebooks in Dataplex Universal Catalog by annotating notebook entries with aspects, view thedataform-code-assetaspect type, filter the results with an aspect-based filter, and set thetypefield insidedataform-code-assetaspect toNOTEBOOK. For instructions about how to annotate entries with aspects, see Manage aspects and enrich metadata in the Dataplex Universal Catalog documentation. - Type
- The type for data canvases is
NOTEBOOK. This type lets you filter notebooks in thedataform-code-assetsystem entry type and thedataform-code-assetaspect type by using theaspect:dataplex-types.global.dataform-code-asset.type=NOTEBOOKquery in an aspect-based filter.
For instructions about how to search for assets in Dataplex Universal Catalog, see Search for data assets in Dataplex Universal Catalog in the Dataplex Universal Catalog documentation.
Troubleshooting
For more information, see Troubleshoot Colab Enterprise.
What's next
- Learn more about Colab Enterprise notebooks in BigQuery.
- Learn how to create notebooks.
- Learn how to schedule notebooks.