本教學課程說明如何匯入以 scikit-learn 訓練的開放式神經網路交換 (ONNX) 模型。您將模型匯入 BigQuery 資料集,並使用 SQL 查詢進行預測。
ONNX 提供統一格式,可用於表示任何機器學習 (ML) 架構。BigQuery ML 支援 ONNX,因此您可以執行下列操作:
- 使用您偏好的架構訓練模型。
- 將模型轉換為 ONNX 模型格式。
- 將 ONNX 模型匯入 BigQuery,並使用 BigQuery ML 進行預測。
選用:訓練模型並轉換為 ONNX 格式
下列程式碼範例說明如何使用 scikit-learn 訓練分類模型,以及如何將產生的管線轉換為 ONNX 格式。本教學課程使用預先建構的範例模型,該模型儲存在 gs://cloud-samples-data/bigquery/ml/onnx/pipeline_rf.onnx。如果您使用範例模型,則不必完成這些步驟。
使用 scikit-learn 訓練分類模型
使用下列範例程式碼,在 Iris 資料集上建立及訓練 scikit-learn 管道。如需安裝及使用 scikit-learn 的操作說明,請參閱 scikit-learn 安裝指南。
import numpy
from sklearn.datasets import load_iris
from sklearn.pipeline import Pipeline
from sklearn.preprocessing import StandardScaler
from sklearn.ensemble import RandomForestClassifier

data = load_iris()
X = data.data[:, :4]
y = data.target

ind = numpy.arange(X.shape[0])
numpy.random.shuffle(ind)
X = X[ind, :].copy()
y = y[ind].copy()

pipe = Pipeline([('scaler', StandardScaler()),
                ('clr', RandomForestClassifier())])
pipe.fit(X, y)
將管道轉換為 ONNX 模型
在 sklearn-onnx 中使用下列程式碼範例,將 scikit-learn 管道轉換為名為 pipeline_rf.onnx 的 ONNX 模型。
from skl2onnx import convert_sklearn
from skl2onnx.common.data_types import FloatTensorType

# Disable zipmap as it is not supported in BigQuery ML.
options = {id(pipe): {'zipmap': False}}

# Define input features. scikit-learn does not store information about the
# training dataset. It is not always possible to retrieve the number of features
# or their types. That's why the function needs another argument called initial_types.
initial_types = [
   ('sepal_length', FloatTensorType([None, 1])),
   ('sepal_width', FloatTensorType([None, 1])),
   ('petal_length', FloatTensorType([None, 1])),
   ('petal_width', FloatTensorType([None, 1])),
]

# Convert the model.
model_onnx = convert_sklearn(
   pipe, 'pipeline_rf', initial_types=initial_types, options=options
)

# And save.
with open('pipeline_rf.onnx', 'wb') as f:
 f.write(model_onnx.SerializeToString())
將 ONNX 模型上傳至 Cloud Storage
儲存模型後,請按照下列步驟操作:
建立資料集
建立 BigQuery 資料集來儲存機器學習模型。
控制台
前往 Google Cloud 控制台的「BigQuery」頁面。
在「Explorer」窗格中,按一下專案名稱。
依序點按 「View actions」(查看動作) >「Create dataset」(建立資料集)。
在「建立資料集」頁面中,執行下列操作:
在「Dataset ID」(資料集 ID) 中輸入
bqml_tutorial。針對「Location type」(位置類型) 選取「Multi-region」(多區域),然後選取「US (multiple regions in United States)」(us (多個美國區域))。
其餘設定請保留預設狀態,然後按一下「建立資料集」。
bq
如要建立新的資料集,請使用 bq mk 指令搭配 --location 旗標。如需可能的完整參數清單,請參閱 bq mk --dataset 指令參考資料。
建立名為「
bqml_tutorial」的資料集,並將資料位置設為「US」,說明則設為「BigQuery ML tutorial dataset」:bq --location=US mk -d \ --description "BigQuery ML tutorial dataset." \ bqml_tutorial
這個指令採用
-d捷徑,而不是使用--dataset旗標。如果您省略-d和--dataset,該指令預設會建立資料集。確認資料集已建立完成:
bq ls
API
請呼叫 datasets.insert 方法,搭配已定義的資料集資源。
{
  "datasetReference": {
     "datasetId": "bqml_tutorial"
  }
}
BigQuery DataFrames
在嘗試這個範例之前,請按照使用 BigQuery DataFrames 的 BigQuery 快速入門導覽課程中的 BigQuery DataFrames 設定說明操作。 詳情請參閱 BigQuery DataFrames 參考說明文件。
如要驗證 BigQuery,請設定應用程式預設憑證。 詳情請參閱「為本機開發環境設定 ADC」。
將 ONNX 模型匯入 BigQuery
下列步驟說明如何使用 CREATE MODEL 陳述式,從 Cloud Storage 匯入範例 ONNX 模型。
如要將 ONNX 模型匯入資料集,請選取下列其中一個選項:
控制台
前往 Google Cloud 控制台的「BigQuery Studio」頁面。
在查詢編輯器中輸入下列
CREATE MODEL陳述式。CREATE OR REPLACE MODEL `bqml_tutorial.imported_onnx_model` OPTIONS (MODEL_TYPE='ONNX', MODEL_PATH='BUCKET_PATH')
請將
BUCKET_PATH改成您上傳至 Cloud Storage 的模型路徑。如果您使用範例模型,請將BUCKET_PATH替換為下列值:gs://cloud-samples-data/bigquery/ml/onnx/pipeline_rf.onnx。作業完成後,您會看到類似以下的訊息:
Successfully created model named imported_onnx_model。新模型會顯示在「資源」面板中。模型會以模型圖示來表示:
 在「資源」面板中選取新模型,「查詢編輯器」旁就會顯示該模型的相關資訊。
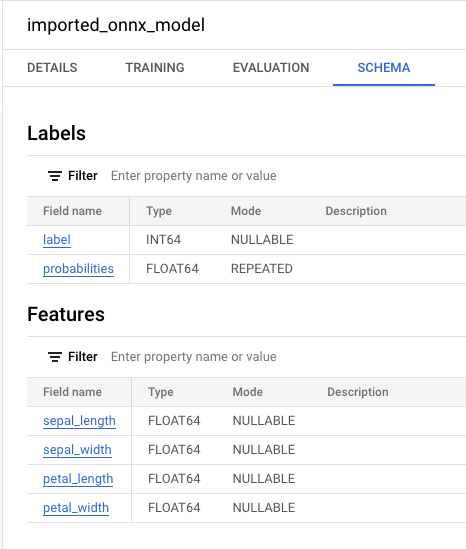
bq
輸入下列
CREATE MODEL陳述式,從 Cloud Storage 匯入 ONNX 模型。bq query --use_legacy_sql=false \ "CREATE OR REPLACE MODEL `bqml_tutorial.imported_onnx_model` OPTIONS (MODEL_TYPE='ONNX', MODEL_PATH='BUCKET_PATH')"
請將
BUCKET_PATH改成您上傳至 Cloud Storage 的模型路徑。如果您使用範例模型,請將BUCKET_PATH替換為下列值:gs://cloud-samples-data/bigquery/ml/onnx/pipeline_rf.onnx。作業完成後,您會看到類似以下的訊息:
Successfully created model named imported_onnx_model。匯入模型後,請確認模型是否顯示在資料集中。
bq ls -m bqml_tutorial
輸出結果會與下列內容相似:
tableId               Type
--------------------- -------
imported_onnx_model  MODEL
BigQuery DataFrames
在嘗試這個範例之前,請按照使用 BigQuery DataFrames 的 BigQuery 快速入門導覽課程中的 BigQuery DataFrames 設定說明操作。 詳情請參閱 BigQuery DataFrames 參考說明文件。
如要驗證 BigQuery,請設定應用程式預設憑證。 詳情請參閱「為本機開發環境設定 ADC」。
使用 ONNXModel 物件匯入模型。
如要進一步瞭解如何將 ONNX 模型匯入 BigQuery,包括格式和儲存空間需求,請參閱匯入 ONNX 模型的 CREATE MODEL 陳述式。
使用匯入的 ONNX 模型進行預測
匯入 ONNX 模型後,您可以使用 ML.PREDICT 函式,透過模型進行預測。
下列步驟中的查詢會使用 imported_onnx_model,根據 ml_datasets 公開資料集 iris 資料表中的輸入資料進行預測。ONNX 模型預期輸入四個 FLOAT 值:
sepal_lengthsepal_widthpetal_lengthpetal_width
這些輸入內容與initial_types您將模型轉換為 ONNX 格式時定義的內容相符。
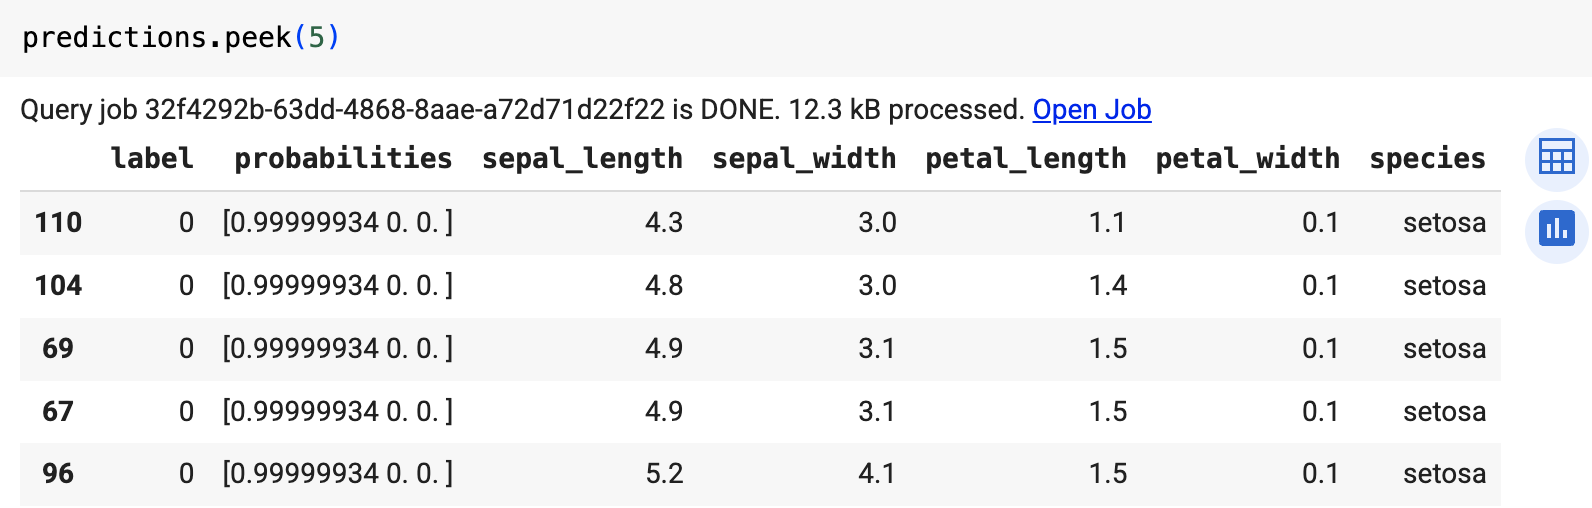
輸出內容包括 label 和 probabilities 資料欄,以及輸入資料表中的資料欄。label 代表預測的類別標籤。
probabilities 是機率陣列,代表每個類別的機率。
如要使用匯入的 ONNX 模型進行預測,請選擇下列其中一種做法:
控制台
前往「BigQuery Studio」頁面。
在查詢編輯器中,輸入使用
ML.PREDICT函式的查詢。SELECT * FROM ML.PREDICT(MODEL `bqml_tutorial.imported_onnx_model`, ( SELECT * FROM `bigquery-public-data.ml_datasets.iris` ) )
查詢結果類似下方:

bq
執行使用 ML.PREDICT 的查詢。
bq query --use_legacy_sql=false \
'SELECT *
FROM ML.PREDICT(
MODEL `example_dataset.imported_onnx_model`,
(SELECT * FROM `bigquery-public-data.ml_datasets.iris`))'
BigQuery DataFrames
在嘗試這個範例之前,請按照使用 BigQuery DataFrames 的 BigQuery 快速入門導覽課程中的 BigQuery DataFrames 設定說明操作。 詳情請參閱 BigQuery DataFrames 參考說明文件。
如要驗證 BigQuery,請設定應用程式預設憑證。 詳情請參閱「為本機開發環境設定 ADC」。
使用 predict 函式執行 ONNX 模型。
結果會類似如下: