開放式神經網路交換格式 (ONNX) 提供統一格式,可表示任何機器學習架構。BigQuery ML 支援 ONNX,因此您可以:
- 使用您偏好的架構訓練模型。
- 將模型轉換為 ONNX 模型格式。
- 將 ONNX 模型匯入 BigQuery,並使用 BigQuery ML 進行預測。
本教學課程說明如何將使用 PyTorch 訓練的 ONNX 模型匯入 BigQuery 資料集,並使用這些模型預測 SQL 查詢。
選用:訓練模型並轉換為 ONNX 格式
下列程式碼範例說明如何將預先訓練的分類模型匯入 PyTorch,以及如何將產生的模型轉換為 ONNX 格式。本教學課程使用儲存在 gs://cloud-samples-data/bigquery/ml/onnx/resnet18.onnx 的預先建構範例模型。如果您使用範例模型,則不必完成這些步驟。
建立圖片分類的 PyTorch 視覺模型
請使用下列程式碼範例匯入 PyTorch 預先訓練的 resnet18 模型,該模型會接受 BigQuery ML ML.DECODE_IMAGE 和 ML.RESIZE_IMAGE 函式傳回的已解碼圖片資料。
import torch
import torch.nn as nn

# Define model input format to match the output format of
# ML.DECODE_IMAGE function: [height, width, channels]
dummy_input = torch.randn(1, 224, 224, 3, device="cpu")

# Load a pretrained pytorch model for image classification
model = torch.hub.load('pytorch/vision:v0.10.0', 'resnet18', pretrained=True)

# Reshape input format from [batch_size, height, width, channels]
# to [batch_size, channels, height, width]
class ReshapeLayer(nn.Module):
    def __init__(self):
        super().__init__()

    def forward(self, x):
        x = x.permute(0, 3, 1, 2)  # reorder dimensions
        return x

class ArgMaxLayer(nn.Module):
    def __init__(self):
        super().__init__()

    def forward(self, x):
       return torch.argmax(x, dim=1)

final_model = nn.Sequential(
    ReshapeLayer(),
    model,
    nn.Softmax(),
    ArgMaxLayer()
)
將模型轉換為 ONNX 格式
請使用下列範例,透過 torch.onnx 匯出 PyTorch 視覺模型。匯出的 ONNX 檔案名稱為 resnet18.onnx。
torch.onnx.export(final_model,            # model being run
                  dummy_input,            # model input
                  "resnet18.onnx",        # where to save the model
                  opset_version=10,       # the ONNX version to export the model to
                  input_names = ['input'],         # the model's input names
                  output_names = ['class_label'])  # the model's output names
將 ONNX 模型上傳至 Cloud Storage
儲存模型後,請按照下列步驟操作:
建立資料集
建立 BigQuery 資料集來儲存機器學習模型。
控制台
前往 Google Cloud 控制台的「BigQuery」頁面。
在「Explorer」窗格中,按一下專案名稱。
依序點按 「View actions」(查看動作) >「Create dataset」(建立資料集)。
在「建立資料集」頁面中,執行下列操作:
在「Dataset ID」(資料集 ID) 中輸入
bqml_tutorial。針對「Location type」(位置類型) 選取「Multi-region」(多區域),然後選取「US (multiple regions in United States)」(us (多個美國區域))。
其餘設定請保留預設狀態,然後按一下「建立資料集」。
bq
如要建立新的資料集,請使用 bq mk 指令搭配 --location 旗標。如需可能的完整參數清單,請參閱 bq mk --dataset 指令參考資料。
建立名為「
bqml_tutorial」的資料集,並將資料位置設為「US」,說明則設為「BigQuery ML tutorial dataset」:bq --location=US mk -d \ --description "BigQuery ML tutorial dataset." \ bqml_tutorial
這個指令採用
-d捷徑,而不是使用--dataset旗標。如果您省略-d和--dataset,該指令預設會建立資料集。確認資料集已建立完成:
bq ls
API
請呼叫 datasets.insert 方法,搭配已定義的資料集資源。
{
  "datasetReference": {
     "datasetId": "bqml_tutorial"
  }
}
BigQuery DataFrames
在嘗試這個範例之前,請按照使用 BigQuery DataFrames 的 BigQuery 快速入門導覽課程中的 BigQuery DataFrames 設定說明操作。 詳情請參閱 BigQuery DataFrames 參考說明文件。
如要驗證 BigQuery,請設定應用程式預設憑證。 詳情請參閱「為本機開發環境設定 ADC」。
將 ONNX 模型匯入 BigQuery
下列步驟說明如何使用 CREATE MODEL 陳述式,將 Cloud Storage 中的 ONNX 範例模型匯入資料集。
控制台
前往 Google Cloud 控制台的「BigQuery Studio」頁面。
在查詢編輯器中輸入下列
CREATE MODEL陳述式。CREATE OR REPLACE MODEL `bqml_tutorial.imported_onnx_model` OPTIONS (MODEL_TYPE='ONNX', MODEL_PATH='BUCKET_PATH')
請將
BUCKET_PATH改成您上傳至 Cloud Storage 的模型路徑。如果您使用範例模型,請將BUCKET_PATH替換為下列值:gs://cloud-samples-data/bigquery/ml/onnx/resnet18.onnx。作業完成後,您會看到類似以下的訊息:
Successfully created model named imported_onnx_model。新模型會顯示在「資源」面板中。模型會以模型圖示來表示:
 在「資源」面板中選取新模型,「查詢編輯器」旁就會顯示該模型的相關資訊。
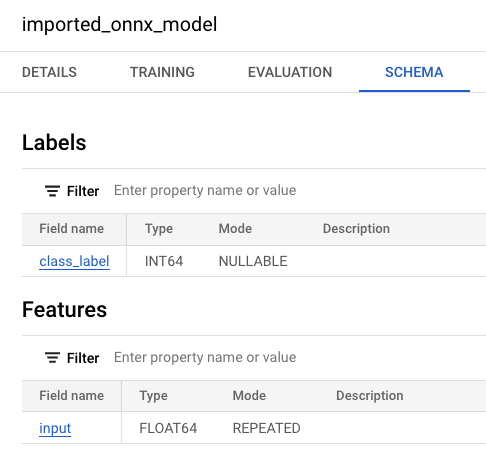
bq
輸入下列
CREATE MODEL陳述式,從 Cloud Storage 匯入 ONNX 模型。bq query --use_legacy_sql=false \ "CREATE OR REPLACE MODEL `bqml_tutorial.imported_onnx_model` OPTIONS (MODEL_TYPE='ONNX', MODEL_PATH='BUCKET_PATH')"
請將
BUCKET_PATH改成您上傳至 Cloud Storage 的模型路徑。如果您使用範例模型,請將BUCKET_PATH替換為這個值:gs://cloud-samples-data/bigquery/ml/onnx/resnet18.onnx。匯入模型後,請確認模型是否顯示在資料集中。
bq ls -m bqml_tutorial
輸出結果會與下列內容相似:
tableId               Type
--------------------- -------
imported_onnx_model  MODEL
如要進一步瞭解如何將 ONNX 模型匯入 BigQuery,包括格式和儲存空間需求,請參閱匯入 ONNX 模型的 CREATE MODEL 陳述式。
在 BigQuery 建立物件資料表,用於分析圖片資料
物件資料表是儲存在 Cloud Storage 中的非結構化資料物件的唯讀資料表。物件資料表可讓您透過 BigQuery 分析非結構化資料。
在本教學課程中,您將使用 ML.PREDICT 函式,輸出儲存在 Cloud Storage bucket 中輸入圖片的預測類別標籤。
建立物件資料表時,您需要執行下列操作:
- 建立 Cloud Storage bucket,並上傳金魚圖片。
- 建立 Cloud 資源連線,用於存取物件資料表。
- 將存取權授予資源連線的服務帳戶。
建立 bucket 並上傳圖片
請按照下列步驟建立 Cloud Storage bucket,並上傳金魚圖片。
控制台
- 在 Google Cloud 控制台,前往「Cloud Storage bucket」頁面。
按一下「 Create」(建立)。
在「Create a bucket」(建立 bucket) 頁面中,輸入 bucket 資訊。
在「開始使用」部分,執行下列操作:
在方塊中輸入
bqml_images。按一下「繼續」。
在「Choose where to store your data」(選擇資料的儲存位置) 專區中,完成下列步驟:
「位置類型」請選取「多區域」。
從位置類型選單中,選取「US (multiple regions in United States)」(美國 (多個美國區域))。
按一下「繼續」。
在「為資料選擇儲存空間級別」專區中:
選取「設定預設類別」。
選取「標準」。
按一下「繼續」。
其餘區段則保留預設值。
點選「建立」。
指令列
輸入下列 gcloud storage buckets create 指令:
gcloud storage buckets create gs://bqml_images --location=us
如果要求成功,指令會傳回下列訊息:
Creating gs://bqml_images/...
將圖片上傳至 Cloud Storage bucket
建立 bucket 後,請下載金魚圖片,然後上傳至 Cloud Storage bucket。
如要上傳圖片,請完成下列步驟:
控制台
- 在 Google Cloud 控制台,前往「Cloud Storage bucket」頁面。
在 bucket 清單中,點按「
bqml_images」。在值區的「物件」分頁中,執行下列任一操作:
將檔案從桌面或檔案管理員拖曳到 Google Cloud 控制台的主要窗格。
依序點選「上傳」>「上傳檔案」,在出現的對話方塊中選取要上傳的圖片檔,然後按一下「開啟」。
指令列
輸入下列 gcloud storage cp 指令:
gcloud storage cp OBJECT_LOCATION gs://bqml_images/IMAGE_NAME
更改下列內容:
OBJECT_LOCATION:圖片檔案的本機路徑。例如:Desktop/goldfish.jpg。IMAGE_NAME:圖片名稱。例如:goldfish.jpg。
如果成功,回應會類似以下內容:
Completed files 1/1 | 164.3kiB/164.3kiB
建立 BigQuery Cloud 資源連線
您必須建立 Cloud 資源連線,才能連線至本教學課程稍後建立的物件資料表。
您可以透過雲端資源連線,查詢儲存在 BigQuery 外部的資料,例如 Cloud Storage 或 Spanner 等 Google Cloud 服務,或是 AWS 或 Azure 等第三方來源。這些外部連結會使用 BigQuery Connection API。
請按照下列步驟建立 Cloud 資源連線。
主控台
前往「BigQuery Studio」頁面。
在左側窗格中,按一下「Explorer」:

如果沒有看到左側窗格,請按一下「展開左側窗格」圖示 開啟窗格。
在「Explorer」窗格中,按一下 「新增資料」。
「新增資料」對話方塊隨即開啟。
在「Filter By」(依條件篩選) 窗格的「Data Source Type」(資料來源類型) 區段中,選取「Databases」(資料庫)。
或者,您也可以在「Search for data sources」(搜尋資料來源) 欄位中輸入
Vertex AI。在「精選資料來源」部分,點選「Vertex AI」。
按一下「Vertex AI Models: BigQuery Federation」解決方案資訊卡。
在「連線類型」清單中,選取「Vertex AI 遠端模型、遠端函式和 BigLake (Cloud 資源)」。
在「連線 ID」欄位中輸入
bqml_tutorial。確認已選取「Multi-region—US」(多區域 - 美國)。
點選「建立連線」。
按一下視窗底部的「前往連線」。或者,在「Explorer」窗格中,依序點選「Connections」和
us.bqml_tutorial。在「連線資訊」窗格,複製服務帳戶 ID。設定連線的權限時,您需要這個 ID。建立連線資源時,BigQuery 會建立專屬的系統服務帳戶,並將其與連線建立關聯。
bq
建立連線:
bq mk --connection --location=US --project_id=PROJECT_ID \
    --connection_type=CLOUD_RESOURCE bqml_tutorial
將
PROJECT_ID替換為您的專案 ID。Google Cloud--project_id參數會覆寫預設專案。建立連線資源時,BigQuery 會建立專屬的系統服務帳戶,並將其與連線建立關聯。
疑難排解:如果收到下列連線錯誤訊息,請更新 Google Cloud SDK:
Flags parsing error: flag --connection_type=CLOUD_RESOURCE: value should be one of...
擷取並複製服務帳戶 ID,以供後續步驟使用:
bq show --connection PROJECT_ID.us.bqml_tutorial
輸出結果會與下列內容相似:
name                          properties
1234.REGION.CONNECTION_ID {"serviceAccountId": "connection-1234-9u56h9@gcp-sa-bigquery-condel.iam.gserviceaccount.com"}
設定連線存取權
將 Storage 物件管理員角色授予 Cloud 資源連線的服務帳戶。您必須在上傳圖片檔案的專案中授予這個角色。
如要授予角色,請按照下列步驟操作:
前往「IAM & Admin」(IAM 與管理) 頁面。
按一下「授予存取權」。
在「新增主體」欄位,輸入先前複製的 Cloud 資源連結服務帳戶 ID。
在「請選擇角色」欄位中,依序選取「Cloud Storage」和「Storage 物件管理員」。
按一下 [儲存]。
建立物件資料表
請按照下列步驟,使用您上傳至 Cloud Storage 的金魚圖片,建立名為 goldfish_image_table 的物件資料表。
控制台
前往「BigQuery Studio」頁面。
在查詢編輯器中輸入這項查詢,即可建立物件資料表。
CREATE EXTERNAL TABLE `bqml_tutorial.goldfish_image_table`
WITH CONNECTION `us.bqml_tutorial`
OPTIONS(
object_metadata = 'SIMPLE',
uris = ['gs://bqml_images/IMAGE_NAME'],
max_staleness = INTERVAL 1 DAY,
metadata_cache_mode = 'AUTOMATIC');
將
IMAGE_NAME替換為圖片檔案名稱,例如goldfish.jpg。作業完成後,您會看到類似
This statement created a new table named goldfish_image_table的訊息。
bq
輸入下列
CREATE EXTERNAL TABLE陳述式,建立物件資料表。bq query --use_legacy_sql=false \ "CREATE EXTERNAL TABLE `bqml_tutorial.goldfish_image_table` WITH CONNECTION `us.bqml_tutorial` OPTIONS( object_metadata = 'SIMPLE', uris = ['gs://bqml_images/IMAGE_NAME'], max_staleness = INTERVAL 1 DAY, metadata_cache_mode = 'AUTOMATIC')"
將
IMAGE_NAME替換為圖片檔案名稱,例如goldfish.jpg。建立物件資料表後,請確認該資料表是否顯示在資料集中。
bq ls bqml_tutorial
輸出結果會與下列內容相似:
tableId               Type
--------------------- --------
goldfish_image_table  EXTERNAL
詳情請參閱「建立物件資料表」。
使用匯入的 ONNX 模型進行預測
您可以使用下列包含 ML.PREDICT 函式的查詢,根據輸入物件資料表 goldfish_image_table 中的圖片資料進行預測。這項查詢會根據 ImageNet 標籤字典,輸出輸入圖片的預測類別標籤。
在查詢中,您必須使用 ML.DECODE_IMAGE 函式解碼圖片資料,才能讓 ML.PREDICT 解讀資料。系統會呼叫 ML.RESIZE_IMAGE 函式,將圖片大小調整為符合模型輸入大小 (224*224)。
如要進一步瞭解如何對圖片物件資料表執行推論,請參閱對圖片物件資料表執行推論。
如要根據圖片資料進行預測,請按照下列步驟操作。
控制台
前往「BigQuery Studio」頁面。
在查詢編輯器中輸入下列
ML.PREDICT查詢。SELECT class_label FROM ML.PREDICT(MODEL
bqml_tutorial.imported_onnx_model, ( SELECT ML.RESIZE_IMAGE(ML.DECODE_IMAGE(DATA), 224, 224, FALSE) AS input FROM bqml_tutorial.goldfish_image_table))查詢結果類似下方:

bq
輸入下列 bq query 指令:
bq query --use_legacy_sql=false \
'SELECT
  class_label
FROM
  ML.PREDICT(MODEL `bqml_tutorial.imported_onnx_model`,
    (
    SELECT
      ML.RESIZE_IMAGE(ML.DECODE_IMAGE(DATA),
        224,
        224,
        FALSE) AS input
    FROM
      bqml_tutorial.goldfish_image_table))'