簡介
這份新手指南將介紹 AutoML。如要瞭解 AutoML 與自訂訓練之間的主要差異,請參閱「選擇訓練方法」。
這項產品可以帶來下列好處:
- 您在數位零售商的行銷部門工作。
- 您正在進行建築專案,目的是識別建築物類型。
- 貴商家網站上有聯絡表單。
手動收錄圖片和表格既繁瑣又費時。教導電腦自動辨識並標記內容。
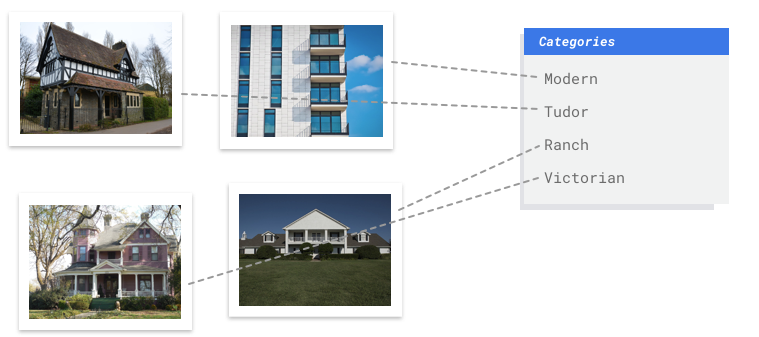
圖片
您與建築物保存委員會合作,試圖找出城市中建築風格一致的社區。您有成千上萬張住家快照需要篩選。不過,手動分類所有這些圖片既枯燥又容易出錯。幾個月前,有位實習生標記了幾百筆資料,但之後就沒有人查看這些資料。如果能教電腦幫你完成這項審查,那就太方便了!
表格
您在數位零售商的行銷部門工作。您與團隊正在依據顧客人物角色,建立個人化電子郵件方案。您已建立人物角色,行銷電子郵件也準備好寄送了。現在,您必須建立系統,依據零售偏好及消費行為將顧客放入各個人物角色,即使是新顧客也一樣。為了盡量提高顧客參與度,您也想預測顧客的消費習慣,以便在最佳時機傳送電子郵件給他們。
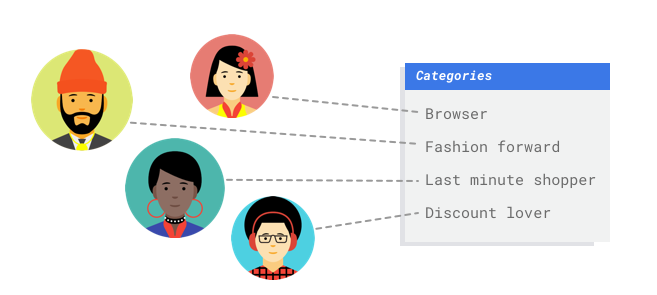
由於您是數位零售商,因此可以取得客戶資料及其購物內容。但是新客戶怎麼辦?傳統方法可以針對長期購物的現有顧客計算這些值,但是不太能處理歷史資料很少的顧客。如果可以建立系統預測這些值,協助您加速向所有顧客傳送個人化行銷方案呢?
幸好,機器學習和 Vertex AI 非常適合用於解決這類問題。
本指南將逐步說明 Vertex AI 如何處理 AutoML 資料集和模型,並說明 Vertex AI 解決的問題類型。
公平性注意事項
Google 致力於遵循負責任的 AI 做法,並持續進步。為此,我們設計 AutoML 等機器學習產品時,會以公平性和以人為本的機器學習等核心原則為基礎。如要進一步瞭解建構自有機器學習系統時,如何採取最佳做法來減少偏誤,請參閱包容性機器學習指南 - AutoML
為什麼 Vertex AI 是解決這個問題的合適工具?
傳統程式設計要求程式設計人員為電腦指定逐步操作說明以供遵循,顏色、角度、解析度和光線的變化太多,需要編碼的規則也太多,才能讓機器做出正確決策。很難想像該從何處著手。或者,顧客留言內容廣泛涉及各種字彙與結構,組合之多,難以運用一組簡單的規則進行擷取。如果您嘗試手動建立篩選器,很快就會發現自己無法將大多數顧客留言分類。您需要一個可泛化各種留言的系統。如果一連串特定規則的約束力會呈指數成長,您就需要可從範例學習的系統。
幸好,機器學習可解決這些問題。
Vertex AI 的運作方式
Vertex AI 涉及監督式學習工作,以達成所選結果。 演算法及訓練方法的具體細節因資料類型和用途而異。機器學習有許多不同的子類別, 這些子類別解決的問題和運作限制各不相同。
圖片
您可以使用已加上分類標籤的範例圖片,訓練、測試及驗證機器學習模型,也可以使用已加上標籤和定界框的範例圖片,訓練、測試及驗證物件偵測模型。您可以透過監督式學習訓練模型,辨識圖片中您感興趣的模式和內容。
表格
您以範例資料訓練機器學習模型。Vertex AI 使用表格 (結構化) 資料訓練機器學習模型,以便對新資料進行推論。資料集中有一個名為「目標」的欄,您的模型將由此學習進行預測。有一些其他資料欄屬於輸入 (稱為特徵),模型將藉此學習模式。您只要變更目標資料欄和訓練選項,就可使用相同的輸入特徵建構多種類型模型。就電子郵件行銷範例而言,這表示您可利用相同的輸入特徵建構模型,但目標推論不同。一個模型可用於預測顧客的人物角色 (類別目標),另一個模型則可預測顧客的每月花費 (數值目標),還有一個模型可用於預測未來三個月的產品每日需求 (數值目標序列)。
Vertex AI 工作流程
Vertex AI 採用標準機器學習工作流程:
- 收集資料:根據您想達成的成果,判斷訓練及測試模型時需要的資料。
- 準備資料:確保您的資料格式設定正確並已加上適當標籤。
- 訓練:設定參數並建構模型。
- 評估:查看模型指標。
- 部署及預測:將您的模型投入運用。
資料準備
不過在開始收集資料之前,請先思考要嘗試解決的問題。這會影響資料需求。
評估用途
先從以下問題開始著手:您想要達到什麼成果?
圖片
彙整資料集時,請務必先從用途著手。您可以先思考以下問題:
- 您想達成什麼成果?
- 如要達成這項結果,您需要辨識哪些類別或物件?
- 人類是否能辨識這些類別?雖然 Vertex AI 可處理的類別數量比人類一次能記住並指派的類別多,但如果人類無法辨識特定類別,Vertex AI 也會難以辨識。
- 哪些類型的範例最能反映系統會看到並嘗試分類的資料類型和範圍?
表格
目標欄的資料類型為何?您可以存取多少資料? 視您的答案而定,Vertex AI 會建立必要模型來因應您的用途:
- 「二元分類」模型可預測二元結果 (兩個類別之一)。這個模型可用於是非題,例如預測顧客是否會購買訂閱。在所有其他條件相同的情況下,二元分類問題需要的資料量少於其他模型類型。
- 「多元分類」模型可從三個以上的分離類別預測一個類別。請使用此模型分類事物。就零售範例而言,您可能想建構多元分類模型,將顧客區分為不同的人物角色。
- 「預測」模型可預測一系列值。舉例來說,零售商可能想預測未來 3 個月的每日產品需求,以便提前適當備貨。
- 「迴歸」模型可預測連續值。就零售範例而言,您可能想建構迴歸模型,預測顧客下個月的消費金額。
收集資料
建立用途之後,請收集能讓您用來建立指定模型的資料。
圖片
 確認所需資料後,您需要設法找到資料的來源。您可以先考慮貴機構收集的所有資料,您可能會發現,自己早就在收集訓練模型所需的相關資料。如果沒有這類資料,可以手動取得,或外包給第三方供應商。
每種類別應包含足夠的有標籤樣本
 Vertex AI Training 訓練的每個類別/標籤至少需要 100 份圖像樣本,才能進行分類。
每個標籤的高品質範例越多,成功辨識標籤的可能性就越高;一般來說,訓練程序使用的標籤資料越多,模型就越準確。每個標籤至少要有 1000 個樣本。
Vertex AI Training 訓練的每個類別/標籤至少需要 100 份圖像樣本,才能進行分類。
每個標籤的高品質範例越多,成功辨識標籤的可能性就越高;一般來說,訓練程序使用的標籤資料越多,模型就越準確。每個標籤至少要有 1000 個樣本。
平均分配各類別的樣本
請務必為每個類別擷取數量大致相同的訓練範例,即使某個標籤有大量資料,最好還是讓每個標籤的資料量平均分配。舉例來說,假設您用來建構模型的圖片有 80% 是現代風格的獨棟住宅,由於標籤分布不均,模型很可能學到一律將相片歸類為現代單戶住宅是安全的做法,而不是冒險預測較不常見的標籤。這就像寫選擇題測驗時,幾乎所有正確答案都是「C」一樣,聰明的應試者很快就會發現,即使不看題目,每次都回答「C」也能答對。
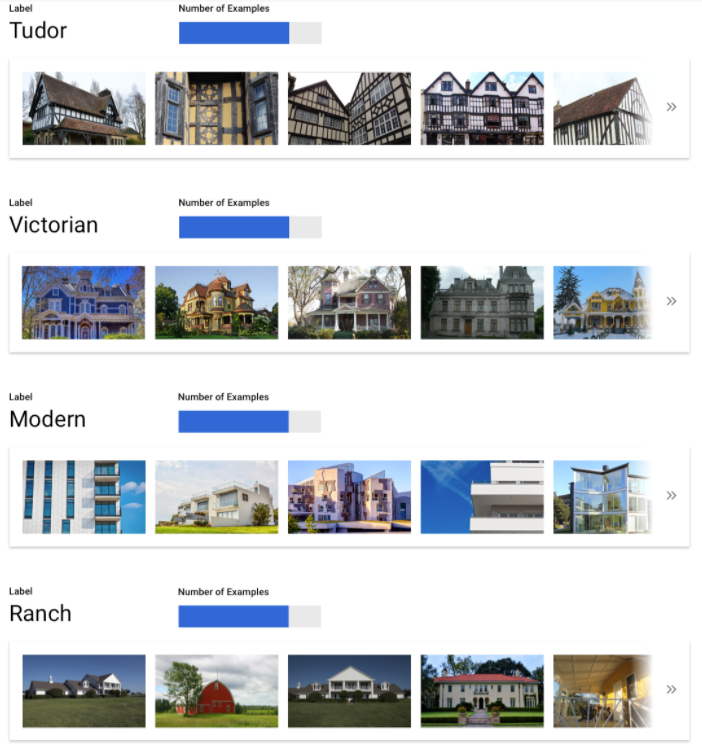
我們瞭解要為每個標籤都找到數量相當的樣本也許不太可能,有些類別可能較難找到公正而無偏見的高品質範例。在這種情況下,您可以遵循這項經驗法則:樣本數最少的標籤,應至少有樣本數最多標籤的 10% 樣本。因此,如果最大標籤有 10,000 個樣本,最小標籤應至少有 1,000 個樣本。
擷取問題空間的變化
基於類似原因,請盡量確保資料能涵蓋問題空間的各種變化。模型訓練程序看到的選取範圍越廣,越能將經驗運用到實際遇到的新樣本。舉例來說,如果您想將消費性電子產品的相片分類,模型在訓練時接觸的消費性電子產品種類越廣泛,就越有可能區分新型平板電腦、手機或筆記型電腦,即使模型從未見過該特定型號也一樣。

將資料與模型的理想輸出進行比對

尋找與您打算進行推論的圖片在視覺上相似的圖片。舉例來說,如果您想分類的房屋圖片都是在下雪的冬天拍攝,即使您已標記感興趣的類別,但如果模型只根據晴天拍攝的房屋圖片進行訓練,可能還是無法獲得出色的成效,因為光線和景色可能差異過大,足以影響成效。理想情況下,訓練範例是從您打算用來分類的資料集擷取的真實世界資料。
表格
建立用途後,您將需要收集資料以訓練模型。
資料來源及準備作業,是建構機器學習模型的關鍵步驟。您擁有的資料會決定可以解決的問題類型。您有多少可用資料?您的資料是否與您想回答的問題相關?收集資料時,請注意下列重要考量。
選取相關特徵
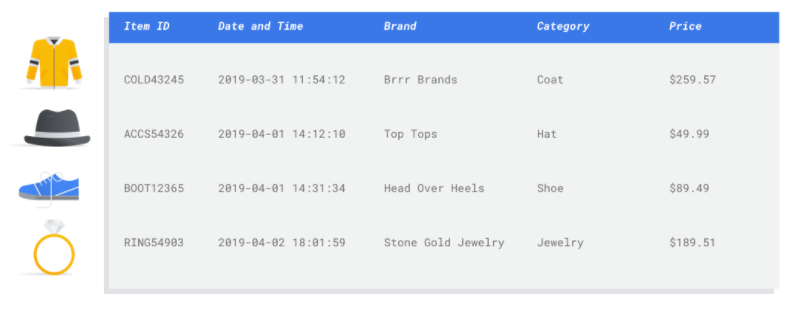
特徵是用於模型訓練的輸入屬性。特徵是指模型識別模式以進行推論的方法,因此必須跟您的問題有關。舉例來說,如要建構模型預測信用卡交易是否為詐欺,您需要建構含有交易詳細資料的資料集,例如買家、賣家、金額、日期與時間,以及購買的項目等等。其他實用特徵可能是買家及賣家的歷史資訊,以及購買項目牽涉詐欺的頻率。還有哪些其他特徵可能有關?
以簡介中提過的零售電子郵件行銷用途為例,以下是您可能需要的部分特徵欄:
- 購買項目清單 (包括品牌、類別、價格、折扣)
- 購買項目數量 (過去一天、一週、一個月、一年)
- 消費總金額 (過去一天、一週、一個月、一年)
- 每天售出的各項商品總數
- 每天的各項商品總庫存量
- 是否在特定日期推出促銷活動
- 已知的購物者客層資料
納入足夠資料
一般來說,擁有的訓練樣本越多,成果會越理想。所需的樣本資料量,也會隨著您要嘗試解決問題的複雜度而增加。相較於多元分類模型,二元分類模型只需要較少的資料量,就能準確預測兩個類別中的一個,因此複雜度較低。
沒有完美的公式,但建議的範例資料量下限如下:
- 「分類」問題:50 列 x 特徵數量
- 預測問題:
- 5000 列 x 特徵數量
- 時間序列 ID 欄中 10 個不重複的值 x 特徵數量
- 「迴歸」問題:200 x 特徵數量
擷取各種變化版本
您的資料集應該要廣納問題空間的各種變化版本。模型在訓練期間看到的樣本越多樣,越能夠將經驗運用到實際遇到的新樣本或較罕見的樣本。假設您的零售模型僅使用冬季購物資料進行訓練,這樣模型是否能夠成功預測夏季服飾偏好或購物行為呢?
準備資料
圖片
 決定好要手動或使用預設分組後,可以透過下列任一方法在 Vertex AI 中新增資料:
- 您可以從電腦或 Cloud Storage 匯入採用可用格式 (CSV 或 JSON Lines) 並內嵌標籤 (和必要時的邊界框) 的資料。如要進一步瞭解匯入檔案格式,請參閱「準備訓練資料」。如要手動分割資料集,可以在 CSV 或 JSON Lines 匯入檔案中指定分割比例。
- 如果資料尚未加上註解,您可以上傳未標記的圖片,然後使用 Google Cloud 控制台套用註解。您可以透過多個註解集管理同一組圖片的註解。舉例來說,您可以為一組圖片建立一個註解集,其中包含用於物件偵測的邊界框和標籤資訊,也可以建立另一個註解集,其中只包含用於分類的標籤註解。
表格
您識別自己的可用資料後,就需要確保這些資料已經就緒進行訓練。
如果資料存有偏見,或含有遺漏或錯誤值,就會影響模型品質。開始訓練模型之前,請考量下列事項。
瞭解詳情。
預防資料外洩及訓練服務偏移
資料外洩是指您在訓練期間使用的輸入特徵「洩漏」您嘗試預測目標的相關資訊,而這些資訊在模型實際服務時是無法取得的。若其中一項輸入特徵與目標欄具有高度關聯性,就可以偵測到此項問題。例如,如果您要建構模型,預測顧客下個月是否會註冊訂閱,而其中一項輸入特徵是該顧客的未來訂閱付款資訊。這在測試時可能會產生出色的模型效能,但是在實際工作環境部署時則並非如此,因為服務時並無法取得未來訂閱付款資訊。
訓練服務偏移是指訓練期間使用的輸入特徵,與提供給模型服務時使用的輸入特徵不同,造成在實際工作環境的模型品質不佳。例如建構模型預測每小時溫度,但訓練時使用的資料僅含每週溫度。另一項範例:在預測學生退學率時總是在訓練資料提供學生成績,但是服務時卻未提供此項資訊。
瞭解訓練資料是預防資料外洩及訓練服務偏移的重要關鍵:
- 使用任何資料前,請確保自己瞭解資料意義,以及是否應使用資料做為特徵
- 在「訓練」分頁標籤檢查關聯性。高關聯性應加以標記進行審查。
- 訓練服務偏移:確保您向模型提供的輸入特徵,也能在服務時以完全相同的形式取得使用。
清除遺漏、不完整及不一致的資料
樣本資料出現遺漏或不正確的值是常見的,因此,請花時間檢閱其中內容,可能的話,請在用於訓練之前提升資料品質。遺漏值越多,資料對機器學習模型訓練的實用性就越低。
- 檢查資料是否有遺漏值,並盡可能修正,或將值留空 (如果資料欄設為可為空值)。Vertex AI 可以處理遺漏值,但如果所有值都可用,您更有可能獲得最佳結果。
- 如要進行預測,請確認訓練資料列之間的時間間隔一致。Vertex AI 可以填補遺漏值,但如果所有資料列都可用,您更有可能獲得最佳結果。
- 請修正或刪除資料錯誤或雜訊以清除資料。請讓資料具有一致性: 檢閱拼字、縮寫及格式。
匯入後分析資料
Vertex AI 會在資料集匯入後提供資料集總覽。請檢查匯入的資料集,確保每個欄都有正確的變數類型。Vertex AI 會根據資料欄值自動偵測變數類型,但最好還是檢查每個資料欄。您也應該檢閱每個欄的「是否可以為空值」;此條件可判定欄是否可擁有遺漏或 NULL 值。
訓練模型
圖片
想想 Vertex AI 如何運用資料集建立自訂模型
您的資料集包含訓練集、驗證集和測試集。如果您未指定分割方式 (請參閱「準備資料」),Vertex AI 會自動將 80% 的圖片用於訓練、10% 用於驗證,另外 10% 則用於測試。
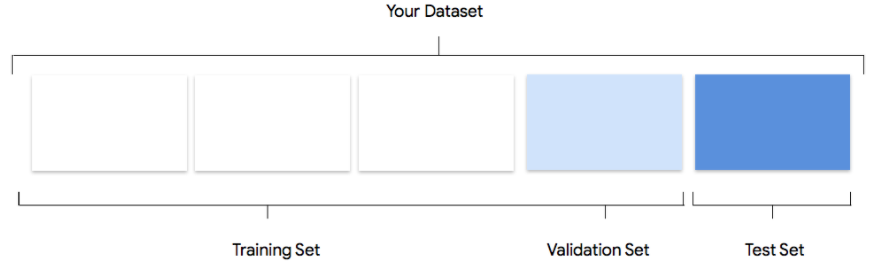
訓練集
 絕大多數的資料都應該在訓練集中。這是模型在訓練期間會「看到」的資料:訓練集是用於學習模型的參數,也就是類神經網路的各個節點之間的連結權重。
驗證集
 驗證集 (有時也稱為「開發」集) 也會在訓練過程中派上用場。
模型學習架構會在訓練過程的每次疊代中納入訓練資料,並根據模型在驗證集上的效能調整模型超參數,也就是指定模型結構的變數。如果您嘗試使用訓練集調整超參數,模型很可能最終會過度專注於訓練資料,難以泛化至與訓練資料不完全相符的範例。使用新穎的資料集微調模型結構,代表模型能更妥善地泛化。
驗證集 (有時也稱為「開發」集) 也會在訓練過程中派上用場。
模型學習架構會在訓練過程的每次疊代中納入訓練資料,並根據模型在驗證集上的效能調整模型超參數,也就是指定模型結構的變數。如果您嘗試使用訓練集調整超參數,模型很可能最終會過度專注於訓練資料,難以泛化至與訓練資料不完全相符的範例。使用新穎的資料集微調模型結構,代表模型能更妥善地泛化。
測試集
 測試集完全不會參與訓練程序。模型完全訓練完畢後,我們會使用測試集為模型帶來全新挑戰。模型在測試集上的成效,可讓您大致瞭解模型在實際資料上的成效。
手動分割
 您也可以自行分割資料集。如要進一步控管程序,或是確定要將特定範例納入模型訓練生命週期的某個部分,手動分割資料是不錯的選擇。
表格
資料集匯入後,下一步就是訓練模型。Vertex AI 會以訓練預設產生可靠的機器學習模型,但您可能希望依據本身用途調整部分參數。
選擇用於訓練的特徵欄數量越多越好,但請檢閱每個欄以確保適合訓練使用。選擇特徵時請記住下列要點:
- 請勿選擇會產生雜訊的特徵欄,例如隨機指派的 ID 欄,每個列都有不重複的值。
- 請確保自己瞭解每個特徵欄及其值。
- 如果您由單一資料集建立多個模型,請移除不屬於目前推論問題的目標欄。
- 請回想公平性原則:您訓練模型時使用的特徵,是否可能為邊緣化群組造成偏差或不公平的決策?
Vertex AI 如何使用資料集
您的資料集會分為訓練、驗證及測試集。Vertex AI 預設套用的分割方式取決於您訓練的模型類型。如有需要,你也可以指定分割點 (手動分割)。詳情請參閱「AutoML 模型資料分割作業簡介」。
訓練集
絕大多數的資料都應該在訓練集中。這是模型在訓練期間會「看到」的資料:訓練集是用於學習模型的參數,也就是類神經網路的各個節點之間的連結權重。
驗證集
驗證集 (有時也稱為「開發」集) 也會在訓練過程中派上用場。
模型學習架構會在訓練過程的每次疊代中納入訓練資料,並根據模型在驗證集上的效能調整模型超參數,也就是指定模型結構的變數。如果您嘗試使用訓練集調整超參數,模型很可能最終會過度專注於訓練資料,難以泛化至與訓練資料不完全相符的範例。使用新穎的資料集微調模型結構,代表模型能更妥善地泛化。
測試集
測試集完全不會參與訓練程序。模型完全訓練完畢後,Vertex AI 會使用測試集,為模型提供全新的挑戰。模型在測試集上的成效,可讓您大致瞭解模型在實際資料上的成效。
評估、測試及部署模型
評估模型
圖片
模型訓練完畢後,會顯示一份模型效能匯總資料。按一下「評估」或「查看完整評估結果」,即可瀏覽詳細分析。
 為模型除錯的重點在於針對資料除錯,而非針對模型。在您評估將模型推送至實際工作環境前後的效能時,如果模型開始出現異常行為,請回頭檢查資料,以確認是否有需要改進之處。
我可以在 Vertex AI 中執行哪些類型的分析?
在 Vertex AI 評估部分,您可以透過模型的測試樣本輸出內容和常見的機器學習指標,評估自訂模型的效能。本節將說明這些概念的意義。
- 模型輸出
- 分數門檻
- 真陽性、真陰性、偽陽性和偽陰性
- 精確度和喚回度
- 精確度/召回率曲線
- 平均精確度
如何解讀模型的輸出內容?
Vertex AI 會從測試資料提取樣本,為您的模型帶來全新考驗。模型會針對每個樣本輸出一串數字,用於表達每個標籤與該樣本的相關程度。數字越大,表示模型判斷標籤適用於該文件的信心就越高。
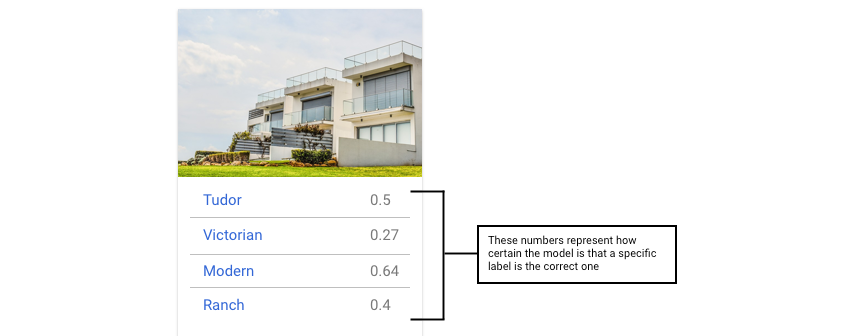
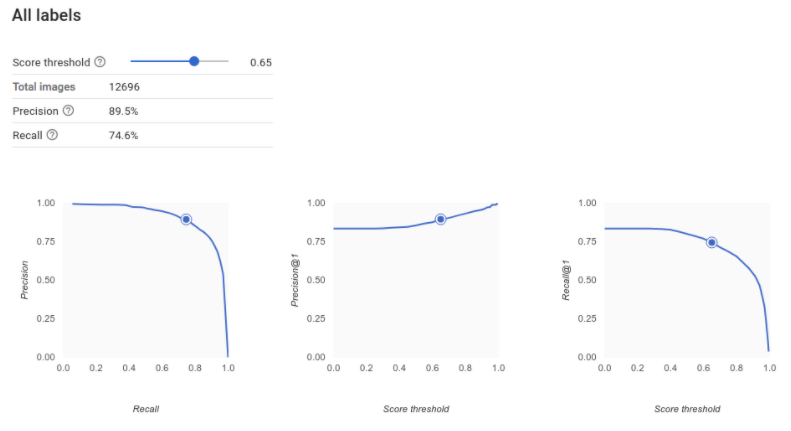
什麼是分數門檻?
我們可以設定分數門檻,將這些機率轉換為二元的「開啟」/「關閉」值。
分數門檻是指模型指派測試項目的類別時必須達到的信心程度。 Google Cloud 控制台中的分數門檻滑桿是一種視覺工具,用於測試資料集中所有類別和個別類別的不同門檻的影響。如果分數門檻偏低,模型會將較多的圖片進行分類,但會在處理過程中產生將幾個圖片分類錯誤的風險。如果分數門檻偏高,模型會將較少的圖片進行分類,但是將圖片分類錯誤的風險也較小。您可以在 Google Cloud 控制台中調整每個類別的門檻來進行實驗。然而,在實際工作環境中使用模型時,則必須採用您認為效能最高的門檻。
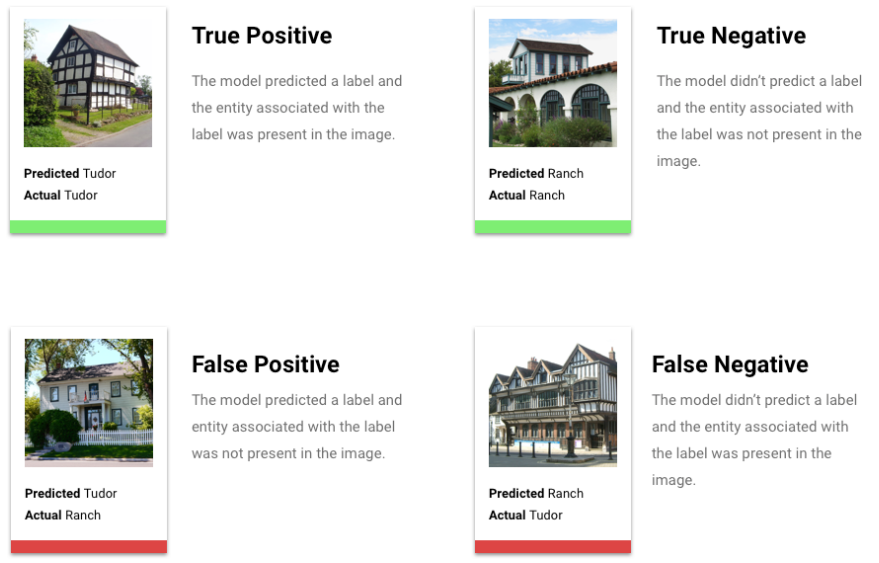
真陽性、真陰性、偽陽性和偽陰性是什麼?
套用分數門檻後,模型所做的推論分為以下四種類別的其中一種:
您認為效能最高的門檻。
我們可以使用這些類別來計算精確度和喚回度,這兩個指標能協助我們衡量模型的有效性。
什麼是精確度和召回率?
精確度和喚回度能協助我們瞭解模型擷取資訊的效能,以及模型漏掉的資訊量。精確度可透過所有獲指派標籤的測試樣本來衡量實際上應使用該標籤來進行分類的樣本數量。喚回度可透過所有應已獲指派該標籤的測試樣本來衡量實際上已獲指派該標籤的樣本數量。
我應該依據精確度還是喚回度進行最佳化?
視用途而定,您可能會想要針對精確度或喚回度進行最佳化。決定最適合的做法時,請考量下列兩個用途。
用途:圖片中的隱私權
假設您要建立一個系統,自動偵測敏感資訊並加以模糊處理。

正向誤判是指不需模糊處理的內容遭到模糊處理,這可能會造成困擾,但不會造成損害。

在此情況下,偽陰性是指需要模糊處理的內容未模糊處理,例如信用卡,這可能會導致身分遭竊。
此時建議您依據喚回度進行最佳化。這項指標會針對所有已完成的推論衡量遺漏數量。高喚回度模型較有可能標示相關程度不高的範例。若類別包含的訓練資料稀少,就非常適合使用喚回度。
用途:搜尋圖庫相片
假設您想建立一個系統,根據特定關鍵字找出最佳的圖庫相片。

在此情況下,偽陽性是指傳回不相關的圖片。由於產品主打只回傳最佳比對圖片,這會是重大失敗。

在此情況下,偽陰性是指系統未傳回關鍵字搜尋的相關圖片。 由於許多搜尋字詞都有數千張相片可能符合,因此這項限制不會造成影響。
此時建議您依據精確度進行最佳化。這項指標會針對所有推論衡量其正確程度。模型的精確度越高,只為最相關樣本加上標籤的可能性越高,若您的類別在訓練資料中屬於共同類別,非常適合採用這種方式。
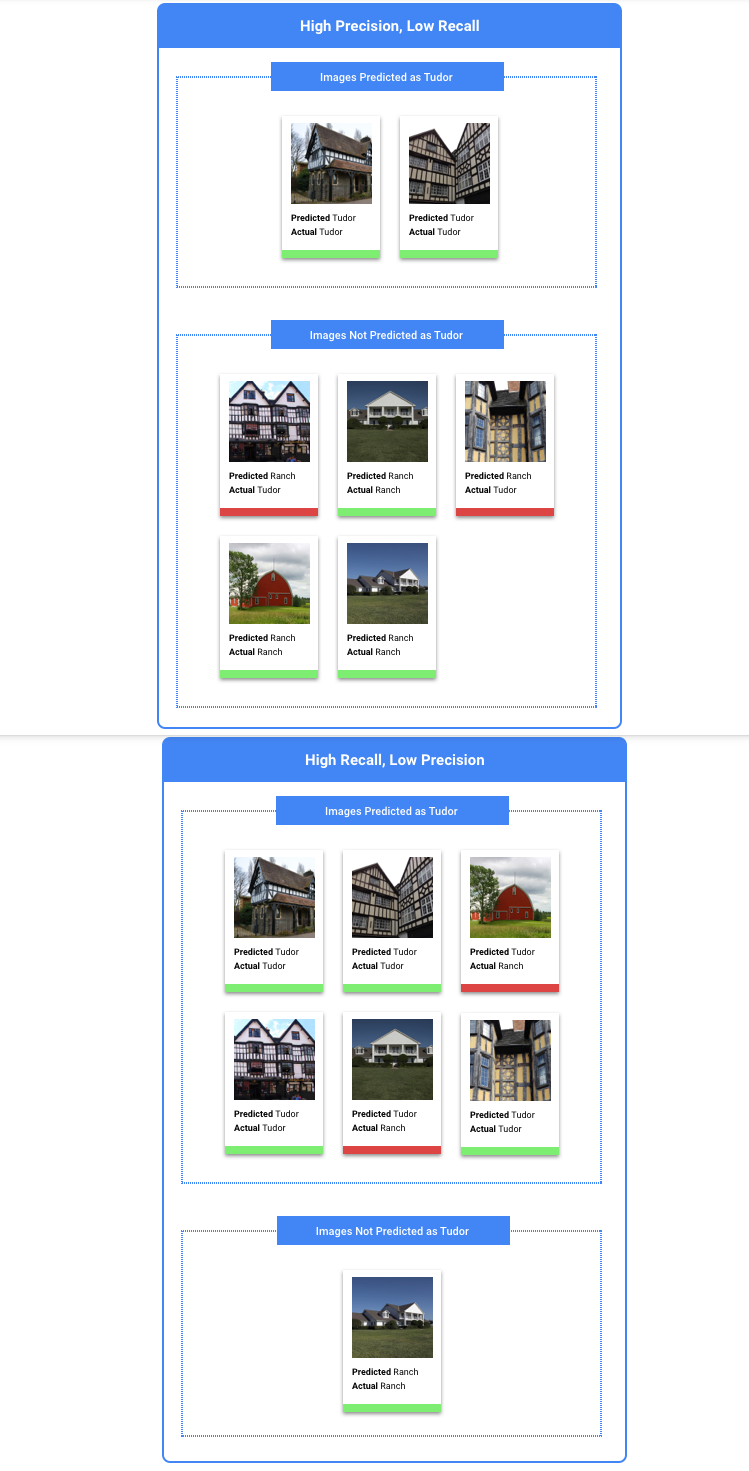
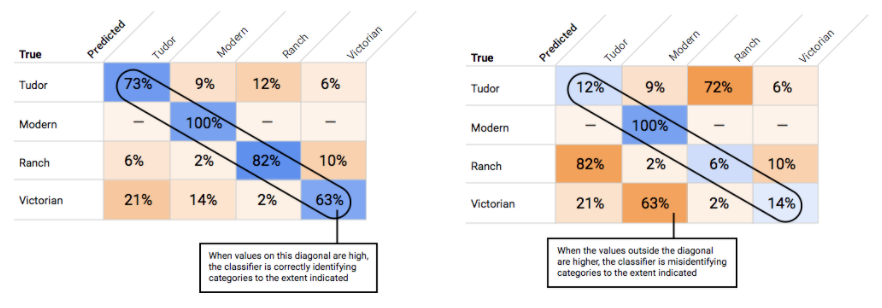
如何使用混淆矩陣?
如何解讀精確度/召回率曲線?
分數門檻工具可讓您瞭解所選的分數門檻對精確度和喚回度有何影響。拖曳分數門檻列上的滑桿時,您可以看到門檻將您置於精確度和喚回度取捨曲線上的哪一個位置,以及該門檻對精確度和喚回度分別造成什麼樣的影響 (如果是多類別模型,圖上的精確度和喚回度代表唯一用於計算精確度和喚回度指標的標籤,在傳回的標籤集中是分數最高的標籤)。這可以協助您在偽陽性和偽陰性之間找到良好的平衡點。
選擇模型整體可接受的門檻之後,按一下各個標籤,查看門檻落在其標籤精確度和喚回度曲線上的哪一個位置。在某些情況下,可能有少數標籤出現許多不正確的推論,這種情況可以協助您決定選擇根據標籤自訂且以類別為準的門檻。舉例來說,假設您查看房屋資料集,發現門檻 0.5 用於每一種圖片類型都能發揮合理的精確度和喚回度,卻唯獨「都鐸式」例外,或許是因為這個類別非常籠統。於是,這個類別就會出現相當多的偽陽性。在此情況下,您可以決定在呼叫分類器進行推論時,只有「Tudor」這一項採用 0.8 的門檻。
什麼是平均精確度?
精確度和喚回度曲線下面積是相當實用的模型準確度指標。這項指標會衡量模型使用所有分數門檻的執行效益。在 Vertex AI 中,這項指標稱為「平均精確度」。這項分數越接近 1.0,代表模型的測試集表現效能越好;若模型隨機猜測每個標籤,平均精確度大約會是 0.5。
表格
模型訓練完成後,您會收到一份成效摘要。模型評估指標是依據模型對部分資料集 (測試資料集) 執行的成效。判斷模型是否已準備好使用實際資料時,有幾個重要的指標和概念需要考量。
分類指標
分數門檻
假設有一個機器學習模型,要預測客戶明年是否會購買夾克。模型在預測特定顧客是否購買夾克前,需要具備多高的信心?在分類模型中,每項推論都會獲得「信心分數」– 這是對模型確信其預測類別正確無誤的數值評估。「分數門檻」是指判定特定分數轉換為是或否決策的數值,也就是指達到這樣的值時,模型會表示「是,此項信心分數夠高,認為此顧客明年將會購買外套」。
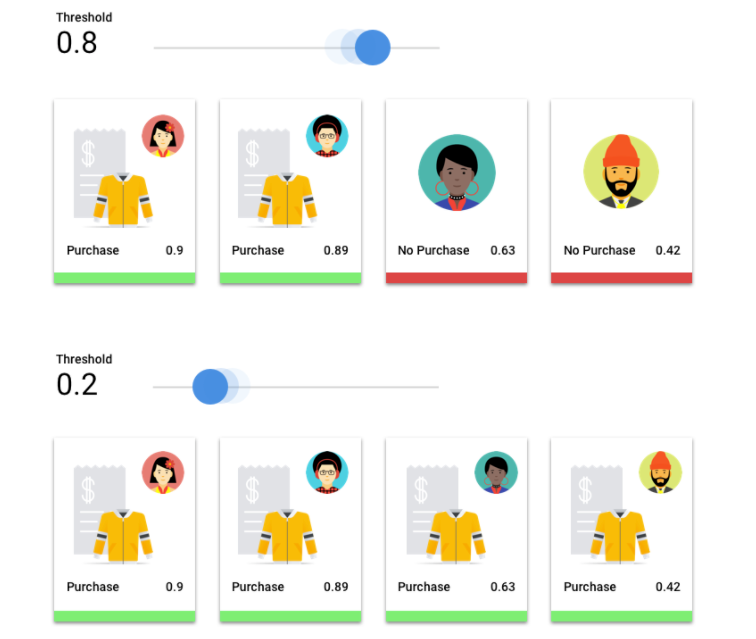
如果分數門檻偏低,模型就有分類錯誤的風險,因此指定分數門檻時應以實際用途為依據。
推論結果
套用分數門檻後,模型所做的推論分為以下四種類別的其中一種。為了瞭解這些類別,請再次假設夾克二元分類模型。在本例中,正類 (模型嘗試預測的類別) 為客戶將在明年購買夾克。
- 真陽性:模型正確預測正類。模型正確預測客戶購買夾克。
- 偽陽性:模型未正確預測正類。模型預測顧客會購買夾克,但顧客並未購買。
- 真陰性:模型正確預測負類。模型正確預測客戶不會購買夾克。
- 偽陰性:模型未正確預測負類。模型預測顧客不會購買夾克,但顧客購買了。

精確度和喚回度
精確度和喚回度能協助您瞭解模型擷取資訊的效能,以及模型漏掉的資訊量。進一步瞭解查準率和查全率。
- 精確度是指正確正向推論的比例。在所有客戶購物的推論中,有多少比例是實際購物?
- 喚回度:模型正確預測出含有此標籤的列的比例。在所有可識別的顧客購物中,比例是多少?
我們建議您按照實際用途決定最佳化精確度或喚回度。
其他分類指標
- AUC PR:精確度和喚回度 (PR) 曲線下的面積。這個值的範圍從零到一,值越大代表模型品質越高。
- AUC ROC:接收者操作特徵 (ROC) 曲線下的面積。範圍從零到一,值越大代表模型品質越高。
- 準確率:模型產生的正確分類推論比例。
- 對數損失:模型推論與目標值之間的交叉熵。範圍從零到無限大,值越低代表模型品質越高。
- F1 分數:精確度與喚回度的調和平均數。如要在類別分布不均的情況下,在精確度與喚回度之間取得平衡,F1 會是相當實用的指標。
預測和迴歸指標
模型建構完成後,Vertex AI 會提供各種標準指標供您檢閱。評估模型沒有所謂的完美解答;選擇評估指標時,應考量您的問題類型,以及您希望模型達成的成果。以下列出 Vertex AI 可提供的一些指標。
平均絕對誤差 (MAE)
MAE 是目標與預測值之間的平均絕對差異。此項指標可在一組推論中衡量誤差的平均幅度,也就是目標與預測值之間的差異。由於 MAE 使用絕對值,因此不會考量關係方向,也不會顯示效能不彰或效能優異。評估 MAE 時,值越小代表模型品質越高 (0 代表完美預測因子)。
均方根誤差 (RMSE)
RMSE 是指目標與預測值之間均方差的平方根。RMSE 對離群值的敏感度高於 MAE,因此如果您擔心大型誤差,RMSE 可作為更實用的評估指標。RMSE 和 MAE 一樣,值越小代表模型品質越高 (0 代表完美預測因子)。
均方根對數誤差 (RMSLE)
RMSLE 是對數尺度的 RMSE。RMSLE 對相對誤差的敏感度高於絕對誤差,對效能不彰的關注程度則高於效能優異。
觀察到的分位數 (僅限預測)
針對指定的目標分位數,觀察到的分位數會顯示實際比例,即觀察到的值低於指定分位數推論值的比例。觀察到的分位數會顯示模型與目標分位數的差距。兩個值之間的差異越小,代表模型品質越高。
縮放的彈珠損失 (僅限預測)
衡量模型在指定目標分位數的品質。數字越小代表模型品質越高。您可以比較不同分位數的縮放彈珠損失指標,判斷模型在這些分位數之間的相對準確度。
測試模型
圖片
Vertex AI 會自動使用 10% 的資料 (如果您自行選擇資料組別,則為任何您選擇使用的百分比) 來測試模型,您可以透過「Evaluate」(評估) 頁面瞭解模型使用該測試資料的效能。不過,假設您想針對模型進行信心檢查,可以透過幾種方式進行。最簡單的方式是在「Deploy & test」(部署及測試) 頁面上上傳幾張圖片,並查看模型為範例選擇的標籤。希望結果與您的預期相符。請嘗試提供幾張您預期會收到的各類型圖片。
如果您想改為在自己的自動化測試中使用模型,一樣可以透過「Deploy & test」(部署及測試) 頁面瞭解如何利用程式輔助呼叫模型。
表格
評估模型指標主要是瞭解如何判定模型已經就緒部署,不過,您也可以使用新資料進行測試。上傳新資料,瞭解模型的推論是否符合您的預期。若您要依據評估指標或以新資料進行測試,就可能需要繼續改善模型效能。
部署模型
圖片
等您滿意模型的效能,就可以實際使用了。 這可能是在實際工作環境使用,或是單次的推論要求。視應用情況而定,您可以透過不同方式使用模型。
批次推論
批次推論功能可一次提出多個推論要求,批次推論是非同步作業,也就是說,模型會等到處理完所有推論要求,再傳回包含推論值的 JSON Lines 檔案。
線上推論
部署模型,以便透過 REST API 提出推論要求。 線上推論是同步 (即時) 作業,因此會快速傳回推論結果,但每次 API 呼叫只能接受一項推論要求。如果模型是應用程式的一部分,且系統部分元件需要快速完成推論,線上推論就非常實用。
表格
等您滿意模型的效能,就可以實際使用了。這可能是在實際工作環境使用,或是單次的推論要求。視用途而定,您可以透過不同方式使用模型。
批次推論
批次推論功能可一次提出多個推論要求,批次推論是非同步作業,也就是說,模型會等到處理完所有推論要求,才會傳回含有推論值的 CSV 檔案或 BigQuery 資料表。
線上推論
部署模型,以便透過 REST API 提出推論要求。線上推論是同步 (即時) 作業,也就是說,系統會快速傳回推論結果,但每次 API 呼叫只接受一項推論要求。如果模型是應用程式的一部分,且系統的某些部分需要快速完成推論,線上推論就非常實用。
清除所用資源
如要避免產生不必要的費用,請在模型閒置時取消部署。
使用完模型後,請刪除您建立的資源,以免系統向您的帳戶收取不必要的費用。