Access Cloud Storage buckets and files in JupyterLab
This page shows you how to mount a Cloud Storage bucket to the JupyterLab interface of your Vertex AI Workbench instance so that you can browse files that are stored in Cloud Storage. You can also open and edit files that are compatible with JupyterLab, such as text files and notebook (IPYNB) files.
Overview
Vertex AI Workbench instances include a Cloud Storage integration that lets you mount a Cloud Storage bucket. This means you can browse the contents of the bucket and work with compatible files from within the JupyterLab interface.
You can access any of the Cloud Storage buckets and files that your instance has access to within the same project as your Vertex AI Workbench instance.
Before you begin
- Sign in to your Google Cloud account. If you're new to Google Cloud, create an account to evaluate how our products perform in real-world scenarios. New customers also get $300 in free credits to run, test, and deploy workloads.
-
In the Google Cloud console, on the project selector page, select or create a Google Cloud project.
Roles required to select or create a project
- Select a project: Selecting a project doesn't require a specific IAM role—you can select any project that you've been granted a role on.
-
Create a project: To create a project, you need the Project Creator
(
roles/resourcemanager.projectCreator), which contains theresourcemanager.projects.createpermission. Learn how to grant roles.
-
Verify that billing is enabled for your Google Cloud project.
-
Enable the Notebooks API.
Roles required to enable APIs
To enable APIs, you need the Service Usage Admin IAM role (
roles/serviceusage.serviceUsageAdmin), which contains theserviceusage.services.enablepermission. Learn how to grant roles. -
In the Google Cloud console, on the project selector page, select or create a Google Cloud project.
Roles required to select or create a project
- Select a project: Selecting a project doesn't require a specific IAM role—you can select any project that you've been granted a role on.
-
Create a project: To create a project, you need the Project Creator
(
roles/resourcemanager.projectCreator), which contains theresourcemanager.projects.createpermission. Learn how to grant roles.
-
Verify that billing is enabled for your Google Cloud project.
-
Enable the Notebooks API.
Roles required to enable APIs
To enable APIs, you need the Service Usage Admin IAM role (
roles/serviceusage.serviceUsageAdmin), which contains theserviceusage.services.enablepermission. Learn how to grant roles.
Required roles
To get the permissions that you need to mount a Cloud Storage bucket to a Vertex AI Workbench instance, ask your administrator to grant you the following IAM roles:
-
Notebooks Runner (
roles/notebooks.runner) on the project -
Storage Object User (
roles/storage.objectUser) on the Vertex AI Workbench instance's service account
For more information about granting roles, see Manage access to projects, folders, and organizations.
You might also be able to get the required permissions through custom roles or other predefined roles.
Required permission for enabling shared storage mounting
To enable shared storage mounting in your Vertex AI Workbench instance,
ask your administrator to grant your Vertex AI Workbench instance's
service account the storage.buckets.list permission on the project.
The storage.buckets.list permission is required for the
Mount shared storage button to appear in the JupyterLab interface of your
Vertex AI Workbench instance.
Create a bucket and a Vertex AI Workbench instance
You must have access to at least one Cloud Storage bucket in the same project as your Vertex AI Workbench instance.- If you need to create a Cloud Storage bucket, see Create a bucket.
- If you haven't already, create a Vertex AI Workbench instance in the same project as your Cloud Storage bucket.
Open JupyterLab
-
In the Google Cloud console, go to the Instances page.
-
Next to your Vertex AI Workbench instance's name, click Open JupyterLab.
Your Vertex AI Workbench instance opens JupyterLab.
Mount the Cloud Storage bucket
To mount and then access a Cloud Storage bucket, do the following:
-
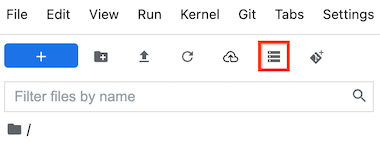
In JupyterLab, make sure the File Browser tab is selected.
-
In the left sidebar, click the Mount shared storage button. If you don't see the button, drag the right side of the sidebar to expand the sidebar until you see the button.
-
In the Bucket name field, enter the Cloud Storage bucket name that you want to mount.
-
Click Mount.
-
Your Cloud Storage bucket appears as a folder in the File browser tab of the left sidebar. Double-click the folder to open it and browse the contents.
Troubleshoot
To find methods for diagnosing and resolving issues with mounting a Cloud Storage bucket to your instance, see Troubleshooting Vertex AI Workbench.
What's next
Learn more about Cloud Storage.
Learn how to query data in BigQuery from within JupyterLab.