作成した Vertex AI エンドポイントから予測を取得するには、Vertex AI API の REST インターフェースにリクエストを送信します。ただし、オンライン予測リクエストを送信できるのは、aiplatform.endpoints.predict 権限を持つプリンシパルのみです。ウェブアプリなどからリクエストを送信するためにエンドポイントを公開することはできません。
このセクションでは、Cloud Run functions の関数にコードをデプロイして、未認証のリクエストを処理します。このチュートリアルの最初のページでダウンロードしたサンプルコードには、この Cloud Run 関数が含まれています(function/ ディレクトリにあります)。必要に応じて、次のコマンドを実行して Cloud Run 関数のコードを確認します。
lessfunction/main.py
この関数をデプロイする目的は次のとおりです。
認証されていないリクエストを受信するように Cloud Run 関数を構成できます。また、デフォルトでは、編集者のロールを持つサービス アカウントを使用して関数を実行します。このロールには、Vertex AI エンドポイントから予測を取得するために必要な aiplatform.endpoints.predict 権限が含まれています。
この関数は、リクエストに対する便利な前処理も実行します。Vertex AI エンドポイントは、トレーニング済みの TensorFlow Keras グラフの最初のレイヤ(固定サイズの正規化された浮動小数点のテンソル)で予測リクエストを想定しています。この関数は、画像の URL を入力として受け取り、イメージをこの形式に前処理し、Vertex AI エンドポイントから予測をリクエストします。
Cloud Run functions の関数をデプロイするには、次の操作を行います。
Google Cloud コンソールの Vertex AI セクションで、[エンドポイント] ページに移動します。
[[["わかりやすい","easyToUnderstand","thumb-up"],["問題の解決に役立った","solvedMyProblem","thumb-up"],["その他","otherUp","thumb-up"]],[["わかりにくい","hardToUnderstand","thumb-down"],["情報またはサンプルコードが不正確","incorrectInformationOrSampleCode","thumb-down"],["必要な情報 / サンプルがない","missingTheInformationSamplesINeed","thumb-down"],["翻訳に関する問題","translationIssue","thumb-down"],["その他","otherDown","thumb-down"]],["最終更新日 2025-09-02 UTC。"],[],[],null,["# Hello custom training: Serve predictions from a custom image classification model\n\nThis page walks through serving predictions from your image classification model\nand viewing these predictions in a web app.\nThis tutorial has several pages:\n\n\u003cbr /\u003e\n\n1. [Setting up your project and environment.](/vertex-ai/docs/tutorials/image-classification-custom)\n\n2. [Training a custom image classification\n model.](/vertex-ai/docs/tutorials/image-classification-custom/training)\n\n3. Serving predictions from a custom image\n classification model.\n\n4. [Cleaning up your project.](/vertex-ai/docs/tutorials/image-classification-custom/cleanup)\n\nEach page assumes that you have already performed the instructions from the\nprevious pages of the tutorial.\nThe rest of this document assumes that you are using the same Cloud Shell environment that you created when following the [first page of this\ntutorial](/vertex-ai/docs/tutorials/image-classification-custom). If your original Cloud Shell session is no longer open, you can return to the environment by doing the following:\n\n\u003cbr /\u003e\n\n1. In the Google Cloud console, activate Cloud Shell.\n\n [Activate Cloud Shell](https://console.cloud.google.com/?cloudshell=true)\n2. In the Cloud Shell session, run the following command:\n\n ```bash\n cd hello-custom-sample\n ```\n\nCreate an endpoint\n------------------\n\nTo get online predictions from the ML model that you trained when following\nthe previous page of this tutorial, create a Vertex AI *endpoint*.\nEndpoints serve online predictions from one or more models.\n\n1. In the Google Cloud console, in the Vertex AI section, go to\n the **Models** page.\n\n [Go to Models](https://console.cloud.google.com/vertex-ai/models)\n2. Find the row of the model that you trained in the [previous step of this\n tutorial](/vertex-ai/docs/tutorials/image-classification-custom/training), `hello_custom`, and click the model's\n name to open the model detail page.\n\n3. On the **Deploy \\& test** tab, click **Deploy to endpoint** to open the\n **Deploy to endpoint** pane.\n\n4. On the **Define your endpoint** step, add some basic information for your\n endpoint:\n\n 1. Select **Create new endpoint**.\n\n 2. In the **Endpoint name** field, enter `hello_custom`.\n\n 3. In the **Model settings** section, ensure that you see the name of your\n model, which is also called `hello_custom`. Specify the following model\n settings:\n\n 1. In the **Traffic split** field, enter `100`. Vertex AI\n supports splitting traffic for an endpoint to multiple models, but\n this tutorial doesn't use that feature.\n\n 2. In the **Minimum number of compute nodes** field, enter `1`.\n\n 3. In the **Machine type** drop-down list, select **n1-standard-2** from\n the **Standard** section.\n\n 4. Click **Done**.\n\n 4. In the **Logging** section, ensure that both types of prediction logging\n are enabled.\n\n Click **Continue**.\n5. On the **Endpoint details** step, confirm that your endpoint will be deployed\n to `us-central1 (Iowa)`.\n\n Do not select the **Use a customer-managed encryption key (CMEK)** checkbox.\n This tutorial does not use [CMEK](/vertex-ai/docs/general/cmek).\n6. Click **Deploy** to create the endpoint and deploy your model to the\n endpoint.\n\nAfter a few minutes, check_circle appears next to the new\nendpoint in the **Endpoints** table. At the same time, you also receive an email\nindicating that you have successfully created the endpoint and deployed your\nmodel to the endpoint.\n\nDeploy a Cloud Run function\n---------------------------\n\nYou can get predictions from the Vertex AI endpoint that you just\ncreated by sending requests to the Vertex AI API's REST interface. However, only\nprincipals with the [`aiplatform.endpoints.predict`\npermission](/vertex-ai/docs/general/access-control) can send online prediction requests. You\ncannot make the endpoint public for anybody to send requests to, for example via\na web app.\n\nIn this section, deploy code to [Cloud Run functions](/functions/docs) to handle\nunauthenticated requests. The sample code that you downloaded when you read the\n[first page of this tutorial](/vertex-ai/docs/tutorials/image-classification-custom) contains code for this\nCloud Run function in the `function/` directory. Optionally, run the\nfollowing command to explore the Cloud Run function code: \n\n less function/main.py\n\nDeploying the function serves the following purposes:\n\n- You *can* configure a Cloud Run function to receive unauthenticated\n requests. Additionally, functions run using [a service account with the Editor\n role by default](/functions/docs/securing/function-identity), which includes\n the `aiplatform.endpoints.predict` permission necessary to get predictions\n from your Vertex AI endpoint.\n\n- This function also performs useful preprocessing on requests. The\n Vertex AI endpoint expects prediction requests in the format\n of the trained TensorFlow Keras graph's first layer: a tensor of normalized\n floats with fixed dimensions. The function takes the URL of an image as input\n and preprocesses the image into this format before requesting a prediction\n from the Vertex AI endpoint.\n\nTo deploy the Cloud Run function, do the following:\n\n1. In the Google Cloud console, in the Vertex AI section, go to\n the **Endpoints** page.\n\n [Go to Endpoints](https://console.cloud.google.com/vertex-ai/endpoints)\n2. Find the row of the endpoint that you created in the previous section, named\n `hello_custom`. In this row, click **Sample request** to open the\n **Sample request** pane.\n\n3. In the **Sample request** pane, find the line of shell code that matches the\n following pattern:\n\n ```bash\n ENDPOINT_ID=\"\u003cvar translate=\"no\"\u003eENDPOINT_ID\u003c/var\u003e\"\n ```\n\n \u003cvar translate=\"no\"\u003eENDPOINT_ID\u003c/var\u003e is a number that identifies this particular endpoint.\n\n Copy this line of code, and run it in your Cloud Shell session to\n set the `ENDPOINT_ID` variable.\n4. Run the following command in your Cloud Shell session to deploy the\n Cloud Run function:\n\n gcloud functions deploy classify_flower \\\n --region=us-central1 \\\n --source=function \\\n --runtime=python37 \\\n --memory=2048MB \\\n --trigger-http \\\n --allow-unauthenticated \\\n --set-env-vars=ENDPOINT_ID=${ENDPOINT_ID}\n\nDeploy a web app to send prediction requests\n--------------------------------------------\n\nFinally, host a static web app on Cloud Storage to get predictions\nfrom your trained ML model. The web app sends requests to your\nCloud Run function, which preprocesses them and gets predictions from the\nVertex AI endpoint.\n\nThe `webapp` directory of the sample code that you downloaded contains a sample\nweb app. In your Cloud Shell session, run the following commands\nto prepare and deploy the web app:\n\n1. Set a couple of shell variables for commands in following steps to use:\n\n PROJECT_ID=\u003cvar translate=\"no\"\u003ePROJECT_ID\u003c/var\u003e\n BUCKET_NAME=\u003cvar translate=\"no\"\u003eBUCKET_NAME\u003c/var\u003e\n\n Replace the following:\n - \u003cvar translate=\"no\"\u003ePROJECT_ID\u003c/var\u003e: Your Google Cloud [project\n ID](/resource-manager/docs/creating-managing-projects#identifying_projects).\n - \u003cvar translate=\"no\"\u003eBUCKET_NAME\u003c/var\u003e: The name of the Cloud Storage bucket that you created when following the [first page of this tutorial](/vertex-ai/docs/tutorials/image-classification-custom).\n2. Edit the app to provide it with the trigger URL of your\n Cloud Run function:\n\n echo \"export const CLOUD_FUNCTION_URL = 'https://us-central1-${PROJECT_ID}.cloudfunctions.net/classify_flower';\" \\\n \u003e webapp/function-url.js\n\n3. Upload the `webapp` directory to your Cloud Storage bucket:\n\n gcloud storage cp webapp gs://${BUCKET_NAME}/ --recursive\n\n4. Make the web app files that you just uploaded [publicly\n readable](/storage/docs/access-control/making-data-public):\n\n gcloud storage objects update gs://${BUCKET_NAME}/webapp/** --add-acl-grant=entity=allUsers,role=READER\n\n | **Note:** Shells (like bash, zsh) sometimes attempt to expand wildcards in ways that can be surprising. For more details, see [URI wildcards](/storage/docs/wildcards#surprising-behavior).\n5. You can now navigate to the following URL to open web app and get\n predictions:\n\n ```\n https://storage.googleapis.com/BUCKET_NAME/webapp/index.html
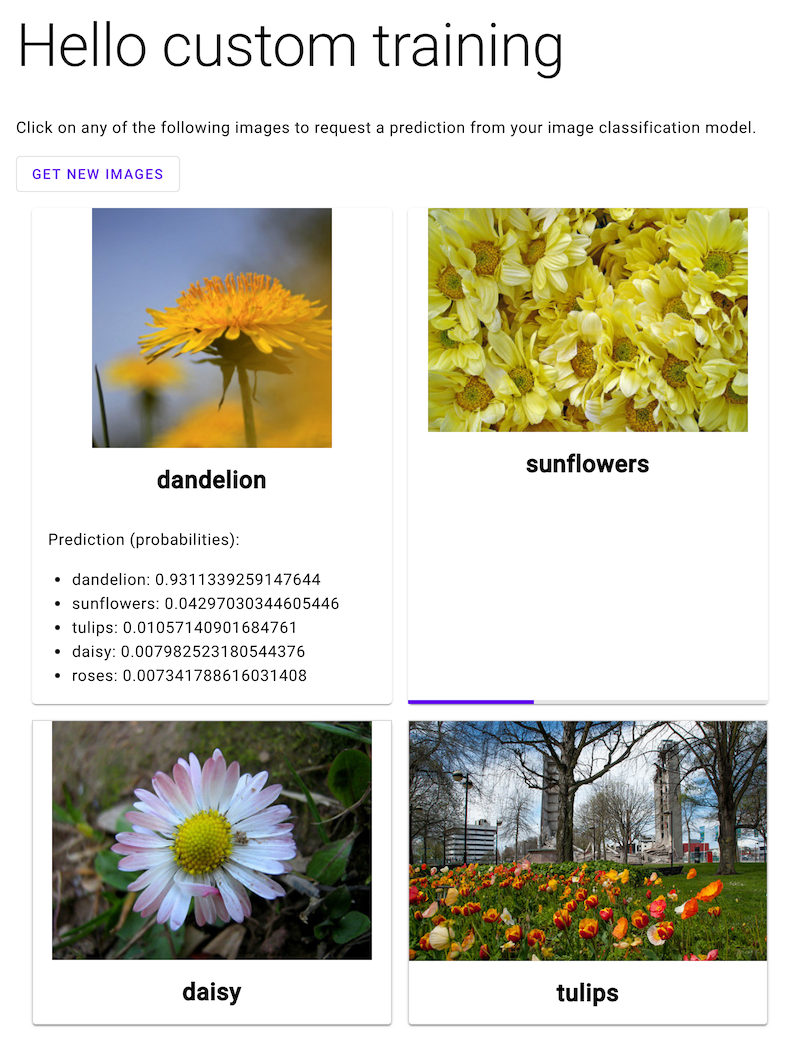
\n ```\n\n Open the web app and click an image of a flower to see your ML model's\n classification of the flower type. The web app presents the prediction as a\n list of flower types and the probability that the image contains each type of\n flower.\n | **Note:** This web app gets predictions for images that were also included in the training dataset for the model. Therefore the model might appear more accurate than it actually is due to [overfitting](https://developers.google.com/machine-learning/glossary#overfitting).\n\nIn the following screenshot, the web app has already gotten one\nprediction and is in the process of sending another prediction\nrequest.\n\nWhat's next\n-----------\n\nFollow the [last page of the tutorial](/vertex-ai/docs/tutorials/image-classification-custom/cleanup) to clean up\nresources that you have created."]]