Introduzione all'addestramento personalizzato: generazione di previsioni da un modello di classificazione delle immagini personalizzato
Mantieni tutto organizzato con le raccolte
Salva e classifica i contenuti in base alle tue preferenze.
Questa pagina illustra l'esecuzione di previsioni dal modello di classificazione delle immagini
e la visualizzazione di queste previsioni in un'app web.
Ogni pagina presuppone che tu abbia già eseguito le istruzioni delle pagine precedenti del tutorial.
Il resto di questo documento presuppone che tu stia utilizzando lo stesso ambiente Cloud Shell creato seguendo la prima pagina di questo tutorial. Se la sessione Cloud Shell originale non è più aperta, puoi tornare all'ambiente nel seguente modo:
In the Google Cloud console, activate Cloud Shell.
Nella sessione di Cloud Shell, esegui questo comando:
cdhello-custom-sample
Creazione di un endpoint
Per ottenere previsioni online dal modello ML che hai addestrato seguendo
la pagina precedente di questo tutorial, crea un endpoint Vertex AI.
Gli endpoint forniscono previsioni online da uno o più modelli.
Nella console Google Cloud , nella sezione Vertex AI, vai alla pagina Modelli.
Trova la riga del modello che hai addestrato nel passaggio precedente di questo
tutorial, hello_custom, e fai clic sul nome del modello per aprire la pagina dei dettagli.
Nella scheda Deployment e test, fai clic su Deployment su endpoint per aprire il riquadro
Deployment su endpoint.
Nel passaggio Definisci l'endpoint, aggiungi alcune informazioni di base per l'endpoint:
Seleziona Crea nuovo endpoint.
Nel campo Nome endpoint, inserisci hello_custom.
Nella sezione Impostazioni modello, assicurati di visualizzare il nome del tuo modello, chiamato anche hello_custom. Specifica le seguenti impostazioni
del modello:
Nel campo Suddivisione del traffico, inserisci 100. Vertex AI
supporta la suddivisione del traffico per un endpoint in più modelli, ma
questo tutorial non utilizza questa funzionalità.
Nel campo Numero minimo di nodi di computing, inserisci 1.
Nell'elenco a discesa Tipo di macchina, seleziona n1-standard-2 dalla sezione Standard.
Fai clic su Fine.
Nella sezione Logging, assicurati che entrambi i tipi di logging delle previsioni
siano abilitati.
Fai clic su Continua.
Nel passaggio Dettagli endpoint, conferma che l'endpoint verrà implementato
in us-central1 (Iowa).
Non selezionare la casella di controllo Utilizza una chiave di crittografia gestita dal cliente (CMEK).
Questo tutorial non utilizza CMEK.
Fai clic su Esegui il deployment per creare l'endpoint ed eseguire il deployment del modello
sull'endpoint.
Dopo qualche minuto, check_circle viene visualizzato accanto al nuovo endpoint nella tabella Endpoint. Allo stesso tempo, ricevi anche un'email
che indica che hai creato correttamente l'endpoint e che hai eseguito il deployment del
modello nell'endpoint.
Esegui il deployment di una funzione Cloud Run
Puoi ottenere previsioni dall'endpoint Vertex AI che hai appena creato inviando richieste all'interfaccia REST dell'API Vertex AI. Tuttavia, solo i
principali con l'autorizzazione aiplatform.endpoints.predict possono inviare richieste di previsione online. Non puoi rendere pubblico l'endpoint in modo che chiunque possa inviare richieste, ad esempio tramite un'app web.
In questa sezione, esegui il deployment del codice in Cloud Run Functions per gestire le richieste non autenticate. Il codice campione che hai scaricato quando hai letto la
prima pagina di questo tutorial contiene il codice per questa
funzione Cloud Run nella directory function/. (Facoltativo) Esegui il comando
seguente per esplorare il codice della funzione Cloud Run:
lessfunction/main.py
Il deployment della funzione ha i seguenti scopi:
Puoi configurare una funzione Cloud Run per ricevere richieste non autenticate. Inoltre, le funzioni vengono eseguite utilizzando un account di servizio con il ruolo Editor per impostazione predefinita, che include l'autorizzazione aiplatform.endpoints.predict necessaria per ottenere previsioni dall'endpoint Vertex AI.
Questa funzione esegue anche un'utile pre-elaborazione delle richieste. L'endpoint
Vertex AI prevede che le richieste di previsione abbiano il formato
del primo livello del grafico TensorFlow Keras addestrato: un tensore di numeri
in virgola mobile normalizzati con dimensioni fisse. La funzione prende l'URL di un'immagine come input
e pre-elabora l'immagine in questo formato prima di richiedere una previsione
dall'endpoint Vertex AI.
Per eseguire il deployment della funzione Cloud Run:
Nella console Google Cloud , nella sezione Vertex AI, vai alla pagina Endpoint.
Trova la riga dell'endpoint che hai creato nella sezione precedente, denominata
hello_custom. In questa riga, fai clic su Richiesta di esempio per aprire il riquadro
Richiesta di esempio.
Nel riquadro Richiesta di esempio, individua la riga di codice shell che corrisponde al seguente pattern:
ENDPOINT_ID="ENDPOINT_ID"
ENDPOINT_ID è un numero che identifica questo particolare endpoint.
Copia questa riga di codice ed eseguila nella sessione di Cloud Shell per
impostare la variabile ENDPOINT_ID.
Esegui questo comando nella sessione di Cloud Shell per eseguire il deployment della funzione Cloud Run:
Esegui il deployment di un'app web per inviare richieste di previsione
Infine, ospita un'app web statica su Cloud Storage per ottenere previsioni
dal modello di ML addestrato. L'app web invia richieste alla tua
funzione Cloud Run, che le pre-elabora e ottiene previsioni dall'endpoint
Vertex AI.
La directory webapp del codice campione che hai scaricato contiene un'app web di esempio. Nella sessione di Cloud Shell, esegui questi comandi per preparare ed eseguire il deployment dell'app web:
Imposta alcune variabili della shell da utilizzare per i comandi nei passaggi successivi:
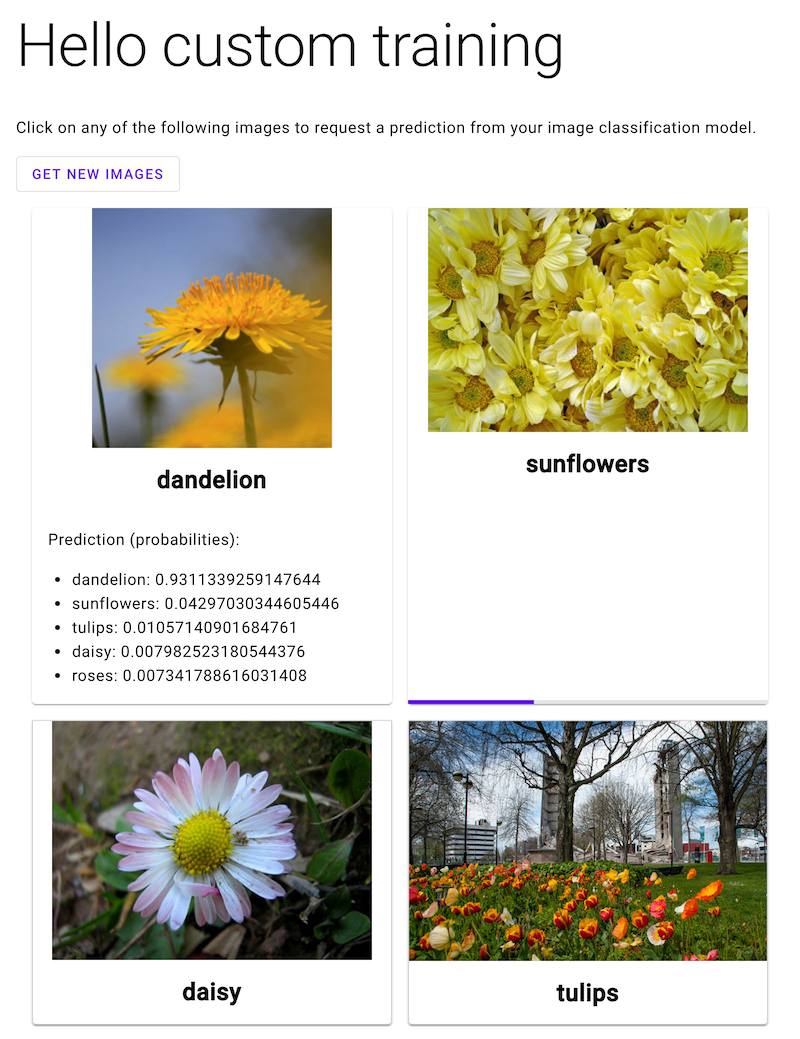
Apri l'app web e fai clic sull'immagine di un fiore per vedere la classificazione del tipo di fiore nel modello ML. L'app web mostra la previsione sotto forma di elenco di tipi di fiori e la probabilità che l'immagine contenga ciascun tipo di fiore.
Nello screenshot seguente, l'app web ha già ricevuto una
previsione e sta inviando un'altra richiesta
di previsione.
Passaggi successivi
Segui le istruzioni riportate nell'ultima pagina del tutorial per eseguire la pulizia
delle risorse che hai creato.
[[["Facile da capire","easyToUnderstand","thumb-up"],["Il problema è stato risolto","solvedMyProblem","thumb-up"],["Altra","otherUp","thumb-up"]],[["Difficile da capire","hardToUnderstand","thumb-down"],["Informazioni o codice di esempio errati","incorrectInformationOrSampleCode","thumb-down"],["Mancano le informazioni o gli esempi di cui ho bisogno","missingTheInformationSamplesINeed","thumb-down"],["Problema di traduzione","translationIssue","thumb-down"],["Altra","otherDown","thumb-down"]],["Ultimo aggiornamento 2025-09-04 UTC."],[],[],null,["# Hello custom training: Serve predictions from a custom image classification model\n\nThis page walks through serving predictions from your image classification model\nand viewing these predictions in a web app.\nThis tutorial has several pages:\n\n\u003cbr /\u003e\n\n1. [Setting up your project and environment.](/vertex-ai/docs/tutorials/image-classification-custom)\n\n2. [Training a custom image classification\n model.](/vertex-ai/docs/tutorials/image-classification-custom/training)\n\n3. Serving predictions from a custom image\n classification model.\n\n4. [Cleaning up your project.](/vertex-ai/docs/tutorials/image-classification-custom/cleanup)\n\nEach page assumes that you have already performed the instructions from the\nprevious pages of the tutorial.\nThe rest of this document assumes that you are using the same Cloud Shell environment that you created when following the [first page of this\ntutorial](/vertex-ai/docs/tutorials/image-classification-custom). If your original Cloud Shell session is no longer open, you can return to the environment by doing the following:\n\n\u003cbr /\u003e\n\n1. In the Google Cloud console, activate Cloud Shell.\n\n [Activate Cloud Shell](https://console.cloud.google.com/?cloudshell=true)\n2. In the Cloud Shell session, run the following command:\n\n ```bash\n cd hello-custom-sample\n ```\n\nCreate an endpoint\n------------------\n\nTo get online predictions from the ML model that you trained when following\nthe previous page of this tutorial, create a Vertex AI *endpoint*.\nEndpoints serve online predictions from one or more models.\n\n1. In the Google Cloud console, in the Vertex AI section, go to\n the **Models** page.\n\n [Go to Models](https://console.cloud.google.com/vertex-ai/models)\n2. Find the row of the model that you trained in the [previous step of this\n tutorial](/vertex-ai/docs/tutorials/image-classification-custom/training), `hello_custom`, and click the model's\n name to open the model detail page.\n\n3. On the **Deploy \\& test** tab, click **Deploy to endpoint** to open the\n **Deploy to endpoint** pane.\n\n4. On the **Define your endpoint** step, add some basic information for your\n endpoint:\n\n 1. Select **Create new endpoint**.\n\n 2. In the **Endpoint name** field, enter `hello_custom`.\n\n 3. In the **Model settings** section, ensure that you see the name of your\n model, which is also called `hello_custom`. Specify the following model\n settings:\n\n 1. In the **Traffic split** field, enter `100`. Vertex AI\n supports splitting traffic for an endpoint to multiple models, but\n this tutorial doesn't use that feature.\n\n 2. In the **Minimum number of compute nodes** field, enter `1`.\n\n 3. In the **Machine type** drop-down list, select **n1-standard-2** from\n the **Standard** section.\n\n 4. Click **Done**.\n\n 4. In the **Logging** section, ensure that both types of prediction logging\n are enabled.\n\n Click **Continue**.\n5. On the **Endpoint details** step, confirm that your endpoint will be deployed\n to `us-central1 (Iowa)`.\n\n Do not select the **Use a customer-managed encryption key (CMEK)** checkbox.\n This tutorial does not use [CMEK](/vertex-ai/docs/general/cmek).\n6. Click **Deploy** to create the endpoint and deploy your model to the\n endpoint.\n\nAfter a few minutes, check_circle appears next to the new\nendpoint in the **Endpoints** table. At the same time, you also receive an email\nindicating that you have successfully created the endpoint and deployed your\nmodel to the endpoint.\n\nDeploy a Cloud Run function\n---------------------------\n\nYou can get predictions from the Vertex AI endpoint that you just\ncreated by sending requests to the Vertex AI API's REST interface. However, only\nprincipals with the [`aiplatform.endpoints.predict`\npermission](/vertex-ai/docs/general/access-control) can send online prediction requests. You\ncannot make the endpoint public for anybody to send requests to, for example via\na web app.\n\nIn this section, deploy code to [Cloud Run functions](/functions/docs) to handle\nunauthenticated requests. The sample code that you downloaded when you read the\n[first page of this tutorial](/vertex-ai/docs/tutorials/image-classification-custom) contains code for this\nCloud Run function in the `function/` directory. Optionally, run the\nfollowing command to explore the Cloud Run function code: \n\n less function/main.py\n\nDeploying the function serves the following purposes:\n\n- You *can* configure a Cloud Run function to receive unauthenticated\n requests. Additionally, functions run using [a service account with the Editor\n role by default](/functions/docs/securing/function-identity), which includes\n the `aiplatform.endpoints.predict` permission necessary to get predictions\n from your Vertex AI endpoint.\n\n- This function also performs useful preprocessing on requests. The\n Vertex AI endpoint expects prediction requests in the format\n of the trained TensorFlow Keras graph's first layer: a tensor of normalized\n floats with fixed dimensions. The function takes the URL of an image as input\n and preprocesses the image into this format before requesting a prediction\n from the Vertex AI endpoint.\n\nTo deploy the Cloud Run function, do the following:\n\n1. In the Google Cloud console, in the Vertex AI section, go to\n the **Endpoints** page.\n\n [Go to Endpoints](https://console.cloud.google.com/vertex-ai/endpoints)\n2. Find the row of the endpoint that you created in the previous section, named\n `hello_custom`. In this row, click **Sample request** to open the\n **Sample request** pane.\n\n3. In the **Sample request** pane, find the line of shell code that matches the\n following pattern:\n\n ```bash\n ENDPOINT_ID=\"\u003cvar translate=\"no\"\u003eENDPOINT_ID\u003c/var\u003e\"\n ```\n\n \u003cvar translate=\"no\"\u003eENDPOINT_ID\u003c/var\u003e is a number that identifies this particular endpoint.\n\n Copy this line of code, and run it in your Cloud Shell session to\n set the `ENDPOINT_ID` variable.\n4. Run the following command in your Cloud Shell session to deploy the\n Cloud Run function:\n\n gcloud functions deploy classify_flower \\\n --region=us-central1 \\\n --source=function \\\n --runtime=python37 \\\n --memory=2048MB \\\n --trigger-http \\\n --allow-unauthenticated \\\n --set-env-vars=ENDPOINT_ID=${ENDPOINT_ID}\n\nDeploy a web app to send prediction requests\n--------------------------------------------\n\nFinally, host a static web app on Cloud Storage to get predictions\nfrom your trained ML model. The web app sends requests to your\nCloud Run function, which preprocesses them and gets predictions from the\nVertex AI endpoint.\n\nThe `webapp` directory of the sample code that you downloaded contains a sample\nweb app. In your Cloud Shell session, run the following commands\nto prepare and deploy the web app:\n\n1. Set a couple of shell variables for commands in following steps to use:\n\n PROJECT_ID=\u003cvar translate=\"no\"\u003ePROJECT_ID\u003c/var\u003e\n BUCKET_NAME=\u003cvar translate=\"no\"\u003eBUCKET_NAME\u003c/var\u003e\n\n Replace the following:\n - \u003cvar translate=\"no\"\u003ePROJECT_ID\u003c/var\u003e: Your Google Cloud [project\n ID](/resource-manager/docs/creating-managing-projects#identifying_projects).\n - \u003cvar translate=\"no\"\u003eBUCKET_NAME\u003c/var\u003e: The name of the Cloud Storage bucket that you created when following the [first page of this tutorial](/vertex-ai/docs/tutorials/image-classification-custom).\n2. Edit the app to provide it with the trigger URL of your\n Cloud Run function:\n\n echo \"export const CLOUD_FUNCTION_URL = 'https://us-central1-${PROJECT_ID}.cloudfunctions.net/classify_flower';\" \\\n \u003e webapp/function-url.js\n\n3. Upload the `webapp` directory to your Cloud Storage bucket:\n\n gcloud storage cp webapp gs://${BUCKET_NAME}/ --recursive\n\n4. Make the web app files that you just uploaded [publicly\n readable](/storage/docs/access-control/making-data-public):\n\n gcloud storage objects update gs://${BUCKET_NAME}/webapp/** --add-acl-grant=entity=allUsers,role=READER\n\n | **Note:** Shells (like bash, zsh) sometimes attempt to expand wildcards in ways that can be surprising. For more details, see [URI wildcards](/storage/docs/wildcards#surprising-behavior).\n5. You can now navigate to the following URL to open web app and get\n predictions:\n\n ```\n https://storage.googleapis.com/BUCKET_NAME/webapp/index.html\n ```\n\n Open the web app and click an image of a flower to see your ML model's\n classification of the flower type. The web app presents the prediction as a\n list of flower types and the probability that the image contains each type of\n flower.\n | **Note:** This web app gets predictions for images that were also included in the training dataset for the model. Therefore the model might appear more accurate than it actually is due to [overfitting](https://developers.google.com/machine-learning/glossary#overfitting).\n\nIn the following screenshot, the web app has already gotten one\nprediction and is in the process of sending another prediction\nrequest.\n\nWhat's next\n-----------\n\nFollow the [last page of the tutorial](/vertex-ai/docs/tutorials/image-classification-custom/cleanup) to clean up\nresources that you have created."]]