本教程介绍如何导入使用 scikit-learn 训练的开放神经网络交换 (ONNX) 模型。您可以将该模型导入 BigQuery 数据集,并使用该模型通过 SQL 查询进行预测。
ONNX 提供了一种用于表示任何机器学习 (ML) 框架的统一格式。BigQuery ML 对 ONNX 的支持让您可以执行以下操作:
- 使用您偏好的框架训练模型。
- 将模型转换为 ONNX 模型格式。
- 将 ONNX 模型导入 BigQuery 并使用 BigQuery ML 进行预测。
目标
- 使用 scikit-learn 创建和训练模型。
- 使用 sklearn-onnx将模型转换为 ONNX 格式。
- 使用
CREATE MODEL语句将 ONNX 模型导入 BigQuery。 - 使用
ML.PREDICT函数通过导入的 ONNX 模型进行预测。
费用
在本文档中,您将使用 Google Cloud的以下收费组件:
如需根据您的预计使用量来估算费用,请使用价格计算器。
完成本文档中描述的任务后,您可以通过删除所创建的资源来避免继续计费。如需了解详情,请参阅清理。
准备工作
- Sign in to your Google Cloud account. If you're new to Google Cloud, create an account to evaluate how our products perform in real-world scenarios. New customers also get $300 in free credits to run, test, and deploy workloads.
-
In the Google Cloud console, on the project selector page, select or create a Google Cloud project.
Roles required to select or create a project
- Select a project: Selecting a project doesn't require a specific IAM role—you can select any project that you've been granted a role on.
-
Create a project: To create a project, you need the Project Creator
(
roles/resourcemanager.projectCreator), which contains theresourcemanager.projects.createpermission. Learn how to grant roles.
-
Verify that billing is enabled for your Google Cloud project.
-
Enable the BigQuery and Cloud Storage APIs.
Roles required to enable APIs
To enable APIs, you need the Service Usage Admin IAM role (
roles/serviceusage.serviceUsageAdmin), which contains theserviceusage.services.enablepermission. Learn how to grant roles. - 确保您拥有必要的权限,以便执行本文档中的任务。
- BigQuery Studio Admin (
roles/bigquery.studioAdmin) - Storage Object Creator (
roles/storage.objectCreator) -
In the Google Cloud console, go to the IAM page.
Go to IAM - Select the project.
-
In the Principal column, find all rows that identify you or a group that you're included in. To learn which groups you're included in, contact your administrator.
- For all rows that specify or include you, check the Role column to see whether the list of roles includes the required roles.
-
In the Google Cloud console, go to the IAM page.
前往 IAM - 选择项目。
- 点击 授予访问权限。
-
在新的主账号字段中,输入您的用户标识符。 这通常是 Google 账号的电子邮件地址。
- 在选择角色列表中,选择一个角色。
- 如需授予其他角色,请点击 添加其他角色,然后添加其他各个角色。
- 点击 Save(保存)。
在 Google Cloud 控制台中,前往 BigQuery 页面。
在探索器窗格中,点击您的项目名称。
点击 查看操作 > 创建数据集
在 创建数据集 页面上,执行以下操作:
在数据集 ID 部分,输入
bqml_tutorial。在位置类型部分,选择多区域,然后选择 US (multiple regions in United States)(美国[美国的多个区域])。
保持其余默认设置不变,然后点击创建数据集。
创建一个名为
bqml_tutorial的数据集,并将数据位置设置为US,说明为BigQuery ML tutorial dataset:bq --location=US mk -d \ --description "BigQuery ML tutorial dataset." \ bqml_tutorial
该命令使用的不是
--dataset标志,而是-d快捷方式。如果省略-d和--dataset,该命令会默认创建一个数据集。确认已创建数据集:
bq ls在 Google Cloud 控制台中,前往 BigQuery Studio 页面。
在查询编辑器中,输入以下
CREATE MODEL语句:CREATE OR REPLACE MODEL `bqml_tutorial.imported_onnx_model` OPTIONS (MODEL_TYPE='ONNX', MODEL_PATH='BUCKET_PATH')
将
BUCKET_PATH替换为您上传到 Cloud Storage 的模型的路径。如果您使用的是示例模型,请将BUCKET_PATH替换为以下值:gs://cloud-samples-data/bigquery/ml/onnx/pipeline_rf.onnx。操作完成后,您会看到类似于以下内容的消息:
Successfully created model named imported_onnx_model。您的新模型会显示在资源面板中。模型由模型图标表示:
 如果您在资源面板中选择新模型,则模型相关信息会显示在查询编辑器旁边。
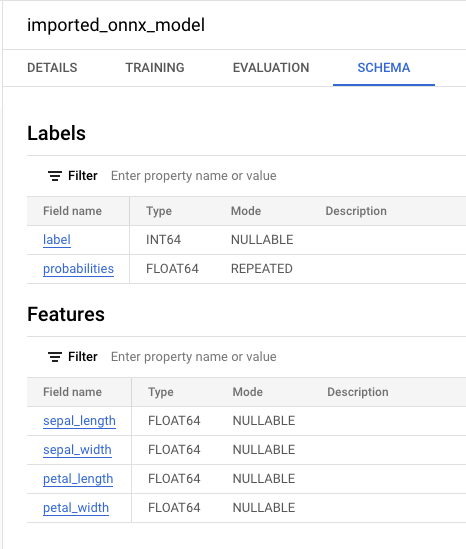
通过输入以下
CREATE MODEL语句,从 Cloud Storage 导入 ONNX 模型。bq query --use_legacy_sql=false \ "CREATE OR REPLACE MODEL `bqml_tutorial.imported_onnx_model` OPTIONS (MODEL_TYPE='ONNX', MODEL_PATH='BUCKET_PATH')"
将
BUCKET_PATH替换为您上传到 Cloud Storage 的模型的路径。如果您使用的是示例模型,请将BUCKET_PATH替换为以下值:gs://cloud-samples-data/bigquery/ml/onnx/pipeline_rf.onnx。操作完成后,您会看到类似于以下内容的消息:
Successfully created model named imported_onnx_model。导入模型后,请验证该模型是否显示在数据集中。
bq ls -m bqml_tutorial
输出内容类似如下:
tableId Type --------------------- ------- imported_onnx_model MODEL
sepal_lengthsepal_widthpetal_lengthpetal_width转到 BigQuery Studio 页面。
在查询编辑器中,输入使用
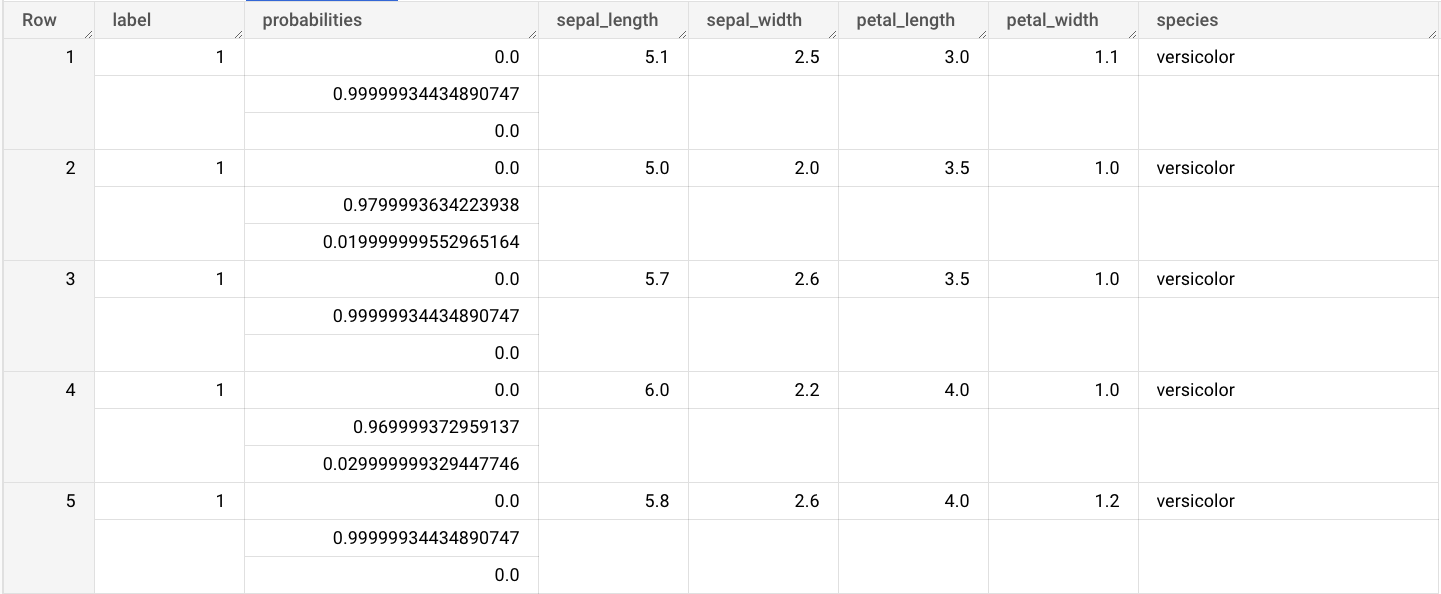
ML.PREDICT函数的查询。SELECT * FROM ML.PREDICT(MODEL `bqml_tutorial.imported_onnx_model`, ( SELECT * FROM `bigquery-public-data.ml_datasets.iris` ) )
查询结果类似于以下内容:
- In the Google Cloud console, go to the Manage resources page.
- In the project list, select the project that you want to delete, and then click Delete.
- In the dialog, type the project ID, and then click Shut down to delete the project.
- In the Google Cloud console, go to the Manage resources page.
- In the project list, select the project that you want to delete, and then click Delete.
- In the dialog, type the project ID, and then click Shut down to delete the project.
- 如需详细了解如何导入 ONNX 模型,请参阅用于 ONNX 模型的
CREATE MODEL语句。 - 如需详细了解可用的 ONNX 转换器和教程,请参阅转换为 ONNX 格式。
- 如需大致了解 BigQuery ML,请参阅 BigQuery ML 简介。
- 如需开始使用 BigQuery ML,请参阅在 BigQuery ML 中创建机器学习模型。
所需的角色
如果您创建新项目,则您是该项目的所有者,并且会获得完成本教程所需的所有 Identity and Access Management (IAM) 权限。
如果您使用的是现有项目,请执行以下操作。
Make sure that you have the following role or roles on the project:
Check for the roles
Grant the roles
如需详细了解 BigQuery 中的 IAM 权限,请参阅 IAM 权限。
可选:训练模型并将其转换为 ONNX 格式
以下代码示例展示了如何使用 scikit-learn 训练分类模型,以及如何将生成的流水线转换为 ONNX 格式。本教程使用存储在 gs://cloud-samples-data/bigquery/ml/onnx/pipeline_rf.onnx 的预构建示例模型。如果您使用的是示例模型,则无需完成这些步骤。
使用 scikit-learn 训练分类模型
使用以下示例代码,基于 Iris 数据集创建和训练 scikit-learn 流水线。如需了解如何安装和使用 scikit-learn,请参阅 scikit-learn 安装指南。
import numpy
from sklearn.datasets import load_iris
from sklearn.pipeline import Pipeline
from sklearn.preprocessing import StandardScaler
from sklearn.ensemble import RandomForestClassifier

data = load_iris()
X = data.data[:, :4]
y = data.target

ind = numpy.arange(X.shape[0])
numpy.random.shuffle(ind)
X = X[ind, :].copy()
y = y[ind].copy()

pipe = Pipeline([('scaler', StandardScaler()),
                ('clr', RandomForestClassifier())])
pipe.fit(X, y)
将流水线转换为 ONNX 模型
使用 sklearn-onnx 中的以下示例代码将 scikit-learn 流水线转换为名为 pipeline_rf.onnx 的 ONNX 模型。
from skl2onnx import convert_sklearn
from skl2onnx.common.data_types import FloatTensorType

# Disable zipmap as it is not supported in BigQuery ML.
options = {id(pipe): {'zipmap': False}}

# Define input features. scikit-learn does not store information about the
# training dataset. It is not always possible to retrieve the number of features
# or their types. That's why the function needs another argument called initial_types.
initial_types = [
   ('sepal_length', FloatTensorType([None, 1])),
   ('sepal_width', FloatTensorType([None, 1])),
   ('petal_length', FloatTensorType([None, 1])),
   ('petal_width', FloatTensorType([None, 1])),
]

# Convert the model.
model_onnx = convert_sklearn(
   pipe, 'pipeline_rf', initial_types=initial_types, options=options
)

# And save.
with open('pipeline_rf.onnx', 'wb') as f:
 f.write(model_onnx.SerializeToString())
将 ONNX 模型上传到 Cloud Storage
保存模型后,请执行以下操作:
创建数据集
创建 BigQuery 数据集以存储机器学习模型。
控制台
bq
如需创建新数据集,请使用带有 --location 标志的 bq mk 命令。 如需查看完整的潜在参数列表,请参阅 bq mk --dataset 命令参考文档。
API
使用已定义的数据集资源调用 datasets.insert 方法。
{
  "datasetReference": {
     "datasetId": "bqml_tutorial"
  }
}
BigQuery DataFrame
在尝试此示例之前,请按照《BigQuery 快速入门:使用 BigQuery DataFrames》中的 BigQuery DataFrames 设置说明进行操作。如需了解详情,请参阅 BigQuery DataFrames 参考文档。
如需向 BigQuery 进行身份验证,请设置应用默认凭证。如需了解详情,请参阅为本地开发环境设置 ADC。
将 ONNX 模型导入 BigQuery
以下步骤介绍了如何使用 CREATE MODEL 语句从 Cloud Storage 导入示例 ONNX 模型。
如需将 ONNX 模型导入数据集,请选择以下选项之一:
控制台
bq
BigQuery DataFrame
在尝试此示例之前,请按照《BigQuery 快速入门:使用 BigQuery DataFrames》中的 BigQuery DataFrames 设置说明进行操作。如需了解详情,请参阅 BigQuery DataFrames 参考文档。
如需向 BigQuery 进行身份验证,请设置应用默认凭证。如需了解详情,请参阅为本地开发环境设置 ADC。
使用 ONNXModel 对象导入模型。
如需详细了解如何将 ONNX 模型导入 BigQuery,包括格式和存储要求,请参阅用于导入 ONNX 模型的 CREATE MODEL 语句。
使用导入的 ONNX 模型进行预测
导入 ONNX 模型后,您可以使用 ML.PREDICT 函数通过该模型进行预测。
以下步骤中的查询使用 imported_onnx_model 根据 ml_datasets 公共数据集的 iris 表中的输入数据进行预测。ONNX 模型需要将四个 FLOAT 值作为输入:
这些输入与您在将模型转换为 ONNX 格式时定义的 initial_types 匹配。
输出包括 label 和 probabilities 列以及输入表中的列。label 表示预测的类标签。probabilities 是一个概率数组,表示每个类的概率。
如需使用导入的 ONNX 模型进行预测,请选择以下选项之一:
控制台
bq
运行使用 ML.PREDICT 的查询。
bq query --use_legacy_sql=false \
'SELECT *
FROM ML.PREDICT(
MODEL `example_dataset.imported_onnx_model`,
(SELECT * FROM `bigquery-public-data.ml_datasets.iris`))'
BigQuery DataFrame
在尝试此示例之前,请按照《BigQuery 快速入门:使用 BigQuery DataFrames》中的 BigQuery DataFrames 设置说明进行操作。如需了解详情,请参阅 BigQuery DataFrames 参考文档。
如需向 BigQuery 进行身份验证,请设置应用默认凭证。如需了解详情,请参阅为本地开发环境设置 ADC。
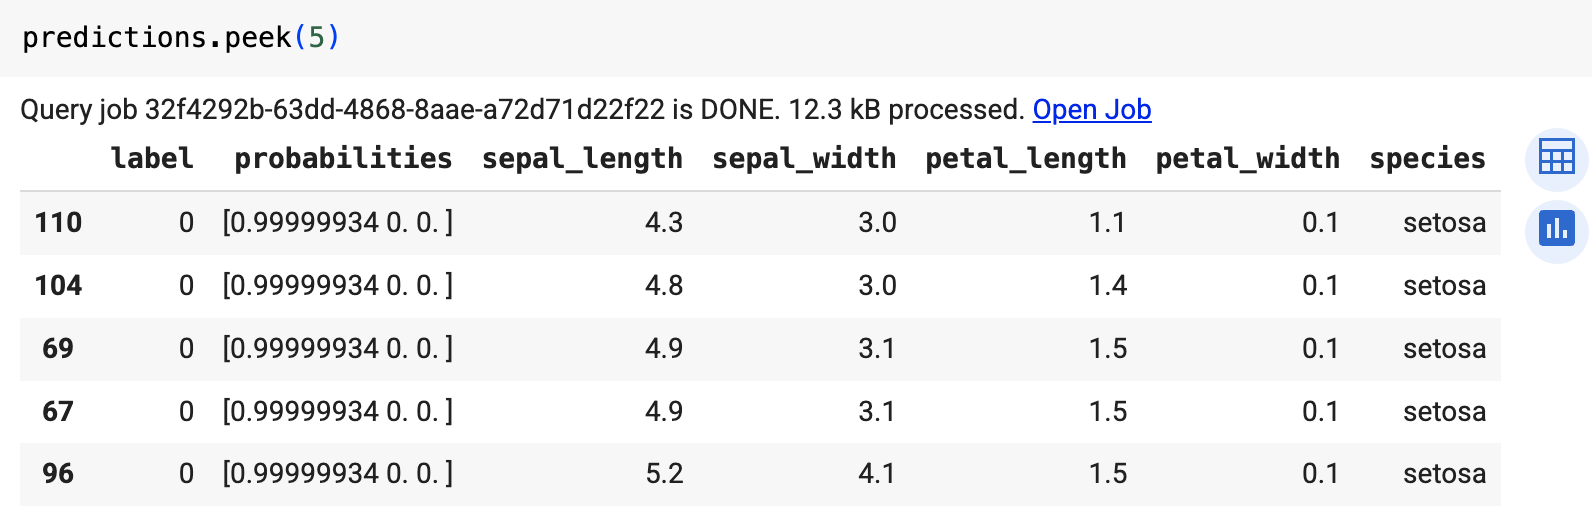
使用 predict 函数运行 ONNX 模型。
结果类似于以下内容:
清理
为避免因本教程中使用的资源导致您的 Google Cloud 账号产生费用,请删除包含这些资源的项目,或者保留项目但删除各个资源。
删除项目
控制台
gcloud
删除各个资源
或者,如需移除本教程中使用的各个资源,请执行以下操作: