En cada página, se supone que ya realizaste las instrucciones de las páginas anteriores del instructivo.
En el resto de este documento, se supone que usas el mismo entorno de Cloud Shell que creaste cuando sigues la primera página de este instructivo. Si tu sesión original de Cloud Shell ya no está abierta, puedes volver al entorno de la siguiente manera:
In the Google Cloud console, activate Cloud Shell.
En la sesión de Cloud Shell, ejecuta el siguiente comando:
cdhello-custom-sample
Crear un extremo
Para obtener predicciones en línea del modelo de AA que entrenaste cuando seguiste la página anterior de este instructivo, crea un extremo de Vertex AI.
Los extremos entregan predicciones en línea de uno o más modelos.
En la consola de Google Cloud , en la sección Vertex AI, ve a la página Modelos.
Busca la fila del modelo que entrenaste en el paso anterior de este instructivo, hello_custom, y haz clic en el nombre del modelo para abrir la página de detalles del modelo.
En la pestaña Implementar y probar, haz clic en Implementar en el extremo para abrir el panel Implementar en el extremo.
En el paso Definir el extremo, agrega información básica para el extremo:
Selecciona Crear extremo nuevo.
En el campo Nombre del extremo, ingresa hello_custom.
En la sección Configuración del modelo, asegúrate de ver el nombre del modelo, que además se llama hello_custom. Especifica la siguiente configuración del modelo:
En el campo División del tráfico, ingresa 100. Vertex AI admite la división del tráfico de un extremo en varios modelos, pero en este instructivo no se usa esa función.
En el campo Cantidad mínima de nodos de procesamiento, ingresa 1.
En la lista desplegable Tipo de máquina, selecciona n1-standard-2 de la sección Estándar.
Haz clic en Listo.
En la sección Registro, asegúrate de que ambos tipos de registro de predicción estén habilitados.
Haz clic en Continuar.
En el paso Detalles del extremo, confirma que el extremo se implementará en us-central1 (Iowa).
No selecciones la casilla de verificación Usar una clave de encriptación administrada por el cliente (CMEK).
En este instructivo, no se usa CMEK.
Haz clic en Implementar para crear el extremo y, luego, implementa el modelo en el extremo.
Después de unos minutos, check_circle aparecerá junto al extremo nuevo en la tabla Extremos. Al mismo tiempo, también recibirás un correo electrónico que indica que creaste el extremo y que implementaste tu modelo en el extremo.
Implementa una función de Cloud Run
Puedes obtener predicciones desde el extremo de Vertex AI que acabas de crear mediante el envío de solicitudes a la interfaz de la API de REST de Vertex AI. Sin embargo, solo los principales con el permiso aiplatform.endpoints.predict pueden enviar solicitudes de predicción en línea. No puedes hacer que el extremo sea público para que nadie envíe solicitudes, por ejemplo, a través de una aplicación web.
En esta sección, implementa código en funciones de Cloud Run para administrar las solicitudes sin autenticar. El código de muestra que descargaste cuando leiste la primera página de este instructivo contiene el código de esta función de Cloud Run en el directorio function/. De manera opcional, ejecuta el siguiente comando para explorar el código de funciones de Cloud Run:
lessfunction/main.py
Implementa la función tiene los siguientes fines:
Puedes configurar una función de Cloud Run para recibir solicitudes sin autenticar. Además, las funciones se ejecutan mediante una cuenta de servicio con la función de editor de forma predeterminada, que incluye el permiso aiplatform.endpoints.predict necesario para obtener predicciones de tu extremo de Vertex AI.
Esta función también realiza un procesamiento previo útil en las solicitudes. El extremo de Vertex AI espera solicitudes de predicción en el formato de la primera capa del grafo de TensorFlow Keras entrenado: un tensor de números de punto flotante normalizados con dimensiones fijas. La función toma la URL de una imagen como entrada y la procesa previamente en este formato antes de solicitar una predicción del extremo de Vertex AI.
Para implementar la función de Cloud Run, haz lo siguiente:
En la consola Google Cloud , en la sección Vertex AI, ve a la página Extremos.
Busca la fila del extremo que creaste en la sección anterior, llamada hello_custom. En esta fila, haz clic en Solicitud de muestra para abrir el panel Solicitud de muestra.
En el panel Solicitud de muestra, busca la línea de código de shell que coincide con el siguiente patrón:
ENDPOINT_ID="ENDPOINT_ID"
ENDPOINT_ID es un número que identifica este extremo en particular.
Copia esta línea de código y ejecútala en tu sesión de Cloud Shell para definir la variable ENDPOINT_ID.
Ejecuta el siguiente comando en tu sesión de Cloud Shell para implementar la función de Cloud Run:
Implementa una aplicación web para enviar solicitudes de predicción
Por último, aloja una aplicación web estática en Cloud Storage para obtener predicciones de tu modelo de AA entrenado. La aplicación web envía solicitudes a tu función de Cloud Run, que las procesa con anterioridad y obtiene predicciones del extremo de Vertex AI.
El directorio webapp del código de muestra que descargaste contiene una aplicación web de muestra. En tu sesión de Cloud Shell, ejecuta los siguientes comandos para preparar e implementar la aplicación web:
Configura algunas variables de shell para los comandos en los siguientes pasos a fin de poder usarlas:
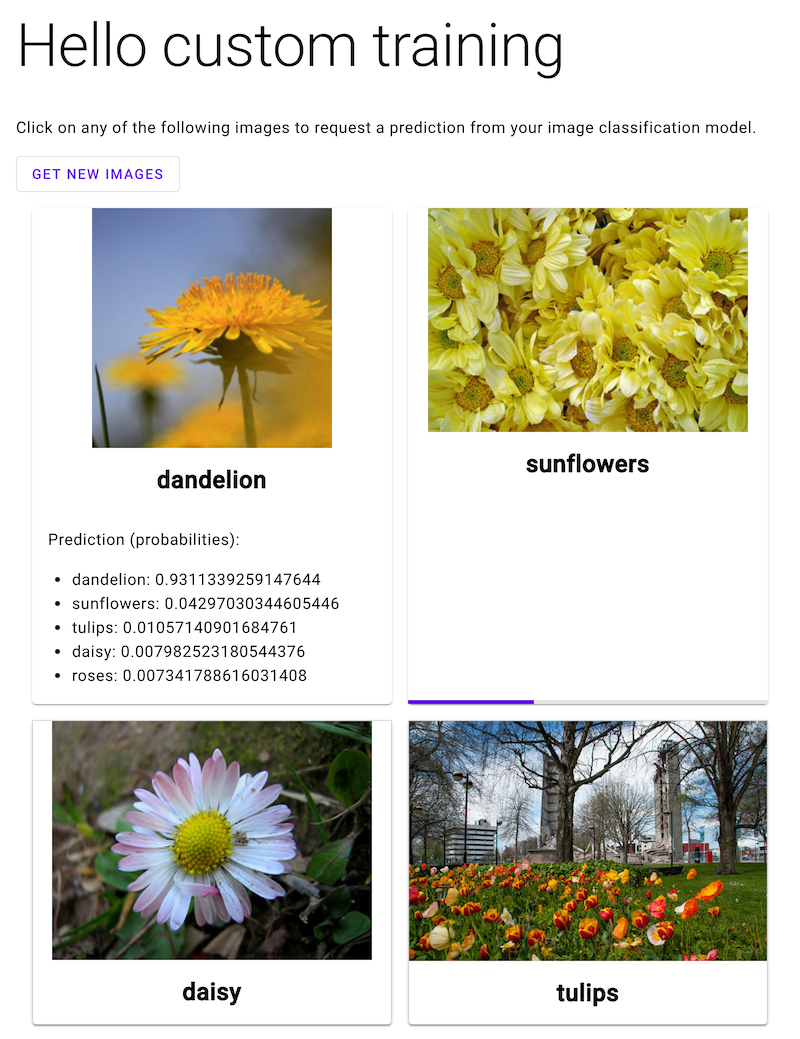
Abre la aplicación web y haz clic en una imagen de una flores para ver la clasificación de tu modelo de AA del tipo de flores. La app web presenta la predicción como una lista de tipos de flores y la probabilidad de que la imagen contiene cada tipo de flores.
En la siguiente captura de pantalla, la aplicación web ya tiene una predicción y está en proceso de enviar otra solicitud de predicción.
[[["Fácil de comprender","easyToUnderstand","thumb-up"],["Resolvió mi problema","solvedMyProblem","thumb-up"],["Otro","otherUp","thumb-up"]],[["Difícil de entender","hardToUnderstand","thumb-down"],["Información o código de muestra incorrectos","incorrectInformationOrSampleCode","thumb-down"],["Faltan la información o los ejemplos que necesito","missingTheInformationSamplesINeed","thumb-down"],["Problema de traducción","translationIssue","thumb-down"],["Otro","otherDown","thumb-down"]],["Última actualización: 2025-09-04 (UTC)"],[],[],null,["# Hello custom training: Serve predictions from a custom image classification model\n\nThis page walks through serving predictions from your image classification model\nand viewing these predictions in a web app.\nThis tutorial has several pages:\n\n\u003cbr /\u003e\n\n1. [Setting up your project and environment.](/vertex-ai/docs/tutorials/image-classification-custom)\n\n2. [Training a custom image classification\n model.](/vertex-ai/docs/tutorials/image-classification-custom/training)\n\n3. Serving predictions from a custom image\n classification model.\n\n4. [Cleaning up your project.](/vertex-ai/docs/tutorials/image-classification-custom/cleanup)\n\nEach page assumes that you have already performed the instructions from the\nprevious pages of the tutorial.\nThe rest of this document assumes that you are using the same Cloud Shell environment that you created when following the [first page of this\ntutorial](/vertex-ai/docs/tutorials/image-classification-custom). If your original Cloud Shell session is no longer open, you can return to the environment by doing the following:\n\n\u003cbr /\u003e\n\n1. In the Google Cloud console, activate Cloud Shell.\n\n [Activate Cloud Shell](https://console.cloud.google.com/?cloudshell=true)\n2. In the Cloud Shell session, run the following command:\n\n ```bash\n cd hello-custom-sample\n ```\n\nCreate an endpoint\n------------------\n\nTo get online predictions from the ML model that you trained when following\nthe previous page of this tutorial, create a Vertex AI *endpoint*.\nEndpoints serve online predictions from one or more models.\n\n1. In the Google Cloud console, in the Vertex AI section, go to\n the **Models** page.\n\n [Go to Models](https://console.cloud.google.com/vertex-ai/models)\n2. Find the row of the model that you trained in the [previous step of this\n tutorial](/vertex-ai/docs/tutorials/image-classification-custom/training), `hello_custom`, and click the model's\n name to open the model detail page.\n\n3. On the **Deploy \\& test** tab, click **Deploy to endpoint** to open the\n **Deploy to endpoint** pane.\n\n4. On the **Define your endpoint** step, add some basic information for your\n endpoint:\n\n 1. Select **Create new endpoint**.\n\n 2. In the **Endpoint name** field, enter `hello_custom`.\n\n 3. In the **Model settings** section, ensure that you see the name of your\n model, which is also called `hello_custom`. Specify the following model\n settings:\n\n 1. In the **Traffic split** field, enter `100`. Vertex AI\n supports splitting traffic for an endpoint to multiple models, but\n this tutorial doesn't use that feature.\n\n 2. In the **Minimum number of compute nodes** field, enter `1`.\n\n 3. In the **Machine type** drop-down list, select **n1-standard-2** from\n the **Standard** section.\n\n 4. Click **Done**.\n\n 4. In the **Logging** section, ensure that both types of prediction logging\n are enabled.\n\n Click **Continue**.\n5. On the **Endpoint details** step, confirm that your endpoint will be deployed\n to `us-central1 (Iowa)`.\n\n Do not select the **Use a customer-managed encryption key (CMEK)** checkbox.\n This tutorial does not use [CMEK](/vertex-ai/docs/general/cmek).\n6. Click **Deploy** to create the endpoint and deploy your model to the\n endpoint.\n\nAfter a few minutes, check_circle appears next to the new\nendpoint in the **Endpoints** table. At the same time, you also receive an email\nindicating that you have successfully created the endpoint and deployed your\nmodel to the endpoint.\n\nDeploy a Cloud Run function\n---------------------------\n\nYou can get predictions from the Vertex AI endpoint that you just\ncreated by sending requests to the Vertex AI API's REST interface. However, only\nprincipals with the [`aiplatform.endpoints.predict`\npermission](/vertex-ai/docs/general/access-control) can send online prediction requests. You\ncannot make the endpoint public for anybody to send requests to, for example via\na web app.\n\nIn this section, deploy code to [Cloud Run functions](/functions/docs) to handle\nunauthenticated requests. The sample code that you downloaded when you read the\n[first page of this tutorial](/vertex-ai/docs/tutorials/image-classification-custom) contains code for this\nCloud Run function in the `function/` directory. Optionally, run the\nfollowing command to explore the Cloud Run function code: \n\n less function/main.py\n\nDeploying the function serves the following purposes:\n\n- You *can* configure a Cloud Run function to receive unauthenticated\n requests. Additionally, functions run using [a service account with the Editor\n role by default](/functions/docs/securing/function-identity), which includes\n the `aiplatform.endpoints.predict` permission necessary to get predictions\n from your Vertex AI endpoint.\n\n- This function also performs useful preprocessing on requests. The\n Vertex AI endpoint expects prediction requests in the format\n of the trained TensorFlow Keras graph's first layer: a tensor of normalized\n floats with fixed dimensions. The function takes the URL of an image as input\n and preprocesses the image into this format before requesting a prediction\n from the Vertex AI endpoint.\n\nTo deploy the Cloud Run function, do the following:\n\n1. In the Google Cloud console, in the Vertex AI section, go to\n the **Endpoints** page.\n\n [Go to Endpoints](https://console.cloud.google.com/vertex-ai/endpoints)\n2. Find the row of the endpoint that you created in the previous section, named\n `hello_custom`. In this row, click **Sample request** to open the\n **Sample request** pane.\n\n3. In the **Sample request** pane, find the line of shell code that matches the\n following pattern:\n\n ```bash\n ENDPOINT_ID=\"\u003cvar translate=\"no\"\u003eENDPOINT_ID\u003c/var\u003e\"\n ```\n\n \u003cvar translate=\"no\"\u003eENDPOINT_ID\u003c/var\u003e is a number that identifies this particular endpoint.\n\n Copy this line of code, and run it in your Cloud Shell session to\n set the `ENDPOINT_ID` variable.\n4. Run the following command in your Cloud Shell session to deploy the\n Cloud Run function:\n\n gcloud functions deploy classify_flower \\\n --region=us-central1 \\\n --source=function \\\n --runtime=python37 \\\n --memory=2048MB \\\n --trigger-http \\\n --allow-unauthenticated \\\n --set-env-vars=ENDPOINT_ID=${ENDPOINT_ID}\n\nDeploy a web app to send prediction requests\n--------------------------------------------\n\nFinally, host a static web app on Cloud Storage to get predictions\nfrom your trained ML model. The web app sends requests to your\nCloud Run function, which preprocesses them and gets predictions from the\nVertex AI endpoint.\n\nThe `webapp` directory of the sample code that you downloaded contains a sample\nweb app. In your Cloud Shell session, run the following commands\nto prepare and deploy the web app:\n\n1. Set a couple of shell variables for commands in following steps to use:\n\n PROJECT_ID=\u003cvar translate=\"no\"\u003ePROJECT_ID\u003c/var\u003e\n BUCKET_NAME=\u003cvar translate=\"no\"\u003eBUCKET_NAME\u003c/var\u003e\n\n Replace the following:\n - \u003cvar translate=\"no\"\u003ePROJECT_ID\u003c/var\u003e: Your Google Cloud [project\n ID](/resource-manager/docs/creating-managing-projects#identifying_projects).\n - \u003cvar translate=\"no\"\u003eBUCKET_NAME\u003c/var\u003e: The name of the Cloud Storage bucket that you created when following the [first page of this tutorial](/vertex-ai/docs/tutorials/image-classification-custom).\n2. Edit the app to provide it with the trigger URL of your\n Cloud Run function:\n\n echo \"export const CLOUD_FUNCTION_URL = 'https://us-central1-${PROJECT_ID}.cloudfunctions.net/classify_flower';\" \\\n \u003e webapp/function-url.js\n\n3. Upload the `webapp` directory to your Cloud Storage bucket:\n\n gcloud storage cp webapp gs://${BUCKET_NAME}/ --recursive\n\n4. Make the web app files that you just uploaded [publicly\n readable](/storage/docs/access-control/making-data-public):\n\n gcloud storage objects update gs://${BUCKET_NAME}/webapp/** --add-acl-grant=entity=allUsers,role=READER\n\n | **Note:** Shells (like bash, zsh) sometimes attempt to expand wildcards in ways that can be surprising. For more details, see [URI wildcards](/storage/docs/wildcards#surprising-behavior).\n5. You can now navigate to the following URL to open web app and get\n predictions:\n\n ```\n https://storage.googleapis.com/BUCKET_NAME/webapp/index.html\n ```\n\n Open the web app and click an image of a flower to see your ML model's\n classification of the flower type. The web app presents the prediction as a\n list of flower types and the probability that the image contains each type of\n flower.\n | **Note:** This web app gets predictions for images that were also included in the training dataset for the model. Therefore the model might appear more accurate than it actually is due to [overfitting](https://developers.google.com/machine-learning/glossary#overfitting).\n\nIn the following screenshot, the web app has already gotten one\nprediction and is in the process of sending another prediction\nrequest.\n\nWhat's next\n-----------\n\nFollow the [last page of the tutorial](/vertex-ai/docs/tutorials/image-classification-custom/cleanup) to clean up\nresources that you have created."]]