批次推論為非同步要求,可直接從模型資源要求推論,不必將模型部署至端點。
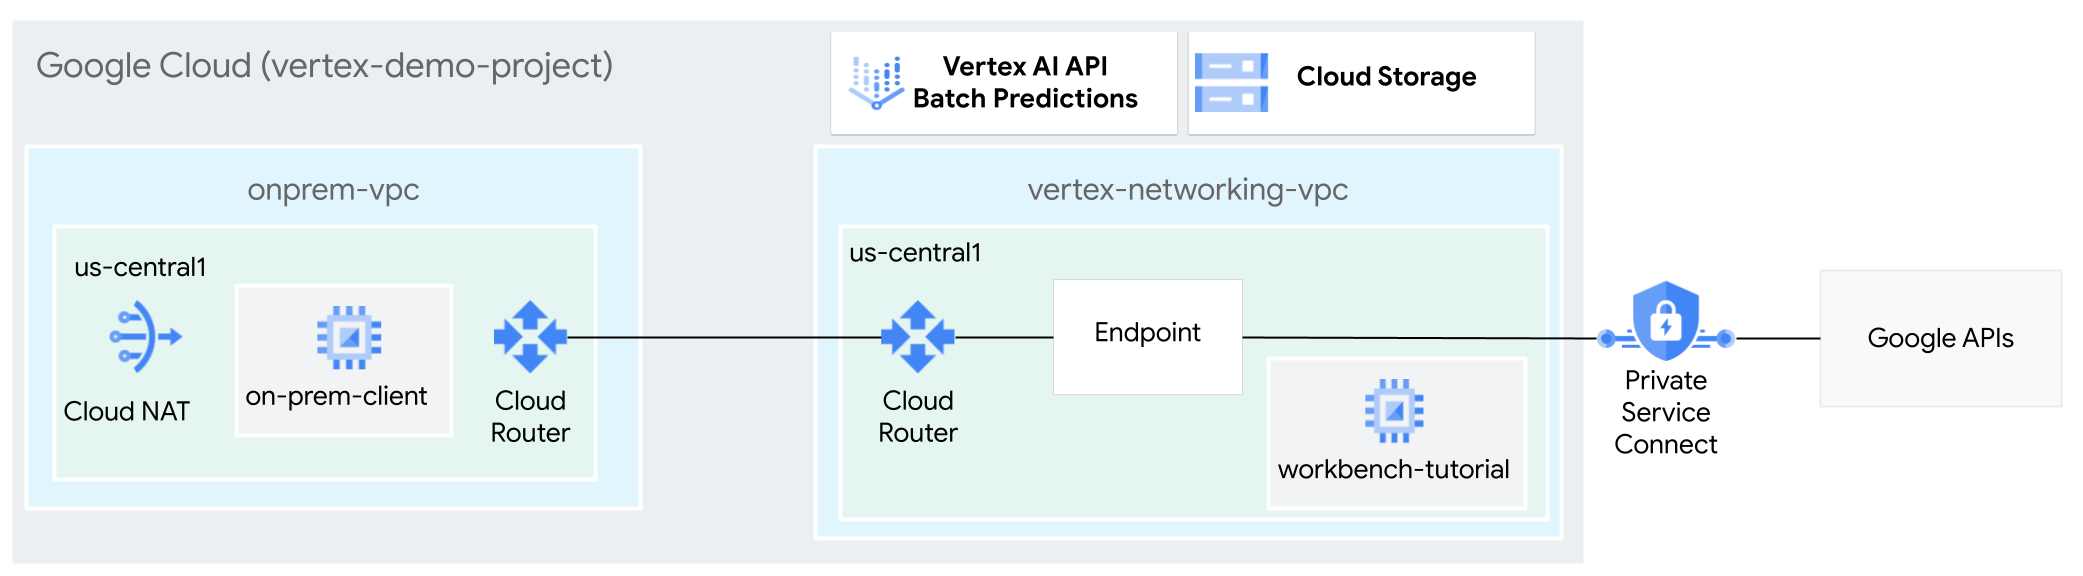
在本教學課程中,您會使用高可用性 VPN (HA VPN),在兩個虛擬私有雲網路之間,私下將批次推論要求傳送至已訓練的模型,這兩個網路可做為多雲端和內部部署私人連線的基礎。
本教學課程適用於熟悉 Vertex AI、虛擬私有雲 (VPC)、 Google Cloud 控制台和 Cloud Shell 的企業網路管理員、資料科學家和研究人員。熟悉 Vertex AI Workbench 有助於瞭解本課程,但並非必要條件。
建立虛擬私有雲網路
在本節中,您將建立兩個虛擬私有雲網路:一個用於存取批次推論的 Google API,另一個則用於模擬地端部署網路。在兩個虛擬私有雲網路中,您會建立 Cloud Router 和 Cloud NAT 閘道。Cloud NAT 閘道可為沒有外部 IP 位址的 Compute Engine 虛擬機器 (VM) 執行個體提供傳出連線。
建立
vertex-networking-vpc虛擬私有雲網路:gcloud compute networks create vertex-networking-vpc \ --subnet-mode custom在
vertex-networking-vpc網路中,建立名為workbench-subnet的子網路,主要 IPv4 範圍為10.0.1.0/28:gcloud compute networks subnets create workbench-subnet \ --range=10.0.1.0/28 \ --network=vertex-networking-vpc \ --region=us-central1 \ --enable-private-ip-google-access建立虛擬私有雲網路,模擬內部部署網路 (
onprem-vpc):gcloud compute networks create onprem-vpc \ --subnet-mode custom在
onprem-vpc網路中,建立名為onprem-vpc-subnet1的子網路,主要 IPv4 範圍為172.16.10.0/29:gcloud compute networks subnets create onprem-vpc-subnet1 \ --network onprem-vpc \ --range 172.16.10.0/29 \ --region us-central1
確認虛擬私有雲網路設定正確無誤
在 Google Cloud 控制台中,前往「VPC networks」(虛擬私有雲網路) 頁面的「Networks in current project」(目前專案中的網路) 分頁。
在虛擬私有雲網路清單中,確認已建立兩個網路:
vertex-networking-vpc和onprem-vpc。按一下「目前專案中的子網路」分頁。
在虛擬私有雲子網路清單中,確認已建立
workbench-subnet和onprem-vpc-subnet1子網路。
設定混合式連線
在本節中,您將建立兩個互相連線的高可用性 VPN 閘道。其中一個位於 vertex-networking-vpc 虛擬私有雲網路。另一個則位於 onprem-vpc 虛擬私有雲網路。每個閘道都包含 Cloud Router 和一對 VPN 通道。
建立高可用性 VPN 閘道
在 Cloud Shell 中,為
vertex-networking-vpc虛擬私有雲網路建立高可用性 VPN 閘道:gcloud compute vpn-gateways create vertex-networking-vpn-gw1 \ --network vertex-networking-vpc \ --region us-central1為
onprem-vpc虛擬私有雲網路建立高可用性 VPN 閘道:gcloud compute vpn-gateways create onprem-vpn-gw1 \ --network onprem-vpc \ --region us-central1在 Google Cloud 控制台中,前往「VPN」頁面的「Cloud VPN Gateways」(Cloud VPN 閘道) 分頁標籤。
確認已建立兩個閘道 (
vertex-networking-vpn-gw1和onprem-vpn-gw1),且每個閘道都有兩個介面 IP 位址。
建立 Cloud Router 和 Cloud NAT 閘道
在兩個虛擬私有雲網路中,您會建立兩個 Cloud Router:一個一般型和一個區域型。在每個區域性 Cloud Router 中,建立 Cloud NAT 閘道。Cloud NAT 閘道可為沒有外部 IP 位址的 Compute Engine 虛擬機器 (VM) 執行個體提供外送連線。
在 Cloud Shell 中,為
vertex-networking-vpcVPC 網路建立 Cloud Router:gcloud compute routers create vertex-networking-vpc-router1 \ --region us-central1\ --network vertex-networking-vpc \ --asn 65001為
onprem-vpcVPC 網路建立 Cloud Router:gcloud compute routers create onprem-vpc-router1 \ --region us-central1\ --network onprem-vpc\ --asn 65002為
vertex-networking-vpc虛擬私有雲網路建立區域 Cloud Router:gcloud compute routers create cloud-router-us-central1-vertex-nat \ --network vertex-networking-vpc \ --region us-central1在區域 Cloud Router 上設定 Cloud NAT 閘道:
gcloud compute routers nats create cloud-nat-us-central1 \
  --router=cloud-router-us-central1-vertex-nat \
  --auto-allocate-nat-external-ips \
  --nat-all-subnet-ip-ranges \
  --region us-central1
為
onprem-vpc虛擬私有雲網路建立區域 Cloud Router:gcloud compute routers create cloud-router-us-central1-onprem-nat \ --network onprem-vpc \ --region us-central1在區域 Cloud Router 上設定 Cloud NAT 閘道:
gcloud compute routers nats create cloud-nat-us-central1-on-prem \
  --router=cloud-router-us-central1-onprem-nat \
  --auto-allocate-nat-external-ips \
  --nat-all-subnet-ip-ranges \
  --region us-central1
前往 Google Cloud 控制台的「Cloud Routers」頁面。
在「Cloud Routers」清單中,確認已建立下列路由器:
cloud-router-us-central1-onprem-natcloud-router-us-central1-vertex-natonprem-vpc-router1vertex-networking-vpc-router1
您可能需要重新整理 Google Cloud 控制台瀏覽器分頁,才能看到新值。
在 Cloud Router 清單中,按一下
cloud-router-us-central1-vertex-nat。在「路由器詳細資料」頁面中,確認已建立
cloud-nat-us-central1Cloud NAT 閘道。按一下 返回箭頭,返回「Cloud Routers」頁面。
在路由器清單中,按一下
cloud-router-us-central1-onprem-nat。在「路由器詳細資料」頁面中,確認已建立
cloud-nat-us-central1-on-premCloud NAT 閘道。
建立 VPN 通道
在 Cloud Shell 中,於
vertex-networking-vpc網路中建立名為vertex-networking-vpc-tunnel0的 VPN 通道:gcloud compute vpn-tunnels create vertex-networking-vpc-tunnel0 \ --peer-gcp-gateway onprem-vpn-gw1 \ --region us-central1 \ --ike-version 2 \ --shared-secret [ZzTLxKL8fmRykwNDfCvEFIjmlYLhMucH] \ --router vertex-networking-vpc-router1 \ --vpn-gateway vertex-networking-vpn-gw1 \ --interface 0在
vertex-networking-vpc網路中,建立名為vertex-networking-vpc-tunnel1的 VPN 通道:gcloud compute vpn-tunnels create vertex-networking-vpc-tunnel1 \ --peer-gcp-gateway onprem-vpn-gw1 \ --region us-central1 \ --ike-version 2 \ --shared-secret [bcyPaboPl8fSkXRmvONGJzWTrc6tRqY5] \ --router vertex-networking-vpc-router1 \ --vpn-gateway vertex-networking-vpn-gw1 \ --interface 1在
onprem-vpc網路中,建立名為onprem-vpc-tunnel0的 VPN 通道:gcloud compute vpn-tunnels create onprem-vpc-tunnel0 \ --peer-gcp-gateway vertex-networking-vpn-gw1 \ --region us-central1\ --ike-version 2 \ --shared-secret [ZzTLxKL8fmRykwNDfCvEFIjmlYLhMucH] \ --router onprem-vpc-router1 \ --vpn-gateway onprem-vpn-gw1 \ --interface 0在
onprem-vpc網路中,建立名為onprem-vpc-tunnel1的 VPN 通道:gcloud compute vpn-tunnels create onprem-vpc-tunnel1 \ --peer-gcp-gateway vertex-networking-vpn-gw1 \ --region us-central1\ --ike-version 2 \ --shared-secret [bcyPaboPl8fSkXRmvONGJzWTrc6tRqY5] \ --router onprem-vpc-router1 \ --vpn-gateway onprem-vpn-gw1 \ --interface 1前往 Google Cloud 控制台的「VPN」VPN頁面。
在 VPN 通道清單中,確認已建立四個 VPN 通道。
建立 BGP 工作階段
Cloud Router 會透過邊界閘道通訊協定 (BGP),在 VPC 網路 (本例中為 vertex-networking-vpc) 和地端部署網路 (以 onprem-vpc 表示) 之間交換路徑。在 Cloud Router 上,您會為地端部署路由器設定介面和 BGP 對等互連。這個介面和 BGP 對等點設定組合起來,就會形成 BGP 工作階段。在本節中,您將為 vertex-networking-vpc 建立兩個 BGP 工作階段,並為 onprem-vpc 建立兩個 BGP 工作階段。
設定路由器之間的介面和 BGP 對等互連後,路由器就會自動開始交換路徑。
為「vertex-networking-vpc」建立 BGP 工作階段
在 Cloud Shell 中,於
vertex-networking-vpc網路中為vertex-networking-vpc-tunnel0建立 BGP 介面:gcloud compute routers add-interface vertex-networking-vpc-router1 \ --interface-name if-tunnel0-to-onprem \ --ip-address 169.254.0.1 \ --mask-length 30 \ --vpn-tunnel vertex-networking-vpc-tunnel0 \ --region us-central1在
vertex-networking-vpc網路中,為bgp-onprem-tunnel0建立 BGP 對等點:gcloud compute routers add-bgp-peer vertex-networking-vpc-router1 \ --peer-name bgp-onprem-tunnel0 \ --interface if-tunnel0-to-onprem \ --peer-ip-address 169.254.0.2 \ --peer-asn 65002 \ --region us-central1在
vertex-networking-vpc網路中,為vertex-networking-vpc-tunnel1建立 BGP 介面:gcloud compute routers add-interface vertex-networking-vpc-router1 \ --interface-name if-tunnel1-to-onprem \ --ip-address 169.254.1.1 \ --mask-length 30 \ --vpn-tunnel vertex-networking-vpc-tunnel1 \ --region us-central1在
vertex-networking-vpc網路中,為bgp-onprem-tunnel1建立 BGP 對等點:gcloud compute routers add-bgp-peer vertex-networking-vpc-router1 \ --peer-name bgp-onprem-tunnel1 \ --interface if-tunnel1-to-onprem \ --peer-ip-address 169.254.1.2 \ --peer-asn 65002 \ --region us-central1
為「onprem-vpc」建立 BGP 工作階段
在
onprem-vpc網路中,為onprem-vpc-tunnel0建立 BGP 介面:gcloud compute routers add-interface onprem-vpc-router1 \ --interface-name if-tunnel0-to-vertex-networking-vpc \ --ip-address 169.254.0.2 \ --mask-length 30 \ --vpn-tunnel onprem-vpc-tunnel0 \ --region us-central1在
onprem-vpc網路中,為bgp-vertex-networking-vpc-tunnel0建立 BGP 對等點:gcloud compute routers add-bgp-peer onprem-vpc-router1 \ --peer-name bgp-vertex-networking-vpc-tunnel0 \ --interface if-tunnel0-to-vertex-networking-vpc \ --peer-ip-address 169.254.0.1 \ --peer-asn 65001 \ --region us-central1在
onprem-vpc網路中,為onprem-vpc-tunnel1建立 BGP 介面:gcloud compute routers add-interface onprem-vpc-router1 \ --interface-name if-tunnel1-to-vertex-networking-vpc \ --ip-address 169.254.1.2 \ --mask-length 30 \ --vpn-tunnel onprem-vpc-tunnel1 \ --region us-central1在
onprem-vpc網路中,為bgp-vertex-networking-vpc-tunnel1建立 BGP 對等點:gcloud compute routers add-bgp-peer onprem-vpc-router1 \ --peer-name bgp-vertex-networking-vpc-tunnel1 \ --interface if-tunnel1-to-vertex-networking-vpc \ --peer-ip-address 169.254.1.1 \ --peer-asn 65001 \ --region us-central1
驗證 BGP 工作階段建立作業
前往 Google Cloud 控制台的「VPN」VPN頁面。
在 VPN 通道清單中,確認每個通道的「BGP 工作階段狀態」欄值已從「設定 BGP 工作階段」變更為「已建立 BGP」。您可能需要重新整理 Google Cloud 控制台瀏覽器分頁,才能看到新值。
驗證vertex-networking-vpc已知的路徑
在 Google Cloud 控制台中,前往「VPC networks」(虛擬私有雲網路) 頁面。
在虛擬私有雲網路清單中,按一下
vertex-networking-vpc。按一下「Routes」(路徑) 分頁標籤。
在「Region」(區域) 清單中選取「us-central1 (Iowa)」(us-central1 (愛荷華州)),然後按一下「View」(查看)。
在「Destination IP range」(目的地 IP 範圍) 欄中,確認子網路的 IP 範圍 (
172.16.10.0/29) 顯示兩次。onprem-vpc-subnet1
驗證onprem-vpc已知的路徑
按一下返回箭頭,返回「VPC 網路」頁面。
在虛擬私有雲網路清單中,按一下
onprem-vpc。按一下「Routes」(路徑) 分頁標籤。
在「Region」(區域) 清單中選取「us-central1 (Iowa)」(us-central1 (愛荷華州)),然後按一下「View」(查看)。
在「目的地 IP 範圍」資料欄中,確認子網路 IP 範圍 (
10.0.1.0/28) 顯示兩次。workbench-subnet
建立 Private Service Connect 消費者端點
在 Cloud Shell 中,預留用於存取 Google API 的消費者端點 IP 位址:
gcloud compute addresses create psc-googleapi-ip \
  --global \
  --purpose=PRIVATE_SERVICE_CONNECT \
  --addresses=192.168.0.1 \
  --network=vertex-networking-vpc
建立轉送規則,將端點連線至 Google API 和服務。
gcloud compute forwarding-rules create pscvertex \
 --global \
 --network=vertex-networking-vpc\
 --address=psc-googleapi-ip \
 --target-google-apis-bundle=all-apis
為「vertex-networking-vpc」建立自訂 advertise 路由
在本節中,您將設定 Cloud Router 自訂通告模式,為 vertex-networking-vpc-router1 (vertex-networking-vpc 的 Cloud Router) 通告自訂 IP 範圍,將 PSC 端點的 IP 位址通告至 onprem-vpc 網路。
前往 Google Cloud 控制台的「Cloud Routers」頁面。
在 Cloud Router 清單中,按一下
vertex-networking-vpc-router1。在「路由器詳細資料」頁面中,按一下「編輯」。
在「公告路徑」區段中,選取「路徑」的「建立自訂路徑」。
選取「公告 Cloud Router 可使用的所有子網路」核取方塊,繼續公告 Cloud Router 可用的子網路。啟用這個選項後,即可模擬預設通告模式下的 Cloud Router 行為。
按一下「新增自訂路徑」。
在「來源」中選取「自訂 IP 範圍」。
在「IP address range」(IP 位址範圍) 中,輸入下列 IP 位址:
192.168.0.1在「說明」中輸入下列文字:
Custom route to advertise Private Service Connect endpoint IP address依序按一下 [完成] 及 [儲存]。
驗證 onprem-vpc 是否已瞭解通告路徑
前往 Google Cloud 控制台的「Routes」(路徑) 頁面。
在「有效路徑」分頁中,執行下列操作:
- 在「Network」(網路) 中選擇
onprem-vpc。 - 在「區域」部分,選擇
us-central1 (Iowa)。 - 點按「查看」。
在路徑清單中,確認是否有名稱開頭為
onprem-vpc-router1-bgp-vertex-networking-vpc-tunnel0和onprem-vpc-router1-bgp-vfertex-networking-vpc-tunnel1的項目,且兩者的目的地 IP 範圍皆為192.168.0.1。如果這些項目沒有立即顯示,請稍候幾分鐘,然後重新整理 Google Cloud 控制台瀏覽器分頁。
- 在「Network」(網路) 中選擇
在 onprem-vpc 中建立使用使用者代管服務帳戶的 VM
在本節中,您會建立 VM 執行個體,模擬傳送批次推論要求的地端用戶端應用程式。根據 Compute Engine 和 IAM 最佳做法,這部 VM 使用的是使用者管理的服務帳戶,而非 Compute Engine 預設服務帳戶。
建立使用者代管的服務帳戶
在 Cloud Shell 中執行下列指令,並將 PROJECT_ID 替換為您的專案 ID:
projectid=PROJECT_ID
gcloud config set project ${projectid}
建立名為
onprem-user-managed-sa的服務帳戶:gcloud iam service-accounts create onprem-user-managed-sa \ --display-name="onprem-user-managed-sa-onprem-client"將 Vertex AI 使用者 (
roles/aiplatform.user) 角色指派給服務帳戶:gcloud projects add-iam-policy-binding $projectid \ --member="serviceAccount:onprem-user-managed-sa@$projectid.iam.gserviceaccount.com" \ --role="roles/aiplatform.user"將「Storage 物件檢視者 (
storage.objectViewer)」角色指派給服務帳戶:gcloud projects add-iam-policy-binding $projectid \ --member="serviceAccount:onprem-user-managed-sa@$projectid.iam.gserviceaccount.com" \ --role="roles/storage.objectViewer"
建立 on-prem-client VM 執行個體
您建立的 VM 執行個體沒有外部 IP 位址,且不允許直接透過網際網路存取。如要啟用 VM 的管理員存取權,請使用 Identity-Aware Proxy (IAP) TCP 轉送功能。
在 Cloud Shell 中,建立
on-prem-clientVM 執行個體:gcloud compute instances create on-prem-client \ --zone=us-central1-a \ --image-family=debian-11 \ --image-project=debian-cloud \ --subnet=onprem-vpc-subnet1 \ --scopes=https://www.googleapis.com/auth/cloud-platform \ --no-address \ --shielded-secure-boot \ --service-account=onprem-user-managed-sa@$projectid.iam.gserviceaccount.com \ --metadata startup-script="#! /bin/bash sudo apt-get update sudo apt-get install tcpdump dnsutils -y"建立防火牆規則,允許 IAP 連線至 VM 執行個體:
gcloud compute firewall-rules create ssh-iap-on-prem-vpc \
  --network onprem-vpc \
  --allow tcp:22 \
  --source-ranges=35.235.240.0/20
驗證 Vertex AI API 的公開存取權
在本節中,您將使用 dig 公用程式,從 on-prem-client VM 執行個體對 Vertex AI API (us-central1-aiplatform.googleapis.com) 執行 DNS 查詢。dig 輸出內容顯示,預設存取權只會使用公開 VIP 存取 Vertex AI API。
在下一節中,您將設定 Vertex AI API 的私人存取權。
在 Cloud Shell 中,使用 IAP 登入
on-prem-clientVM 執行個體:gcloud compute ssh on-prem-client \ --zone=us-central1-a \ --tunnel-through-iap在
on-prem-clientVM 執行個體中,執行dig指令:dig us-central1-aiplatform.googleapis.com您應該會看到類似以下的
dig輸出內容,其中「answer」區段中的 IP 位址是公用 IP 位址:; <<>> DiG 9.16.44-Debian <<>> us-central1.aiplatfom.googleapis.com ;; global options: +cmd ;; Got answer: ;; ->>HEADER<<- opcode: QUERY, status: NOERROR, id: 42506 ;; flags: qr rd ra; QUERY: 1, ANSWER: 16, AUTHORITY: 0, ADDITIONAL: 1 ;; OPT PSEUDOSECTION: ; EDNS: version: 0, flags:; udp: 512 ;; QUESTION SECTION: ;us-central1.aiplatfom.googleapis.com. IN A ;; ANSWER SECTION: us-central1.aiplatfom.googleapis.com. 300 IN A 173.194.192.95 us-central1.aiplatfom.googleapis.com. 300 IN A 142.250.152.95 us-central1.aiplatfom.googleapis.com. 300 IN A 172.217.219.95 us-central1.aiplatfom.googleapis.com. 300 IN A 209.85.146.95 us-central1.aiplatfom.googleapis.com. 300 IN A 209.85.147.95 us-central1.aiplatfom.googleapis.com. 300 IN A 142.250.125.95 us-central1.aiplatfom.googleapis.com. 300 IN A 142.250.136.95 us-central1.aiplatfom.googleapis.com. 300 IN A 142.250.148.95 us-central1.aiplatfom.googleapis.com. 300 IN A 209.85.200.95 us-central1.aiplatfom.googleapis.com. 300 IN A 209.85.234.95 us-central1.aiplatfom.googleapis.com. 300 IN A 142.251.171.95 us-central1.aiplatfom.googleapis.com. 300 IN A 108.177.112.95 us-central1.aiplatfom.googleapis.com. 300 IN A 142.250.128.95 us-central1.aiplatfom.googleapis.com. 300 IN A 142.251.6.95 us-central1.aiplatfom.googleapis.com. 300 IN A 172.217.212.95 us-central1.aiplatfom.googleapis.com. 300 IN A 74.125.124.95 ;; Query time: 8 msec ;; SERVER: 169.254.169.254#53(169.254.169.254) ;; WHEN: Wed Sep 27 04:10:16 UTC 2023 ;; MSG SIZE rcvd: 321
設定及驗證 Vertex AI API 的私人存取權
在本節中,您將設定 Vertex AI API 的私密存取權,這樣傳送批次推論要求時,系統就會將要求重新導向至 PSC 端點。PSC 端點會將這些私密要求轉送至 Vertex AI 批次推論 REST API。
更新 /etc/hosts 檔案,指向 PSC 端點
在這個步驟中,您會在 /etc/hosts 檔案中新增一行,導致傳送至公開服務端點 (us-central1-aiplatform.googleapis.com) 的要求重新導向至 PSC 端點 (192.168.0.1)。
在
on-prem-clientVM 執行個體中,使用vim或nano等文字編輯器開啟/etc/hosts檔案:sudo vim /etc/hosts在檔案中新增下列這行文字:
192.168.0.1 us-central1-aiplatform.googleapis.com這行會將 PSC 端點的 IP 位址 (
192.168.0.1) 指派給 Vertex AI Google API 的完整網域名稱 (us-central1-aiplatform.googleapis.com)。編輯後的檔案應如下所示:
127.0.0.1       localhost
::1             localhost ip6-localhost ip6-loopback
ff02::1         ip6-allnodes
ff02::2         ip6-allrouters

192.168.0.1 us-central1-aiplatform.googleapis.com  # Added by you
172.16.10.6 on-prem-client.us-central1-a.c.vertex-genai-400103.internal on-prem-client  # Added by Google
169.254.169.254 metadata.google.internal  # Added by Google
按照下列方式儲存檔案:
- 如果使用
vim,請按下Esc鍵,然後輸入:wq儲存檔案並結束。 - 如果使用
nano,請輸入Control+O並按下Enter儲存檔案,然後輸入Control+X結束。
- 如果使用
按照下列方式 Ping Vertex AI 端點:
ping us-central1-aiplatform.googleapis.comping指令應傳回下列輸出內容。192.168.0.1是 PSC 端點 IP 位址:PING us-central1-aiplatform.googleapis.com (192.168.0.1) 56(84) bytes of data.輸入
Control+C即可退出ping。輸入
exit即可退出on-prem-clientVM 執行個體。
在 vertex-networking-vpc 中建立 Vertex AI Workbench 適用的使用者管理服務帳戶
在本節中,您會建立由使用者管理的服務帳戶,然後指派 IAM 角色給該服務帳戶,藉此控管 Vertex AI Workbench 執行個體的存取權。建立執行個體時,請指定服務帳戶。
在 Cloud Shell 中執行下列指令,並將 PROJECT_ID 替換為您的專案 ID:
projectid=PROJECT_ID
gcloud config set project ${projectid}
建立名為
workbench-sa的服務帳戶:gcloud iam service-accounts create workbench-sa \ --display-name="workbench-sa"將 Vertex AI 使用者 (
roles/aiplatform.user) 身分與存取權管理角色指派給服務帳戶:gcloud projects add-iam-policy-binding $projectid \ --member="serviceAccount:workbench-sa@$projectid.iam.gserviceaccount.com" \ --role="roles/aiplatform.user"將 BigQuery 使用者 (
roles/bigquery.user) 身分與存取權管理角色指派給服務帳戶:gcloud projects add-iam-policy-binding $projectid \ --member="serviceAccount:workbench-sa@$projectid.iam.gserviceaccount.com" \ --role="roles/bigquery.user"將Storage 管理員 (
roles/storage.admin) 身分與存取權管理角色指派給服務帳戶:gcloud projects add-iam-policy-binding $projectid \ --member="serviceAccount:workbench-sa@$projectid.iam.gserviceaccount.com" \ --role="roles/storage.admin"將記錄檢視者 (
roles/logging.viewer) 身分與存取權管理角色指派給服務帳戶:gcloud projects add-iam-policy-binding $projectid \ --member="serviceAccount:workbench-sa@$projectid.iam.gserviceaccount.com" \ --role="roles/logging.viewer"
建立 Vertex AI Workbench 執行個體
在 Cloud Shell 中建立 Vertex AI Workbench 執行個體,並指定
workbench-sa服務帳戶:gcloud workbench instances create workbench-tutorial \ --vm-image-project=deeplearning-platform-release \ --vm-image-family=common-cpu-notebooks \ --machine-type=n1-standard-4 \ --location=us-central1-a \ --subnet-region=us-central1 \ --shielded-secure-boot=True \ --subnet=workbench-subnet \ --disable-public-ip \ --service-account-email=workbench-sa@$projectid.iam.gserviceaccount.com前往 Google Cloud 控制台的「Vertex AI Workbench」頁面,然後點選「Instances」分頁標籤。
按一下 Vertex AI Workbench 執行個體名稱 (
workbench-tutorial) 旁的「Open JupyterLab」(開啟 JupyterLab)。Vertex AI Workbench 執行個體會開啟 JupyterLab。
依序選取「File」>「New」>「Notebook」。
從「Select Kernel」選單中選取「Python 3 (Local)」,然後按一下「Select」。
開啟新筆記本時,會看到預設的程式碼儲存格,讓您能輸入程式碼。看起來像是
[ ]:後方接著文字欄位。 文字欄位是用來貼上程式碼。如要安裝 Python 適用的 Vertex AI SDK,請將下列程式碼貼到儲存格中,然後按一下「Run the selected cells and advance」(執行所選儲存格並繼續) :
!pip3 install --upgrade google-cloud-bigquery scikit-learn==1.2在這個步驟和後續步驟中,請按一下「在下方插入儲存格」,視需要新增程式碼儲存格,然後將程式碼貼到儲存格中,並按一下「執行所選儲存格並前進」。
如要在這個 Jupyter 執行階段中使用新安裝的套件,請重新啟動執行階段:
# Restart kernel after installs so that your environment can access the new packages
import IPython

app = IPython.Application.instance()
app.kernel.do_shutdown(True)
在 JupyterLab 筆記本中設定下列環境變數,並將 PROJECT_ID 替換為您的專案 ID。
# set project ID and location
PROJECT_ID = "PROJECT_ID"
REGION = "us-central1"
建立 Cloud Storage bucket 來暫存訓練工作:
BUCKET_NAME = f"{PROJECT_ID}-ml-staging"
BUCKET_URI = f"gs://{BUCKET_NAME}"
!gcloud storage buckets create {BUCKET_URI} --location={REGION} --project={PROJECT_ID}
準備訓練資料
在本節中,您將準備用於訓練推論模型的資料。
在 JupyterLab 筆記本中,建立 BigQuery 用戶端:
from google.cloud import bigquery
bq_client = bigquery.Client(project=PROJECT_ID)
從 BigQuery
ml_datasets公開資料集擷取資料:DATA_SOURCE = "bigquery-public-data.ml_datasets.census_adult_income" # Define the SQL query to fetch the dataset query = f""" SELECT * FROM `{DATA_SOURCE}` LIMIT 20000 """ # Download the dataset to a dataframe df = bq_client.query(query).to_dataframe() df.head()使用
sklearn程式庫拆分資料,用於訓練和測試:from sklearn.model_selection import train_test_split # Split the dataset X_train, X_test = train_test_split(df, test_size=0.3, random_state=43) # Print the shapes of train and test sets print(X_train.shape, X_test.shape)將訓練和測試資料架構匯出至暫存值區中的 CSV 檔案:
X_train.to_csv(f"{BUCKET_URI}/train.csv",index=False, quoting=1, quotechar='"')
X_test[[i for i in X_test.columns if i != "income_bracket"]].iloc[:20].to_csv(f"{BUCKET_URI}/test.csv",index=False,quoting=1, quotechar='"')
準備訓練應用程式
在本節中,您將建立及建構 Python 訓練應用程式,並儲存至暫存值區。
在 JupyterLab 筆記本中,為訓練應用程式檔案建立新資料夾:
!mkdir -p training_package/trainer現在 JupyterLab 導覽選單中應該會顯示名為「
training_package」的資料夾。定義特徵、目標、標籤和步驟,以訓練模型並匯出至檔案:
%%writefile training_package/trainer/task.py
from sklearn.ensemble import RandomForestClassifier
from sklearn.feature_selection import SelectKBest
from sklearn.pipeline import FeatureUnion, Pipeline
from sklearn.preprocessing import LabelBinarizer
import pandas as pd
import argparse
import joblib
import os

TARGET = "income_bracket"
# Define the feature columns that you use from the dataset
COLUMNS = (
  "age",
  "workclass",
  "functional_weight",
  "education",
  "education_num",
  "marital_status",
  "occupation",
  "relationship",
  "race",
  "sex",
  "capital_gain",
  "capital_loss",
  "hours_per_week",
  "native_country",
)

# Categorical columns are columns that have string values and
# need to be turned into a numerical value to be used for training
CATEGORICAL_COLUMNS = (
  "workclass",
  "education",
  "marital_status",
  "occupation",
  "relationship",
  "race",
  "sex",
  "native_country",
)

# load the arguments
parser = argparse.ArgumentParser()
parser.add_argument('--training-dir', dest='training_dir', default=os.getenv('AIP_MODEL_DIR'), type=str,help='get the staging directory')
args = parser.parse_args()

# Load the training data
X_train = pd.read_csv(os.path.join(args.training_dir,"train.csv"))
# Remove the column we are trying to predict ('income-level') from our features list
# Convert the Dataframe to a lists of lists
train_features = X_train.drop(TARGET, axis=1).to_numpy().tolist()
# Create our training labels list, convert the Dataframe to a lists of lists
train_labels = X_train[TARGET].to_numpy().tolist()

# Since the census data set has categorical features, we need to convert
# them to numerical values. We'll use a list of pipelines to convert each
# categorical column and then use FeatureUnion to combine them before calling
# the RandomForestClassifier.
categorical_pipelines = []

# Each categorical column needs to be extracted individually and converted to a numerical value.
# To do this, each categorical column will use a pipeline that extracts one feature column via
# SelectKBest(k=1) and a LabelBinarizer() to convert the categorical value to a numerical one.
# A scores array (created below) will select and extract the feature column. The scores array is
# created by iterating over the COLUMNS and checking if it is a CATEGORICAL_COLUMN.
for i, col in enumerate(COLUMNS):
   if col in CATEGORICAL_COLUMNS:
      # Create a scores array to get the individual categorical column.
      # Example:
      #  data = [39, 'State-gov', 77516, 'Bachelors', 13, 'Never-married', 'Adm-clerical',
      #         'Not-in-family', 'White', 'Male', 2174, 0, 40, 'United-States']
      #  scores = [0, 1, 0, 0, 0, 0, 0, 0, 0, 0, 0, 0, 0, 0]
      #
      # Returns: [['Sate-gov']]
      scores = []
      # Build the scores array
      for j in range(len(COLUMNS)):
         if i == j:  # This column is the categorical column we want to extract.
            scores.append(1)  # Set to 1 to select this column
         else:  # Every other column should be ignored.
            scores.append(0)
      skb = SelectKBest(k=1)
      skb.scores_ = scores
      # Convert the categorical column to a numerical value
      lbn = LabelBinarizer()
      r = skb.transform(train_features)
      lbn.fit(r)
      # Create the pipeline to extract the categorical feature
      categorical_pipelines.append(
         (
            "categorical-{}".format(i),
            Pipeline([("SKB-{}".format(i), skb), ("LBN-{}".format(i), lbn)]),
         )
      )

# Create pipeline to extract the numerical features
skb = SelectKBest(k=6)
# From COLUMNS use the features that are numerical
skb.scores_ = [1, 0, 1, 0, 1, 0, 0, 0, 0, 0, 1, 1, 1, 0]
categorical_pipelines.append(("numerical", skb))

# Combine all the features using FeatureUnion
preprocess = FeatureUnion(categorical_pipelines)

# Create the classifier
classifier = RandomForestClassifier()

# Transform the features and fit them to the classifier
classifier.fit(preprocess.transform(train_features), train_labels)

# Create the overall model as a single pipeline
pipeline = Pipeline([("union", preprocess), ("classifier", classifier)])

# Save the model pipeline
joblib.dump(pipeline, os.path.join(args.training_dir,"model.joblib"))
在每個子目錄中建立
__init__.py檔案,將子目錄設為套件:!touch training_package/__init__.py !touch training_package/trainer/__init__.py建立 Python 套件設定指令碼:
%%writefile training_package/setup.py
from setuptools import find_packages
from setuptools import setup

setup(
   name='trainer',
   version='0.1',
   packages=find_packages(),
   include_package_data=True,
   description='Training application package for census income classification.'
)
使用
sdist指令建立訓練應用程式的來源發布版本:!cd training_package && python setup.py sdist --formats=gztar將 Python 套件複製到暫存值區:
!gcloud storage cp training_package/dist/trainer-0.1.tar.gz $BUCKET_URI/確認暫存值區包含三個檔案:
!gcloud storage ls $BUCKET_URI輸出應如下所示:
gs://$BUCKET_NAME/test.csv
gs://$BUCKET_NAME/train.csv
gs://$BUCKET_NAME/trainer-0.1.tar.gz
訓練模型
在本節中,您將建立及執行自訂訓練作業,藉此訓練模型。
在 JupyterLab 筆記本中執行下列指令,建立自訂訓練工作:
!gcloud ai custom-jobs create --display-name=income-classification-training-job \
   --project=$PROJECT_ID \
   --worker-pool-spec=replica-count=1,machine-type='e2-highmem-2',executor-image-uri='us-docker.pkg.dev/vertex-ai/training/sklearn-cpu.1-0:latest',python-module=trainer.task \
   --python-package-uris=$BUCKET_URI/trainer-0.1.tar.gz \
   --args="--training-dir","/gcs/$BUCKET_NAME" \
   --region=$REGION
輸出內容應與下方示例類似。每個自訂工作路徑中的第一個數字是專案編號 (PROJECT_NUMBER),第二個數字是自訂工作 ID (CUSTOM_JOB_ID)。請記下這些數字,以便在下一個步驟中使用。
Using endpoint [https://us-central1-aiplatform.googleapis.com/]
CustomJob [projects/721032480027/locations/us-central1/customJobs/1100328496195960832] is submitted successfully.

Your job is still active. You may view the status of your job with the command

$ gcloud ai custom-jobs describe projects/721032480027/locations/us-central1/customJobs/1100328496195960832

or continue streaming the logs with the command

$ gcloud ai custom-jobs stream-logs projects/721032480027/locations/us-central1/customJobs/1100328496195960832
執行自訂訓練工作,並在工作執行時串流記錄,顯示進度:
!gcloud ai custom-jobs stream-logs projects/PROJECT_NUMBER/locations/us-central1/customJobs/CUSTOM_JOB_ID替換下列值:
- PROJECT_NUMBER:上一個指令輸出內容中的專案編號
- CUSTOM_JOB_ID:上一個指令輸出內容中的自訂工作 ID
自訂訓練工作現正執行中。這項作業大約 10 分鐘才能完成。
工作完成後,您可以從暫存值區將模型匯入 Vertex AI Model Registry。
匯入模型
自訂訓練工作會將訓練好的模型上傳至暫存值區。工作完成後,您可以將模型從值區匯入 Vertex AI Model Registry。
在 JupyterLab 筆記本中,執行下列指令匯入模型:
!gcloud ai models upload --container-image-uri="us-docker.pkg.dev/vertex-ai/prediction/sklearn-cpu.1-2:latest" \
   --display-name=income-classifier-model \
   --artifact-uri=$BUCKET_URI \
   --project=$PROJECT_ID \
   --region=$REGION
列出專案中的 Vertex AI 模型,如下所示:
!gcloud ai models list --region=us-central1輸出內容應如下所示。如果列出兩個以上的模型,清單中的第一個模型就是您最近匯入的模型。
記下「MODEL_ID」MODEL_ID欄中的值。您需要這項資訊才能建立批次推論要求。
Using endpoint [https://us-central1-aiplatform.googleapis.com/]
MODEL_ID             DISPLAY_NAME
1871528219660779520  income-classifier-model
或者,您也可以按照下列方式列出專案中的模型:
在 Google Cloud 控制台的 Vertex AI 部分,前往「Vertex AI Model Registry」頁面。
前往 Vertex AI Model Registry 頁面
如要查看模型的 ID 和其他詳細資料,請按一下模型名稱,然後按一下「版本詳細資料」分頁標籤。
從模型取得批次推論結果
現在可以要求模型進行批次推論。批次推論要求是從 on-prem-client VM 執行個體提出。
建立批次推論要求
在這個步驟中,您會使用 ssh 登入 on-prem-client VM 執行個體。
在 VM 執行個體中,建立名為 request.json 的文字檔,其中包含要傳送至模型的範例 curl 要求酬載,以取得批次推論結果。
在 Cloud Shell 中執行下列指令,並將 PROJECT_ID 替換為您的專案 ID:
projectid=PROJECT_ID
gcloud config set project ${projectid}
使用
ssh登入on-prem-clientVM 執行個體:gcloud compute ssh on-prem-client \ --project=$projectid \ --zone=us-central1-a在
on-prem-clientVM 執行個體中,使用vim或nano等文字編輯器建立名為request.json的新檔案,並包含下列文字:{ "displayName": "income-classification-batch-job", "model": "projects/PROJECT_ID/locations/us-central1/models/MODEL_ID", "inputConfig": { "instancesFormat": "csv", "gcsSource": { "uris": ["BUCKET_URI/test.csv"] } }, "outputConfig": { "predictionsFormat": "jsonl", "gcsDestination": { "outputUriPrefix": "BUCKET_URI" } }, "dedicatedResources": { "machineSpec": { "machineType": "n1-standard-4", "acceleratorCount": "0" }, "startingReplicaCount": 1, "maxReplicaCount": 2 } }替換下列值:
- PROJECT_ID:您的專案 ID
- MODEL_ID:模型的模型 ID
- BUCKET_URI:儲存空間值區的 URI,您已在其中暫存模型
執行下列指令,傳送批次推論要求:
curl -X POST \
   -H "Authorization: Bearer $(gcloud auth print-access-token)" \
   -H "Content-Type: application/json; charset=utf-8" \
   -d @request.json \
   "https://us-central1-aiplatform.googleapis.com/v1/projects/PROJECT_ID/locations/us-central1/batchPredictionJobs"
將 PROJECT_ID 替換為您的專案 ID。
回應中應會顯示下列內容:
"state": "JOB_STATE_PENDING"批次推論工作現在會非同步執行。執行過程大約需要 20 分鐘。
在 Google Cloud 控制台的 Vertex AI 專區中,前往「Batch predictions」(批次預測) 頁面。
批次推論工作執行時,狀態為
Running。完成後,狀態會變更為Finished。按一下批次推論工作名稱 (
income-classification-batch-job),然後按一下詳細資料頁面中的「匯出位置」連結,即可在 Cloud Storage 中查看批次工作的輸出檔案。或者,您也可以點選「上次更新時間」欄和「動作」選單之間的「在 Cloud Storage 中查看預測輸出內容」圖示 。
按一下
prediction.results-00000-of-00002或prediction.results-00001-of-00002檔案連結,然後點選「已通過驗證的網址」連結開啟檔案。批次推論作業的輸出內容應如下列示例:
{"instance": ["27", " Private", "391468", " 11th", "7", " Divorced", " Craft-repair", " Own-child", " White", " Male", "0", "0", "40", " United-States"], "prediction": " <=50K"}
{"instance": ["47", " Self-emp-not-inc", "192755", " HS-grad", "9", " Married-civ-spouse", " Machine-op-inspct", " Wife", " White", " Female", "0", "0", "20", " United-States"], "prediction": " <=50K"}
{"instance": ["32", " Self-emp-not-inc", "84119", " HS-grad", "9", " Married-civ-spouse", " Craft-repair", " Husband", " White", " Male", "0", "0", "45", " United-States"], "prediction": " <=50K"}
{"instance": ["32", " Private", "236543", " 12th", "8", " Divorced", " Protective-serv", " Own-child", " White", " Male", "0", "0", "54", " Mexico"], "prediction": " <=50K"}
{"instance": ["60", " Private", "160625", " HS-grad", "9", " Married-civ-spouse", " Prof-specialty", " Husband", " White", " Male", "5013", "0", "40", " United-States"], "prediction": " <=50K"}
{"instance": ["34", " Local-gov", "22641", " HS-grad", "9", " Never-married", " Protective-serv", " Not-in-family", " Amer-Indian-Eskimo", " Male", "0", "0", "40", " United-States"], "prediction": " <=50K"}
{"instance": ["32", " Private", "178623", " HS-grad", "9", " Never-married", " Other-service", " Not-in-family", " Black", " Female", "0", "0", "40", " ?"], "prediction": " <=50K"}
{"instance": ["28", " Private", "54243", " HS-grad", "9", " Divorced", " Transport-moving", " Not-in-family", " White", " Male", "0", "0", "60", " United-States"], "prediction": " <=50K"}
{"instance": ["29", " Local-gov", "214385", " 11th", "7", " Divorced", " Other-service", " Unmarried", " Black", " Female", "0", "0", "20", " United-States"], "prediction": " <=50K"}
{"instance": ["49", " Self-emp-inc", "213140", " HS-grad", "9", " Married-civ-spouse", " Exec-managerial", " Husband", " White", " Male", "0", "1902", "60", " United-States"], "prediction": " >50K"}