Crea un notebook de Colab Enterprise con la Google Cloud consola
Aprende a crear un notebook de Colab Enterprise y ejecutar su código en un entorno de ejecución predeterminado con la Google Cloud consola. En esta página, también se describe cómo cambiar el nombre, importar y borrar un notebook.
Antes de comenzar
- Sign in to your Google Cloud account. If you're new to Google Cloud, create an account to evaluate how our products perform in real-world scenarios. New customers also get $300 in free credits to run, test, and deploy workloads.
-
In the Google Cloud console, on the project selector page, select or create a Google Cloud project.
Roles required to select or create a project
- Select a project: Selecting a project doesn't require a specific IAM role—you can select any project that you've been granted a role on.
-
Create a project: To create a project, you need the Project Creator
(
roles/resourcemanager.projectCreator), which contains theresourcemanager.projects.createpermission. Learn how to grant roles.
-
Verify that billing is enabled for your Google Cloud project.
-
Enable the Vertex AI, Dataform, and Compute Engine APIs.
Roles required to enable APIs
To enable APIs, you need the Service Usage Admin IAM role (
roles/serviceusage.serviceUsageAdmin), which contains theserviceusage.services.enablepermission. Learn how to grant roles. -
En la Google Cloud consola, ve a la página Mis notebooks de Colab Enterprise.
-
En el menú Región, selecciona la región en la que deseas crear tu notebook.
-
Haz clic en Notebook nuevo.
Vertex AI crea y abre tu notebook.
-
En la Google Cloud consola, ve a la página Mis notebooks de Colab Enterprise.
-
En el menú Región, selecciona la región que contiene el notebook.
-
Haz clic en el notebook que quieras abrir.
-
Mantén el cursor sobre la celda de código que desees ejecutar y, luego, haz clic en el botón Ejecutar celda.
-
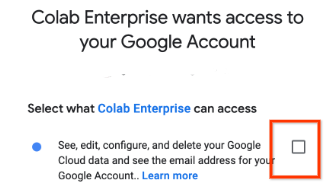
Si es la primera vez que te conectas a un entorno de ejecución con las credenciales de usuario final habilitadas, aparecerá un diálogo de Acceso.
Para otorgar a Colab Enterprise acceso a tus credenciales de usuario, completa los siguientes pasos:
-
En el cuadro de diálogo Acceder, haga clic en su cuenta de usuario.
-
Selecciona Ver, editar, configurar y borrar tus datos de Google Cloud … para otorgar a Colab Enterprise acceso a tus credenciales de usuario.
-
Haz clic en Continuar.
-
-
En la Google Cloud consola, ve a la página Mis notebooks de Colab Enterprise.
-
En el menú Región, selecciona la región que contiene el notebook.
-
Junto al notebook al que deseas cambiarle el nombre, haz clic en el Acciones el menú y, luego, seleccionarCambiar nombre.
-
En el cuadro de diálogo Cambiar nombre de notebook, cambia el nombre del notebook y, luego, haz clic en Cambiar nombre.
-
En la Google Cloud consola, ve a la página Mis notebooks de Colab Enterprise.
-
En el menú Región, selecciona la región en la que deseas importar tu notebook.
-
Haz clic en Importar.
-
En el diálogo Import notebooks, selecciona una Import source.
-
Si seleccionaste:
- Tu computadora: Navega hasta un archivo de notebook y selecciónalo para importarlo.
- Cloud Storage: Navega a un notebook en Cloud Storage y selecciónalo.
- En URL, ingresa la URL del archivo de notebook que deseas importar.
-
Para agregar otro notebook, haz clic en Agregar notebook.
-
Después de agregar los notebooks que deseas importar, haz clic en Importar.
Colab Enterprise importa tus archivos de notebook.
- In the Google Cloud console, go to the Manage resources page.
- In the project list, select the project that you want to delete, and then click Delete.
- In the dialog, type the project ID, and then click Shut down to delete the project.
-
En la Google Cloud consola, ve a la página Mis notebooks de Colab Enterprise.
-
En el menú Región, selecciona la región que contiene el notebook que deseas borrar.
-
Junto al notebook que deseas borrar, haz clic en el menú Acciones y, luego, selecciona Borrar notebook.
-
En el cuadro de diálogo Borrar notebook, haz clic en Confirmar.
Lee la Introducción a Colab Enterprise.
Para encontrar un notebook que te ayude a comenzar tu proyecto rápidamente, consulta la galería de notebooks.
Roles requeridos
Para obtener los permisos que necesitas para crear un notebook de Colab Enterprise y ejecutar el código del notebook en un entorno de ejecución, pídele a tu administrador que te otorgue el rol de IAM de usuario de Colab Enterprise (roles/aiplatform.colabEnterpriseUser) en el proyecto.
Para obtener más información sobre cómo otorgar roles, consulta Administra el acceso a proyectos, carpetas y organizaciones.
También puedes obtener los permisos necesarios a través de roles personalizados o cualquier otro rol predefinido.
Crea un notebook
Para crear un notebook de Colab Enterprise con la Google Cloud consola, haz lo siguiente:Cuando completes las tareas que se describen en este documento, podrás borrar los recursos que creaste para evitar que se te siga facturando. Para obtener más información, consulta Realiza una limpieza.
Ejecuta código en un entorno de ejecución predeterminado
Para ejecutar el código de un notebook de Colab Enterprise en el entorno de ejecución predeterminado, haz lo siguiente:
Después de que se inicie el entorno de ejecución, Colab Enterprise se conectará a él y ejecutará el código en la celda.
Cambia el nombre de tu notebook
Para cambiar el nombre de un notebook de Colab Enterprise, haz lo siguiente:Cómo importar un notebook
Para importar un notebook a Colab Enterprise, haz lo siguiente:Limpia
Sigue estos pasos para evitar que se apliquen cargos a tu cuenta de Google Cloud por los recursos que usaste en esta página.
Para evitar que se apliquen cargos a tu Google Cloud cuenta por los recursos usados en este instructivo, borra el proyecto que contiene los recursos o conserva el proyecto y borra los recursos individuales.