Mantieni tutto organizzato con le raccolte
Salva e classifica i contenuti in base alle tue preferenze.
Salvataggio di un blocco note in GitHub
Per eseguire il backup dell'istanza di blocchi note gestiti dall'utente e renderla disponibile
ad altri, salva i contenuti dell'istanza di blocchi note gestiti dall'utente
su GitHub.
Creare un repository GitHub
Se non hai già un repository GitHub, devi crearne uno.
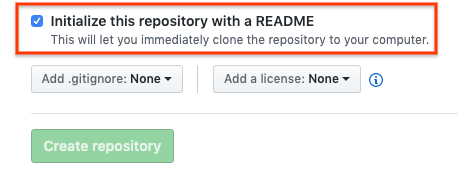
Quando crei il repository GitHub, assicurati che possa essere clonato selezionando la casella di controllo Inizializza questo repository con un file README.
Clona il repository GitHub nell'istanza di blocchi note gestiti dall'utente
Per clonare il repository GitHub nell'istanza di blocchi note gestiti dall'utente, completa i seguenti passaggi:
Nel repository GitHub, fai clic sul pulsante Code (Codice)
e poi sulla scheda Local (Locale).
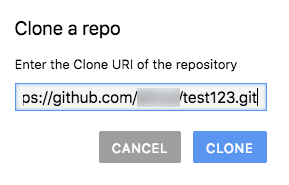
Copia l'URL HTTPS.
Nella console Google Cloud , vai alla pagina Notebook gestiti dall'utente.
Aggiungere i file di cui è stato eseguito il commit al repository GitHub
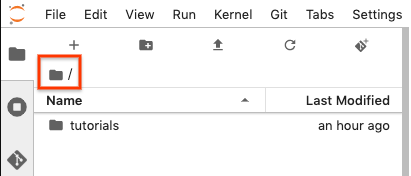
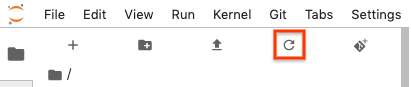
L'istanza di blocchi note gestiti dall'utente mostra il repository
come nuova cartella. Se non
vedi il repository GitHub clonato come cartella, fai clic sul pulsante Aggiorna elenco
file.
Fai doppio clic sulla cartella del repository per aprirla.
Aggiungi un nuovo notebook all'istanza di blocchi note gestiti dall'utente.
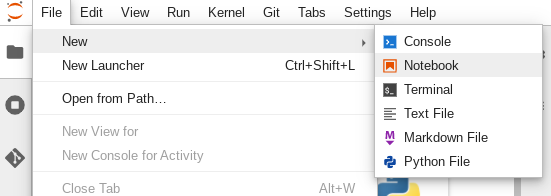
Per aggiungere un file del blocco note, puoi utilizzare il menu o Avvio app.
Menu
Per aggiungere un nuovo file del blocco note dal menu, seleziona
File > Nuovo > Blocco note.
Nella finestra di dialogo Seleziona kernel, seleziona il kernel per il nuovo
notebook, ad esempio Python 3, quindi fai clic su Seleziona.
Si apre il nuovo file del notebook.
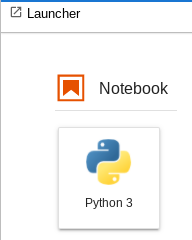
Launcher
Per aggiungere un nuovo file di blocco note da Avvio app, seleziona
File > Nuovo > Avvio app.
Fai clic sul riquadro del kernel che vuoi utilizzare.
Si apre il nuovo file del notebook.
Rinomina il nuovo file del notebook.
Menu
Seleziona File > Rinomina blocco note. Viene visualizzata la finestra di dialogo
Rinomina file.
Nel campo Nuovo nome, modifica Untitled.ipynb con un nome
significativo, ad esempio install.ipynb.
Fai clic su Rinomina.
Launcher
Fai clic con il tasto destro del mouse sulla scheda Untitled.ipynb e poi fai clic su
Rinomina blocco note. Viene visualizzata la finestra di dialogo Rinomina file.
Nel campo Nuovo nome, modifica Untitled.ipynb con un nome
significativo, ad esempio install.ipynb.
Fai clic su Rinomina.
Seleziona la scheda Git. Il nuovo notebook è elencato nel raggruppamento Non monitorati.
Per aggiungere il nuovo notebook come file per il repository GitHub, fai clic con il tasto destro del mouse
sul nuovo notebook e seleziona Monitora. Nella scheda Git, il notebook
viene ora aggiunto al raggruppamento In staging.
Per eseguire il commit del nuovo blocco note nel repository GitHub, nella scheda Git,
aggiungi un commento al commit e fai clic su Commit.
Per aprire una finestra del terminale Git, seleziona
Git > Apri repository Git nel terminale.
Nella finestra del terminale Git, inserisci il comando git push.
Se utilizzi un nome utente e una password GitHub, quando ti viene richiesto, inserisci il tuo
nome utente e la password GitHub.
[[["Facile da capire","easyToUnderstand","thumb-up"],["Il problema è stato risolto","solvedMyProblem","thumb-up"],["Altra","otherUp","thumb-up"]],[["Difficile da capire","hardToUnderstand","thumb-down"],["Informazioni o codice di esempio errati","incorrectInformationOrSampleCode","thumb-down"],["Mancano le informazioni o gli esempi di cui ho bisogno","missingTheInformationSamplesINeed","thumb-down"],["Problema di traduzione","translationIssue","thumb-down"],["Altra","otherDown","thumb-down"]],["Ultimo aggiornamento 2025-09-04 UTC."],[],[],null,["# Save a notebook to GitHub\n=========================\n\n\n| Vertex AI Workbench user-managed notebooks is\n| [deprecated](/vertex-ai/docs/deprecations). On\n| April 14, 2025, support for\n| user-managed notebooks will end and the ability to create user-managed notebooks instances\n| will be removed. Existing instances will continue to function\n| but patches, updates, and upgrades won't be available. To continue using\n| Vertex AI Workbench, we recommend that you\n| [migrate\n| your user-managed notebooks instances to Vertex AI Workbench instances](/vertex-ai/docs/workbench/user-managed/migrate-to-instances).\n\n\u003cbr /\u003e\n\nTo back up your user-managed notebooks instance and make it available\nto others, save the contents of your user-managed notebooks instance\nto GitHub.\n\nCreate a GitHub repository\n--------------------------\n\nIf you don't already have a [GitHub](https://github.com/) repository, you must create one.\n\nWhen you create your GitHub repository make sure that your GitHub repository\ncan be cloned by selecting the **Initialize this repository with a README**\ncheckbox.\n\nClone your GitHub repository in your user-managed notebooks instance\n--------------------------------------------------------------------\n\nTo clone your GitHub repository in your user-managed notebooks\ninstance, complete the following steps:\n\n1. In your GitHub repository, click the **Code** button,\n and then click the **Local** tab.\n\n2. Copy the **HTTPS** URL.\n\n3. In the Google Cloud console, go to the **User-managed notebooks** page.\n\n [Go to User-managed notebooks](https://console.cloud.google.com/vertex-ai/workbench/user-managed)\n4. Click **Open JupyterLab** to open\n your user-managed notebooks instance.\n\n5. In the JupyterLab\n folder **File Browser**, select\n the folder where you want to clone the GitHub repository. For example,\n the home folder.\n\n6. In JupyterLab, select\n **Git \\\u003e Clone a Repository**.\n\n7. If prompted, enter your credentials.\n\n - If you use a GitHub username and password, enter your\n GitHub username and password.\n\n - If you use two-factor authentication with GitHub,\n create and use a [personal access token](https://help.github.com/en/articles/creating-a-personal-access-token-for-the-command-line).\n\n8. In the **Clone a repo** dialog, paste the HTTPS URL for your GitHub repository.\n\n9. Click **Clone**.\n\nConfigure your user-managed notebooks instance with your GitHub user information\n--------------------------------------------------------------------------------\n\n1. In JupyterLab, select\n **Git \\\u003e Open Git Repository in Terminal**\n to open a Git terminal window.\n\n2. In the Git terminal window, enter the following commands to configure\n your Git username and email:\n\n ```scdoc\n git config --global user.name \"YOUR_NAME\"\n git config --global user.email \"YOUR_EMAIL\"\n ```\n3. If your GitHub account requires SSH authentication, complete\n the following steps to connect your account:\n\n 1. From your Git terminal in your user-managed notebooks\n instance, follow GitHub's\n [instructions for generating a new SSH key](https://help.github.com/en/github/authenticating-to-github/generating-a-new-ssh-key-and-adding-it-to-the-ssh-agent).\n\n 2. Follow the\n [instructions for adding that SSH key to your GitHub\n account](https://help.github.com/en/github/authenticating-to-github/adding-a-new-ssh-key-to-your-github-account).\n\n4. Close the Git terminal window.\n\nAdd your committed files to your GitHub repository\n--------------------------------------------------\n\n1. Your user-managed notebooks instance shows your repository\n as a new folder. If you don't\n see your cloned GitHub repository as a folder, click the **Refresh File\n List** button.\n\n2. Double-click your repository folder to open it.\n\n3. Add a new notebook to your user-managed notebooks instance.\n\n To add a notebook file, you can use the menu or the Launcher. \n\n ### Menu\n\n 1. To add a new notebook file from the menu, select\n **File \\\u003e New \\\u003e Notebook**.\n\n 2. In the **Select kernel** dialog, select the kernel for your new\n notebook, for example, **Python 3** , and then click **Select**.\n\n Your new notebook file opens.\n\n ### Launcher\n\n 1. To add a new notebook file from the Launcher, select\n **File \\\u003e New \\\u003e Launcher**.\n\n 2. Click the tile for the kernel you want to use.\n\n Your new notebook file opens.\n4. Rename your new notebook file.\n\n ### Menu\n\n 1. Select **File \\\u003e Rename notebook** . The\n **Rename file** dialog opens.\n\n 2. In the **New name** field, change `Untitled.ipynb` to something\n meaningful, such as `install.ipynb`.\n\n 3. Click **Rename**.\n\n ### Launcher\n\n 1. Right-click the `Untitled.ipynb` tab and then click\n **Rename notebook** . The **Rename file** dialog opens.\n\n 2. In the **New name** field, change `Untitled.ipynb` to something\n meaningful, such as `install.ipynb`.\n\n 3. Click **Rename**.\n\n5. Select the **Git** tab. Your new notebook is listed in the **Untracked**\n grouping.\n\n6. To add the new notebook as a file for your GitHub repository, right-click\n the new notebook and select **Track** . On the **Git** tab, your notebook\n is now added to the **Staged** grouping.\n\n7. To commit your new notebook to your GitHub repository, on the **Git** tab,\n add a commit comment and click **Commit**.\n\n8. To open a Git terminal window, select\n **Git \\\u003e Open Git repository in terminal**.\n\n9. In the Git terminal window, enter the `git push` command.\n\n - If you use a GitHub username and password, when prompted, enter your\n GitHub username and password.\n\n - If you use two-factor authentication with GitHub,\n [create a personal access token](https://help.github.com/en/articles/creating-a-personal-access-token-for-the-command-line)\n to use.\n\n When the `git push` command completes, your committed files are in\n your GitHub repository."]]