Pengantar
Panduan pemula ini memperkenalkan AutoML. Untuk memahami perbedaan utama antara pelatihan kustom dan AutoML, lihat Memilih metode pelatihan.
Mendorong imajinasi:
- Anda bekerja di departemen pemasaran untuk retailer digital.
- Anda sedang mengerjakan project arsitektur yang mengidentifikasi jenis bangunan.
- Bisnis Anda memiliki formulir kontak di situsnya.
Menyeleksi gambar dan tabel secara manual membosankan dan memakan waktu. Melatih komputer untuk mengidentifikasi dan menandai konten secara otomatis.
Gambar
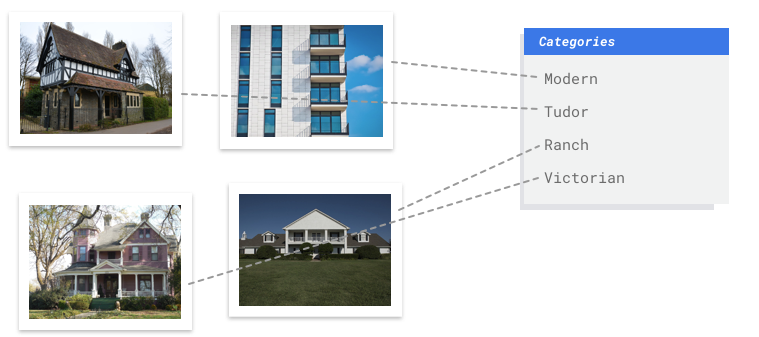
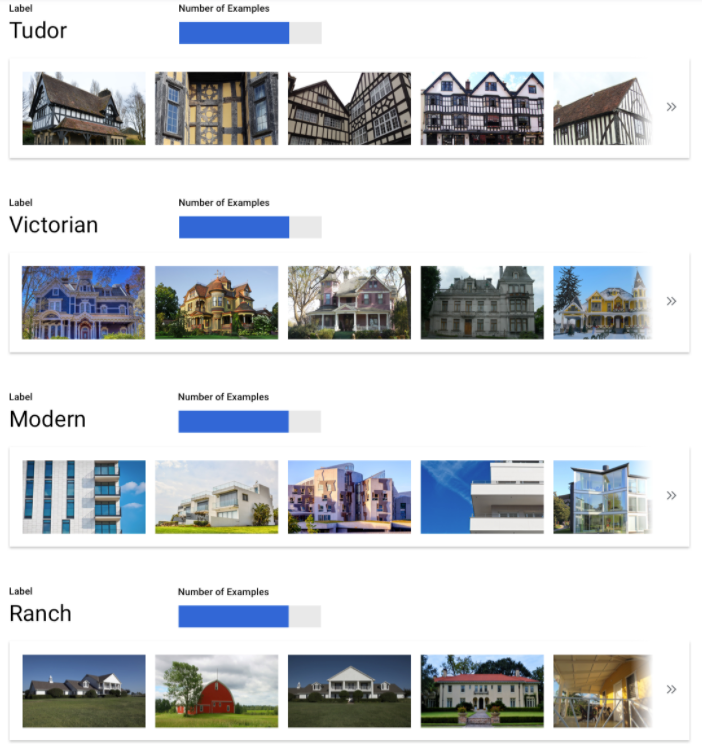
Anda bekerja dengan dewan pelestarian arsitektur yang mencoba mengidentifikasi
kawasan yang memiliki gaya arsitektur yang konsisten di kota Anda. Anda memiliki ratusan ribu snapshot rumah untuk disaring. Namun, cara ini merepotkan dan rentan error saat
mencoba mengategorikan semua gambar ini secara manual. Seorang pekerja magang memberi label beberapa ratus gambar beberapa bulan yang lalu, tetapi tidak ada orang lain yang pernah melihat data tersebut. Akan sangat berguna jika Anda bisa mengajari
komputer Anda untuk melakukan tinjauan ini untuk Anda!
Berbentuk tabel
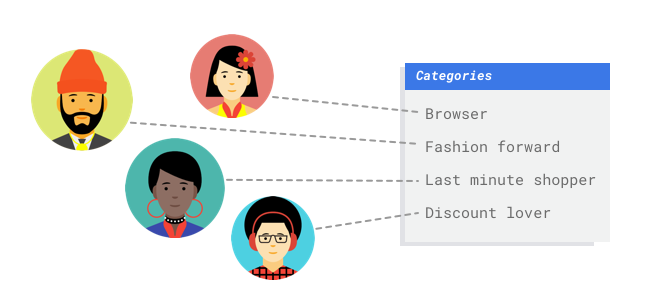
Anda bekerja di departemen pemasaran untuk retailer digital. Anda dan tim Anda membuat program email yang dipersonalisasi berdasarkan persona pelanggan. Anda telah membuat persona dan email pemasaran siap digunakan. Sekarang, Anda harus membuat sistem yang menggabungkan pelanggan ke setiap persona berdasarkan preferensi retail dan perilaku belanja, bahkan ketika mereka adalah pelanggan baru. Untuk memaksimalkan customer engagement, sebaiknya Anda juga memprediksi kebiasaan pengeluaran mereka agar dapat mengoptimalkan kapan akan mengirimkan email kepada mereka.
Karena Anda adalah retailer digital, Anda memiliki data tentang pelanggan dan pembelian yang telah mereka lakukan. Namun, bagaimana dengan pelanggan baru? Pendekatan tradisional dapat menghitung nilai ini untuk pelanggan lama dengan histori pembelian yang panjang, tetapi tidak memberikan hasil yang baik untuk pelanggan yang memiliki sedikit data historis. Bagaimana jika Anda dapat membuat sistem untuk memprediksi nilai-nilai ini dan meningkatkan kecepatan dalam menyampaikan program pemasaran yang dipersonalisasi kepada semua pelanggan Anda?
Untungnya, machine learning dan Vertex AI siap mengatasi masalah ini.
Panduan ini akan menuntun Anda memahami cara kerja Vertex AI untuk set data dan model AutoML, serta menggambarkan jenis masalah yang dipecahkan oleh Vertex AI.
Catatan tentang keadilan
Google berkomitmen untuk membuat kemajuan dalam mengikuti praktik AI yang bertanggung jawab. Untuk mencapai hal ini, produk ML kami, termasuk AutoML, dirancang berdasarkan prinsip-prinsip inti seperti keadilan dan machine learning yang berpusat pada manusia. Untuk mengetahui informasi selengkapnya tentang praktik terbaik guna memitigasi bias saat membangun sistem ML Anda sendiri, lihat Panduan ML inklusif - AutoML
Mengapa Vertex AI adalah alat yang tepat untuk masalah ini?
Pemrograman klasik mengharuskan programmer menentukan petunjuk langkah demi langkah yang harus diikuti komputer. Ada begitu banyak variasi warna, sudut, resolusi, dan pencahayaan sehingga diperlukan coding yang terlalu banyak aturan untuk memberi tahu mesin cara membuat keputusan yang benar. Sulit untuk membayangkan di mana Anda akan memulai. Atau, komentar pelanggan menggunakan kosakata dan struktur yang luas dan beragam, serta terlalu beragam untuk dipahami oleh sekumpulan aturan sederhana. Jika mencoba membuat filter manual, Anda akan langsung menyadari bahwa Anda tidak dapat mengategorikan sebagian besar komentar pelanggan. Anda memerlukan sistem yang dapat melakukan generalisasi terhadap berbagai komentar. Dalam skenario ketika urutan aturan tertentu terikat untuk diperluas secara eksponensial, Anda memerlukan sistem yang dapat belajar dari contoh.
Untungnya, machine learning dapat mengatasi masalah ini.
Bagaimana cara kerja Vertex AI?
Vertex AI melibatkan tugas pembelajaran yang diawasi untuk mencapai hasil yang dipilih. Detail algoritma dan metode pelatihan berubah berdasarkan jenis data dan kasus penggunaan. Ada banyak subkategori machine learning, yang semuanya dapat memecahkan masalah yang berbeda dan bekerja dalam batasan yang berbeda.
Gambar
Anda akan melatih, menguji, dan memvalidasi model machine learning dengan gambar contoh yang dianotasikan dengan label untuk klasifikasi, atau dianotasi dengan label dan kotak pembatas untuk deteksi objek. Dengan pembelajaran yang diawasi, Anda dapat melatih model untuk mengenali pola dan konten yang penting bagi Anda dalam gambar.
Berbentuk tabel
Anda akan melatih model machine learning dengan contoh data. Vertex AI
menggunakan data tabulasi (terstruktur) untuk melatih model machine learning guna membuat
inferensi pada data baru. Satu kolom dari set data Anda, yang disebut target,
adalah hal yang akan dipelajari oleh model Anda untuk diprediksi. Beberapa kolom data lainnya merupakan inpu
(yang disebut fitur) yang polanya akan dipelajari oleh model. Anda dapat
menggunakan fitur input yang sama untuk membuat beberapa jenis model cukup dengan mengubah
kolom target dan opsi pelatihan. Dari contoh pemasaran melalui email, hal ini berarti bahwa Anda dapat membuat model dengan fitur input yang sama tetapi dengan inferensi target yang berbeda. Satu model dapat memprediksi persona pelanggan
(target kategoris), model lainnya dapat memprediksi pengeluaran bulanan mereka
(target numerik), dan model lainnya dapat memperkirakan permintaan harian produk Anda
selama tiga bulan ke depan (serangkaian target numerik).
Alur kerja Vertex AI
Vertex AI menggunakan alur kerja machine learning standar:
- Mengumpulkan data: Tentukan data yang diperlukan untuk melatih dan menguji model Anda berdasarkan hasil yang ingin dicapai.
- Menyiapkan data: Pastikan data Anda diformat dan diberi label dengan benar.
- Melatih: Menetapkan parameter dan membuat model.
- Mengevaluasi: Meninjau metrik model.
- Men-deploy dan memprediksi: Membuat model Anda tersedia untuk digunakan.
Persiapan Data
Namun, sebelum mulai mengumpulkan data, pikirkan masalah yang ingin Anda pecahkan. Proses ini akan menginformasikan persyaratan data Anda.
Menilai kasus penggunaan Anda
Mulailah dengan masalah Anda: Apa hasil yang ingin Anda capai?
Gambar
Saat menyusun set data, selalu mulailah dengan kasus penggunaan. Anda dapat mulai dengan pertanyaan-pertanyaan berikut:
- Apa hasil yang ingin Anda capai?
- Jenis kategori atau objek apa yang perlu Anda kenali untuk mencapai hasil ini?
- Mungkinkah manusia mengenali kategori-kategori tersebut? Meskipun Vertex AI dapat menangani kategori yang lebih besar daripada yang dapat diingat dan ditetapkan manusia pada satu waktu, jika manusia tidak dapat mengenali kategori tertentu, maka Vertex AI juga akan mengalami kesulitan.
- Jenis contoh apa yang paling mencerminkan jenis dan rentang data yang akan dilihat sistem Anda dan dicoba untuk diklasifikasikan?
Berbentuk tabel
Jenis data apa yang merupakan kolom target? Berapa banyak data yang dapat Anda akses? Bergantung pada jawaban Anda, Vertex AI membuat model yang diperlukan untuk menyelesaikan kasus penggunaan Anda:
- Model klasifikasi biner memprediksi hasil biner (salah satu dari dua kelas). Gunakan metode ini untuk pertanyaan ya atau tidak, misalnya, memprediksi apakah pelanggan akan membeli langganan (atau tidak). Semua hal lainnya tetap sama, masalah klasifikasi biner memerlukan lebih sedikit data dibandingkan jenis model lainnya.
- Model klasifikasi kelas jamak memprediksi satu kelas dari tiga atau lebih kelas terpisah. Gunakan ini untuk mengategorikan berbagai hal. Untuk contoh retail, Anda ingin membangun model klasifikasi multi-kelas untuk menyegmentasikan pelanggan ke dalam persona yang berbeda.
- Model perkiraan memprediksi urutan nilai. Misalnya, sebagai retailer, Anda mungkin ingin memperkirakan permintaan harian produk selama 3 bulan ke depan, sehingga Anda dapat menyediakan inventaris produk dengan tepat di awal.
- Model regresi memprediksi nilai berkelanjutan. Untuk contoh retail, Anda ingin membangun model regresi untuk memprediksi jumlah yang akan dibelanjakan pelanggan bulan depan.
Mengumpulkan data
Setelah menetapkan kasus penggunaan, kumpulkan data yang memungkinkan Anda membuat model yang diinginkan.
Gambar
 Setelah menentukan data yang diperlukan, Anda harus menemukan cara untuk mendapatkannya. Anda dapat
memulai dengan mempertimbangkan semua data yang dikumpulkan organisasi Anda. Anda mungkin mendapati bahwa Anda sudah mengumpulkan data relevan yang diperlukan untuk melatih model. Jika tidak memiliki data tersebut, Anda dapat memperolehnya secara manual atau melakukan outsourcing ke penyedia pihak ketiga.
Setelah menentukan data yang diperlukan, Anda harus menemukan cara untuk mendapatkannya. Anda dapat
memulai dengan mempertimbangkan semua data yang dikumpulkan organisasi Anda. Anda mungkin mendapati bahwa Anda sudah mengumpulkan data relevan yang diperlukan untuk melatih model. Jika tidak memiliki data tersebut, Anda dapat memperolehnya secara manual atau melakukan outsourcing ke penyedia pihak ketiga.
Sertakan contoh berlabel secukupnya untuk setiap kategori
 Jumlah minimum yang diperlukan oleh Vertex AI Training adalah 100 contoh gambar per kategori/label untuk klasifikasi.
Kemungkinan keberhasilan pengenalan label akan meningkat dengan banyaknya contoh berkualitas tinggi untuk setiap label; secara umum, makin banyak data berlabel yang dapat dibawa ke proses pelatihan, makin baik model Anda. Targetkan minimal 1.000 contoh per label.
Jumlah minimum yang diperlukan oleh Vertex AI Training adalah 100 contoh gambar per kategori/label untuk klasifikasi.
Kemungkinan keberhasilan pengenalan label akan meningkat dengan banyaknya contoh berkualitas tinggi untuk setiap label; secara umum, makin banyak data berlabel yang dapat dibawa ke proses pelatihan, makin baik model Anda. Targetkan minimal 1.000 contoh per label.
Distribusikan contoh secara merata di seluruh kategori
Penting untuk menangkap jumlah contoh pelatihan yang kurang lebih sama untuk setiap kategori. Meskipun Anda memiliki banyak data untuk satu label, sebaiknya
lakukan distribusi yang setara untuk setiap label. Untuk mengetahui alasannya, bayangkan 80% gambar yang Anda gunakan untuk membuat model adalah gambar rumah satu keluarga dengan gaya modern. Dengan distribusi label yang tidak seimbang, model Anda sangat mungkin untuk mengetahui bahwa aman untuk selalu memberi tahu Anda bahwa foto adalah rumah modern satu keluarga, daripada mencoba memprediksi label yang jauh lebih jarang digunakan.
Ini seperti menulis ujian pilihan ganda yang hampir semua jawaban yang benar adalah "C". Peserta ujian yang cerdas akan mengetahui bahwa jawabannya selalu "C" tanpa harus melihat pertanyaannya.
Kami memahami bahwa mungkin tidak selalu dapat menemukan jumlah contoh yang kurang lebih sama untuk setiap label. Contoh berkualitas tinggi dan bebas bias untuk beberapa kategori mungkin lebih sulit diperoleh. Dalam situasi tersebut, ikuti aturan praktis ini: Label dengan jumlah contoh terendah harus memiliki setidaknya 10% contoh dibandingkan label dengan jumlah contoh tertinggi. Jadi, jika label terbanyak memiliki 10.000 contoh, label terkecil harus memiliki minimal 1.000 contoh.
Tangkap variasi di ruang masalah Anda
Untuk alasan yang sama, cobalah untuk memastikan bahwa data Anda menangkap
variasi dan keberagaman di ruang masalah Anda. Semakin luas pemilihan yang dapat dilihat oleh proses pelatihan model, semakin mudah
hal tersebut akan digeneralisasi ke contoh baru. Misalnya, jika Anda mencoba mengklasifikasikan foto barang elektronik konsumen ke dalam
beberapa kategori, semakin luas variasi barang elektronik konsumen yang diekspos oleh model
dalam pelatihan, semakin besar kemungkinannya untuk dapat membedakannya antara model baru tablet, ponsel, atau laptop, meskipun belum pernah melihat model spesifik
tersebut sebelumnya.

Mencocokkan data dengan output yang diinginkan untuk model Anda

Temukan gambar yang secara visual mirip dengan gambar yang ingin Anda buat inferensinya. Jika Anda mencoba mengklasifikasikan gambar rumah yang semuanya diambil pada cuaca musim dingin yang bersalju, Anda mungkin tidak akan
mendapatkan performa yang bagus dari model yang dilatih hanya pada gambar rumah yang diambil pada cuaca cerah
walaupun Anda telah menandainya dengan kelas yang Anda minati, karena perbedaan pencahayaan dan pemandangan
dapat memengaruhi performa. Idealnya, contoh pelatihan Anda adalah data dunia nyata yang diambil dari set data yang sama dengan model yang Anda rencanakan untuk digunakan dalam klasifikasi.
Berbentuk tabel
Setelah menetapkan kasus penggunaan, Anda harus mengumpulkan data untuk melatih model.
Pengambilan dan persiapan data adalah langkah penting untuk membangun model machine learning.
Data yang Anda miliki menginformasikan jenis masalah yang dapat Anda pecahkan. Berapa banyak data
yang Anda miliki? Apakah data Anda relevan dengan pertanyaan yang Anda coba jawab? Saat
mengumpulkan data Anda, perhatikan pertimbangan utama berikut.
Memilih fitur yang relevan
Fitur adalah atribut input yang digunakan untuk pelatihan model. Fitur adalah cara model Anda mengidentifikasi pola untuk membuat inferensi, sehingga harus relevan dengan masalah Anda. Misalnya, untuk membuat model yang memprediksi apakah transaksi kartu kredit bersifat menipu atau tidak, Anda harus membuat set data yang berisi detail transaksi seperti pembeli, penjual, jumlah, tanggal dan waktu, serta item yang dibeli. Fitur bermanfaat lainnya dapat berupa informasi historis tentang pembeli dan penjual, serta seberapa sering item yang dibeli terlibat dalam penipuan. Fitur lain apa yang mungkin relevan?
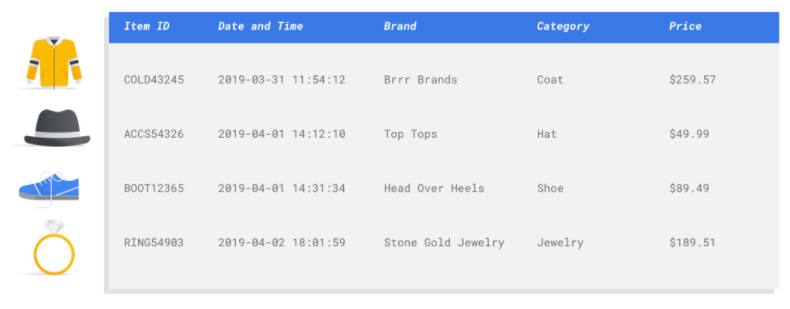
Pertimbangkan kasus penggunaan pemasaran melalui email ritel dari pengantar. Berikut beberapa kolom fitur yang mungkin Anda perlukan:
- Daftar item yang dibeli (termasuk merek, kategori, harga, diskon)
- Jumlah item yang dibeli (hari, minggu, bulan, tahun terakhir)
- Jumlah uang yang dibelanjakan (hari, minggu, bulan, tahun terakhir)
- Untuk setiap item, jumlah total yang terjual setiap hari
- Untuk setiap item, total stok tersedia setiap hari
- Apakah Anda menjalankan promosi untuk hari tertentu atau tidak
- Profil demografi pembeli yang diketahui
Menyertakan data yang cukup
Secara umum, makin banyak contoh pelatihan yang Anda miliki, makin baik hasilnya. Jumlah contoh data
yang diperlukan juga diskalakan dengan kompleksitas masalah yang Anda coba pecahkan. Anda tidak akan
memerlukan banyak data untuk mendapatkan model klasifikasi biner yang akurat dibandingkan dengan model
kelas jamak karena lebih mudah untuk memprediksi satu kelas dari dua kelas dibandingkan banyak kelas.
Tidak ada formula yang sempurna, tetapi ada batas minimum yang disarankan untuk data contoh:
- Masalah Klasifikasi: 50 baris x jumlah angka
- Masalah perkiraan:
- 5.000 baris x jumlah fitur
- 10 nilai unik di kolom ID deret waktu x jumlah fitur
- Masalah regresi: 200 x jumlah fitur
Menangkap variasi
Set data Anda harus menangkap keragaman ruang masalah Anda. Makin beragam contoh yang dilihat model selama pelatihan, makin mudah model tersebut digeneralisasi ke contoh baru atau yang kurang umum. Bayangkan jika model retail Anda hanya dilatih menggunakan data pembelian dari musim dingin. Apakah ia bisa memprediksi preferensi pakaian musim panas atau perilaku pembelian dengan sukses?
Menyiapkan data
Gambar
 Setelah memutuskan strategi yang tepat untuk Anda—pemisahan manual atau default—Anda dapat menambahkan data di
Vertex AI menggunakan salah satu metode berikut:
Setelah memutuskan strategi yang tepat untuk Anda—pemisahan manual atau default—Anda dapat menambahkan data di
Vertex AI menggunakan salah satu metode berikut:
- Anda dapat mengimpor data dari komputer atau dari Cloud Storage dalam format yang tersedia (CSV atau JSON Lines) dengan label (dan kotak pembatas, jika perlu) secara inline. Untuk informasi selengkapnya tentang format file impor, lihat Menyiapkan data pelatihan Anda. Jika ingin membagi set data secara manual, Anda dapat menentukan pemisahannya dalam file impor CSV atau JSON Lines.
- Jika data belum dianotasi, Anda dapat mengupload gambar tidak berlabel dan menggunakan Google Cloud konsol untuk menerapkan anotasi. Anda dapat mengelola anotasi ini dalam beberapa kumpulan anotasi untuk kumpulan gambar yang sama. Misalnya, untuk satu kumpulan gambar, Anda dapat memiliki satu anotasi yang ditetapkan dengan kotak pembatas dan informasi label untuk melakukan deteksi objek, dan juga membuat anotasi lain yang ditetapkan hanya dengan anotasi label untuk klasifikasi.
Berbentuk tabel
Setelah mengidentifikasi data yang tersedia, Anda harus memastikan data tersebut siap untuk pelatihan.
Jika data Anda bias atau berisi nilai yang tidak ada atau salah, hal ini akan memengaruhi
kualitas model. Pertimbangkan hal berikut sebelum Anda mulai melatih model.
Pelajari lebih lanjut.
Mencegah kebocoran data dan diferensiasi performa pelatihan dan penayangan
Kebocoran data adalah saat Anda menggunakan fitur input selama pelatihan yang "membocorkan" informasi tentang target yang ingin Anda prediksi yang tidak tersedia ketika model benar-benar disalurkan. Hal ini dapat dideteksi jika fitur yang sangat berkorelasi dengan kolom target disertakan sebagai salah satu fitur input. Misalnya, jika Anda membuat model untuk memprediksi apakah pelanggan akan mendaftar untuk berlangganan di bulan depan atau tidak, dan salah satu fitur input adalah pembayaran langganan mendatang dari pelanggan tersebut. Hal ini dapat menghasilkan performa model yang kuat selama pengujian, tetapi tidak saat di-deploy dalam produksi, karena informasi pembayaran langganan pada masa mendatang tidak tersedia pada waktu inferensi.
Diferensiasi performa pelatihan dan penayangan adalah ketika fitur input yang digunakan selama waktu pelatihan berbeda dengan yang diberikan ke model pada waktu inferensi, sehingga menyebabkan kualitas model yang buruk dalam produksi. Misalnya, membangun model untuk memprediksi suhu setiap jam, tetapi melatih dengan data yang hanya berisi suhu mingguan. Contoh lain: selalu mencantumkan nilai siswa dalam data pelatihan saat memprediksi siswa yang putus sekolah, tetapi tidak memberikan informasi ini pada waktu inferensi.
Memahami data pelatihan sangat penting untuk mencegah kebocoran data dan diferensiasi performa pelatihan dan penayangan:
- Sebelum menggunakan data apa pun, pastikan Anda mengetahui arti data dan apakah Anda harus menggunakannya sebagai fitur atau tidak
- Periksa korelasi di tab Train. Korelasi yang tinggi harus ditandai untuk ditinjau.
- Diferensiasi performa pelatihan dan penayangan: pastikan Anda hanya menyediakan fitur input ke model yang tersedia dalam bentuk yang sama persis pada waktu inferensi.
Membersihkan data yang hilang, tidak lengkap, dan tidak konsisten
Sangat umum untuk memiliki nilai yang hilang dan tidak akurat dalam contoh data Anda. Luangkan waktu untuk meninjau dan, jika memungkinkan, tingkatkan kualitas data Anda sebelum menggunakannya untuk pelatihan. Makin banyak nilai yang hilang, makin kurang berguna data Anda untuk melatih model machine learning.
- Periksa data Anda untuk menemukan nilai yang tidak ada dan perbaiki jika memungkinkan, atau kosongkan nilai jika kolom disetel ke nullable. Vertex AI dapat menangani nilai yang tidak ada, tetapi Anda cenderung akan mendapatkan hasil optimal jika semua nilai tersedia.
- Untuk mendapatkan perkiraan, periksa apakah interval di antara baris pelatihan sudah konsisten. Vertex AI dapat menyiratkan nilai yang tidak ada, tetapi Anda cenderung akan mendapatkan hasil optimal jika semua baris tersedia.
- Bersihkan data Anda dengan memperbaiki atau menghapus error atau derau data. Buat data Anda konsisten: Tinjau ejaan, singkatan, dan format.
Menganalisis data setelah mengimpor
Vertex AI memberikan ringkasan set data Anda setelah diimpor. Tinjau set data yang Anda impor untuk memastikan setiap kolom memiliki jenis variabel yang benar. Vertex AI akan otomatis mendeteksi jenis variabel berdasarkan nilai kolom, tetapi sebaiknya tinjau setiap kolom. Anda juga harus meninjau nullability setiap kolom, yang menentukan apakah kolom dapat memiliki nilai yang hilang atau NULL.
Latih model
Gambar
Pertimbangkan cara Vertex AI menggunakan set data Anda dalam membuat model kustom
Set data Anda berisi set pelatihan, validasi, dan pengujian. Jika pemisahan tidak ditentukan (lihat Menyiapkan data), Vertex AI akan otomatis menggunakan 80% gambar Anda untuk pelatihan,
10% untuk validasi, dan 10% untuk pengujian
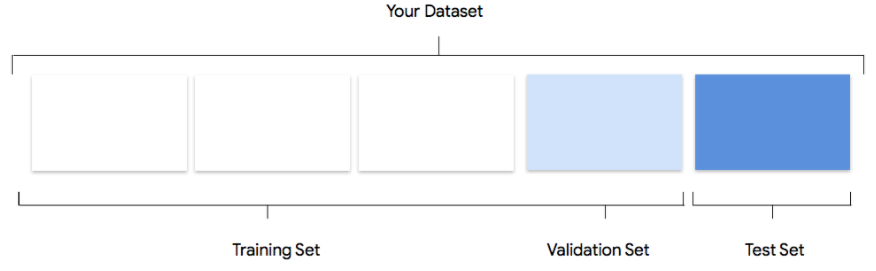
Set Pelatihan
 Sebagian besar data Anda harus berada dalam set pelatihan. Data ini adalah data yang "dilihat"
oleh model Anda selama pelatihan: data yang digunakan untuk mempelajari parameter model,
yaitu bobot koneksi antara node jaringan neural.
Sebagian besar data Anda harus berada dalam set pelatihan. Data ini adalah data yang "dilihat"
oleh model Anda selama pelatihan: data yang digunakan untuk mempelajari parameter model,
yaitu bobot koneksi antara node jaringan neural.
Set Validasi
 Set validasi, terkadang juga disebut dengan set "dev", juga digunakan selama proses pelatihan.
Setelah framework pembelajaran model menggabungkan data pelatihan selama setiap
iterasi proses pelatihan, framework tersebut akan menggunakan performa model pada
validasi yang ditetapkan untuk menyesuaikan hyperparameter model, yang merupakan variabel yang menentukan struktur model. Jika Anda mencoba menggunakan set pelatihan
untuk menyesuaikan hyperparameter, kemungkinan besar model akan terlalu fokus pada data pelatihan Anda,
dan mengalami kesulitan untuk menggeneralisasi contoh yang tidak cocok dengannya.
Menggunakan set data yang agak baru untuk menyesuaikan struktur model akan membuat model Anda digeneralisasi dengan lebih
baik.
Set validasi, terkadang juga disebut dengan set "dev", juga digunakan selama proses pelatihan.
Setelah framework pembelajaran model menggabungkan data pelatihan selama setiap
iterasi proses pelatihan, framework tersebut akan menggunakan performa model pada
validasi yang ditetapkan untuk menyesuaikan hyperparameter model, yang merupakan variabel yang menentukan struktur model. Jika Anda mencoba menggunakan set pelatihan
untuk menyesuaikan hyperparameter, kemungkinan besar model akan terlalu fokus pada data pelatihan Anda,
dan mengalami kesulitan untuk menggeneralisasi contoh yang tidak cocok dengannya.
Menggunakan set data yang agak baru untuk menyesuaikan struktur model akan membuat model Anda digeneralisasi dengan lebih
baik.
Set Pengujian
 Set pengujian tidak terlibat dalam proses pelatihan sama sekali. Setelah model
menyelesaikan pelatihan sepenuhnya, kami menggunakan set pengujian sebagai tantangan yang benar-benar baru untuk model Anda. Performa model
Anda di set pengujian dimaksudkan untuk memberi Anda gambaran yang cukup tentang performa model Anda pada data dunia nyata.
Set pengujian tidak terlibat dalam proses pelatihan sama sekali. Setelah model
menyelesaikan pelatihan sepenuhnya, kami menggunakan set pengujian sebagai tantangan yang benar-benar baru untuk model Anda. Performa model
Anda di set pengujian dimaksudkan untuk memberi Anda gambaran yang cukup tentang performa model Anda pada data dunia nyata.
Pembagian manual
 Anda juga dapat membagi set data sendiri. Membagi data secara manual merupakan
pilihan tepat jika Anda ingin menerapkan kontrol yang lebih besar atas prosesnya atau jika ada contoh tertentu yang Anda yakin ingin disertakan
pada bagian tertentu dari siklus proses pelatihan model Anda singkat ini.
Anda juga dapat membagi set data sendiri. Membagi data secara manual merupakan
pilihan tepat jika Anda ingin menerapkan kontrol yang lebih besar atas prosesnya atau jika ada contoh tertentu yang Anda yakin ingin disertakan
pada bagian tertentu dari siklus proses pelatihan model Anda singkat ini.
Berbentuk tabel
Setelah set data Anda diimpor, langkah berikutnya adalah melatih model. Vertex AI akan menghasilkan model machine learning yang andal dengan default pelatihan, tetapi Anda dapat menyesuaikan beberapa parameter berdasarkan kasus penggunaan Anda.
Coba pilih sebanyak mungkin kolom fitur untuk pelatihan, tetapi tinjau setiap kolom untuk memastikan kesesuaiannya untuk pelatihan. Perhatikan hal-hal berikut untuk pemilihan fitur:
- Jangan pilih kolom fitur yang akan menimbulkan derau, seperti kolom ID yang ditetapkan secara acak dengan nilai unik untuk setiap baris.
- Pastikan Anda memahami setiap kolom fitur dan nilainya.
- Jika Anda membuat beberapa model dari satu set data, hapus kolom target yang bukan bagian dari masalah inferensi saat ini.
- Ingat kembali prinsip-prinsip keadilan: Apakah Anda melatih model dengan fitur yang dapat menyebabkan pengambilan keputusan yang bias atau tidak adil untuk kelompok marginal?
Cara Vertex AI menggunakan set data
Set data Anda akan dibagi menjadi set pelatihan, validasi, dan pengujian. Vertex AI
pembagian default berlaku bergantung pada jenis model yang
Anda latih. Anda juga dapat menentukan pembagian (pembagian secara manual) jika
diperlukan. Untuk mengetahui informasi selengkapnya, lihat Tentang pembagian data untuk model
AutoML.
Set Pelatihan
Sebagian besar data Anda harus berada dalam set pelatihan. Data ini adalah data yang "dilihat"
oleh model Anda selama pelatihan: data yang digunakan untuk mempelajari parameter model,
yaitu bobot koneksi antara node jaringan neural.
Set Validasi
Set validasi, terkadang juga disebut dengan set "dev", juga digunakan selama proses pelatihan.
Setelah framework pembelajaran model menggabungkan data pelatihan selama setiap
iterasi proses pelatihan, framework tersebut akan menggunakan performa model pada
validasi yang ditetapkan untuk menyesuaikan hyperparameter model, yang merupakan variabel yang menentukan struktur model. Jika Anda mencoba menggunakan set pelatihan
untuk menyesuaikan hyperparameter, kemungkinan besar model akan terlalu fokus pada data pelatihan Anda,
dan mengalami kesulitan untuk menggeneralisasi contoh yang tidak cocok dengannya.
Menggunakan set data yang agak baru untuk menyesuaikan struktur model akan membuat model Anda digeneralisasi dengan lebih
baik.
Set Pengujian
Set pengujian tidak terlibat dalam proses pelatihan sama sekali. Setelah model menyelesaikan
pelatihan sepenuhnya, Vertex AI menggunakan set pengujian sebagai tantangan yang benar-benar baru untuk model Anda.
Performa model di set pengujian dimaksudkan untuk memberi Anda gambaran yang cukup baik
tentang performa model Anda pada data dunia nyata.
Mengevaluasi, menguji, dan men-deploy model
Mengevaluasi model
Gambar
Setelah model dilatih, Anda akan menerima ringkasan performa model tersebut. Klik evaluasi atau lihat evaluasi lengkap untuk melihat analisis yang mendetail.
 Proses debug model lebih berfokus pada proses debug data daripada model itu sendiri. Jika pada suatu saat model Anda
mulai bertindak secara tidak terduga saat Anda mengevaluasi performanya sebelum dan sesudah
dikirim ke produksi, Anda harus kembali dan memeriksa data untuk mengevaluasi
area yang dapat ditingkatkan.
Proses debug model lebih berfokus pada proses debug data daripada model itu sendiri. Jika pada suatu saat model Anda
mulai bertindak secara tidak terduga saat Anda mengevaluasi performanya sebelum dan sesudah
dikirim ke produksi, Anda harus kembali dan memeriksa data untuk mengevaluasi
area yang dapat ditingkatkan.
Jenis analisis apa yang dapat saya lakukan di Vertex AI?
Di bagian evaluasi Vertex AI, Anda dapat menilai performa model kustom menggunakan output model pada contoh pengujian, dan metrik machine learning yang umum. Di bagian ini, kita akan membahas arti dari masing-masing konsep ini.
- Output model
- Nilai minimum skor
- Positif benar, negatif benar, positif palsu, dan negatif palsu
- Presisi dan perolehan
- Kurva presisi/perolehan
- Presisi rata-rata
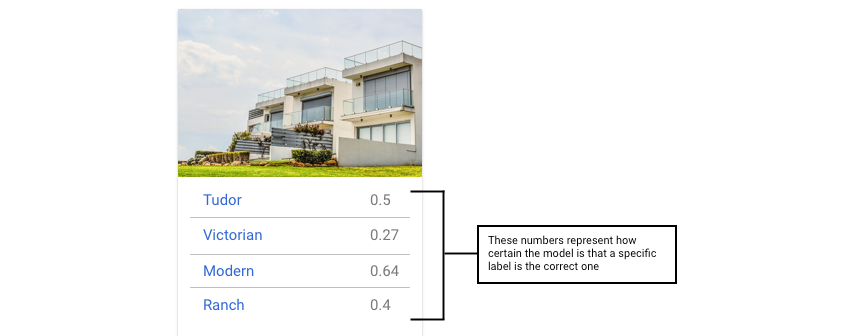
Bagaimana cara menafsirkan output model?
Vertex AI mengambil contoh dari data pengujian Anda untuk menyajikan tantangan yang benar-benar baru bagi
model Anda. Untuk setiap contoh, model menghasilkan serangkaian angka yang menyatakan
seberapa kuat pengaitan setiap label dengan contoh tersebut. Jika angkanya tinggi, model memiliki keyakinan tinggi
bahwa label harus diterapkan ke dokumen tersebut.
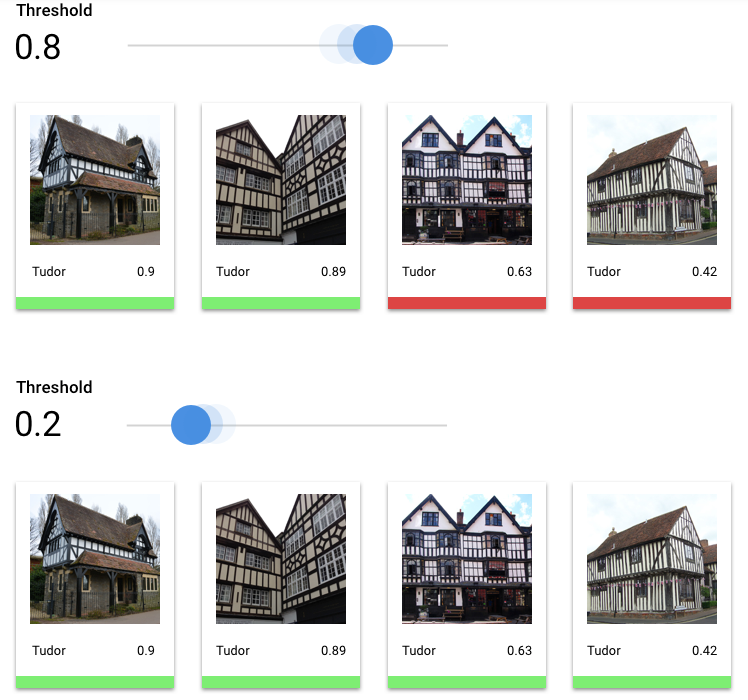
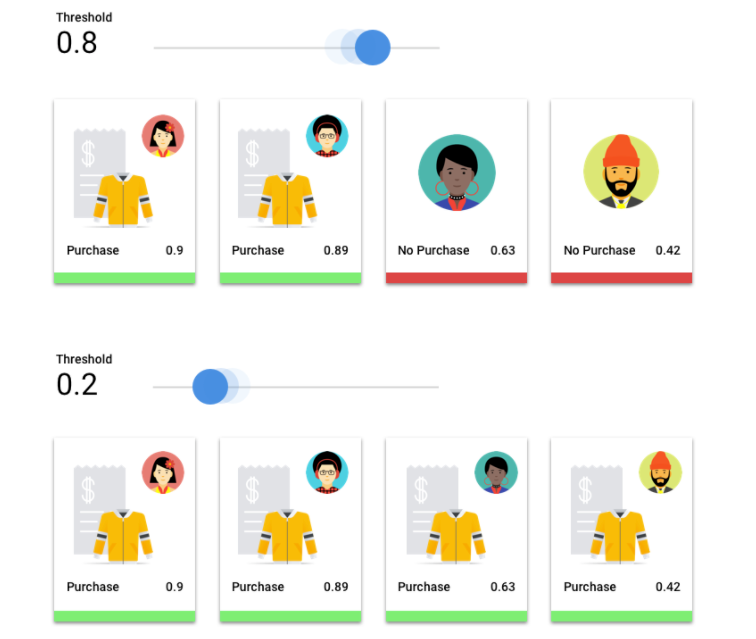
Berapa Nilai Minimum Skor?
Kita dapat mengonversi probabilitas ini menjadi nilai biner 'aktif'/'nonaktif' dengan menetapkan ambang batas skor.
Nilai minimum skor mengacu pada tingkat keyakinan yang harus dimiliki model untuk
menetapkan kategori pada item pengujian. Penggeser nilai minimum skor di konsol Google Cloud adalah alat visual untuk menguji
efek nilai minimum yang berbeda untuk semua kategori dan kategori individual dalam set data Anda.
Jika nilai minimum skor rendah, model Anda akan mengklasifikasi lebih banyak gambar, tetapi berisiko
salah mengklasifikasikan beberapa gambar dalam prosesnya. Jika nilai minimum skor tinggi,
model Anda akan mengklasifikasikan lebih sedikit gambar, tetapi berisiko lebih rendah dalam mengklasifikasikan gambar. Anda dapat mengubah nilai minimum per kategori di konsol Google Cloud untuk bereksperimen. Namun, saat menggunakan model Anda dalam
produksi, Anda harus menerapkan batas yang menurut Anda optimal.
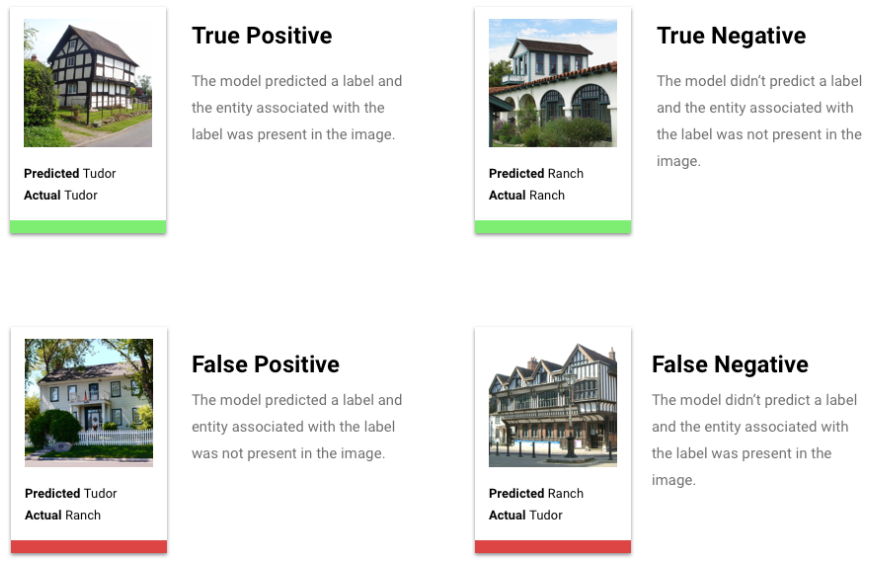
Apa itu Positif Benar, Negatif Benar, Positif Palsu, Negatif Palsu?
Setelah menerapkan nilai minimum skor, inferensi yang dibuat oleh model Anda akan termasuk dalam salah satu dari empat kategori berikut:
Nilai minimum yang menurut Anda optimal di pihak Anda.
Kami dapat menggunakan kategori ini untuk menghitung presisi dan perolehan — metrik yang membantu kami mengukur efektivitas model kami.
Apa yang dimaksud dengan presisi dan perolehan?
Presisi dan perolehan membantu kita memahami seberapa baik model kita menangkap informasi,
dan seberapa banyak sisanya. Presisi memberi tahu kita, dari semua contoh pengujian yang diberi label, berapa banyak yang sebenarnya
seharusnya dikategorikan dengan label tersebut. Perolehan memberi tahu kita, dari semua contoh
pengujian yang seharusnya memiliki label ditetapkan, berapa banyak yang benar-benar diberi label.
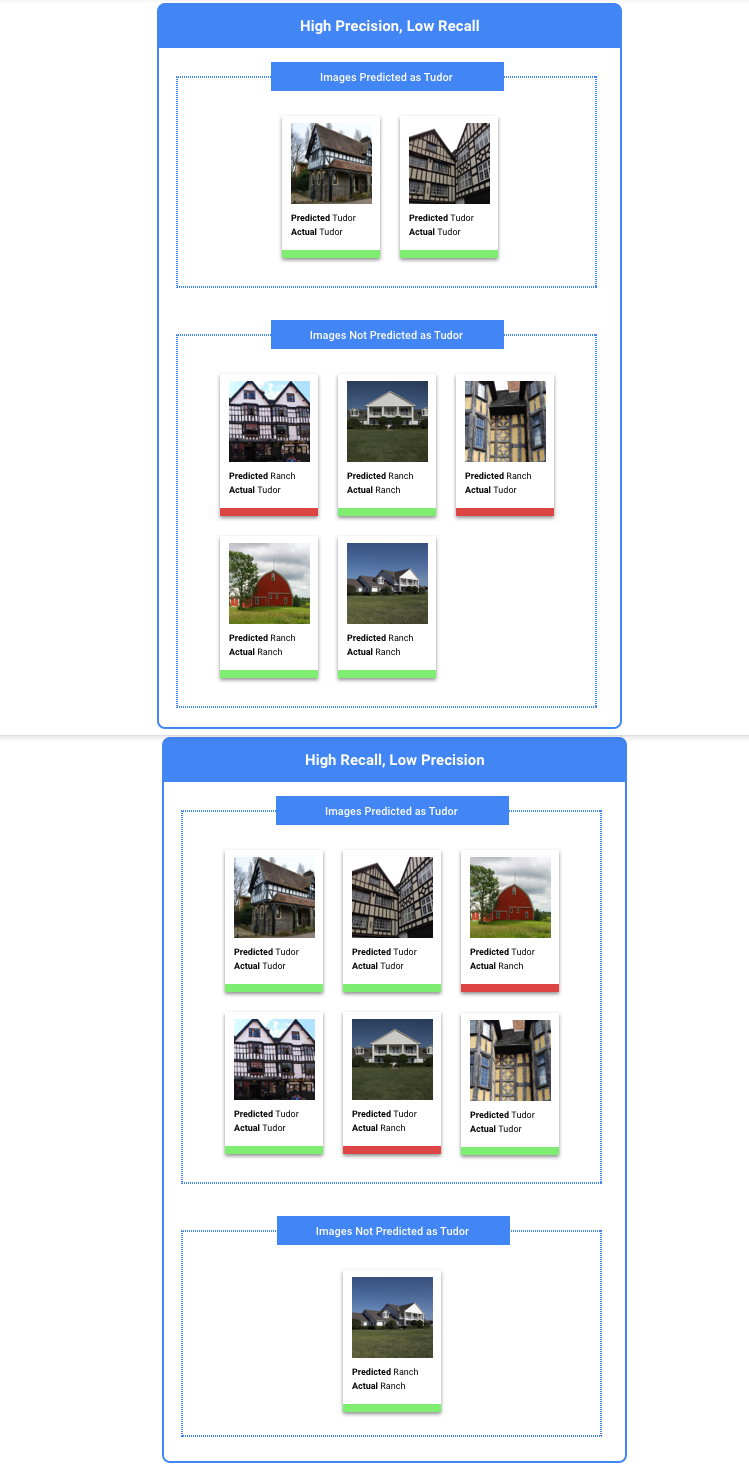
Apakah saya harus mengoptimalkan presisi atau perolehan?
Bergantung pada kasus penggunaan, sebaiknya optimalkan presisi atau perolehan. Pertimbangkan dua kasus penggunaan berikut saat memutuskan pendekatan mana yang paling cocok untuk Anda.
Kasus Penggunaan: Privasi dalam gambar
Misalnya Anda ingin membuat sistem yang otomatis mendeteksi informasi sensitif dan memburamkannya.

Positif palsu dalam kasus ini adalah, hal-hal yang tidak perlu diburamkan yang kemudian diburamkan,
yang dapat mengganggu tetapi tidak merugikan.

Negatif palsu dalam kasus ini adalah hal-hal yang perlu diburamkan dan gagal diburamkan, seperti kartu kredit, yang dapat menyebabkan pencurian identitas.
Dalam hal ini, sebaiknya optimalkan perolehan. Metrik ini mengukur berapa banyak yang diabaikan untuk semua inferensi yang dibuat. Model perolehan yang tinggi cenderung memberi label pada contoh yang sedikit relevan. Hal ini berguna untuk kasus saat kategori Anda memiliki sedikit data pelatihan.
Kasus penggunaan: Penelusuran foto stok
Misalnya, Anda ingin membuat sistem yang menemukan foto stok terbaik untuk kata kunci tertentu.

Positif palsu dalam kasus ini adalah menampilkan gambar yang tidak relevan. Karena produk Anda dikenal hanya menampilkan gambar yang paling cocok, hal ini akan menjadi kegagalan besar.

Negatif palsu dalam kasus ini adalah kegagalan menampilkan gambar yang relevan untuk penelusuran kata kunci. Karena banyak istilah penelusuran memiliki ribuan foto dengan potensial kecocokan, hal ini tidak masalah.
Dalam hal ini, Anda perlu mengoptimalkan presisi. Metrik ini mengukur seberapa benar inferensi yang dibuat untuk semua inferensi tersebut. Model presisi tinggi cenderung hanya memberi label pada contoh yang paling relevan, yang berguna ketika kelas Anda sudah umum dalam data pelatihan.
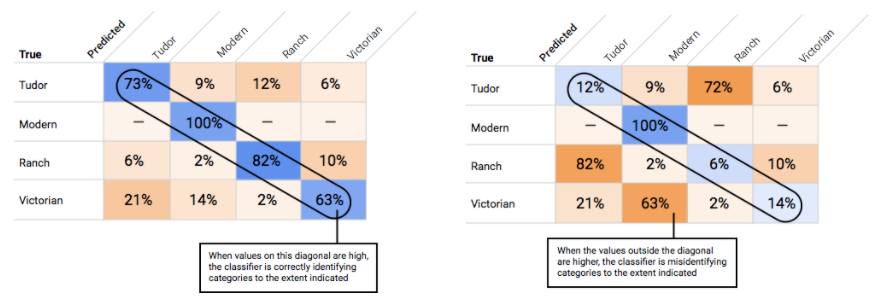
Bagaimana cara menggunakan Matriks Konfusi?
Bagaimana cara menafsirkan kurva presisi-perolehan?
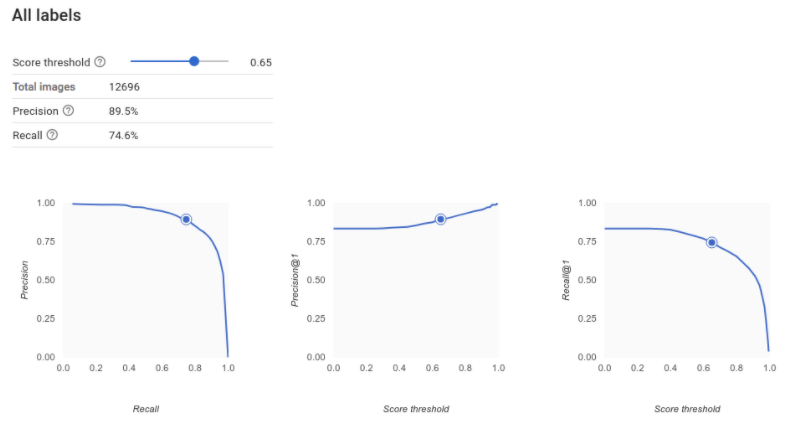
Alat nilai minimum skor dapat Anda gunakan untuk mempelajari pengaruh nilai minimum skor yang dipilih terhadap
presisi dan perolehan. Saat menarik penggeser pada batang nilai minimum skor, Anda dapat melihat
posisi nilai minimum tersebut pada kurva keseimbangan presisi-perolehan,
serta pengaruhnya terhadap presisi dan perolehan secara terpisah (untuk model multikelas, pada grafik ini, presisi
dan perolehan berarti satu-satunya label yang digunakan untuk menghitung metrik presisi dan perolehan adalah
label dengan skor teratas dalam kumpulan label yang ditampilkan). Hal ini dapat membantu Anda menemukan keseimbangan yang baik antara
positif palsu dan negatif palsu.
Setelah memilih nilai minimum yang tampaknya dapat diterima untuk model Anda secara keseluruhan, klik setiap label dan lihat posisi batas tersebut pada kurva presisi-presisi per label. Dalam beberapa kasus, ini mungkin berarti Anda mendapatkan banyak inferensi yang salah untuk beberapa label, yang dapat membantu Anda memutuskan untuk memilih nilai minimum per kelas yang disesuaikan untuk label tersebut. Misalnya, Anda melihat set data rumah dan memperhatikan bahwa nilai minimum 0,5 memiliki presisi dan perolehan yang wajar untuk setiap jenis gambar kecuali "Tudor", mungkin karena itu adalah kategori yang sangat umum. Untuk kategori ini, Anda melihat banyak sekali positif palsu. Dalam hal ini, Anda mungkin memutuskan untuk menggunakan nilai minimum 0,8 hanya untuk "Tudor" saat memanggil pengklasifikasi untuk inferensi.
Apa yang dimaksud dengan presisi rata-rata?
Metrik yang berguna untuk akurasi model adalah area di bawah kurva presisi-perolehan. Kurva ini mengukur seberapa baik performa model Anda di semua nilai minimum skor. Di Vertex AI, metrik ini disebut Presisi Rata-Rata. Makin mendekati 1,0 skor ini, makin baik performa model Anda pada set pengujian; model yang menebak secara acak untuk setiap label akan mendapatkan presisi rata-rata sekitar 0,5.
Berbentuk tabel
Setelah pelatihan model selesai, Anda akan menerima ringkasan performanya. Metrik evaluasi model didasarkan
pada performa model terhadap sebagian set data Anda (set data pengujian). Ada beberapa
metrik dan konsep utama yang perlu dipertimbangkan saat menentukan apakah model Anda siap digunakan
dengan data sebenarnya.
Metrik klasifikasi
Nilai minimum skor
Pertimbangkan model machine learning yang memprediksi apakah pelanggan akan membeli jaket
pada tahun depan. Seberapa yakin model sebelum memprediksi bahwa pelanggan tertentu akan membeli
jaket? Dalam model klasifikasi, setiap inferensi diberi skor keyakinan – penilaian numerik untuk
kepastian model bahwa kelas yang diprediksi benar. Nilai minimum skor adalah
angka yang menentukan kapan skor tertentu dikonversi menjadi keputusan ya atau tidak; yaitu,
nilai saat model Anda mengatakan "ya, skor keyakinan ini cukup tinggi untuk menyimpulkan bahwa
pelanggan ini akan membeli mantel pada tahun depan.
Jika nilai minimum skor rendah, model Anda akan berisiko salah klasifikasi. Oleh karena itu, nilai minimum skor harus didasarkan pada kasus penggunaan tertentu.
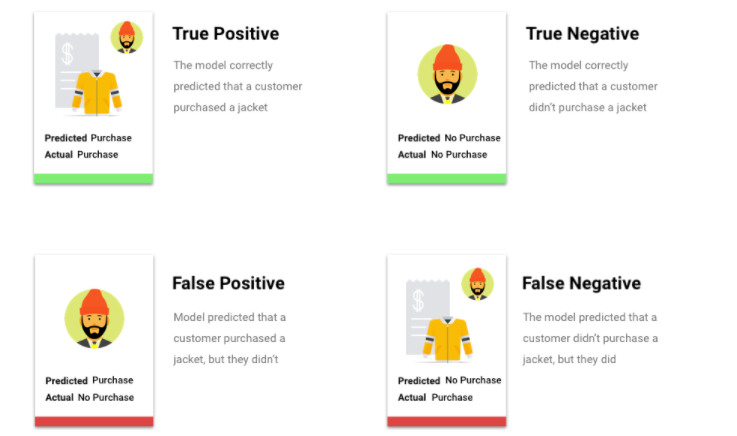
Hasil inferensi
Setelah menerapkan nilai minimum skor, inferensi yang dibuat oleh model Anda akan termasuk dalam salah satu dari empat kategori. Untuk memahami kategori-kategori ini, bayangkan kembali model klasifikasi biner jaket. Dalam contoh ini, kelas positif (yang ingin diprediksi oleh model) adalah pelanggan akan membeli jaket pada tahun depan.
- Positif benar: Model memprediksi kelas positif dengan benar. Model ini memprediksi dengan benar bahwa pelanggan membeli jaket.
- Positif palsu: Model salah memprediksi kelas positif. Model ini memprediksi bahwa pelanggan membeli jaket, tetapi mereka tidak membelinya.
- Negatif benar: Model memprediksi kelas negatif dengan benar. Model ini memprediksi dengan benar bahwa pelanggan tidak membeli jaket.
- Negatif palsu: Model salah memprediksi kelas negatif. Model tersebut memprediksi bahwa pelanggan tidak membeli jaket, tetapi mereka membelinya.
Presisi dan perolehan
Metrik presisi dan perolehan membantu Anda memahami seberapa baik model Anda menangkap informasi dan apa yang terlewatkan. Pelajari lebih lanjut presisi dan perolehan.
- Presisi adalah bagian dari inferensi positif yang benar. Dari semua inferensi pembelian pelanggan, berapa bagian yang merupakan pembelian sebenarnya?
- Perolehan adalah bagian baris dengan label ini yang diprediksi dengan benar oleh model. Dari semua pembelian pelanggan yang dapat diidentifikasi, berapa bagiannya?
Bergantung pada kasus penggunaan, Anda mungkin perlu mengoptimalkan presisi atau perolehan.
Metrik klasifikasi lainnya
- ABK PR: Area di bawah kurva presisi-perolehan (PR). Rentangnya dari nol hingga satu, dengan nilai yang lebih tinggi menunjukkan model yang berkualitas lebih tinggi.
- ABK ROC: Area di bawah kurva karakteristik operasi penerima (ROC). Rentangnya dari nol hingga satu, dengan nilai yang lebih tinggi menunjukkan model yang berkualitas lebih tinggi.
- Akurasi: Bagian inferensi klasifikasi yang dihasilkan oleh model yang benar.
- Kerugian log: Entropi silang antara inferensi model dan nilai target. Rentangnya dari nol hingga tak terbatas, di mana nilai yang lebih rendah menunjukkan model yang berkualitas lebih tinggi.
- Skor F1: Rata-rata harmonis presisi dan perolehan. F1 adalah metrik yang berguna jika Anda mencari keseimbangan antara presisi dan perolehan, serta terdapat distribusi kelas yang tidak merata.
Metrik regresi dan perkiraan
Setelah model Anda dibuat, Vertex AI menyediakan berbagai metrik standar untuk Anda tinjau. Tidak ada jawaban yang sempurna tentang cara mengevaluasi model Anda; pertimbangkan metrik evaluasi dalam konteks jenis masalah dan hal yang ingin dicapai dengan model Anda. Daftar berikut adalah ringkasan beberapa metrik yang dapat diberikan oleh Vertex AI.
Rata-rata error absolut (MAE)
MAE adalah perbedaan absolut rata-rata antara nilai target dan prediksi. Ini mengukur besaran rata-rata error--perbedaan antara target dan nilai yang diprediksi--dalam serangkaian inferensi. Dan karena menggunakan nilai absolut, MAE tidak mempertimbangkan arah hubungan, maupun menunjukkan performa buruk atau performa berlebih. Saat mengevaluasi MAE, nilai yang lebih kecil menunjukkan model dengan kualitas lebih tinggi (0 mewakili prediktor sempurna).
Galat akar rataan kuadrat (GARK)
GARK adalah akar kuadrat dari rata-rata perbedaan kuadrat antara nilai target dan prediksi. GARK lebih sensitif terhadap pencilan daripada MAE, jadi jika Anda khawatir dengan error yang besar, GARK dapat menjadi metrik yang lebih berguna untuk dievaluasi. Serupa dengan MAE, nilai yang lebih kecil menunjukkan model dengan kualitas lebih tinggi (0 mewakili prediktor sempurna).
Rata-rata error logaritmik kuadrat (RMSLE)
RMSLE adalah GARK dalam skala logaritmik. RMSLE lebih sensitif terhadap error relatif daripada error absolut dan lebih sensitif terhadap performa buruk daripada performa berlebih.
Kuantil yang diamati (hanya perkiraan)
Untuk kuantil target tertentu, kuantil yang diamati menunjukkan bagian sebenarnya dari nilai yang diamati di bawah nilai inferensi kuantil yang ditentukan. Kuantil yang diamati menunjukkan seberapa jauh atau dekat model dengan kuantil target. Perbedaan yang lebih kecil di antara kedua nilai tersebut menunjukkan model yang berkualitas lebih tinggi.
Kerugian pinball dalam skala besar (khusus perkiraan)
Mengukur kualitas model pada kuantil target tertentu. Angka yang lebih rendah menunjukkan model yang berkualitas lebih tinggi. Anda dapat membandingkan metrik kerugian pinball yang diskalakan pada kuantil berbeda untuk menentukan akurasi relatif model Anda di antara kuantil yang berbeda tersebut.
Uji model Anda
Gambar
Vertex AI menggunakan 10% data Anda secara otomatis (atau, jika Anda memilih pembagian data sendiri, berapa pun persentase yang Anda pilih untuk digunakan) untuk menguji model, dan halaman "Evaluate" akan memberi tahu Anda yang dilakukan model pada data uji tersebut. Namun, jika Anda ingin memeriksa keyakinan model, ada beberapa cara untuk melakukannya. Cara termudah adalah mengupload beberapa gambar di halaman "Deploy & menguji", dan melihat label yang dipilih model untuk contoh Anda. Semoga label sesuai dengan harapan Anda. Coba beberapa contoh dari setiap jenis gambar yang ingin Anda terima.
Jika Anda ingin menggunakan model dalam pengujian otomatis Anda sendiri, halaman "Deploy & test" juga memberi tahu cara melakukan panggilan ke model secara terprogram.
Berbentuk tabel
Evaluasi metrik model pada dasarnya adalah cara menentukan apakah model Anda siap di-deploy atau tidak, tetapi Anda juga dapat mengujinya dengan data baru. Upload data baru untuk melihat apakah inferensi model cocok dengan harapan Anda. Berdasarkan metrik evaluasi atau pengujian dengan data baru, Anda mungkin perlu terus meningkatkan performa model.
Deploy model Anda
Gambar
Setelah puas dengan performa model Anda, kini saatnya menggunakan model tersebut. Mungkin itu berarti penggunaan skala produksi, atau mungkin permintaan inferensi satu kali. Bergantung pada kasus penggunaan, Anda dapat menggunakan model dengan berbagai cara.
Inferensi batch
Inferensi batch berguna untuk membuat banyak permintaan inferensi sekaligus. Inferensi batch bersifat asinkron, artinya model akan menunggu hingga memproses semua permintaan inferensi sebelum menampilkan file JSON Lines dengan nilai inferensi.
Inferensi online
Deploy model Anda agar tersedia untuk permintaan inferensi menggunakan REST API. Inferensi online bersifat sinkron (real-time), artinya inferensi akan menampilkan hasil inferensi dengan cepat, tetapi hanya menerima satu permintaan inferensi per panggilan API. Inferensi online berguna jika model Anda adalah bagian dari aplikasi dan bagian dari sistem Anda bergantung pada penyelesaian inferensi yang cepat.
Berbentuk tabel
Setelah puas dengan performa model Anda, kini saatnya menggunakan model tersebut. Anda dapat menggunakannya untuk penggunaan skala produksi, atau permintaan inferensi satu kali. Bergantung pada kasus penggunaan, Anda dapat menggunakan model dengan berbagai cara.
Inferensi batch
Inferensi batch berguna untuk membuat banyak permintaan inferensi sekaligus. Inferensi batch bersifat asinkron, artinya model akan menunggu hingga semua permintaan inferensi diproses sebelum menampilkan file CSV atau Tabel BigQuery dengan nilai inferensi.
Inferensi online
Deploy model Anda agar tersedia untuk permintaan inferensi menggunakan REST API. Inferensi online bersifat sinkron (real-time), artinya inferensi akan menampilkan inferensi dengan cepat, tetapi hanya menerima satu permintaan inferensi per panggilan API. Inferensi online berguna jika model Anda merupakan bagian dari aplikasi dan bagian dari sistem Anda bergantung pada penyelesaian inferensi yang cepat.
Pembersihan
Untuk membantu menghindari tagihan yang tidak diinginkan, batalkan deployment model Anda saat tidak digunakan.
Setelah selesai menggunakan model, hapus resource yang dibuat untuk menghindari timbulnya biaya yang tidak diinginkan pada akun Anda.