Mengelola fitur melalui metadata
Halaman ini menjelaskan cara mengelola beberapa fitur instance Vertex AI Workbench dengan mengubah pasangan nilai kunci metadata instance.
Kunci metadata
Untuk mengetahui informasi tentang fitur dan kunci metadatanya masing-masing, lihat tabel berikut.
| Fitur | Deskripsi | Kunci metadata | Nilai dan default yang diterima |
|---|---|---|---|
| Mengaktifkan Cloud Storage FUSE pada image container |
Memasang |
container-allow-fuse |
|
| nbconvert |
Memungkinkan Anda mengekspor dan mendownload notebook sebagai jenis file yang berbeda. |
notebook-disable-nbconvert |
|
| Hapus ke sampah |
Menggunakan perilaku sampah sistem operasi saat menghapus dari JupyterLab. |
notebook-enable-delete-to-trash |
|
| Dataproc |
Mengaktifkan akses ke kernel Dataproc. Untuk mengetahui informasi selengkapnya, lihat Membuat instance yang mendukung Dataproc. |
disable-mixer |
|
| Penonaktifan saat tidak ada aktivitas |
Mengaktifkan penonaktifan saat tidak ada aktivitas. Untuk mengetahui informasi selengkapnya, lihat Penonaktifan saat tidak ada aktivitas. |
idle-timeout-seconds |
Bilangan bulat yang mewakili waktu tidak ada aktivitas dalam detik. Nilai default-nya adalah 10800 detik (180 menit).
|
| Atribut tamu |
Mengaktifkan atribut tamu. Diperlukan untuk menjalankan penonaktifan saat perangkat tidak digunakan. Untuk mengetahui informasi selengkapnya, lihat Persyaratan untuk menjalankan penonaktifan saat tidak ada aktivitas. |
enable-guest-attributes |
true (default): Mengaktifkan atribut tamu.false: Menonaktifkan atribut tamu. |
| Patch OS terjadwal |
Menjadwalkan update OS otomatis instance. Hal ini mengaktifkan layanan upgrade tanpa pengawasan Debian dan hanya berlaku untuk image berbasis VM. |
install-unattended-upgrades |
|
| Pengguna Jupyter kustom |
Menentukan nama pengguna Jupyter default. Setelan ini
menentukan nama folder untuk notebook Anda. Misalnya,
daripada direktori |
jupyter-user |
String. Nilai defaultnya adalah jupyter. |
| Mendownload file |
Memungkinkan Anda mendownload file dari JupyterLab. |
notebook-disable-downloads |
|
| Akses root |
Mengaktifkan akses root. |
notebook-disable-root |
|
| Akses terminal |
Mengaktifkan akses terminal. |
notebook-disable-terminal |
|
| Upgrade terjadwal |
Menjadwalkan upgrade otomatis instance. |
notebook-upgrade-schedule |
Jadwal mingguan atau bulanan yang Anda tetapkan, dalam
format
unix-cron, misalnya, 00 19 * * MON berarti setiap minggu pada
hari Senin, pukul 1900 Waktu Greenwich (GMT).
Fitur ini dinonaktifkan secara default.
|
| Skrip pasca-startup |
Menjalankan skrip kustom setelah skrip startup lainnya selesai. Untuk mengetahui detail urutan eksekusi, lihat Urutan eksekusi skrip startup. |
post-startup-script |
URI skrip pasca-startup di Cloud Storage, misalnya:
gs://bucket/hello.sh. Fitur ini dinonaktifkan secara default.
|
| Perilaku skrip pasca-startup |
Menentukan kapan dan bagaimana skrip pasca-startup berjalan. |
post-startup-script-behavior |
|
| Melaporkan kondisi acara |
Memeriksa responsivitas setiap 30 detik untuk metrik VM. |
report-event-health |
|
| Mengaktifkan pratinjau JupyterLab 4 |
Mengaktifkan JupyterLab 4 (Pratinjau) di instance Anda. Untuk mengetahui informasi selengkapnya, lihat Pratinjau JupyterLab 4. |
enable-jupyterlab4-preview |
|
Urutan eksekusi skrip startup
Jika Anda menggunakan beberapa skrip startup untuk instance Vertex AI Workbench, skrip tersebut akan berjalan dalam urutan berikut:
startup-script: Berjalan pertama kali selama setiap proses booting setelah booting awal.startup-script-url: Berjalan kedua selama setiap booting setelah booting awal.workbench-startup-scripts: Berjalan setelah skrip booting Compute Engine (startup-scriptdanstartup-script-url) selesai.post-startup-script: Berjalan setelahworkbench-startup-scriptsselesai.
Perhatikan bahwa untuk kunci metadata post-startup-script, Anda harus memberikan skrip sebagai Cloud Storage URI. Anda tidak dapat memberikan konten skrip secara langsung sebagai nilai.
Metadata yang dikelola oleh Compute Engine
Beberapa kunci metadata telah ditentukan sebelumnya oleh Compute Engine. Untuk mengetahui informasi selengkapnya, lihat Kunci metadata standar.
Kunci metadata yang dilindungi
Beberapa kunci metadata dicadangkan hanya untuk penggunaan sistem. Jika Anda menetapkan nilai ke kunci metadata ini, nilai baru akan ditimpa oleh nilai sistem.
Kunci metadata yang dicadangkan mencakup, tetapi tidak terbatas pada:
data-disk-urienable-osloginframeworknotebooks-apinotebooks-api-versionnvidia-driver-gcs-pathproxy-urlrestrictionshutdown-scripttitleversion
Membuat instance dengan metadata tertentu
Anda dapat membuat instance Vertex AI Workbench dengan metadata tertentu menggunakan Google Cloud konsol, Google Cloud CLI, Terraform, atau Notebooks API.
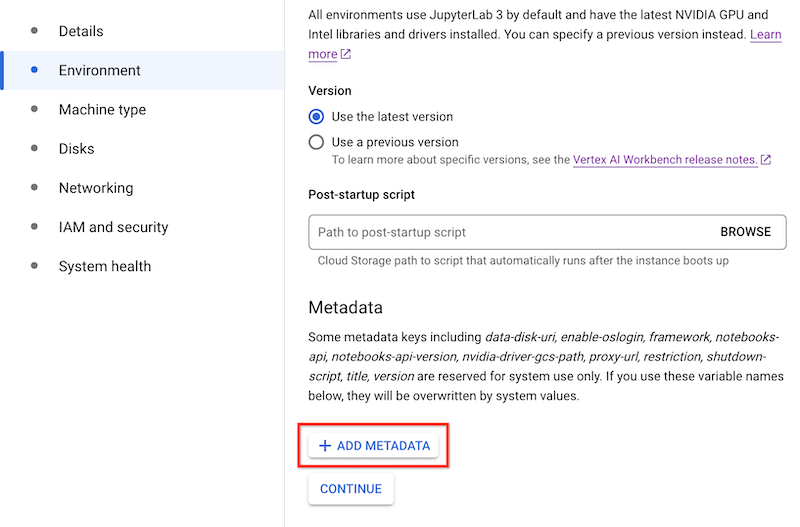
Konsol
Saat membuat instance Vertex AI Workbench, Anda dapat menambahkan metadata di bagian Lingkungan pada Opsi lanjutan.
gcloud
Saat membuat instance Vertex AI Workbench, Anda dapat menambahkan metadata menggunakan perintah berikut:
gcloud workbench instances create INSTANCE_NAME --metadata=KEY=VALUE
Terraform
Untuk menambahkan metadata, buat resource dengan pasangan nilai kunci metadata.
Untuk mempelajari cara menerapkan atau menghapus konfigurasi Terraform, lihat Perintah dasar Terraform.
Notebooks API
Gunakan metode instances.create
dengan nilai metadata untuk mengelola fitur yang sesuai.
Memperbarui metadata instance
Anda dapat memperbarui metadata instance Vertex AI Workbench menggunakan Google Cloud konsol, Google Cloud CLI, Terraform, atau Notebooks API.
Konsol
Untuk memperbarui metadata instance Vertex AI Workbench, lakukan hal berikut:
Di konsol Google Cloud , buka halaman Instances.
Dalam daftar instance, klik nama instance yang ingin Anda perbarui.
Di halaman Detail instance, klik Software dan keamanan.
Di bagian Metadata, perbarui pasangan nilai kunci metadata yang ingin Anda ubah.
Klik Kirim.
gcloud
Anda dapat memperbarui metadata pada instance Vertex AI Workbench menggunakan perintah berikut:
gcloud workbench instances update INSTANCE_NAME --metadata=KEY=VALUE
Terraform
Anda dapat mengubah pasangan nilai kunci metadata untuk mengelola fitur yang sesuai pada instance Vertex AI Workbench.
Untuk mempelajari cara menerapkan atau menghapus konfigurasi Terraform, lihat Perintah dasar Terraform.
Notebooks API
Gunakan metode instances.patch
dengan nilai metadata dan gce_setup.metadata di updateMask
untuk mengelola fitur yang sesuai.
Menghapus metadata dari instance
Anda dapat menghapus metadata dari instance Vertex AI Workbench menggunakan konsol Google Cloud , Google Cloud CLI, Terraform, atau Notebooks API.
Konsol
Untuk menghapus metadata dari instance Vertex AI Workbench, lakukan langkah berikut:
Di konsol Google Cloud , buka halaman Instances.
Dalam daftar instance, klik nama instance yang ingin Anda ubah.
Di halaman Detail instance, klik Software dan keamanan.
Di bagian Metadata, di sebelah kanan key-value pair yang ingin Anda hapus, klik Hapus.
Klik Kirim.
gcloud
Anda dapat menghapus metadata dari instance Vertex AI Workbench menggunakan perintah berikut:
gcloud workbench instances update INSTANCE_NAME --metadata=KEY
Terraform
Anda dapat menghapus key-value pair metadata untuk mengelola fitur yang sesuai dari instance Vertex AI Workbench.
Untuk mempelajari cara menerapkan atau menghapus konfigurasi Terraform, lihat Perintah dasar Terraform.
Notebooks API
Gunakan metode instances.patch
dengan nilai metadata yang ditetapkan ke string kosong dan
gce_setup.metadata di updateMask untuk menghapus
fitur yang sesuai.