이 튜토리얼의 이전 단계에서 학습한 모델 hello_custom의 행을 찾고 모델 이름을 클릭하여 모델 세부정보 페이지를 엽니다.
배포 및 테스트 탭에서 엔드포인트에 배포를 클릭하여 엔드포인트에 배포 창을 엽니다.
엔드포인트 정의 단계에서 엔드포인트의 기본 정보를 추가합니다.
새 엔드포인트 만들기를 선택합니다.
엔드포인트 이름 필드에 hello_custom을 입력합니다.
모델 설정 섹션에 hello_custom이라는 모델 이름이 표시되는지 확인합니다. 다음 모델 설정을 지정합니다.
트래픽 분할 필드에 100을 입력합니다. Vertex AI는 엔드포인트의 트래픽을 여러 모델로 분할하는 기능을 지원하지만 이 튜토리얼에서는 이 기능을 사용하지 않습니다.
최소 컴퓨팅 노드 수 필드에 1을 입력합니다.
머신 유형 드롭다운 목록의 표준 섹션에서 n1-standard-2를 선택합니다.
완료를 클릭합니다.
로깅 섹션에서 두 가지 유형의 예측 로깅이 사용 설정되어 있는지 확인합니다.
계속을 클릭합니다.
엔드포인트 세부정보 단계에서 엔드포인트가 us-central1 (Iowa)에 배포될 것임을 확인합니다.
고객 관리 암호화 키(CMEK) 사용 체크박스를 선택하지 마세요.
이 튜토리얼에서는 CMEK를 사용하지 않습니다.
배포를 클릭하여 엔드포인트를 만들고 모델을 엔드포인트에 배포합니다.
몇 분 후 엔드포인트 테이블의 새 엔드포인트 옆에 check_circle이 나타납니다. 동시에 엔드포인트를 성공적으로 만들고 모델을 엔드포인트에 배포했음을 알리는 이메일도 전송됩니다.
Cloud Run 함수 배포
Vertex AI API의 REST 인터페이스에 요청을 전송하여 방금 만든 Vertex AI 엔드포인트에서 예측을 가져올 수 있습니다. 하지만 aiplatform.endpoints.predict 권한이 있는 주 구성원만 온라인 예측 요청을 보낼 수 있습니다. 엔드포인트는 예를 들어 웹 앱을 통해 누구나 요청을 보낼 수 있는 공개 상태로 설정할 수 없습니다.
이 섹션에서는 Cloud Run Functions에 코드를 배포하여 인증되지 않은 요청을 처리합니다. 이 튜토리얼의 첫 번째 페이지를 읽을 때 다운로드한 샘플 코드의 function/ 디렉터리에는 이 Cloud Run Functions의 코드가 포함되어 있습니다. 원하는 경우 다음 명령어를 실행하여 Cloud Run Functions 코드를 탐색합니다.
lessfunction/main.py
함수 배포는 다음 목적으로 사용됩니다.
인증되지 않은 요청을 수신하도록 Cloud Run Functions를 구성할 수 있습니다. 또한 함수는 기본적으로 편집자 역할이 있는 서비스 계정(Vertex AI 엔드포인트에서 예측을 가져오는 데 필요한 aiplatform.endpoints.predict 권한 포함)을 사용하여 실행됩니다.
또한 이 함수는 요청에 대한 유용한 사전 처리를 수행합니다. Vertex AI 엔드포인트는 학습된 TensorFlow Keras 그래프의 첫 번째 레이어의 형식, 즉 고정 차원의 정규화 부동소수점 수의 텐서로 된 예측 요청을 기대합니다. 함수는 이미지의 URL을 입력으로 받아서 이미지를 이 형식으로 사전 처리한 후에 Vertex AI 엔드포인트로부터 예측을 요청합니다.
[[["이해하기 쉬움","easyToUnderstand","thumb-up"],["문제가 해결됨","solvedMyProblem","thumb-up"],["기타","otherUp","thumb-up"]],[["이해하기 어려움","hardToUnderstand","thumb-down"],["잘못된 정보 또는 샘플 코드","incorrectInformationOrSampleCode","thumb-down"],["필요한 정보/샘플이 없음","missingTheInformationSamplesINeed","thumb-down"],["번역 문제","translationIssue","thumb-down"],["기타","otherDown","thumb-down"]],["최종 업데이트: 2025-09-04(UTC)"],[],[],null,["# Hello custom training: Serve predictions from a custom image classification model\n\nThis page walks through serving predictions from your image classification model\nand viewing these predictions in a web app.\nThis tutorial has several pages:\n\n\u003cbr /\u003e\n\n1. [Setting up your project and environment.](/vertex-ai/docs/tutorials/image-classification-custom)\n\n2. [Training a custom image classification\n model.](/vertex-ai/docs/tutorials/image-classification-custom/training)\n\n3. Serving predictions from a custom image\n classification model.\n\n4. [Cleaning up your project.](/vertex-ai/docs/tutorials/image-classification-custom/cleanup)\n\nEach page assumes that you have already performed the instructions from the\nprevious pages of the tutorial.\nThe rest of this document assumes that you are using the same Cloud Shell environment that you created when following the [first page of this\ntutorial](/vertex-ai/docs/tutorials/image-classification-custom). If your original Cloud Shell session is no longer open, you can return to the environment by doing the following:\n\n\u003cbr /\u003e\n\n1. In the Google Cloud console, activate Cloud Shell.\n\n [Activate Cloud Shell](https://console.cloud.google.com/?cloudshell=true)\n2. In the Cloud Shell session, run the following command:\n\n ```bash\n cd hello-custom-sample\n ```\n\nCreate an endpoint\n------------------\n\nTo get online predictions from the ML model that you trained when following\nthe previous page of this tutorial, create a Vertex AI *endpoint*.\nEndpoints serve online predictions from one or more models.\n\n1. In the Google Cloud console, in the Vertex AI section, go to\n the **Models** page.\n\n [Go to Models](https://console.cloud.google.com/vertex-ai/models)\n2. Find the row of the model that you trained in the [previous step of this\n tutorial](/vertex-ai/docs/tutorials/image-classification-custom/training), `hello_custom`, and click the model's\n name to open the model detail page.\n\n3. On the **Deploy \\& test** tab, click **Deploy to endpoint** to open the\n **Deploy to endpoint** pane.\n\n4. On the **Define your endpoint** step, add some basic information for your\n endpoint:\n\n 1. Select **Create new endpoint**.\n\n 2. In the **Endpoint name** field, enter `hello_custom`.\n\n 3. In the **Model settings** section, ensure that you see the name of your\n model, which is also called `hello_custom`. Specify the following model\n settings:\n\n 1. In the **Traffic split** field, enter `100`. Vertex AI\n supports splitting traffic for an endpoint to multiple models, but\n this tutorial doesn't use that feature.\n\n 2. In the **Minimum number of compute nodes** field, enter `1`.\n\n 3. In the **Machine type** drop-down list, select **n1-standard-2** from\n the **Standard** section.\n\n 4. Click **Done**.\n\n 4. In the **Logging** section, ensure that both types of prediction logging\n are enabled.\n\n Click **Continue**.\n5. On the **Endpoint details** step, confirm that your endpoint will be deployed\n to `us-central1 (Iowa)`.\n\n Do not select the **Use a customer-managed encryption key (CMEK)** checkbox.\n This tutorial does not use [CMEK](/vertex-ai/docs/general/cmek).\n6. Click **Deploy** to create the endpoint and deploy your model to the\n endpoint.\n\nAfter a few minutes, check_circle appears next to the new\nendpoint in the **Endpoints** table. At the same time, you also receive an email\nindicating that you have successfully created the endpoint and deployed your\nmodel to the endpoint.\n\nDeploy a Cloud Run function\n---------------------------\n\nYou can get predictions from the Vertex AI endpoint that you just\ncreated by sending requests to the Vertex AI API's REST interface. However, only\nprincipals with the [`aiplatform.endpoints.predict`\npermission](/vertex-ai/docs/general/access-control) can send online prediction requests. You\ncannot make the endpoint public for anybody to send requests to, for example via\na web app.\n\nIn this section, deploy code to [Cloud Run functions](/functions/docs) to handle\nunauthenticated requests. The sample code that you downloaded when you read the\n[first page of this tutorial](/vertex-ai/docs/tutorials/image-classification-custom) contains code for this\nCloud Run function in the `function/` directory. Optionally, run the\nfollowing command to explore the Cloud Run function code: \n\n less function/main.py\n\nDeploying the function serves the following purposes:\n\n- You *can* configure a Cloud Run function to receive unauthenticated\n requests. Additionally, functions run using [a service account with the Editor\n role by default](/functions/docs/securing/function-identity), which includes\n the `aiplatform.endpoints.predict` permission necessary to get predictions\n from your Vertex AI endpoint.\n\n- This function also performs useful preprocessing on requests. The\n Vertex AI endpoint expects prediction requests in the format\n of the trained TensorFlow Keras graph's first layer: a tensor of normalized\n floats with fixed dimensions. The function takes the URL of an image as input\n and preprocesses the image into this format before requesting a prediction\n from the Vertex AI endpoint.\n\nTo deploy the Cloud Run function, do the following:\n\n1. In the Google Cloud console, in the Vertex AI section, go to\n the **Endpoints** page.\n\n [Go to Endpoints](https://console.cloud.google.com/vertex-ai/endpoints)\n2. Find the row of the endpoint that you created in the previous section, named\n `hello_custom`. In this row, click **Sample request** to open the\n **Sample request** pane.\n\n3. In the **Sample request** pane, find the line of shell code that matches the\n following pattern:\n\n ```bash\n ENDPOINT_ID=\"\u003cvar translate=\"no\"\u003eENDPOINT_ID\u003c/var\u003e\"\n ```\n\n \u003cvar translate=\"no\"\u003eENDPOINT_ID\u003c/var\u003e is a number that identifies this particular endpoint.\n\n Copy this line of code, and run it in your Cloud Shell session to\n set the `ENDPOINT_ID` variable.\n4. Run the following command in your Cloud Shell session to deploy the\n Cloud Run function:\n\n gcloud functions deploy classify_flower \\\n --region=us-central1 \\\n --source=function \\\n --runtime=python37 \\\n --memory=2048MB \\\n --trigger-http \\\n --allow-unauthenticated \\\n --set-env-vars=ENDPOINT_ID=${ENDPOINT_ID}\n\nDeploy a web app to send prediction requests\n--------------------------------------------\n\nFinally, host a static web app on Cloud Storage to get predictions\nfrom your trained ML model. The web app sends requests to your\nCloud Run function, which preprocesses them and gets predictions from the\nVertex AI endpoint.\n\nThe `webapp` directory of the sample code that you downloaded contains a sample\nweb app. In your Cloud Shell session, run the following commands\nto prepare and deploy the web app:\n\n1. Set a couple of shell variables for commands in following steps to use:\n\n PROJECT_ID=\u003cvar translate=\"no\"\u003ePROJECT_ID\u003c/var\u003e\n BUCKET_NAME=\u003cvar translate=\"no\"\u003eBUCKET_NAME\u003c/var\u003e\n\n Replace the following:\n - \u003cvar translate=\"no\"\u003ePROJECT_ID\u003c/var\u003e: Your Google Cloud [project\n ID](/resource-manager/docs/creating-managing-projects#identifying_projects).\n - \u003cvar translate=\"no\"\u003eBUCKET_NAME\u003c/var\u003e: The name of the Cloud Storage bucket that you created when following the [first page of this tutorial](/vertex-ai/docs/tutorials/image-classification-custom).\n2. Edit the app to provide it with the trigger URL of your\n Cloud Run function:\n\n echo \"export const CLOUD_FUNCTION_URL = 'https://us-central1-${PROJECT_ID}.cloudfunctions.net/classify_flower';\" \\\n \u003e webapp/function-url.js\n\n3. Upload the `webapp` directory to your Cloud Storage bucket:\n\n gcloud storage cp webapp gs://${BUCKET_NAME}/ --recursive\n\n4. Make the web app files that you just uploaded [publicly\n readable](/storage/docs/access-control/making-data-public):\n\n gcloud storage objects update gs://${BUCKET_NAME}/webapp/** --add-acl-grant=entity=allUsers,role=READER\n\n | **Note:** Shells (like bash, zsh) sometimes attempt to expand wildcards in ways that can be surprising. For more details, see [URI wildcards](/storage/docs/wildcards#surprising-behavior).\n5. You can now navigate to the following URL to open web app and get\n predictions:\n\n ```\n https://storage.googleapis.com/BUCKET_NAME/webapp/index.html
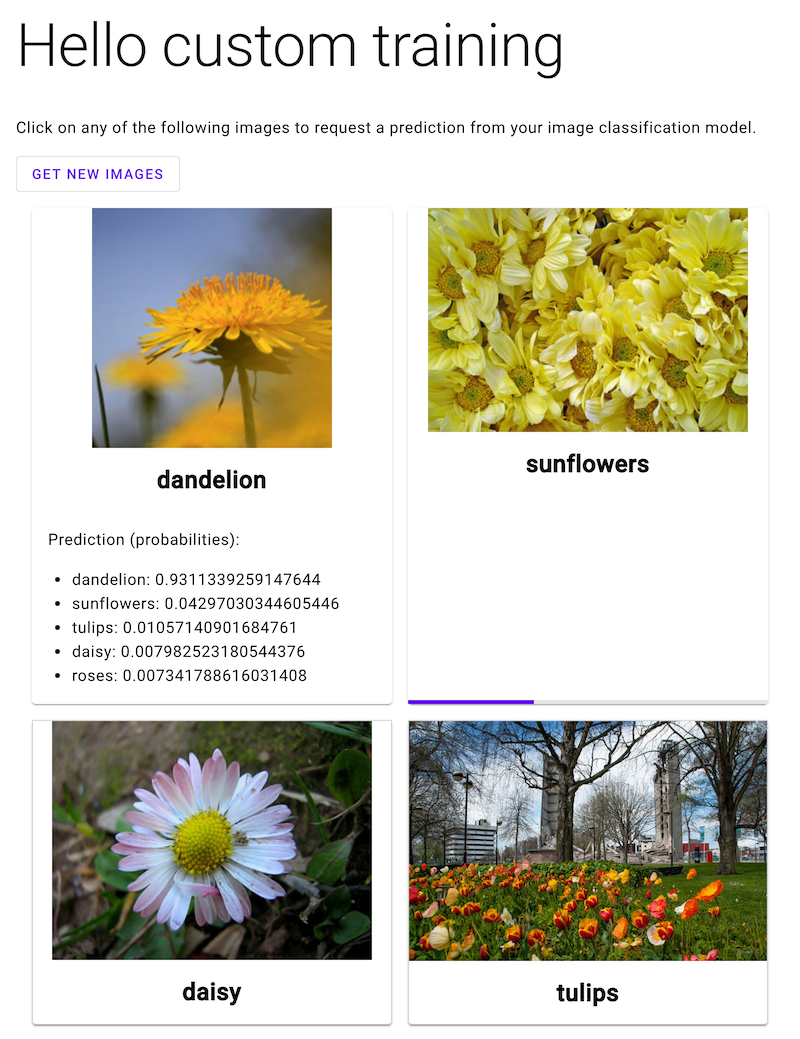
\n ```\n\n Open the web app and click an image of a flower to see your ML model's\n classification of the flower type. The web app presents the prediction as a\n list of flower types and the probability that the image contains each type of\n flower.\n | **Note:** This web app gets predictions for images that were also included in the training dataset for the model. Therefore the model might appear more accurate than it actually is due to [overfitting](https://developers.google.com/machine-learning/glossary#overfitting).\n\nIn the following screenshot, the web app has already gotten one\nprediction and is in the process of sending another prediction\nrequest.\n\nWhat's next\n-----------\n\nFollow the [last page of the tutorial](/vertex-ai/docs/tutorials/image-classification-custom/cleanup) to clean up\nresources that you have created."]]