Google Cloud 콘솔을 사용하여 Colab Enterprise 노트북 만들기
Google Cloud 콘솔을 사용하여 Colab Enterprise 노트북을 만들고 기본 런타임에서 코드를 실행하는 방법을 알아봅니다. 이 페이지에서는 노트북 이름을 바꾸고, 가져오고, 삭제하는 방법도 설명합니다.
시작하기 전에
- Sign in to your Google Cloud account. If you're new to Google Cloud, create an account to evaluate how our products perform in real-world scenarios. New customers also get $300 in free credits to run, test, and deploy workloads.
-
In the Google Cloud console, on the project selector page, select or create a Google Cloud project.
Roles required to select or create a project
- Select a project: Selecting a project doesn't require a specific IAM role—you can select any project that you've been granted a role on.
-
Create a project: To create a project, you need the Project Creator
(
roles/resourcemanager.projectCreator), which contains theresourcemanager.projects.createpermission. Learn how to grant roles.
-
Verify that billing is enabled for your Google Cloud project.
-
Enable the Vertex AI, Dataform, and Compute Engine APIs.
Roles required to enable APIs
To enable APIs, you need the Service Usage Admin IAM role (
roles/serviceusage.serviceUsageAdmin), which contains theserviceusage.services.enablepermission. Learn how to grant roles. -
Google Cloud 콘솔에서 Colab Enterprise 내 노트북 페이지로 이동합니다.
-
리전 메뉴에서 노트북을 만들 리전을 선택합니다.
-
새 노트북을 클릭합니다.
Vertex AI에서 노트북을 만들고 엽니다.
-
Google Cloud 콘솔에서 Colab Enterprise 내 노트북 페이지로 이동합니다.
-
리전 메뉴에서 노트북이 포함된 리전을 선택합니다.
-
열려는 노트북을 클릭합니다.
-
실행하려는 코드 셀 위에 마우스 포인터를 올려놓고 셀 실행 버튼을 클릭합니다.
-
최종 사용자 인증 정보가 사용 설정된 런타임에 처음 연결하는 경우 로그인 대화상자가 표시됩니다.
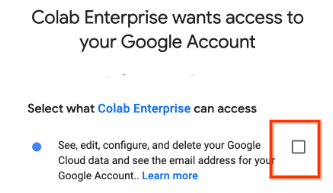
Colab Enterprise에 사용자 인증 정보에 대한 액세스 권한을 부여하려면 다음 단계를 완료하세요.
-
로그인 대화상자에서 사용자 계정을 클릭합니다.
-
Google Cloud 데이터 확인, 수정, 구성, 삭제를 선택하여 Colab Enterprise에 사용자 인증 정보에 대한 액세스 권한을 부여합니다.
-
계속을 클릭합니다.
-
-
Google Cloud 콘솔에서 Colab Enterprise 내 노트북 페이지로 이동합니다.
-
리전 메뉴에서 노트북이 포함된 리전을 선택합니다.
-
이름을 바꾸려는 노트북 옆에 있는 작업 메뉴를 클릭한 후 이름 변경을 선택합니다.
-
노트북 이름 바꾸기 대화상자에서 노트북 이름을 변경한 후 이름 바꾸기를 클릭합니다.
-
Google Cloud 콘솔에서 Colab Enterprise 내 노트북 페이지로 이동합니다.
-
리전 메뉴에서 노트북을 가져올 리전을 선택합니다.
-
가져오기를 클릭합니다.
-
노트북 가져오기 대화상자에서 가져오기 소스를 선택합니다.
-
선택한 항목에 따라 다음과 같은 결과가 표시됩니다.
- 내 컴퓨터에서 가져올 노트북 파일을 찾아 선택합니다.
- Cloud Storage에서 Cloud Storage의 노트북으로 이동하여 선택합니다.
- URL에 가져올 노트북 파일의 URL을 입력합니다.
-
다른 노트북을 추가하려면 노트북 추가를 클릭합니다.
-
가져올 노트북을 추가한 후 가져오기를 클릭합니다.
Colab Enterprise에서 노트북 파일을 가져옵니다.
- In the Google Cloud console, go to the Manage resources page.
- In the project list, select the project that you want to delete, and then click Delete.
- In the dialog, type the project ID, and then click Shut down to delete the project.
-
Google Cloud 콘솔에서 Colab Enterprise 내 노트북 페이지로 이동합니다.
-
리전 메뉴에서 삭제할 노트북이 포함된 리전을 선택합니다.
-
삭제하려는 노트북 옆에 있는 작업 메뉴를 클릭한 후 노트북 삭제를 선택합니다.
-
노트북 삭제 대화상자에서 확인을 클릭합니다.
Colab Enterprise 소개 읽어보기
프로젝트를 빠르게 시작하는 데 도움이 되는 노트북을 찾으려면 노트북 갤러리를 참조하세요.
필요한 역할
Colab Enterprise 노트북을 만들고 런타임에서 노트북 코드를 실행하는 데 필요한 권한을 얻으려면 관리자에게 프로젝트에 대한 Colab Enterprise 사용자 (roles/aiplatform.colabEnterpriseUser) IAM 역할을 부여해 달라고 요청하세요.
역할 부여에 대한 자세한 내용은 프로젝트, 폴더, 조직에 대한 액세스 관리를 참조하세요.
커스텀 역할이나 다른 사전 정의된 역할을 통해 필요한 권한을 얻을 수도 있습니다.
노트북 만들기
Google Cloud 콘솔을 사용하여 Colab Enterprise 노트북을 만들려면 다음 안내를 따르세요.이 문서에 설명된 태스크를 완료했으면 만든 리소스를 삭제하여 청구가 계속되는 것을 방지할 수 있습니다. 자세한 내용은 삭제를 참조하세요.
기본 런타임에서 코드 실행
기본 런타임에서 Colab Enterprise 노트북 코드를 실행하려면 다음 안내를 따르세요.
런타임이 시작되면 Colab Enterprise가 런타임에 연결하고 셀에서 코드를 실행합니다.
노트북 이름 변경
Colab Enterprise 노트북 이름을 바꾸려면 다음 안내를 따르세요.노트북 가져오기
노트북을 Colab Enterprise로 가져오려면 다음 안내를 따르세요.삭제
이 페이지에서 사용한 리소스 비용이 Google Cloud 계정에 청구되지 않도록 하려면 다음 단계를 수행합니다.
이 튜토리얼에서 사용된 리소스 비용이 Google Cloud 계정에 청구되지 않도록 하려면 리소스가 포함된 프로젝트를 삭제하거나 프로젝트는 유지하되 개별 리소스를 삭제하세요.