Occasionally, you may want to change the model or source Explore of a Look or dashboard. For example, you have a Look or dashboard that is based on LookML from model A. You also have a second model — model B. You want to change the model reference of a Look or dashboard to model B instead of model A. This page addresses how to change the source model or Explore for a Look or dashboard.
There are multiple solutions, depending on the use case:
- For a single Look:
- For one or more dashboards, create a LookML copy.
- For multiple Looks or dashboards:
Edit the Look's expanded URL
For a one-off Look, you can use the expanded URL from the Look's underlying Explore to change the model name in the URL.
- From the Look, select the Explore from Here link to open the Look's query in an Explore.
- Select Share from the Explore's gear menu to open the Share URLs menu.
- Copy the URL from the Expanded URL option.
-
Change the model name in the expanded URL. The model name comes right after
the instance name and the
/explorepart of the URL. The URL takes the following form:https://instance_name.looker.com/explore/MODEL_NAME/EXPLORE_NAME?fields=...In this example, the model name islauren_ecommerce: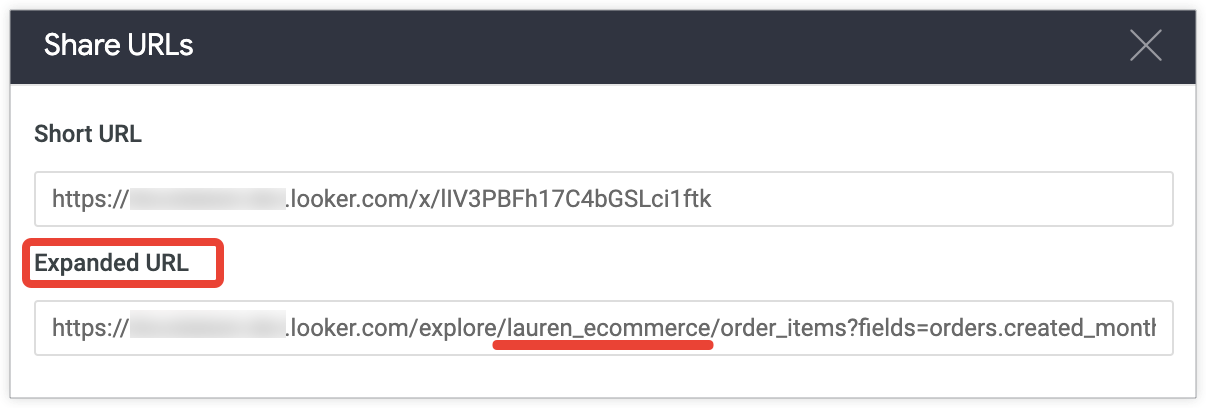
- Paste the new Explore URL in a browser to verify that it works with the updated model name.
- Save the Explore as a new Look, or overwrite your existing Look.
Overwrite a Look with another Look
You can overwrite a Look with another Look that is based on the selected model or Explore.
- Build an Explore that is based on the selected model or Explore.
- Save the Explore as a Look with the same name in the same folder as your existing Look, which will overwrite your existing Look.
Create LookML copies of dashboards
You can convert one or more dashboards to a LookML dashboard and update the dashboard's model in the LookML:
- For each dashboard, create a LookML copy of the dashboard and save it in your LookML project. (If your dashboards are already LookML dashboards, you can skip this step.)
-
In your LookML project, use the Looker IDE's
search and replace function
to find instances of
model:, and then update the value to a different model name. - You can leave the updated dashboards as LookML dashboards, or you can convert them to user-defined dashboards.
Use the Looker API
You can use the Looker API to update the model for multiple dashboards:
-
Use the
dashboard_elementsAPI endpoint to get all the dashboard elements. The response will provide the query IDs. -
If any of the dashboard tiles are
Look-linked tiles,
use the
looksendpoint to find the query ID of the underlying Look. -
For each of the query IDs:
-
Call the
queryendpoint to get the response body of the query. -
Copy the
queryresponse body. -
Update the
modelkey's value to your new model. -
Use the
create_queryendpoint to create a new query, passing in the edited body.
-
Call the
-
For the dashboard, change the query ID for each of the elements by using
the
update_dashboard_elementendpoint, passing in the edited body.
Use the Looker Content Validator
The Content Validator is a tool that checks Looks and dashboards for errors, and it also has a Find & Replace in All Content feature, which you can use to change the underlying model or Explore for all Looks or dashboard tiles.
The Find & Replace in All Content feature changes all Looks and dashboards on the Looker instance. To apply a change to only a few Looks or dashboard tiles, you can make a breaking change, as described in the following steps.
If you don't want to change the model or Explore reference for all content across an instance, but do want to change the reference for more than one Look or dashboard tile at a time, you can use the Content Validator to replace the references for a handful of Looks or dashboard tiles all at once:
- Enable Development Mode to ensure that no users are impacted by the changes made in the following steps.
-
Intentionally "break" the existing model by renaming the model file in the
Looker IDE to another name that you know does not exist, such as
zzz. This will cause every Look and dashboard that uses the original model to break. - Select Content Validator in the Develop menu to open the Content Validator.
- Select Validate to run the Content Validator.
- In the Content Validator results, select the Content button to group the results by content.
- Find the Looks or dashboard tiles for which you want to change the model reference.
- Select the Replace button for each individual Look or dashboard to replace the "broken" model name with the new model name you want to use.
- Check that the Looks or dashboard tiles work as expected now that they point to the new model.
- Finally, go back to your project and rename the model file in the Looker IDE back to its original name and run the Content Validator again to verify that all validation errors are cleared.