Looker is great at making data accessible to all your users or customers. As we like to say, Looker helps "democratize data." You can empower your users to view query results on their own without having to have an analyst manually create a dashboard; with Looker, your users can even conduct their own analyses. One way to do this is using Looker's signed embed feature. This page discusses two different methods for implementing signed embed, the Looker API and Looker's embed Software Development Kit (SDK).
Say you want to integrate query results into your company's own application or internal systems and don't want to have to provide all your users with Looker credentials. This can be accomplished with Looker's signed embed feature. This is distinct from the general reference to SSO workflows such as LDAP or SAML, which also can be integrated into your Looker instance.
The signed in signed embed signifies that, once the embed URL is created and the request is sent from the browser, the user's Looker session has started and they are logged in. These URLs are signed and can be used only once. These URLs create iframes that allow developers to embed content such as Explores, Looks, and dashboards into your company's website or application. When the URL is used, if the user does not have an existing account, one will be created for them based on the parameters passed into the URL.
Developers can leverage the Looker API or Looker API SDKs to dynamically create these iframes. You can apply themes and customize the content to fit the needs of your company or of a specific group of users. To see more about the potential of embedding Looker into your content, here's a full demo with an explanation of how these concepts can be applied.
So how do I start?
Now, say you've watched the demo and you want to explore adding these iframes to your application. Where should you begin, and what method is right for your use case?
Looker offers several main options for generating this content, which can be placed inside your application or website:
- Looker's example repos of scripts written in various programming languages (C#, Python, Node.js, Python, Ruby, PHP)
- The
Create Signed Embed Urlendpoint included in our REST API, which is accessible through HTTP requests or one of our SDKs - Looker's Embed SDK
We generally recommend the Embed SDK and REST API endpoint to customers as opposed to example scripts, because both the SDK and the REST API are frequently updated by our developers, and they generally create shorter URLs compared to the scripts. (The shorter URLs are a bit easier to manage.) There are also some useful security features that the Embed SDK and the REST API endpoint offer, which are discussed later on this page.
Suppose we want our app user to be able to view a dashboard from Looker on a data page in a customer application. A common embed workflow might look like this:
- The user logs in to an application. They may use a SAML service or just an email and a password to log in to the app.
- The application confirms that the credentials are correct, and the user can successfully access the content.
- Based on the response from the login workflow, the user's information is passed into a function that may use one of our example scripts to create the signed embed URL. These scripts require the user's permissions, group IDs, the embed secret, the host URL, user attributes such as first and last name, access filters, session length, and the URL we want the user to be able to access. All this information is sent to Looker, and a signed URL is created.
- The user navigates to the data page in the application, where this signed URL is placed in an iframe; next, the browser serves a request on the iframe URL. The dashboard propagates with a personalized experience, and the user can access data from Looker within the application.
The Create Signed Embed Url endpoint
Using Looker's REST API or one of the SDKs, a developer can generate an encoded, signed URL that is based on a set of parameters. This is a POST request. The server where the API request originates must be able to authenticate into Looker with admin permissions. One of the main benefits of using this endpoint is that an embed secret is not required to use it; the endpoint is already configured to retrieve the current embed secret. Calls to this endpoint also don't count against API rate limitations. In general, API credentials are easier to rotate compared to an embed secret. Multiple API 3 credentials can be active at the same time, but only a single embed secret can be used at once on one instance. This makes it easier to swap out the credentials without service disruption. The Create Signed Embed Url endpoint also creates a shorter, more concise URL compared to the examples scripts in our signed embed URL script example repository.
Here's an example workflow that uses the Create Signed Embed Url endpoint:
- The user attempts to in to your application, most often with a username and password combination or possibly through an identity provider (IdP).
- If they successfully sign in to the application, the
Create Signed Embed Urlendpoint is run. A function created by your dev team passes that user's specific credentials into this endpoint, and a signed URL is returned from Looker to your server. - The user may have the option to click a data tab in the application. When they navigate to the data tab, this page requests the signed URL from your server and places it in the iframe on the page.
- The user sees a dashboard from Looker seamlessly iframed into your application with live data.
Embed SDK
Looker's Embed SDK is a collection of JavaScript functions that are packaged to make embedding Looker content easier for developers. The Embed SDK lets you add Looker content to a page in your application or on your website without having to create specific HTML elements. The SDK allows developers to create secure point-to-point communication between the HTML page and your Looker content. The Embed SDK now encapsulates the iframe, meaning that customers will not have to create or manage the iframe. The Embed SDK is only for browser apps, but it does include a helper utility function to generate the signed URL. These are both available in TypeScript and Python. Even though the Embed SDK is featured on the nmpjs registry, you don't need to use a Node.js web server.
One unique feature of the Embed SDK is that it also lets you leverage Looker components, a collection of reusable blocks of code that were created to help implement Looker's design system.
Another benefit of the Embed SDK is the number of prebuilt functions that remove a lot of the work from your development team. One of the primary examples is canceling clicks. The Embed SDK uses the MessageChannel API rather than postMessage. This means that two scripts running on the same page can communicate with one another using the postMessage API. This allows other functions to communicate with the iframe or have other functions communicate with the iframe.
An example workflow for the Embed SDK may look like this:
- The user attempts to log in to your application.
- If the login is successful, their information is sent to the
Node.jshelper utility on the server that runs the application. This passes the required information to the Looker instance, and a signed URL is returned. - The user navigates to the data page in the application where the Embed SDK is used to place the iframe. Since the Embed SDK is written in JavaScript, we can use
LookerEmbedSDK.createDashboardWithIdand target a specific DOM element (usually a span or div) on the page to append the iframe (signed URL) to. - The page is loaded, and the signed URL loads the dashboard from the Looker instance.
So...which method is the best?
Which one of these methods your development team uses will depend on your specific use case:
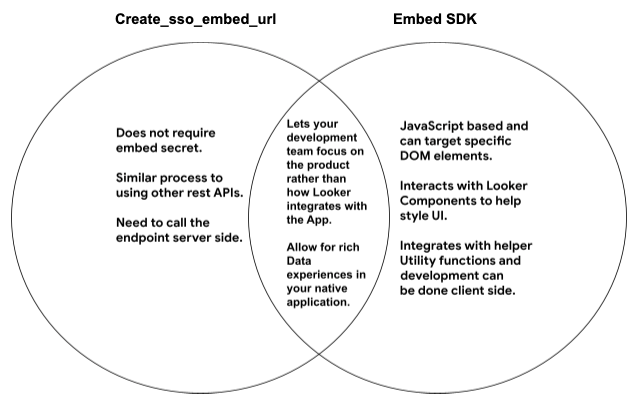
As shown in the previous diagram, both the Create Signed Embed Url endpoint method and the Embed SDK method described previously let your development team focus on the product rather than how Looker integrates with the app. Both methods also allow for rich data experiences in your native application.
The Create Signed Embed Url endpoint method differs from the Embed SDK method in the following ways:
- It does not require an embed secret.
- The process is similar to using other REST APIs.
- The endpoint must be called server-side.
The Embed SDK method has the following features:
- It is JavaScript based and can target specific DOM elements.
- It interacts with Looker components to help style the UI.
- It integrates with helper utility functions, and development can be done client-side.
If you have specific questions about the development or architecture requirements, you can reach out to Looker's Professional Services team or one of our development partners.
In addition, our support team can help you work through any high-level issues or unexpected behavior. You can open a support request in Looker's Help Center by clicking Contact Us.
Check out the Signed embed tools and troubleshooting resources Community post for additional resources.