Imagine that you have many users who share one Explore but who have different use cases depending on their team or region. Each user wants to see only the fields that apply to their unique use cases. To cater to the diverse needs of your users, you can use LookML refinements to customize existing views and Explores without having to modify the original LookML. You can then include these refined views and Explores in separate, dedicated model files that are customized to your users' different needs.
This page provides an example of using LookML refinements to customize a single base view and create distinct Explores for two different teams within your company. It also includes examples of hiding and adding fields in refined content.
Ingredients
- LookML views
- LookML Explores
- LookML model files
- LookML refinements
- Generic LookML files for housing refinements
- The LookML
includeparameter - The LookML
hiddenparameter (for fields) - Optionally, model access to specific models for viewers, configured by a Looker admin
Prerequisites
- A configured LookML model
- Permissions to develop LookML
- Experiencing developing models in LookML, including familiarity with more advanced LookML concepts like refinements and extends
Example: Creating multiple customized Explores from the same base view
Suppose you have a Sales Explore that contains data about customers, purchases, shipping, and location. Your company's Marketing and Logistics teams both need to explore this data, but they each focus on different fields within the Sales Explore.
You want to display only the fields that are useful to each team in the Explore field picker to make exploring easier. To do this, you can define two different refinements of the Sales Explore and the sales view that it is based on. The Marketing team's Explore can show fields that are related to customers and purchasing trends, while the Logistics team's Explore can show fields that are related to shipping and location. You can also add new fields to each refined view that are specific to each team's needs.
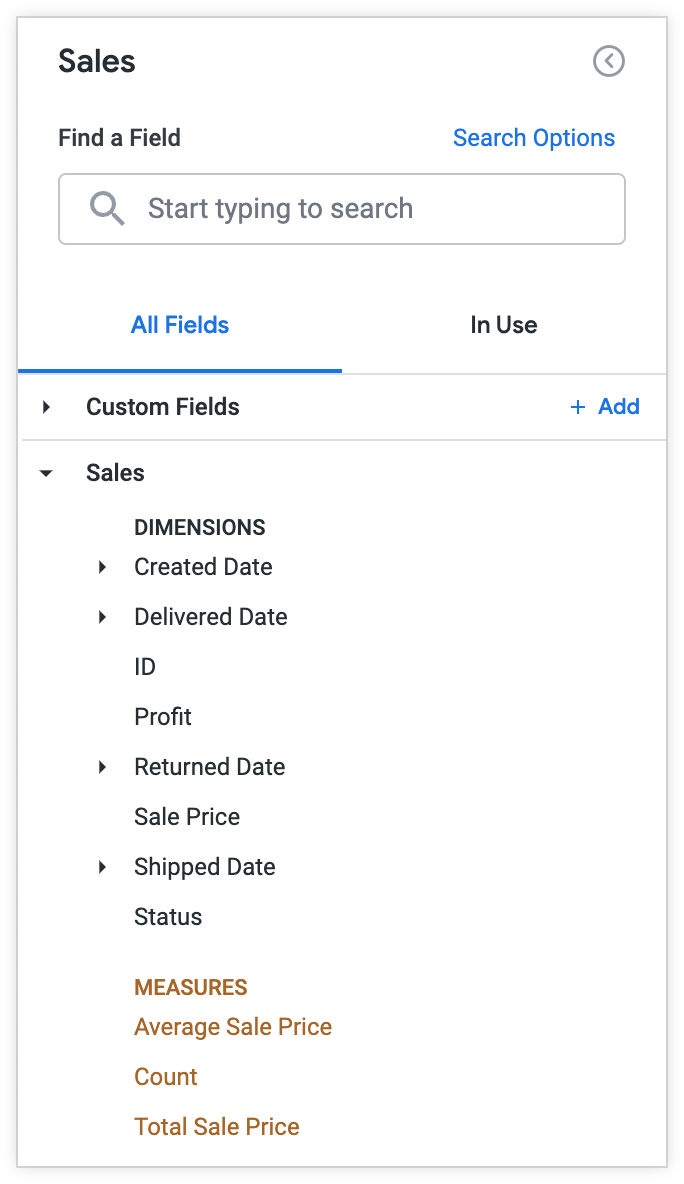
Currently, the field picker for the Sales Explore displays all the fields from the Sales view:
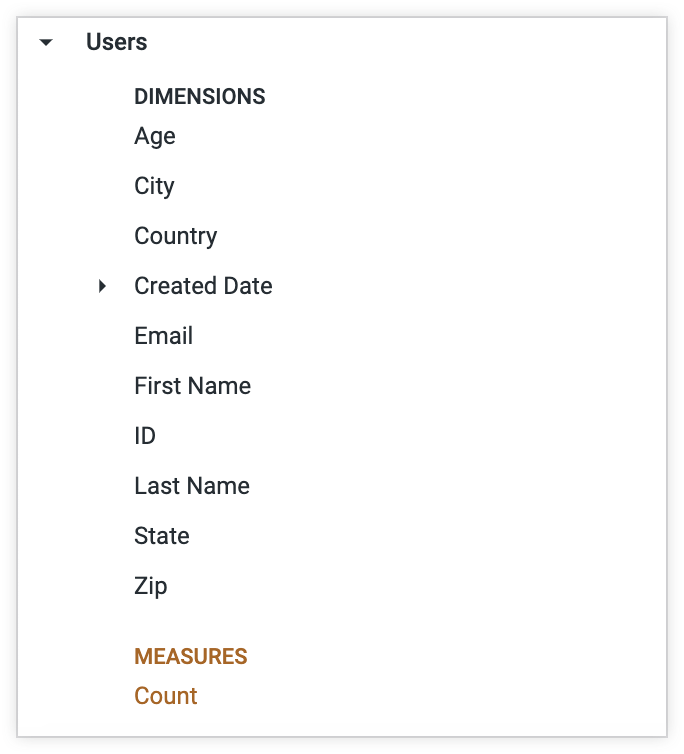
The field picker also displays all the fields from the joined Users view:
You can refine the sales view to create two separate Explores that contain only the fields that are of interest to the Marketing and Logistics teams by following these steps:
Create a new LookML file, in this example a file called
base_analysis.lkml, that contains the LookML for the Sales Explore, which is based on thesalesview and the joinedusersview. Since you want to use the basesalesExplore and its corresponding views to create a customized Explore for each team, you can define all the shared fields and properties in a single location, such as within a single file.# base_analysis.lkml include: "views/sales.view.lkml" include: "views/inventory_items.view.lkml" include: "views/users.view.lkml" explore: sales { join: inventory_items { type: left_outer sql_on: ${sales.inventory_item_id} = ${inventory_items.id} ;; relationship: many_to_one } join: users { type: left_outer sql_on: ${sales.user_id} = ${users.id} ;; relationship: many_to_one } }Create two separate files to house the refinements of the Sales Explore that you will define for each team. You can name the files
marketing_analysis.lkmlandlogistics_analysis.lkml. The LookML code, shown next, refines the basesalesExplore as defined in thebase_analysis.lkmlfile, shown previously, to add the label Sales Analysis for Marketing Team within a new file calledmarketing_analysis.lkml. The statementinclude: "/base/base_analysis.lkml"makes the contents of thebase_analysis.lkmlfile available to reference within themarketing_analysis.lkmlfile.# marketing_analysis.lkml include: "/base/base_analysis.lkml" explore: +sales { label: "Sales Analysis for Marketing Team" }Create a separate model file for each team, such as
ecommerce_marketing.modelandecommerce_logistics.model. By housing the different refinements in separate dedicated models for each team, you can refine the same set of views and Explores multiple times without overwriting the customizations you have made for one team's use case. See the LookML refinements documentation page for more information.With the
includeparameter, includemarketing_analysis.lkmlin theecommerce_marketing.modelmodel, and includelogistics_analysis.lkmlwithin theecommerce_logistics.modelmodel.Add any additional refinements to the
marketing_analysis.lkmlandlogistics_analysis.lkmlfiles as desired. For example, you can hide unnecessary fields and add new fields to the refined Explores for each team.
You can optionally have a Looker admin configure model access for each dedicated model to provide specific teams with Explore-level access.
Hiding unnecessary fields from the refined Explores
You can refine the sales view as follows in the marketing_analysis.lkml file to hide the Returned, Shipped, Delivered, and Created dimension groups, as well as the Status dimension, since those fields are not used by the Marketing team:
# marketing_analysis.lkml

include: "/base/base_analysis.lkml"

explore: +sales {
  label: "Sales Analysis for Marketing Team"
}
view: +sales
dimension_group: returned {
hidden: yes
}
dimension_group: shipped {
hidden: yes
}
dimension_group: delivered {
hidden: yes
}
dimension_group: created {
hidden: yes
}
dimension: status {
hidden: yes
}
}
Similarly, you can use the following LookML in the logistics_analysis.lkml file to hide fields that the Logistics team doesn't need (like Profit, Sale Price, and Average Sale Price):
# logistics_analysis.lkml

include: "/base/base_analysis.lkml"

explore: +sales {
  label: "Sales Analysis for Logistics Team"
}

view: +sales {
  dimension: profit {
    hidden: yes
  }

  dimension: sale_price {
    hidden: yes
  }

  measure: average_sale_price {
    hidden: yes
  }
}
Since the Logistics team has no need to see personal information about customers, such as their names, ages, or email addresses, you can also add a refinement for the joined users view within the logistics_analysis.lkml file to hide these fields from the Explore:
  view: +users {
    dimension: age {
    hidden: yes
  }

  dimension: email {
    hidden: yes
  }

  dimension: first_name {
    hidden: yes
  }

  dimension: last_name {
    hidden: yes
  }

  dimension_group: created {
    hidden: yes
  }
}
Adding new fields to the refined Explores
You can also create new fields that are of interest to the Marketing team within the refined sales view. For example, you can add fields for Average Sale Price, Total Sale Price, and Average Spend per User within the refined sales view:

You can use the following LookML to add these fields to the refined sales view in the marketing_analysis.lkml file:
# marketing_analysis.lkml

view: +sales {
  measure: average_sale_price {
    type: average
    value_format_name: usd
    sql: ${sale_price} ;;
    drill_fields: [detail*]
  }

  measure: total_sale_price {
    type: sum
    value_format_name: usd
    sql: ${sale_price} ;;
    drill_fields: [detail*]
  }

  measure: average_spend_per_user {
    type: number
    value_format_name: usd
    sql: 1.0 * ${total_sale_price} / NULLIF(${users.count},0) ;;
    drill_fields: [detail*]
  }
}
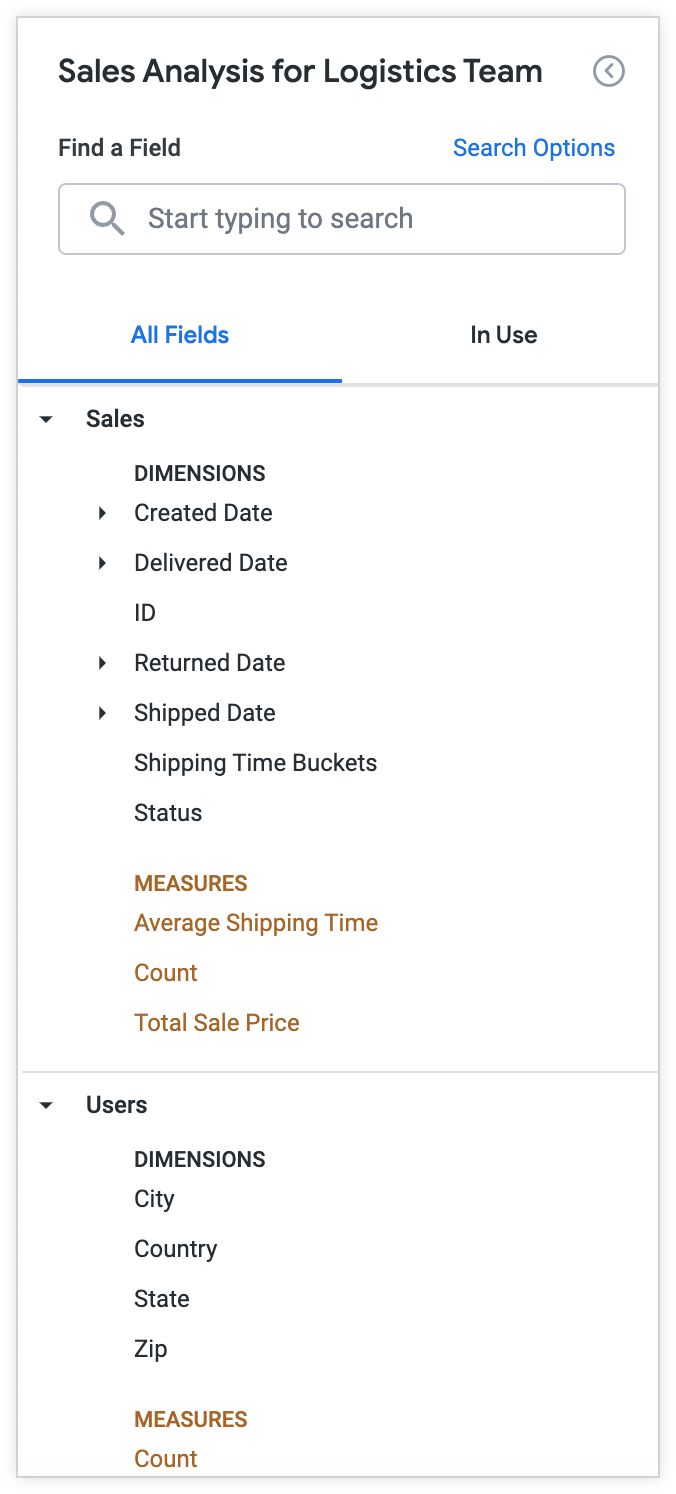
The Marketing Explore you created will contain the new fields under the Sales view in addition to the fields in the joined Users view. The Returned, Shipped, Delivered, and Created dimension groups and the Status dimension are hidden since the Marketing team doesn't need them.
Similarly, for the Logistics team, you can create new fields that will be useful to the Logistics team, such as Shipping Time Buckets and Average Shipping Time:
You can use the following LookML to add these fields to the refined sales view in the logistics_analysis.lkml file:
# logistics_analysis.lkml

view: +sales {
  dimension: shipping_time_buckets {
    case: {
      when: {
        sql: ${shipping_time} <= 7 ;;
        label: "One Week"
      }
      when: {
        sql: ${shipping_time} > 7 AND ${shipping_time} <= 14 ;;
        label: "Two Weeks"
      }
      when: {
        sql:  ${shipping_time} > 14 ;;
        label: "Over Two Weeks"
      }
      else: "Note Shipped"
    }
  }

  measure: average_shipping_time {
    type: average
    value_format_name: decimal_4
    sql: ${shipping_time} ;;
  }
}
The Logistics Explore you created will contain the new fields under the Sales view in addition to the fields in the joined Users view. The Profit, Sale Price, and Average Sale Price fields from the Sales view and the Age, Email, First Name, Last Name, and Created fields from the Users Explore are hidden since the Logistics team doesn't need them.
Each team now has an Explore that is more tailored to their specific needs. While this approach involves a bit more setup upfront, by keeping the core data in one place, you can make it easier to find and use.