Webhook 可以是标准 webhook,也可以是灵活 webhook。对于标准的网络钩子,请求和响应字段由 Conversational Agents (Dialogflow CX) 定义。使用灵活的 webhook,您可以定义请求和响应字段。
标准 webhook
使用标准 webhook,您可以使用 Conversational Agents (Dialogflow CX) 定义的请求和响应消息。请求消息会提供有关会话的许多详细信息。例如,当前活跃页面、最近匹配的意图、会话参数值和代理定义的响应都包含在内。
标准 webhook 请求
调用具有网络钩子的 fulfillment 时,对话式代理 (Dialogflow CX) 会向您的网络钩子服务发送 HTTPS POST 网络钩子请求。此请求的正文是一个 WebhookRequest JSON 对象,其中包含有关会话的信息。
某些集成会使用其他信息填充 WebhookRequest.payload 字段。例如,Dialogflow CX 电话网关集成会提供最终用户的来电显示。
如需了解详情,请参阅 WebhookRequest(V3) 或 WebhookRequest(V3Beta1) 参考文档。
标准 webhook 响应
一旦网络钩子服务收到网络钩子请求,其需要发送一个网络钩子响应。您的响应会受到以下限制:
- 响应必须在您创建网络钩子资源时配置的超时时间内发生,否则请求将超时。
- 响应大小不得超过 64 KiB。
如需了解详情,请参阅 WebhookResponse(V3) 或 WebhookResponse(V3Beta1) 参考文档。
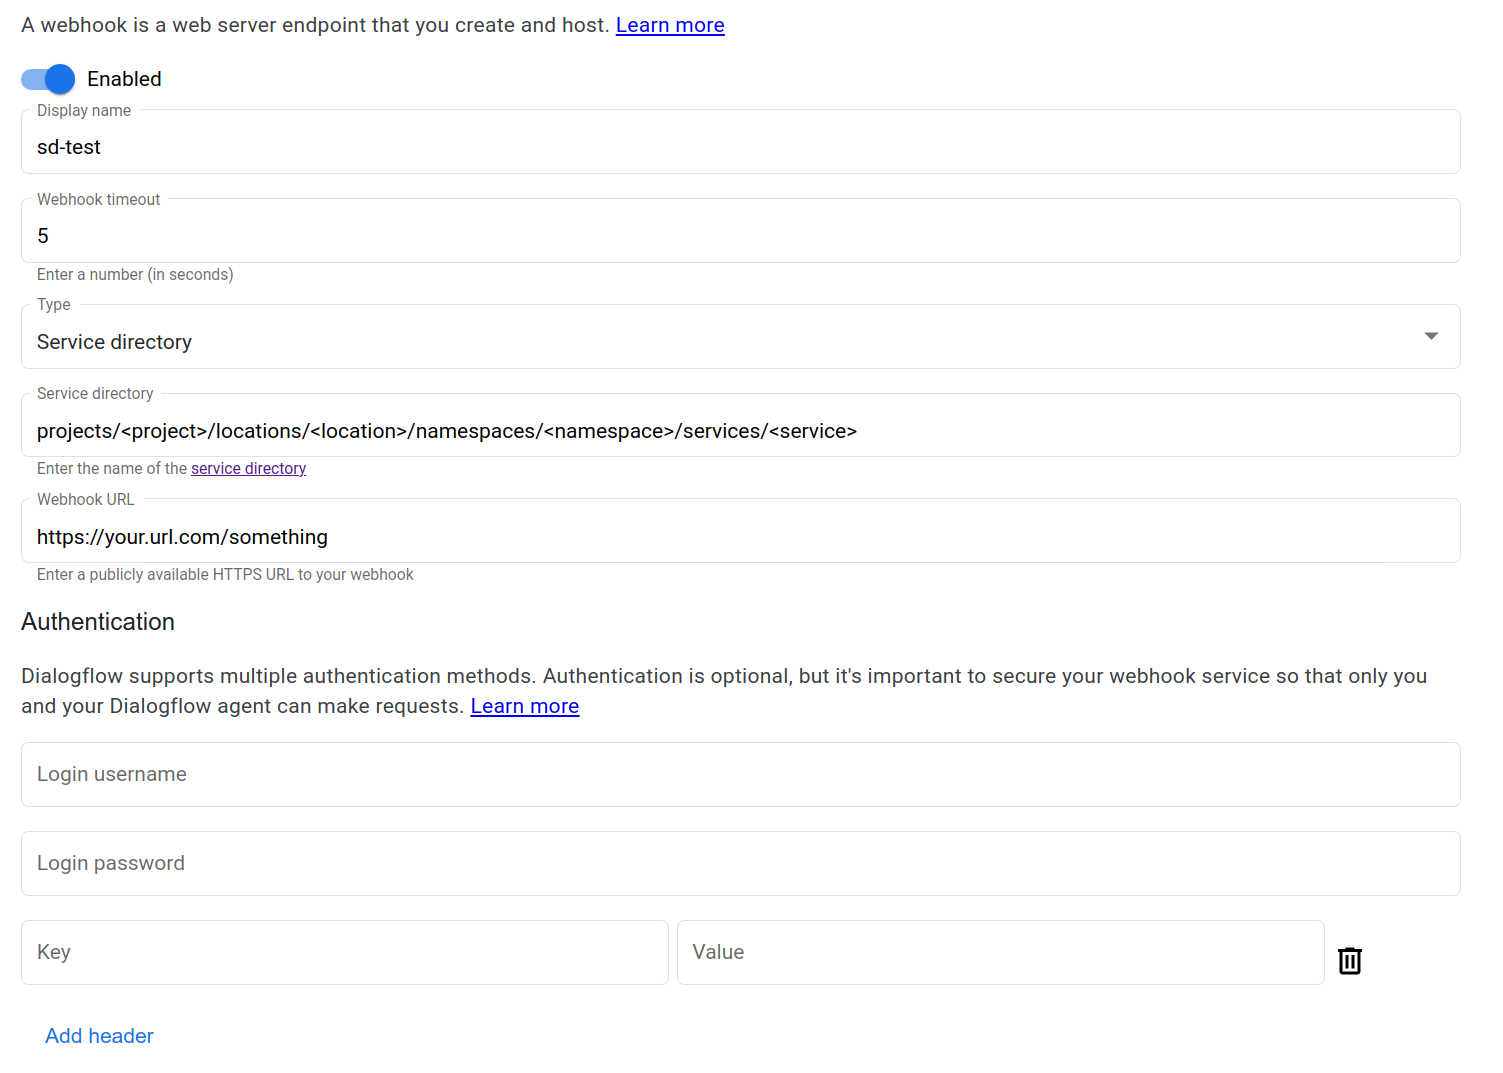
标准的网络钩子资源设置
以下介绍了标准 webhook 的 webhook 资源设置:
| 术语 | 定义 |
|---|---|
| 显示名称 | 控制台中显示的 webhook 名称。 |
| 网络钩子超时 | 当 Conversational Agents (Dialogflow CX) 向您的网络钩子服务发送网络钩子请求时,在等待响应时可能会超时。此设置用于控制超时时间(以秒为单位)。如果发生超时,Conversational Agents (Dialogflow CX) 会调用 webhook.error.timeout 事件。 |
| 类型 | 如果您使用 Service Directory 进行专用网络访问,请将其设置为 Service Directory;否则,请将其设置为 Generic web service。 |
| 网络钩子网址 | 提供您的网络钩子服务的网址。 |
| 子类型 | 设置为标准 |
| 特定于环境的 webhook | 您可以提供特定于环境的 webhook。 |
| 身份验证 | 请参阅“身份验证”部分。 |
| 自定义 CA 证书 | 用于上传自定义 CA 证书。 |
灵活的 webhook
借助灵活的 webhook,您可以定义请求 HTTP 方法、请求网址参数以及请求和响应消息的字段。请求只能提供所选的参数值,而响应只能提供参数替换值。实际上,这种限制是有益的,因为它简化了代理与 webhook 之间的接口。代理和 webhook 之间很少需要传递会话参数值以外的任何内容。这还简化了网络钩子的实现,因为请求和响应消息仅包含您需要的内容,并且您可以针对各种场景提供唯一的网络钩子消息。
灵活的 webhook 请求
为代理创建网络钩子资源时,您可以为网络钩子请求指定以下内容:
- 用于发送到您的网络钩子服务的网络钩子请求的 HTTP 方法。
- Conversational Agents (Dialogflow CX) 应使用此网址发送到您的网络钩子服务的会话参数值。
- 如果您选择
POST、PUT或PATCH作为方法,则可以指定 Conversational Agents (Dialogflow CX) 应通过请求 JSON 正文发送到您的 Webhook 服务的会话参数值。
如需使用请求网址或 JSON 正文发送会话参数值,请像往常一样使用参数引用。您无需对参数引用进行网址转义,也不需要将引用括在引号中。在运行时,Conversational Agents (Dialogflow CX) 会根据需要对参数值进行网址转义。列表或复合值将以 JSON 格式提供。
在 JSON 正文中使用参数引用时,无论参数的类型如何,都必须将引用括在引号中。如果参数实际上是数值标量、列表或复合值,对话式 AI 助理 (Dialogflow CX) 会在运行时发送请求时移除引号,以保留参数的数据类型。字符串标量类型将保持引号。如果字符串值中引用了数值标量、列表或复合值(例如:“This is a number: $session.params.size”),则该参数将被视为字符串(“This is a number: 3”)。
例如,您可以向请求网址提供 fruit 和 size 会话参数值,如下所示:
https://your-webhook-service.com/handler?f=$session.params.fruit&s=$session.params.size
并将其添加到请求 JSON 正文中,如下所示:
{
  "fruitParameter": "$session.params.fruit",
  "sizeParameter": "$session.params.size"
}
灵活的 webhook 响应
为代理创建 webhook 资源时,您可以指定会话参数,Conversational Agents (Dialogflow CX) 应在运行时将这些参数设置为 webhook 响应的特定字段。
您的响应会受到以下限制:
- 响应必须在您创建网络钩子资源时配置的超时时间内发生,否则请求将超时。
- 响应大小不得超过 64 KiB。
请使用以下格式指定标量、列表或复合字段:
$.fully.qualified.path.to.field
例如,请考虑以下 JSON 响应:
{
  "routes" : [
    {
      "legs" : [
        {
          "distance" : {
            "text" : "2,064 mi",
            "value" : 3321004
          }
        }
      ]
    }
  ]
}
如需指定“value”字段,请使用以下代码:
$.routes[0].legs[0].distance.value
灵活的网络钩子资源设置
以下介绍了灵活 webhook 的 webhook 资源设置:
| 术语 | 定义 |
|---|---|
| 显示名称 | 控制台中显示的 webhook 名称。 |
| 网络钩子超时 | 当 Conversational Agents (Dialogflow CX) 向您的网络钩子服务发送网络钩子请求时,在等待响应时可能会超时。此设置用于控制超时时间(以秒为单位)。如果发生超时,Conversational Agents (Dialogflow CX) 会调用 webhook.error.timeout 事件。 |
| 类型 | 如果您使用 Service Directory 进行专用网络访问,请将其设置为 Service Directory;否则,请将其设置为 Generic web service。 |
| 网络钩子网址 | 提供您的 webhook 服务的网址,其中可能包含对会话参数的引用。 |
| 子类型 | 设置为灵活 |
| 方法 | 设置网络钩子请求的 HTTP 方法。 |
| 请求正文 | 按照上述说明提供请求 JSON 正文。 |
| 响应配置 | 提供应设置为响应字段的会话参数(如上所述)。 |
| 特定于环境的 webhook | 您可以提供特定于环境的 webhook。 |
| 身份验证 | 请参阅“身份验证”部分。 |
| 自定义 CA 证书 | 用于上传自定义 CA 证书。 |
使用预定义的自定义模板
Dialogflow 提供预定义的自定义模板,您可以使用这些模板将灵活的网络钩子与 Salesforce CRM 集成。
在管理标签页下,依次点击 Webhook 和 + 创建。
在子类型下,选择灵活。
点击使用预定义模板进行配置以启用此功能。
在集成类型下拉菜单中,选择 Salesforce。
在 API 名称下拉菜单中,选择一个 API 名称。模板会根据您选择的 API 名称自动填写 webhook 表单。
根据您的参数,您可以手动配置以下字段(如果适用):
- 网络钩子网址
- 方法
- 请求正文 JSON
- 响应配置
必需的 OAuth 字段将在身份验证部分中突出显示。
点击保存以创建该 Webhook。
网络钩子服务要求
您的网络钩子服务必须满足以下要求:
- 它必须处理 HTTPS 请求。不支持 HTTP。如果您使用计算或无服务器计算解决方案在 Google Cloud Platform 上托管网络钩子服务,请参阅使用 HTTPS 服务的产品文档。对于其他托管项,请参阅获取您网域的 SSL 证书。
- 其请求的网址须可公开访问,除非它以 Cloud Run 资源的形式托管或以 Service Directory Webhook 的形式访问。
- 它必须按照标准网络钩子或灵活网络钩子部分中所述的方式处理请求和响应。
- 如果您的代理未与 Service Directory 专用网络访问通道集成,则网络钩子调用会被视为服务边界外,并在启用 VPC Service Controls 时被阻止。Service Directory 支持有限的端点,请参阅 Service Directory 了解详情。
身份验证
请务必保护您的网络钩子服务,确保只有您或您的 Conversational Agents (Dialogflow CX) 代理才有权发出请求。这是在创建或修改网络钩子资源时进行配置。Conversational Agents (Dialogflow CX) 支持以下身份验证机制:
| 术语 | 定义 |
|---|---|
| 身份验证标头 | 对于 webhook 设置,您可以指定可选的 HTTP 标头键值对。如果已提供,Conversational Agents (Dialogflow CX) 会将这些 HTTP 标头添加到网络钩子请求中。通常,提供一个键为 authorization 的对即可。这些标头值支持会话参数引用和系统函数解析,就像在静态响应消息中一样。如果您为 authorization 标头使用静态凭据,我们建议您使用 Secret Manager 提供凭据。 |
| 使用用户名和密码进行基本身份验证 | 对于 webhook 设置,您可以指定可选的登录用户名和密码值。如果提供,Conversational Agents (Dialogflow CX) 会向网络钩子请求添加授权 HTTP 标头。此标头的格式为:"authorization: Basic <base 64 encoding of the string username:password>"。我们建议您使用 Secret Manager 提供用户名和密码。 |
| 第三方 OAuth | 您可以指定第三方 OAuth 配置,以便 Conversational Agents (Dialogflow CX) 从 OAuth 系统交换访问令牌,并将其添加到授权 HTTP 标头中。仅支持客户端凭据流程。我们建议您使用 Secret Manager 提供客户端密钥。 |
| 服务代理访问令牌 | 已停用 |
| 服务账号 | 您可以使用服务账号进行身份验证。此凭据可用于访问其他 Google Cloud API。 |
| 服务代理 ID 令牌 | 您可以在服务代理身份验证中选择 ID 令牌,以使用服务代理 ID 令牌进行身份验证。可用于访问 Cloud Run 资源。 |
| 双向 TLS 身份验证 | 请参阅双向 TLS 身份验证文档。 |
第三方 OAuth
Conversational Agents (Dialogflow CX) 可以从第三方 OAuth 提供方收集访问令牌,并在发出 webhook 请求时将其添加到授权 HTTP 标头中。
以下介绍了第三方 OAuth 的资源设置:
| 术语 | 定义 |
|---|---|
| 客户端 ID | 请求 OAuth 令牌时要使用的客户端 ID。 |
| 客户端密钥 | 请求 OAuth 令牌时要使用的密钥。我们建议您使用 Secret Manager 提供客户端密钥。 |
| OAuth 端点网址 | 用于请求 OAuth 令牌的网址。 |
| OAuth 范围 | OAuth 令牌可用于的范围的逗号分隔列表。 |
发送到 OAuth 端点网址以接收令牌的请求不包含为网络钩子请求配置的自定义请求标头。您可以将自定义信息作为 OAuth 端点网址查询字符串中的参数传递给 OAuth 服务器。
服务代理 ID 令牌
Conversational Agents (Dialogflow CX) 可以使用 Conversational Agents (Dialogflow CX) 服务代理生成 ID 令牌。
当 Conversational Agents (Dialogflow CX) 调用 webhook 时,系统会在授权 HTTP 标头中添加令牌。
向以下实体授予 Invoker 角色权限后,ID 令牌便可用于访问 Cloud Run 资源
service-agent-project-number@gcp-sa-dialogflow.iam.gserviceaccount.com
用于生成 ID 令牌的受众群体将是整个网络钩子网址(不包括任何查询参数)。如果您使用的是 Cloud Run,请确保 Cloud Run 受众群体支持此网址。例如,如果网络钩子网址为
https://myproject.cloudfunctions.net/my-function/method1?query=value
自定义受众群体中需要包含以下网址。
https://myproject.cloudfunctions.net/my-function/method1
任何网络钩子也可以选择性地使用 Google 客户端库或 github.com/googleapis/google-auth-library-nodejs 等开源库验证令牌。
服务账号
服务账号可用于对任何支持 webhook 的 Google API 发出的 webhook 请求进行身份验证。
如果您还没有服务账号,请创建一个服务账号。
由于服务账号是主账号,因此您可以为服务账号授予角色(就像为任何其他主账号授予角色一样),以便服务账号能够访问您项目中的资源。系统会使用服务账号电子邮件地址生成访问令牌,并将其发送在该 webhook 请求的 Authorization 标头中。
配置 webhook 以使用服务账号的用户必须具有以下权限:
roles/iam.serviceAccountUser
为了让 Conversational Agents (Dialogflow CX) 生成令牌,Dialogflow Service Agent 必须具有以下权限:
roles/iam.serviceAccountTokenCreator
该服务账号还必须有权访问托管该 webhook 的服务。
Secret Manager 身份验证
如果您使用身份验证标头、使用用户名和密码进行基本身份验证,或使用第三方 OAuth,则可以使用 Secret Manager 将凭据存储为密钥。以下是使用密钥对 webhook 进行身份验证的必要步骤:
- 如果您还没有 Secret,请创建 Secret。
- 向 Dialogflow Service Agent 授予对新 Secret 的 Secret Manager Secret Accessor (
roles/secretmanager.secretAccessor) 角色。 - 将您的凭据复制到剪贴板。
- 向密文添加新的密文版本。将您的凭据粘贴为 Secret 值。
- 如果您使用身份验证标头,请输入
Bearer <YOUR_CREDENTIAL>。 - 如果您使用的是基本用户名和密码身份验证,请改为输入
<YOUR_USERNAME>:<YOUR_PASSWORD>。 - 请省略末尾的所有换行符。
- 如果您使用身份验证标头,请输入
- 复制您刚刚添加的 Secret 版本的名称。名称格式为
projects/{project_id}/secrets/{secret_id}/versions/{version_id}"。 - 打开 Webhook 修改界面,然后执行以下操作:
- 如果您使用身份验证标头,请创建新的Secret 版本请求标头。输入“Authorization”作为键,然后将 Secret 版本名称粘贴到 Secret 版本输入框中。
- 如果您使用的是基本用户名和密码身份验证,请点击 Basic Auth 下的 Secret version,然后将 Secret 版本名称粘贴到 Secret version 输入框中。
- 如果您使用第三方 OAuth,请点击第三方 OAuth 下的密钥版本,然后将密钥版本名称粘贴到密钥版本输入框中。
- 点击保存。
HTTPS 证书验证
默认情况下,Conversational Agents (Dialogflow CX) 使用 Google 的默认信任库来验证 HTTPS 证书。如果您打算为 HTTPS 服务器使用 Google 的默认信任库无法识别的证书(例如自签名证书或自定义根证书),请参阅自定义 CA 证书。
特定于环境的 webhook
如果您使用环境将生产系统与开发系统隔离开来(推荐),则可以将 webhook 配置为特定于环境。对于您定义的每个 webhook 资源,您都可以为为代理定义的每个环境提供唯一的网址和身份验证设置。
这样,您就可以在将 webhook 代码更新部署到生产环境之前,安全地开发和测试这些更新。
创建或修改网络钩子资源
运行网络钩子服务后,您需要在代理中创建具有连接和身份验证信息的网络钩子资源。创建后,您还可以随时修改 webhook 资源设置。
如需创建或修改网络钩子资源,请执行以下操作:
控制台
- 打开 Dialogflow CX 控制台。
- 选择您的 Google Cloud 项目。
- 选择您的代理。
- 选择管理标签页。
- 点击网络钩子。
- 点击创建,或点击要修改的列表中的某个聊天通知钩子资源。
- 输入标准的 Webhook 资源设置或灵活的 Webhook 资源设置。
- 点击保存。
API
如需创建网络钩子资源,请参阅 Webhook 类型的 create 方法。如需修改 webhook 资源(环境专用设置除外),请参阅 Webhook 类型的 patch 或 update 方法。
为网络钩子参考选择协议和版本:
| 协议 | V3 | V3beta1 |
|---|---|---|
| REST | 网络钩子资源 | 网络钩子资源 |
| RPC | 网络钩子接口 | 网络钩子接口 |
| C++ | WebhooksClient | 不可用 |
| C# | WebhooksClient | 不可用 |
| Go | WebhooksClient | 不可用 |
| Java | WebhooksClient | WebhooksClient |
| Node.js | WebhooksClient | WebhooksClient |
| PHP | 不可用 | 不可用 |
| Python | WebhooksClient | WebhooksClient |
| Ruby | 不可用 | 不可用 |
如需修改特定于环境的 webhook 设置,请参阅 Environment 类型的 patch 或 update 方法。
为环境参考选择协议和版本:
| 协议 | V3 | V3beta1 |
|---|---|---|
| REST | 环境资源 | 环境资源 |
| RPC | 环境接口 | 环境接口 |
| C++ | EnvironmentsClient | 不可用 |
| C# | EnvironmentsClient | 不可用 |
| Go | EnvironmentsClient | 不可用 |
| Java | EnvironmentsClient | EnvironmentsClient |
| Node.js | EnvironmentsClient | EnvironmentsClient |
| PHP | 不可用 | 不可用 |
| Python | EnvironmentsClient | EnvironmentsClient |
| Ruby | 不可用 | 不可用 |
网络钩子错误
如果您的网络钩子服务在处理网络钩子请求时发生错误,则网络钩子代码应返回以下某个 HTTP 状态代码:
400Bad Request401Unauthorized403Forbidden404Not found500Server fault503Service Unavailable
在以下任何一种错误情况下,Conversational Agents (Dialogflow CX) 都会调用网络钩子错误或超时内置事件,并继续照常处理:
- 响应已超时。
- 收到错误状态代码。
- 无效响应。
- 网络钩子服务不可用。
此外,如果网络钩子服务调用是由检测意图 API 调用触发的,则检测意图响应中的 queryResult.webhookStatuses 字段包含网络钩子状态信息。
自动重试
Conversational Agents (Dialogflow CX) 包含内部机制,可在发生特定网络钩子错误时自动重试,以提高稳健性。系统只会重试非终端错误(例如超时或连接错误)。
为了降低重复调用的可能性,请执行以下操作:
- 设置更长的 webhook 超时阈值。
- 支持在 webhook 逻辑中实现幂等性或去重。
使用 Cloud Run
Conversational Agents (Dialogflow CX) 与 Cloud Run 集成,因此您可以创建安全的无服务器网络钩子。如果您创建的 Cloud Run 资源与您的代理位于同一项目中,请在身份验证配置中选择 Service Agent Auth -> ID Token,以便您的代理可以安全地调用您的网络钩子。
不过,在下面两种情况下,您必须手动设置此集成:
- 您的代理项目必须存在具有以下地址的 Conversational Agents (Dialogflow CX) Service Agent
service account:
service-agent-project-number@gcp-sa-dialogflow.iam.gserviceaccount.com
- 为项目创建新的代理。
- 执行以下命令:
gcloud beta services identity create --service=dialogflow.googleapis.com --project=agent-project-id
- 如果网络钩子函数位于与代理不同的项目中,则必须向 Cloud Run 资源项目中的 Conversational Agents (Dialogflow CX) Service Agent 服务账号提供 Cloud Run Invoker 或 Cloud Functions Invoker IAM 角色。
- 在“身份验证配置”部分中,依次选择 Service Agent Auth -> ID Token。
使用容器化 webhook 和 Go ezcx 框架
如果您想使用 Go 实现容器化 webhook,请参阅 Go ezcx 框架。此框架可以简化创建 webhook 时所需的许多步骤。
将 Cloud Run 与仅限内部流量搭配使用
只要代理位于同一项目或同一 VPC Service Controls 边界中,设置为接受来自同一项目或同一 VPC Service Controls 边界中 VPC 网络的内部流量的 Cloud Run 资源就可以用作 webhook。
使用 Service Directory 进行专用网络访问
对话式 AI 助理 (Dialogflow CX) 与 Service Directory 专用网络访问集成,因此可以连接到 VPC 网络内的网络钩子目标。这样便可保留在 Google Cloud 网络内部的流量,并强制执行 IAM 和 VPC Service Controls。
如需设置以专用网络为目标的网络钩子,请执行以下操作:
按照 Service Directory 专用网络配置中的说明来配置 VPC 网络和 Service Directory 端点。
您的代理项目必须存在具有以下地址的 Conversational Agents (Dialogflow CX) Service Agent service account:
service-agent-project-number@gcp-sa-dialogflow.iam.gserviceaccount.com
在您的 Service Directory 所在的项目中,向 Conversational Agents (Dialogflow CX) Service Agent 服务账号授予以下角色:
servicedirectory.viewerservicedirectory.pscAuthorizedService
此外,如果您的 Service Directory 位于与 Dialogflow CX 代理不同的项目中,您还需要向托管 Dialogflow CX 代理的项目中的对话式代理 (Dialogflow CX) 服务代理账号授予
servicedirectory.viewer角色。创建网络钩子时,提供 Service Directory 服务以及网址和可选的身份验证信息。
控制台
API
请参阅
Webhook类型的serviceDirectory字段。为网络钩子参考选择协议和版本:
协议 V3 V3beta1 REST 网络钩子资源 网络钩子资源 RPC 网络钩子接口 网络钩子接口 C++ WebhooksClient 不可用 C# WebhooksClient 不可用 Go WebhooksClient 不可用 Java WebhooksClient WebhooksClient Node.js WebhooksClient WebhooksClient PHP 不可用 不可用 Python WebhooksClient WebhooksClient Ruby 不可用 不可用
如需排查问题,您可以设置非公开拨测,以检查 Service Directory 是否配置正确。
示例和问题排查
请参阅网络钩子方法指南。