Hinweise
Richten Sie ein Google Cloud -Projekt und zwei (2) Cloud Storage-Buckets ein, falls Sie dies noch nicht getan haben.
Projekt einrichten
- Sign in to your Google Cloud account. If you're new to Google Cloud, create an account to evaluate how our products perform in real-world scenarios. New customers also get $300 in free credits to run, test, and deploy workloads.
-
In the Google Cloud console, on the project selector page, select or create a Google Cloud project.
Roles required to select or create a project
- Select a project: Selecting a project doesn't require a specific IAM role—you can select any project that you've been granted a role on.
-
Create a project: To create a project, you need the Project Creator
(
roles/resourcemanager.projectCreator), which contains theresourcemanager.projects.createpermission. Learn how to grant roles.
-
Verify that billing is enabled for your Google Cloud project.
-
Enable the Dataproc, Compute Engine, Cloud Storage, and Cloud Run functions APIs.
Roles required to enable APIs
To enable APIs, you need the Service Usage Admin IAM role (
roles/serviceusage.serviceUsageAdmin), which contains theserviceusage.services.enablepermission. Learn how to grant roles. -
Install the Google Cloud CLI.
-
Wenn Sie einen externen Identitätsanbieter (IdP) verwenden, müssen Sie sich zuerst mit Ihrer föderierten Identität in der gcloud CLI anmelden.
-
Führen Sie folgenden Befehl aus, um die gcloud CLI zu initialisieren:
gcloud init -
In the Google Cloud console, on the project selector page, select or create a Google Cloud project.
Roles required to select or create a project
- Select a project: Selecting a project doesn't require a specific IAM role—you can select any project that you've been granted a role on.
-
Create a project: To create a project, you need the Project Creator
(
roles/resourcemanager.projectCreator), which contains theresourcemanager.projects.createpermission. Learn how to grant roles.
-
Verify that billing is enabled for your Google Cloud project.
-
Enable the Dataproc, Compute Engine, Cloud Storage, and Cloud Run functions APIs.
Roles required to enable APIs
To enable APIs, you need the Service Usage Admin IAM role (
roles/serviceusage.serviceUsageAdmin), which contains theserviceusage.services.enablepermission. Learn how to grant roles. -
Install the Google Cloud CLI.
-
Wenn Sie einen externen Identitätsanbieter (IdP) verwenden, müssen Sie sich zuerst mit Ihrer föderierten Identität in der gcloud CLI anmelden.
-
Führen Sie folgenden Befehl aus, um die gcloud CLI zu initialisieren:
gcloud init - In the Google Cloud console, go to the Cloud Storage Buckets page.
- Click Create.
- On the Create a bucket page, enter your bucket information. To go to the next
step, click Continue.
-
In the Get started section, do the following:
- Enter a globally unique name that meets the bucket naming requirements.
- To add a
bucket label,
expand the Labels section (),
click add_box
Add label, and specify a
keyand avaluefor your label.
-
In the Choose where to store your data section, do the following:
- Select a Location type.
- Choose a location where your bucket's data is permanently stored from the Location type drop-down menu.
- If you select the dual-region location type, you can also choose to enable turbo replication by using the relevant checkbox.
- To set up cross-bucket replication, select
Add cross-bucket replication via Storage Transfer Service and
follow these steps:
Set up cross-bucket replication
- In the Bucket menu, select a bucket.
In the Replication settings section, click Configure to configure settings for the replication job.
The Configure cross-bucket replication pane appears.
- To filter objects to replicate by object name prefix, enter a prefix that you want to include or exclude objects from, then click Add a prefix.
- To set a storage class for the replicated objects, select a storage class from the Storage class menu. If you skip this step, the replicated objects will use the destination bucket's storage class by default.
- Click Done.
-
In the Choose how to store your data section, do the following:
- Select a default storage class for the bucket or Autoclass for automatic storage class management of your bucket's data.
- To enable hierarchical namespace, in the Optimize storage for data-intensive workloads section, select Enable hierarchical namespace on this bucket.
- In the Choose how to control access to objects section, select whether or not your bucket enforces public access prevention, and select an access control method for your bucket's objects.
-
In the Choose how to protect object data section, do the
following:
- Select any of the options under Data protection that you
want to set for your bucket.
- To enable soft delete, click the Soft delete policy (For data recovery) checkbox, and specify the number of days you want to retain objects after deletion.
- To set Object Versioning, click the Object versioning (For version control) checkbox, and specify the maximum number of versions per object and the number of days after which the noncurrent versions expire.
- To enable the retention policy on objects and buckets, click the Retention (For compliance) checkbox, and then do the following:
- To enable Object Retention Lock, click the Enable object retention checkbox.
- To enable Bucket Lock, click the Set bucket retention policy checkbox, and choose a unit of time and a length of time for your retention period.
- To choose how your object data will be encrypted, expand the Data encryption section (), and select a Data encryption method.
- Select any of the options under Data protection that you
want to set for your bucket.
-
In the Get started section, do the following:
- Click Create.
- Erstellen Sie die Workflow-Vorlage.
  gcloud dataproc workflow-templates create wordcount-template \
      --region=us-central1
- Fügen Sie der Workflow-Vorlage den Wordcount-Job hinzu.
-
Geben Sie output-bucket-name an, bevor Sie den Befehl ausführen. Die Funktion stellt den Eingabe-Bucket bereit.
Nachdem Sie den Namen des Ausgabe-Buckets eingegeben haben, sollte das Argument des Ausgabe-Buckets so lauten:
gs://your-output-bucket/wordcount-output". -
Die Schritt-ID „count“ ist erforderlich und identifiziert den hinzugefügten Hadoop-Job.
          gcloud dataproc workflow-templates add-job hadoop \
              --workflow-template=wordcount-template \
              --step-id=count \
              --jar=file:///usr/lib/hadoop-mapreduce/hadoop-mapreduce-examples.jar \
              --region=us-central1 \
              -- wordcount gs://input-bucket gs://output-bucket-name/wordcount-output
-
Geben Sie output-bucket-name an, bevor Sie den Befehl ausführen. Die Funktion stellt den Eingabe-Bucket bereit.
Nachdem Sie den Namen des Ausgabe-Buckets eingegeben haben, sollte das Argument des Ausgabe-Buckets so lauten:
- Führen Sie den Workflow mit einem verwalteten Einzelknoten aus. Dataproc erstellt den Cluster, führt den Workflow aus und löscht den Cluster, wenn der Workflow abgeschlossen ist.
gcloud dataproc workflow-templates set-managed-cluster wordcount-template \ --cluster-name=wordcount \ --single-node \ --region=us-central1 - Klicken Sie in der Google Cloud Console auf der Dataproc-Seite Workflows auf den Namen
wordcount-template, um die Seite Workflow-Vorlagendetails zu öffnen. Bestätigen Sie die Wordcount-template-Attribute.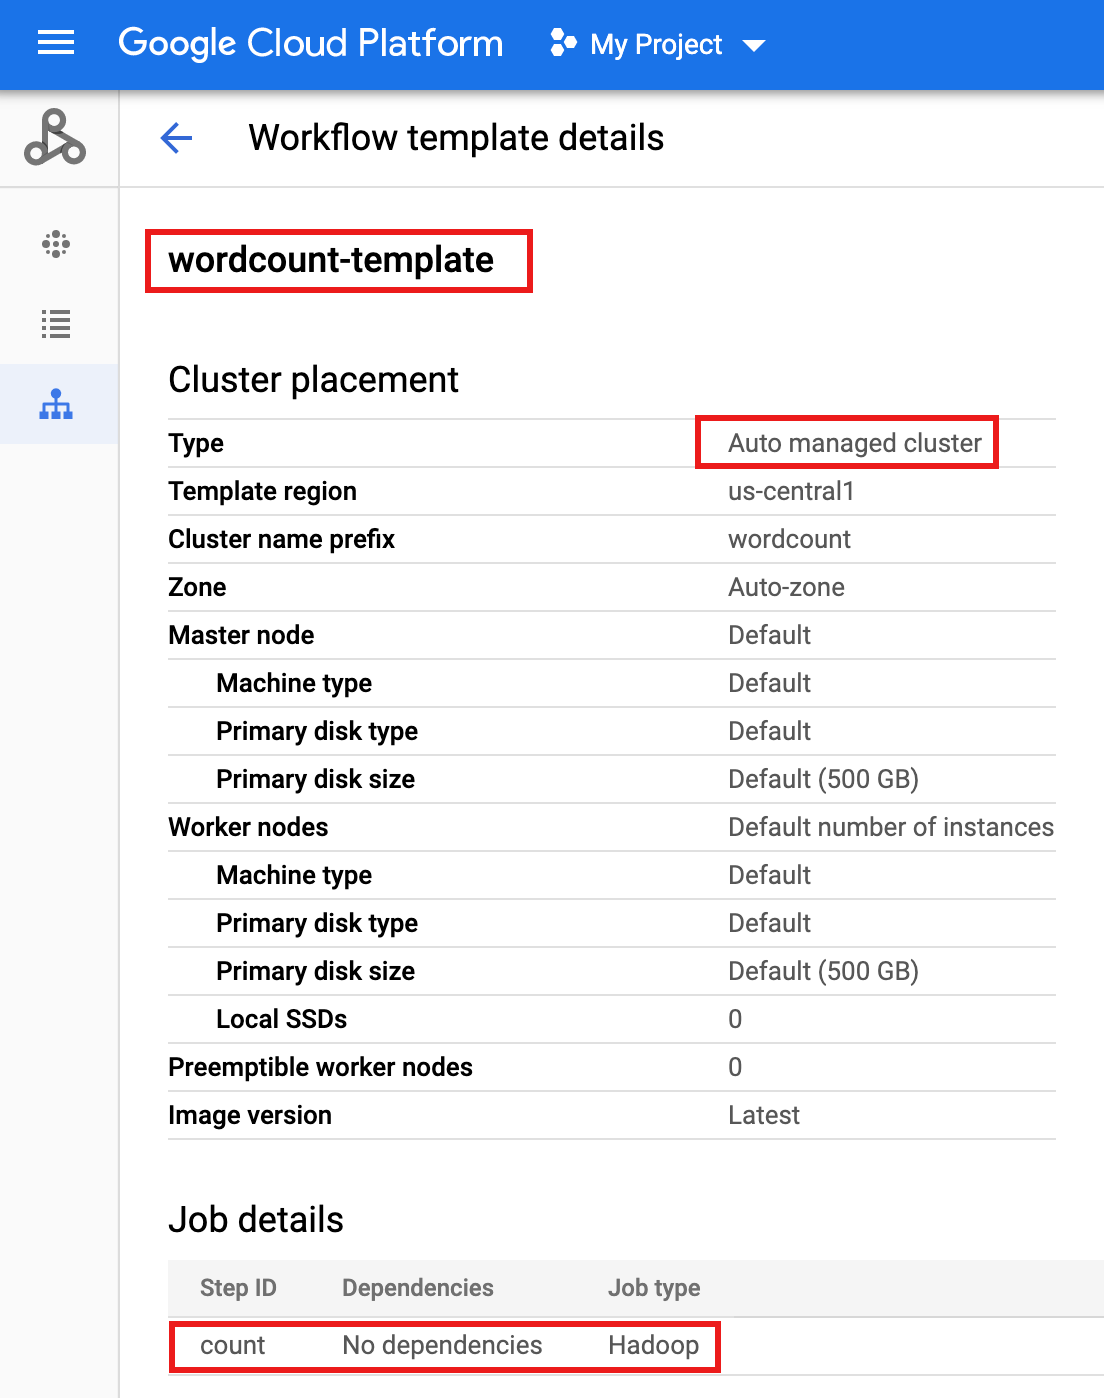
- Exportieren Sie die Workflow-Vorlage zur Parametrisierung in eine
wordcount.yaml-Textdatei.gcloud dataproc workflow-templates export wordcount-template \ --destination=wordcount.yaml \ --region=us-central1
- Öffnen Sie in einem Texteditor
wordcount.yamlund fügen Sie am Ende der YAML-Datei einenparameters-Block hinzu, damit der Cloud Storage-INPUT_BUCKET_URI alsargs[1]an die Wordcount-Binärdatei übergeben werden kann, wenn der Workflow ausgelöst wird.Unten sehen Sie ein Beispiel für eine exportierte YAML-Datei. Sie haben zwei Möglichkeiten, Ihre Vorlage zu aktualisieren:
- Kopieren Sie dann die gesamte Datei und fügen Sie sie ein, um die exportierte Datei
wordcount.yamlzu ersetzen, nachdem Sie your-output_bucket durch den Namen des Ausgabe-Buckets ersetzt haben, ODER - Kopieren Sie den Abschnitt
parametersund fügen Sie ihn an das Ende der exportiertenwordcount.yaml-Datei ein.
jobs: - hadoopJob: args: - wordcount - gs://input-bucket - gs://your-output-bucket/wordcount-output mainJarFileUri: file:///usr/lib/hadoop-mapreduce/hadoop-mapreduce-examples.jar stepId: count placement: managedCluster: clusterName: wordcount config: softwareConfig: properties: dataproc:dataproc.allow.zero.workers: 'true' parameters: - name: INPUT_BUCKET_URI description: wordcount input bucket URI fields: - jobs['count'].hadoopJob.args[1] - Kopieren Sie dann die gesamte Datei und fügen Sie sie ein, um die exportierte Datei
- Importieren Sie die parametrisierte
wordcount.yaml-Textdatei. Geben Sie "Y" ein, wenn Sie aufgefordert werden, die Vorlage zu überschreiben.gcloud dataproc workflow-templates import wordcount-template \ --source=wordcount.yaml \ --region=us-central1
Öffnen Sie in derGoogle Cloud -Konsole die Seite Cloud Run-Funktionen und klicken Sie auf FUNKTION ERSTELLEN.
Geben Sie auf der Seite Funktion erstellen die folgenden Informationen ein oder wählen Sie sie aus:
- Name: Wortzahl
- Zugewiesener Speicher:Behalten Sie die Standardauswahl bei.
- Trigger:
- cl
- Ereignistyp: Abschluss/Erstellen
- Bucket: Wählen Sie Ihren Eingabe-Bucket aus (siehe Cloud Storage-Bucket im Projekt erstellen). Wenn Sie diesem Bucket eine Datei hinzufügen, löst die Funktion den Workflow aus. Der Workflow führt die Wordcount-Anwendung aus, mit der alle Textdateien im Bucket verarbeitet werden.
Quellcode:
- Inline-Editor
- Laufzeit: Node.js 8
- Tab
INDEX.JS: Ersetzen Sie das Standard-Code-Snippet durch den folgenden Code und bearbeiten Sie die Zeileconst projectId, um Ihre -your-project-id- (ohne einen voran- oder nachgestellten "-") anzugeben.
const dataproc = require('@google-cloud/dataproc').v1; exports.startWorkflow = (data) => { const projectId = '-your-project-id-' const region = 'us-central1' const workflowTemplate = 'wordcount-template' const client = new dataproc.WorkflowTemplateServiceClient({ apiEndpoint: `${region}-dataproc.googleapis.com`, }); const file = data; console.log("Event: ", file); const inputBucketUri = `gs://${file.bucket}/${file.name}`; const request = { name: client.projectRegionWorkflowTemplatePath(projectId, region, workflowTemplate), parameters: {"INPUT_BUCKET_URI": inputBucketUri} }; client.instantiateWorkflowTemplate(request) .then(responses => { console.log("Launched Dataproc Workflow:", responses[1]); }) .catch(err => { console.error(err); }); };- Tab
PACKAGE.JSON: Ersetzen Sie das Standard-Code-Snippet durch den folgenden Code.
{ "name": "dataproc-workflow", "version": "1.0.0", "dependencies":{ "@google-cloud/dataproc": ">=1.0.0"} }- Auszuführende Funktion: Eingabe: "startWorkflow".
Klicken Sie auf ERSTELLEN.
Kopieren Sie die öffentliche Datei
rose.txtin Ihren Bucket, um die Funktion auszulösen. Fügen Sie in den Befehl your-input-bucket-name (den Bucket, der zum Auslösen der Funktion verwendet wird) ein.gcloud storage cp gs://pub/shakespeare/rose.txt gs://your-input-bucket-name
Warten Sie 30 Sekunden und führen Sie dann den folgenden Befehl aus, um zu prüfen, ob die Funktion erfolgreich ausgeführt wurde.
gcloud functions logs read wordcount
...
Function execution took 1348 ms, finished with status: 'ok'
Wenn Sie die Funktionslogs von der Listenseite Funktionen in der Google Cloud -Console aus aufrufen möchten, klicken Sie auf den Funktionsnamen
wordcountund dann auf der Seite Funktionsdetails auf „LOGS ANZEIGEN“.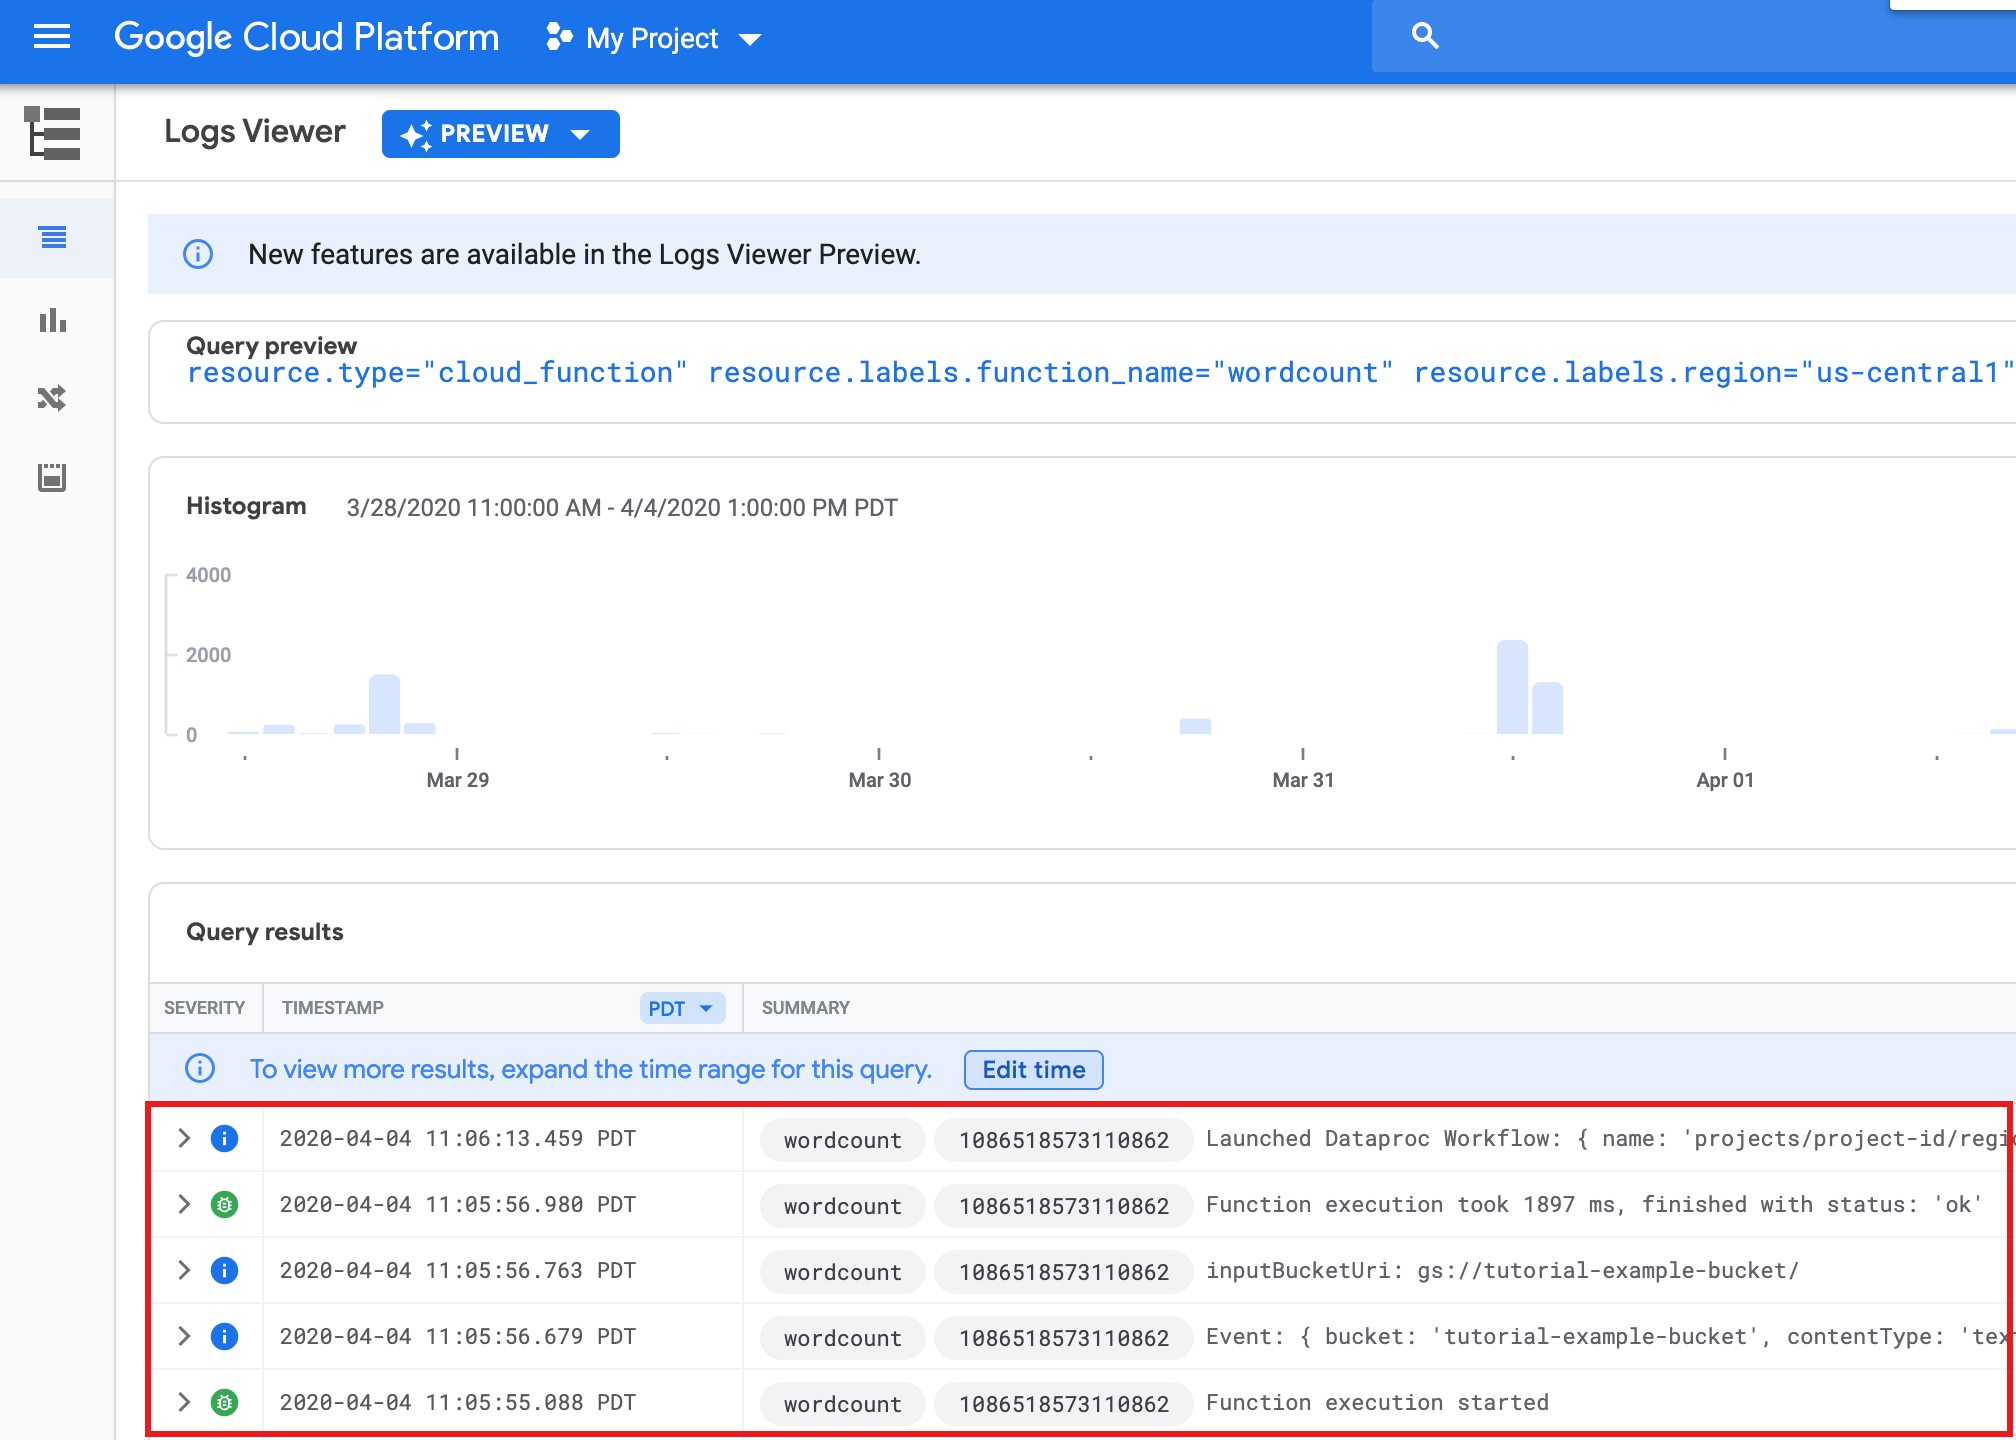
Sie können den Ordner
wordcount-outputin Ihrem Ausgabe-Bucket auf der Seite Storage-Browser in derGoogle Cloud -Konsole ansehen.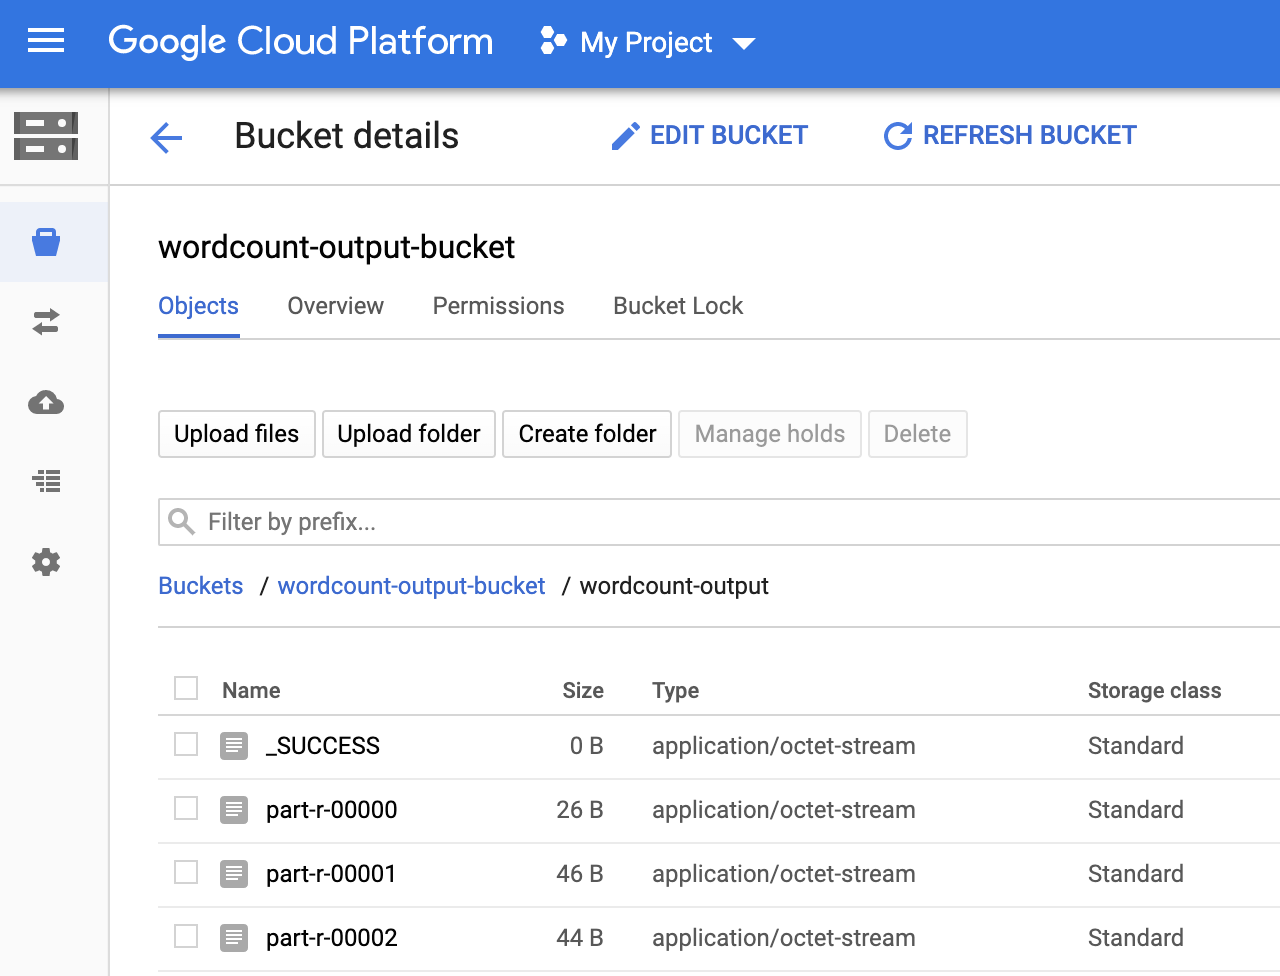
Nach Abschluss des Workflows bleiben die Jobdetails in derGoogle Cloud -Konsole erhalten. Klicken Sie auf den
count...-Job, der auf der Dataproc-Seite Jobs aufgeführt ist, um Details zum Workflow-Job anzuzeigen.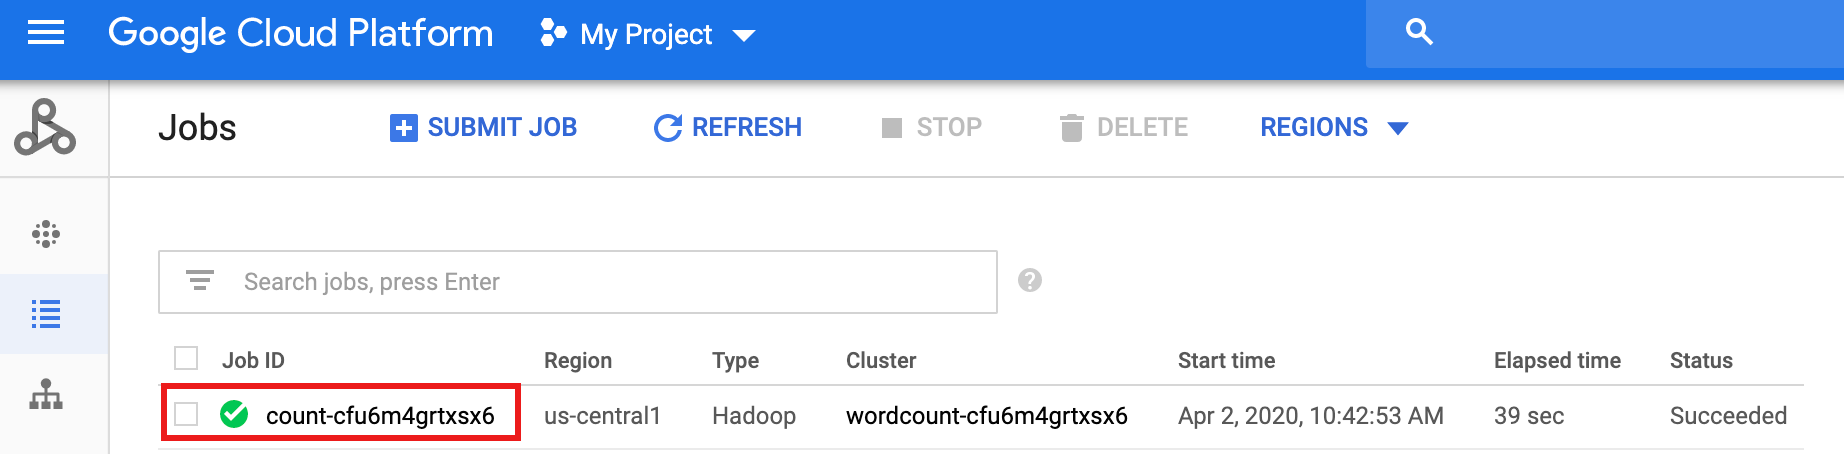
- In the Google Cloud console, go to the Manage resources page.
- In the project list, select the project that you want to delete, and then click Delete.
- In the dialog, type the project ID, and then click Shut down to delete the project.
- In the Google Cloud console, go to the Cloud Storage Buckets page.
- Click the checkbox for the bucket that you want to delete.
- To delete the bucket, click Delete, and then follow the instructions.
- Weitere Informationen finden Sie unter Übersicht über Dataproc-Workflow-Vorlagen.
- Weitere Informationen finden Sie unter Lösungen für die Workflow-Planung.
Zwei Cloud Storage-Buckets in Ihrem Projekt erstellen oder verwenden
Sie benötigen zwei Cloud Storage-Buckets in Ihrem Projekt: einen für Eingabedateien und einen für die Ausgabe.
Workflow-Vorlage erstellen
Um eine Workflow-Vorlage zu erstellen und zu definieren, kopieren Sie die folgenden Befehle und führen Sie sie in einem lokalen Terminalfenster oder in Cloud Shell aus.
Workflow-Vorlage parametrisieren
Parametrisieren Sie die Eingabe-Bucket-Variable, die an die Workflow-Vorlage übergeben werden soll.
Cloud Functions-Funktion erstellen
Funktion testen
Bereinigen
Der Workflow in dieser Anleitung löscht den verwalteten Cluster, wenn der Workflow abgeschlossen ist. Sie können andere Ressourcen aus dieser Anleitung löschen, um wiederkehrende Kosten zu vermeiden.
Projekt löschen
Cloud Storage-Buckets löschen
Workflow-Vorlage löschen
gcloud dataproc workflow-templates delete wordcount-template \
    --region=us-central1
Cloud Functions-Funktion löschen
Öffnen Sie in der Google Cloud Console die Seite Cloud Run-Funktionen, klicken Sie auf das Kästchen links neben der Funktion wordcount und klicken Sie dann auf Löschen.