This document describes how to install and use the JupyterLab extension on a machine or self-managed VM that has access to Google services. It also describes how to develop and deploy serverless Spark notebook code.
Install the extension within minutes to take advantage of the following features:
- Launch serverless Spark & BigQuery notebooks to develop code quickly
- Browse and preview BigQuery datasets in JupyterLab
- Edit Cloud Storage files in JupyterLab
- Schedule a notebook on Composer
Before you begin
- Sign in to your Google Cloud account. If you're new to Google Cloud, create an account to evaluate how our products perform in real-world scenarios. New customers also get $300 in free credits to run, test, and deploy workloads.
-
In the Google Cloud console, on the project selector page, select or create a Google Cloud project.
Roles required to select or create a project
- Select a project: Selecting a project doesn't require a specific IAM role—you can select any project that you've been granted a role on.
-
Create a project: To create a project, you need the Project Creator
(
roles/resourcemanager.projectCreator), which contains theresourcemanager.projects.createpermission. Learn how to grant roles.
-
Enable the Dataproc API.
Roles required to enable APIs
To enable APIs, you need the Service Usage Admin IAM role (
roles/serviceusage.serviceUsageAdmin), which contains theserviceusage.services.enablepermission. Learn how to grant roles. -
Install the Google Cloud CLI.
-
If you're using an external identity provider (IdP), you must first sign in to the gcloud CLI with your federated identity.
-
To initialize the gcloud CLI, run the following command:
gcloud init -
In the Google Cloud console, on the project selector page, select or create a Google Cloud project.
Roles required to select or create a project
- Select a project: Selecting a project doesn't require a specific IAM role—you can select any project that you've been granted a role on.
-
Create a project: To create a project, you need the Project Creator
(
roles/resourcemanager.projectCreator), which contains theresourcemanager.projects.createpermission. Learn how to grant roles.
-
Enable the Dataproc API.
Roles required to enable APIs
To enable APIs, you need the Service Usage Admin IAM role (
roles/serviceusage.serviceUsageAdmin), which contains theserviceusage.services.enablepermission. Learn how to grant roles. -
Install the Google Cloud CLI.
-
If you're using an external identity provider (IdP), you must first sign in to the gcloud CLI with your federated identity.
-
To initialize the gcloud CLI, run the following command:
gcloud init
Install the JupyterLab extension
You can install and use the JupyterLab extension on a machine or VM that has access to Google services, such as your local machine or a Compute Engine VM instance.
To install the extension, follow these steps:
Download and install Python version 3.11 or higher from
python.org/downloads.- Verify the Python 3.11+ installation.
python3 --version
- Verify the Python 3.11+ installation.
Virtualize the Python environment.
pip3 install pipenv
- Create a installation folder.
mkdir jupyter
- Change to the installation folder.
cd jupyter
- Create a virtual environment.
pipenv shell
- Create a installation folder.
Install JupyterLab in the virtual environment.
pipenv install jupyterlab
Install the JupyterLab extension.
pipenv install bigquery-jupyter-plugin
jupyter lab
The JupyterLab Launcher page opens in your browser. It contains a Dataproc Jobs and Sessions section. It can also contain Serverless for Apache Spark Notebooks and Dataproc Cluster Notebooks sections if you have access to Dataproc serverless notebooks or Dataproc clusters with the Jupyter optional component running in your project.

By default, your Serverless for Apache Spark Interactive session runs in the project and region you set when you ran
gcloud initin Before you begin. You can change the project and region settings for your sessions from JupyterLab Settings > Google Cloud Settings > Google Cloud Project Settings.You must restart the extension for the changes to take effect.
Create a Serverless for Apache Spark runtime template
Serverless for Apache Spark runtime templates (also called session templates) contain configuration settings for executing Spark code in a session. You can create and manage runtime templates using Jupyterlab or the gcloud CLI.
JupyterLab
Click the
New runtime templatecard in the Serverless for Apache Spark Notebooks section on the JupyterLab Launcher page.
Fill in the Runtime template form.

Template Info:
- Display name, Runtime ID, and Description: Accept or fill a template display name, template runtime ID, and template description.
Execution Configuration: Select User Account to execute notebooks with the user identity instead of the Dataproc service account identity.
- Service Account: If you do not specify a service account, the Compute Engine default service account is used.
- Runtime version: Confirm or select the runtime version.
- Custom container image: Optionally specify the URI of a custom container image.
- Staging Bucket: You can optionally specify the name of a Cloud Storage staging bucket for use by Serverless for Apache Spark.
- Python packages repository: By default, Python packages are
downloaded and installed from the PyPI pull-through cache
when users execute
pipinstall commands in their notebooks. You can specify your organization's private artifacts repository for Python packages to use as the default Python packages repository.
Encryption: Accept the default Google-owned and Google-managed encryption key or select Customer-managed encryption key (CMEK). If CMEK, select of provide the key information.
Network Configuration: Select a subnetwork in the project or shared from a host project (you can change the project from JupyterLab Settings > Google Cloud Settings > Google Cloud Project Settings. You can specify network tags to apply to the specified network. Note that Serverless for Apache Spark enables Private Google Access (PGA) on the specified subnet. For network connectivity requirements, see Google Cloud Serverless for Apache Spark network configuration.
Session Configuration: You can optionally fill in these fields to limit the duration of sessions created with the template.
- Max idle time: The maximum idle time before the session is terminated. Allowable range: 10 minutes to 336 hours (14 days).
- Max session time: The maximum lifetime of a session before the session is terminated. Allowable range: 10 minutes to 336 hours (14 days).
Metastore: To use a Dataproc Metastore service with your sessions, select the metastore project ID and service.
Persistent History Server: You can select an available Persistent Spark History Server to allow you to access session logs during and after sessions.
Spark properties: You can select then add Spark Resource Allocation, Autoscaling, or GPU properties. Click Add Property to add other Spark properties. For more information, see Spark properties.
Labels: Click Add Label for each label to set on sessions created with the template.
Click Save to create the template.
To view or delete a runtime template.
- Click Settings > Google Cloud Settings.
The Dataproc Settings > Serverless Runtime Templates section displays the list of runtime templates.

- Click a template name to view template details.
- You can delete a template from the Action menu for the template.
Open and reload the JupyterLab Launcher page to view the saved notebook template card on the JupyterLab Launcher page.

gcloud
Create a YAML file with your runtime template configuration.
Simple YAML
environmentConfig:
  executionConfig:
    networkUri: default
jupyterSession:
  kernel: PYTHON
  displayName: Team A
labels:
  purpose: testing
description: Team A Development Environment
Complex YAML
description: Example session template
environmentConfig:
  executionConfig:
    serviceAccount: sa1
    # Choose either networkUri or subnetworkUri
    networkUri:
    subnetworkUri: default
    networkTags:
     - tag1
    kmsKey: key1
    idleTtl: 3600s
    ttl: 14400s
    stagingBucket: staging-bucket
  peripheralsConfig:
    metastoreService: projects/my-project-id/locations/us-central1/services/my-metastore-id
    sparkHistoryServerConfig:
      dataprocCluster: projects/my-project-id/regions/us-central1/clusters/my-cluster-id
jupyterSession:
  kernel: PYTHON
  displayName: Team A
labels:
  purpose: testing
runtimeConfig:
  version: "2.3"
  containerImage: gcr.io/my-project-id/my-image:1.0.1
  properties:
    "p1": "v1"
description: Team A Development Environment
Create a session (runtime) template from your YAML file by running the following gcloud beta dataproc session-templates import command locally or in Cloud Shell:
gcloud beta dataproc session-templates import TEMPLATE_ID \
    --source=YAML_FILE \
    --project=PROJECT_ID \
    --location=REGION
- See gcloud beta dataproc session-templates for commands to describe, list, export, and delete session templates.
Launch and manage notebooks
After installing the Dataproc JupyterLab extension, you can click template cards on the JupyterLab Launcher page to:
Launch a Jupyter notebook on Serverless for Apache Spark
The Serverless for Apache Spark Notebooks section on the JupyterLab Launcher page displays notebook template cards that map to Serverless for Apache Spark runtime templates (see Create a Serverless for Apache Spark runtime template).

Click a card to create a Serverless for Apache Spark session and launch a notebook. When session creation is complete and the notebook kernel is ready to use, the kernel status changes from
StartingtoIdle (Ready).Write and test notebook code.
Copy and paste the following PySpark
Pi estimationcode in the PySpark notebook cell, then press Shift+Return to run the code.import random def inside(p): x, y = random.random(), random.random() return x*x + y*y < 1 count = sc.parallelize(range(0, 10000)) .filter(inside).count() print("Pi is roughly %f" % (4.0 * count / 10000))
Notebook result:

After creating and using a notebook, you can terminate the notebook session by clicking Shut Down Kernel from the Kernel tab.
- To reuse the session, create a new notebook by choosing Notebook from the File>>New menu. After the new notebook is created, choose the existing session from the kernel selection dialog. The new notebook will reuse the session and retain the session context from the previous notebook.
If you don't terminate the session, Dataproc terminates the session when the session idle timer expires. You can configure the session idle time in the runtime template configuration. The default session idle time is one hour.
Launch a notebook on a Dataproc on Compute Engine cluster
If you created a Dataproc on Compute Engine Jupyter cluster, the JupyterLab Launcher page contains a Dataproc Cluster Notebook section with pre-installed kernel cards.

To launch a Jupyter notebook on your Dataproc on Compute Engine cluster:
Click a card in the Dataproc Cluster Notebook section.
When the kernel status changes from
StartingtoIdle (Ready), you can start writing and executing notebook code.After creating and using a notebook, you can terminate the notebook session by clicking Shut Down Kernel from the Kernel tab.
Manage input and output files in Cloud Storage
Analyzing exploratory data and building ML models often involves file-based inputs and outputs. Serverless for Apache Spark accesses these files on Cloud Storage.
To access the Cloud Storage browser, click the Cloud Storage browser icon in the JupyterLab Launcher page sidebar, then double-click a folder to view its contents.

You can click Jupyter-supported file types to open and edit them. When you save changes to the files, they are written to Cloud Storage.
To create a new Cloud Storage folder, click the new folder icon, then enter the name of the folder.
To upload files into a Cloud Storage bucket or a folder, click the upload icon, then select the files to upload.
Develop Spark notebook code
After installing the Dataproc JupyterLab extension, you can launch Jupyter notebooks from the JupyterLab Launcher page to develop application code.
PySpark and Python code development
Serverless for Apache Spark and Dataproc on Compute Engine clusters support PySpark kernels. Dataproc on Compute Engine also supports Python kernels.
Click a PySpark card in the Serverless for Apache Spark Notebooks or Dataproc Cluster Notebook section on the JupyterLab Launcher page to open a PySpark notebook.
Click a Python kernel card in the Dataproc Cluster Notebook section on the JupyterLab Launcher page to open a Python notebook.
SQL code development
To open a PySpark notebook to write and execute SQL code, on the JupyterLab Launcher page, in the Serverless for Apache Spark Notebooks or Dataproc Cluster Notebook section, click the PySpark kernel card.
Spark SQL magic: Since the PySpark kernel that launches
Serverless for Apache Spark Notebooks
is preloaded with Spark SQL magic, instead of using spark.sql('SQL STATEMENT').show()
to wrap your SQL statement, you can type
%%sparksql magic at the top of a cell, then type your SQL statement in the cell.
BigQuery SQL: The BigQuery Spark connector allows your notebook code to load data from BigQuery tables, perform analysis in Spark, and then write the results to a BigQuery table.

The Serverless for Apache Spark 2.2
and later runtimes include the
BigQuery Spark connector.
If you use earlier runtime to launch Serverless for Apache Spark notebooks,
you can install Spark BigQuery Connector by adding the following Spark property
to your Serverless for Apache Spark runtime template:
spark.jars: gs://spark-lib/bigquery/spark-bigquery-with-dependencies_2.12-0.25.2.jar
Scala code development
Dataproc on Compute Engine clusters created with image
versions 2.0 and later include Apache Toree,
a Scala kernel for the Jupyter Notebook platform that provides interactive access
to Spark.
Click the Apache Toree card in the Dataproc cluster Notebook section on the JupyterLab Launcher page to open a notebook for Scala code development.
Figure 1. Apache Toree kernel card in the JupyterLab Launcher page.
Develop code with the Visual Studio Code extension
You can use the Google Cloud Visual Studio Code (VS Code) extension lets you do the following:
- Develop and run Spark code in Serverless for Apache Spark notebooks.
- Create and manage Serverless for Apache Spark runtime (session) templates, interactive sessions, and batch workloads.
The Visual Studio Code extension is free, but you are charged for any Google Cloud services, including Dataproc, Serverless for Apache Spark and Cloud Storage resources that you use.
Use VS Code with BigQuery: You can also use VS Code with BigQuery to do the following:
- Develop and execute BigQuery notebooks.
- Browse, inspect, and preview BigQuery datasets.
Before you begin
- Download and install VS Code.
- Open VS Code, and then in the activity bar, click Extensions.
Using the search bar, find the Jupyter extension, and then click Install. The Jupyter extension by Microsoft is a required dependency.

Install the Google Cloud extension
- Open VS Code, and then in the activity bar, click Extensions.
Using the search bar, find the Google Cloud Code extension, and then click Install.

If prompted, restart VS Code.
The Google Cloud Code icon is now visible in the VS Code activity bar.
Configure the extension
- Open VS Code, and then in the activity bar, click Google Cloud Code.
- Open the Dataproc section.
- Click Login to Google Cloud. You are redirected to sign in with your credentials.
- Use the top-level application taskbar to navigate to Code > Settings > Settings > Extensions.
- Find Google Cloud Code, and click the Manage icon to open the menu.
- Select Settings.
- In the Project and Dataproc Region fields, enter the name of the Google Cloud project and the region to use to develop notebooks and manage Serverless for Apache Spark resources.
Develop Serverless for Apache Spark notebooks
- Open VS Code, and then in the activity bar, click Google Cloud Code.
- Open the Notebooks section, then click New Serverless Spark Notebook.
- Select or create a new runtime (session) template to use for the notebook session.
A new
.ipynbfile containing sample code is created and opened in the editor.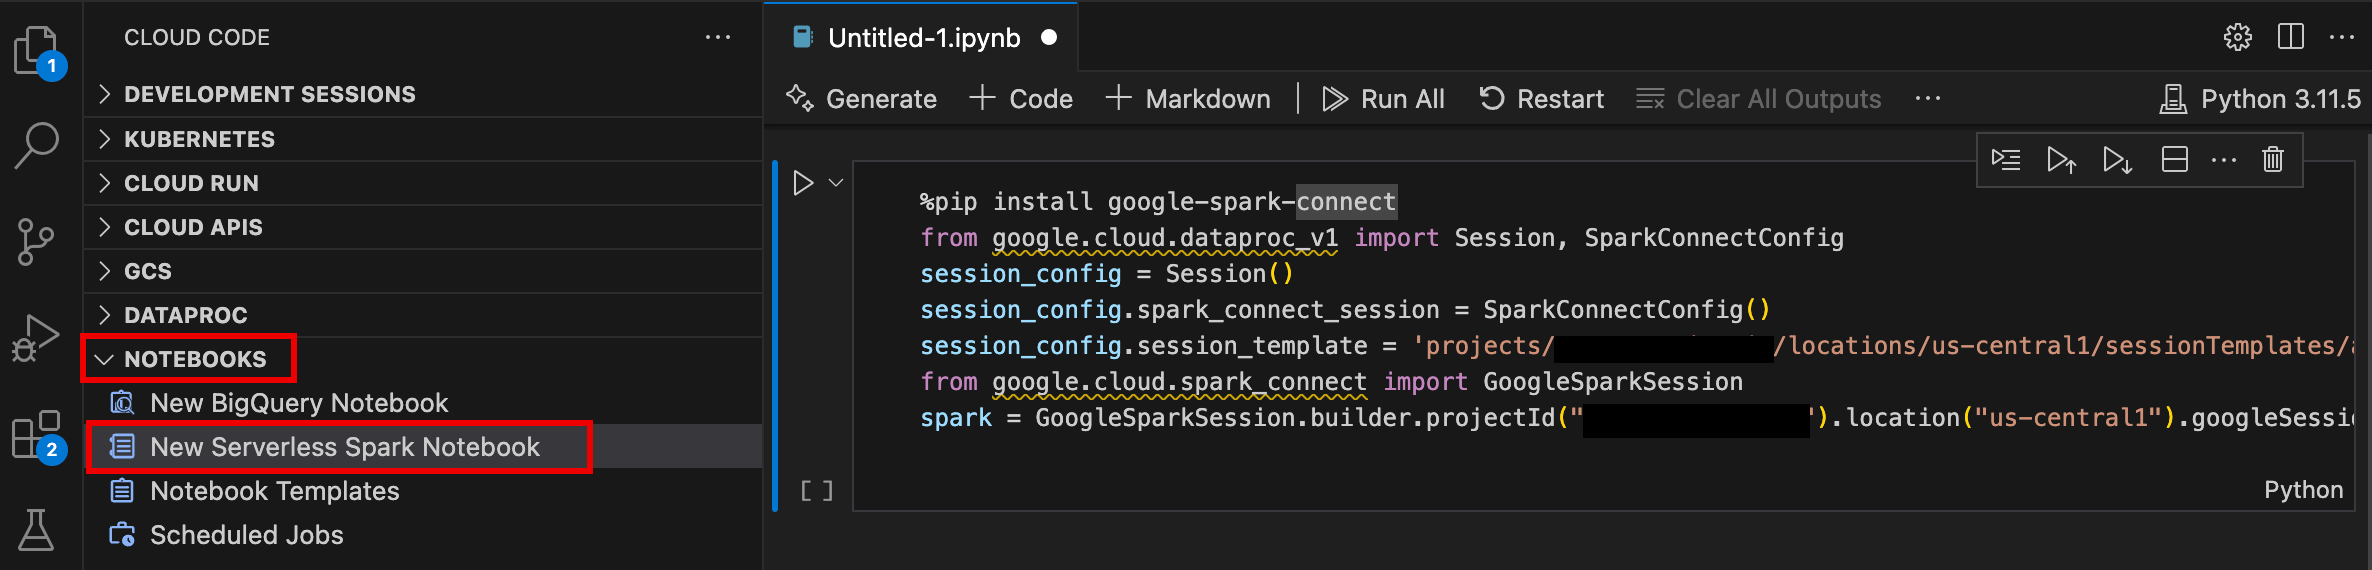
You can now write and execute code in your Serverless for Apache Spark notebook.
Create and manage Serverless for Apache Spark resources
- Open VS Code, and then in the activity bar, click Google Cloud Code.
Open the Dataproc section, then click the following resource names:
- Clusters: Create and manage clusters and jobs.
- Serverless: Create and manage batch workloads and interactive sessions.
- Spark Runtime Templates: Create and manage session templates.

Dataset explorer
Use the JupyterLab Dataset explorer to view BigLake metastore datasets.
To open the JupyterLab Dataset Explorer, click its icon in the sidebar.
You can search for a database, table, or column in the Dataset explorer. Click a database, table, or column name to view the associated metadata.

Deploy your code
After installing the Dataproc JupyterLab extension, you can use JupyterLab to:
Execute your notebook code on the Google Cloud Serverless for Apache Spark infrastructure
Schedule notebook execution on Cloud Composer
Submit batch jobs to the Google Cloud Serverless for Apache Spark infrastructure or to your Dataproc on Compute Engine cluster.
Schedule notebook execution on Cloud Composer
Complete the following steps to schedule your notebook code on Cloud Composer to run as a batch job on Serverless for Apache Spark or on a Dataproc on Compute Engine cluster.
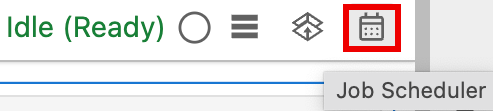
Click the Job Scheduler button on top right of the notebook.
Fill in the Create A Scheduled Job form to provide the following information:
- A unique name for the notebook execution job
- The Cloud Composer environment to use to deploy the notebook
- Input parameters if the notebook is parameterized
- The Dataproc cluster or serverless runtime template to use
run the notebook
- If a cluster is selected, whether to stop the cluster after the notebook finishes executing on the cluster
- Retry count and retry delay in minutes if notebook execution fails on the first try
- Execution notifications to send and the recipient list. Notifications are sent using an Airflow SMTP configuration.
- The notebook execution schedule
Click Create.
After the notebook is successfully scheduled, the job name appears in the list of scheduled jobs in the Cloud Composer environment.

Submit a batch job to Google Cloud Serverless for Apache Spark
Click the Serverless card in the Dataproc Jobs and Sessions section on the JupyterLab Launcher page.
Click the Batch tab, then click Create Batch and fill in the Batch Info fields.
Click Submit to submit the job.
Submit a batch job to a Dataproc on Compute Engine cluster
Click the Clusters card in the Dataproc Jobs and Sessions section on the JupyterLab Launcher page.
Click the Jobs tab, then click Submit Job.
Select a Cluster, then fill in the Job fields.
Click Submit to submit the job.
View and manage resources
After installing the Dataproc JupyterLab extension, you can view and manage Google Cloud Serverless for Apache Spark and Dataproc on Compute Engine from the Dataproc Jobs and Sessions section on the JupyterLab Launcher page.
Click the Dataproc Jobs and Sessions section to show the Clusters and Serverless cards.
To view and manage Google Cloud Serverless for Apache Spark sessions:
- Click the Serverless card.
- Click the Sessions tab, then a session ID to open the Session details page to view session properties, view Google Cloud logs in Logs Explorer, and terminate a session. Note: A unique Google Cloud Serverless for Apache Spark session is created to launch each Google Cloud Serverless for Apache Spark notebook.
To view and manage Google Cloud Serverless for Apache Spark batches:
- Click the Batches tab to view the list of Google Cloud Serverless for Apache Spark batches in the current project and region. Click a batch ID to view batch details.
To view and manage Dataproc on Compute Engine clusters:
- Click the Clusters card. The Clusters tab is selected to list active Dataproc on Compute Engine clusters in the current project and region. You can click the icons in the Actions column to start, stop, or restart a cluster. Click a cluster name to view cluster details. You can click the icons in the Actions column to clone, stop, or delete a job.
To view and manage Dataproc on Compute Engine jobs:
- Click the Jobs card to view the list of jobs in the current project. Click a job ID to view job details.