경우에 따라 Google Cloud 위협 인텔리전스 (GCTI) 팀에서 제공된 선별된 감지가 너무 많이 발생할 수 있습니다. 선별된 감지 규칙에 대한 제외를 구성하면 이러한 감지의 양을 줄일 수 있습니다. 규칙 제외는 Google Security Operations 선별된 감지에만 사용됩니다.
선별된 감지 규칙에 대한 제외를 구성하려면 다음 단계를 수행합니다.
탐색 메뉴에서 규칙 및 감지를 선택합니다. 제외 탭을 클릭합니다.
제외 만들기를 클릭하여 새 제외를 만듭니다. 제외 만들기 창이 열립니다.
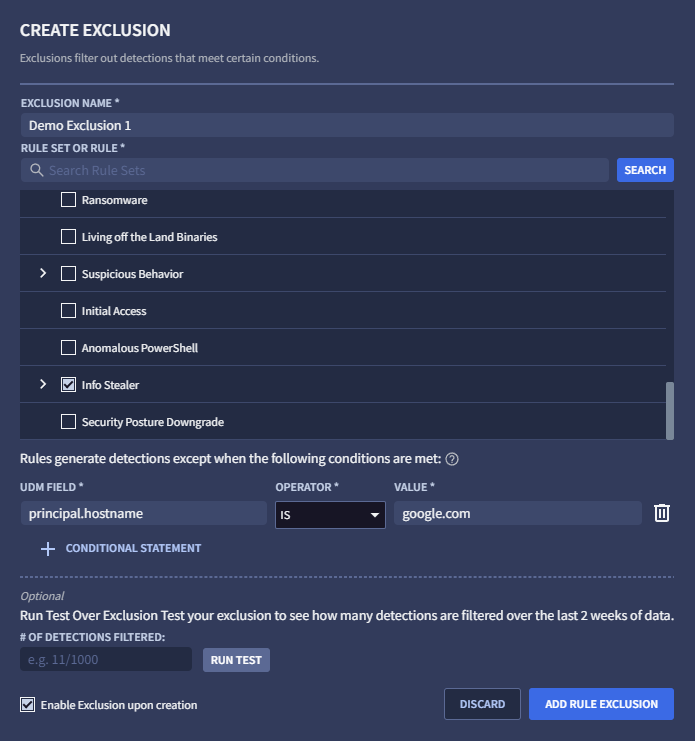
그림 1: 제외 만들기
고유한 제외 이름을 지정합니다. 이 이름은 '제외' 탭의 제외 목록에 표시됩니다.
제외를 적용할 규칙 또는 규칙 집합을 선택합니다. 규칙 목록을 스크롤하거나 검색창을 사용하고 검색을 클릭하여 특정 규칙을 검색할 수 있습니다.
규칙 집합의 규칙은 감지가 트리거된 경우에만 표시됩니다.
UDM 필드를 선택하고 연산자를 지정하고, 값을 입력하여 제외할 UDM 값을 입력합니다. 각 값마다 Enter 키를 눌러야 합니다. 그렇지 않으면 + 조건문을 클릭할 때 오류 메시지가 표시됩니다. 예를 들어 principal.hostname = google.com을 제외하도록 구성할 수 있습니다.
조건에 추가 값을 입력할 수 있습니다. Enter 키를 누를 때마다 값이 기록되고 다른 값을 입력할 수 있습니다. 하나의 조건에 대한 여러 값이 논리 OR을 사용하여 조인되는데, 이는 값 중 하나라도 일치하는 경우 제외가 일치한다는 의미입니다.
+ 조건문을 클릭하여 이 제외에 조건을 추가할 수 있습니다. 유효하지 않은 조건을 지정하려고 하면 오류 메시지가 표시됩니다. 여러 조건은 논리곱을 사용하여 조인됩니다. 즉, 모든 조건이 일치하는 경우에만 제외가 일치합니다.
(선택사항) 테스트 실행을 클릭하여 지난 2주간 기록된 감지의 제외 항목을 평가하여 사용 설정 시 얼마나 많은 제외가 수행될지 확인할 수 있습니다.
(선택 사항) 당분간 제외를 중지하려면 생성 시 제외 사용 설정을 선택 해제(이 옵션은 기본적으로 사용 설정됨)합니다.
준비가 되면 규칙 제외 추가를 클릭합니다.
UDM 뷰어에서 제외 만들기
다음 단계를 완료하여 UDM 뷰어 내에서 제외를 만들 수도 있습니다.
탐색 메뉴에서 규칙 및 감지를 선택합니다. 선별된 감지 탭을 클릭합니다.
대시보드를 클릭한 다음 감지가 있는 규칙을 선택합니다.
타임라인에서 이벤트로 이동하여 원시 로그 및 UDM 이벤트 뷰어 아이콘을 클릭합니다.
UDM 이벤트 뷰에서 제외할 UDM 필드를 선택하고 보기 옵션을 선택한 다음 제외를 선택합니다. 제외 만들기 창이 열립니다. 창에 사용자의 UDM 선택에서 가져온 규칙, UDM 필드, 값이 미리 채워집니다.
새 제외에 고유한 이름을 지정합니다.
(선택사항) 테스트 실행을 클릭하여 지난 2주간 기록된 감지의 제외 항목을 평가하여 사용 설정 시 얼마나 많은 제외가 수행될지 확인할 수 있습니다.
준비가 되면 규칙 제외 추가를 클릭합니다.
제외 관리하기
제외를 하나 이상 만든 후에는 제외 탭에서 다음 옵션을 사용할 수 있습니다. 탐색 메뉴에서 규칙 및 감지를 선택합니다. 제외 탭을 클릭합니다.
제외 목록은 제외 테이블에 나열됩니다. 사용 설정됨 전환 버튼을 중지됨으로 설정하여 나열된 제외를 중지할 수 있습니다.
필터 아이콘 filter_alt를 클릭하여 표시되는 제외 항목을 필터링할 수 있습니다. 필요에 따라 사용 설정됨, 중지됨 또는 보관처리됨 옵션을 선택합니다.
[[["이해하기 쉬움","easyToUnderstand","thumb-up"],["문제가 해결됨","solvedMyProblem","thumb-up"],["기타","otherUp","thumb-up"]],[["이해하기 어려움","hardToUnderstand","thumb-down"],["잘못된 정보 또는 샘플 코드","incorrectInformationOrSampleCode","thumb-down"],["필요한 정보/샘플이 없음","missingTheInformationSamplesINeed","thumb-down"],["번역 문제","translationIssue","thumb-down"],["기타","otherDown","thumb-down"]],["최종 업데이트: 2025-09-04(UTC)"],[[["\u003cp\u003eRule exclusions in Google Security Operations allow you to reduce the volume of detections generated by Google Cloud Threat Intelligence (GCTI) curated detection rules.\u003c/p\u003e\n"],["\u003cp\u003eExclusions can be created from the Exclusions tab in the Rules & Detections section by specifying a unique name, selecting the rule or rule set, and entering the UDM field values to exclude.\u003c/p\u003e\n"],["\u003cp\u003eYou can create exclusions directly from the UDM viewer by selecting a UDM field within an event, and the exclusion window will be pre-populated with relevant information.\u003c/p\u003e\n"],["\u003cp\u003eExclusions can be managed from the Exclusions tab, where you can enable, disable, filter, edit, archive, or unarchive them.\u003c/p\u003e\n"],["\u003cp\u003eBefore finalizing an exclusion, you have the option to run a test to see how many detections would have been excluded in the past two weeks.\u003c/p\u003e\n"]]],[],null,["Configure rule exclusions \nSupported in: \nGoogle secops [SIEM](/chronicle/docs/secops/google-secops-siem-toc)\n\nCreate exclusions from the Exclusions tab\n\nYou might find that the curated detections provided by the Google Cloud Threat Intelligence (GCTI) team\nare generating too many detections. You can configure exclusions to the curated detection\nrules to help reduce the volume of these detections. Rule exclusions are used only with Google Security Operations\ncurated detections.\n\nTo configure an exclusion to a curated detection rule, complete the following steps:\n\n1. In the navigation bar, select **Rules \\& Detections** . Click the **Exclusions** tab.\n\n2. Click **Create Exclusion** to create a new exclusion. The **Create Exclusion** window opens.\n\n **Figure 1: Create Exclusion**\n3. Specify a unique exclusion name. This name will appear in the list of exclusions on the Exclusions tab.\n\n4. Select the Rule or Rule Set to apply the exclusion to. You can either scroll through the list of rules or search for a particular rule using the search field and clicking **Search**.\n Rules in a rule set are displayed only if they triggered a detection.\n\n5. Enter the UDM value to exclude by selecting a **UDM Field** , specifying an operator, and entering a value. You must press the Enter key for each value, otherwise you receive an error message when you click **+ Conditional Statement** . For example, you might want to configure an exclusion when `principal.hostname = google.com`.\n\n You can enter additional values to a condition. Each time you press the Enter key, the value is recorded and you are able to enter another value. Multiple values for one condition are joined using a logical OR, meaning an exclusion matches if any of the values matches.\n\n You can add additional conditions to this exclusion by clicking **+ Conditional Statement**. If you attempt to specify an invalid condition, you will receive an error message. Multiple conditions are joined using a logical AND, meaning an exclusion only matches if every one of the conditions also matches.\n6. (Optional) Click **Run Test** to determine how many exclusions would be made if enabled, computed by evaluating the exclusion over the past two weeks of recorded detections.\n\n7. (Optional) Uncheck **Enable Exclusion Upon Creation** if you want to disable the exclusion for the time being (this option is enabled by default).\n\n8. Click **Add Rule Exclusion** when ready.\n\nCreate exclusions from the UDM viewer\n\nYou can also create exclusions from within the UDM viewer by completing the following steps:\n\n1. In the navigation bar, select **Rules \\& Detections** . Click the **Curated Detections** tab.\n\n2. Click **Dashboard** and then select a rule with detections.\n\n3. Navigate to an event in the **Timeline** and click the Raw Log and UDM Event viewer icon.\n\n4. In the UDM Event view, select the UDM field to exclude, select **View Options** , and then select **Exclude** . The **Create Exclusion** window opens. The window is pre-populated with the rule, UDM field, and value drawn from your UDM selection.\n\n5. Give the new exclusion a unique name.\n\n6. (Optional) Click **Run Test** to determine how many exclusions would be made if enabled, computed by evaluating the exclusion over the past two weeks of recorded detections.\n\n7. Click **Add Rule Exclusion** when ready.\n\nManage exclusions\n\nOnce you have created one or more exclusions, you have the following options from the **Exclusions** tab (in the navigation bar, select **Rules \\& Detections** . Click the **Exclusions** tab.):\n\n- The exclusions are listed in the exclusions table. You can disable any of the exclusions listed by setting the **Enabled** toggle to the **Disabled**.\n- You can filter which exclusions are displayed by clicking the filter icon filter_alt. Select the **Enabled** , **Disabled** , or **Archived** options as needed.\n- To edit an exclusion, click the menu icon more_vert and select **Edit**.\n- To archive an exclusion, click the menu icon more_vert and select **Archive**.\n- To unarchive an exclusion, click the menu icon more_vert and select **Unarchive**.\n\n**Need more help?** [Get answers from Community members and Google SecOps professionals.](https://security.googlecloudcommunity.com/google-security-operations-2)"]]