このページでは、所有するカスタム ドメイン(example.com など)から API を提供する方法について説明します。
独自のドメイン名ではなく、Google が管理するドメイン名を使用することもできます。詳細については、Google が管理するドメインを使用するをご覧ください。
始める前に
- API に使用するドメイン名を持っていない場合、ドメイン名登録事業者よりドメイン名を取得します。
- ドメインの所有権を確認します。
- ドメイン名を使用して、API ホスト名を定義します。
- ドメインで SSL を使用している場合は、SSL 証明書を入手してアップロードします。
- API と Extensible Service Proxy(ESP)をデプロイします。
ドメイン名を使用できるように API を構成する
適切なタブの手順に沿って設定します。
App Engine
API プロジェクトを設定し、確認済みのドメインを使用するには、アプリケーションにカスタム ドメインを追加するの手順に従ってください。
Compute Engine
Compute Engine インスタンスから API を設定するには、インスタンス グループでロードバランサを使用することをおすすめします。ドメイン名に外部 IP アドレスを予約し、その外部 IP アドレスをロードバランサに使用する必要があります。
独自のドメイン名から API を設定するには:
- プロジェクトに少なくとも 1 つの静的外部 IP アドレスを予約します。
- 予約した IP アドレスに任意の名前をつけます。
- [タイプ] で [グローバル] をクリックします。
- [接続先] で [なし] をクリックします。後で、この IP アドレスをロードバランサに関連付けます。
- ドメイン プロバイダのアカウントに移動し、ドメインの設定を変更します。データ フィールドに外部 IP アドレスを持つ API 名(
myapi.example.comなど)を含む A レコードを作成する必要があります。 - API を実行しているインスタンスと Extensible Service Proxy(ESP)を持つインスタンス グループを作成します。
- グループに任意の名前を割り当て、説明を追加します。
- [ゾーン] リストから、API インスタンスで使用するゾーンをクリックします。
- [インスタンス定義] リストで [既存のインスタンスを選択] をクリックします。
- [VM インスタンス] に、API を実行する VM インスタンスを追加します。
- [作成] をクリックします。
- HTTP(S) ロードバランサを作成して構成します。
- [バックエンド サービスを定義] > [バックエンド サービスを作成または選択] をクリックします。
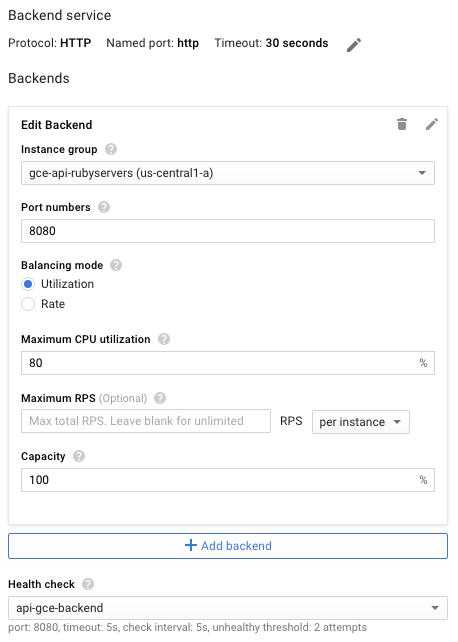
- バックエンド サービスの構成で、任意の名前と説明を割り当てます。
- [プロトコル] フィールドで、ロードバランサを経由してサポートするプロトコルを [HTTP]、[HTTPS] のいずれかから選択します。
- [インスタンス グループ] リストで、インスタンス グループをクリックします。
- [ポート番号] フィールドに「
8080」と入力します。 - [ヘルスチェック] をクリックして、次のようにヘルスチェックを構成します。
- ヘルスチェック構成の名前を入力します。
- ポート番号
8080を割り当てます。 - 残りの設定にデフォルト値を使用するには、[保存] をクリックします。
- ここでは、残りの構成についてはデフォルトのままにします。 追加のポートなどは、後から必要に応じて変更できます。
- [ホストとパスのルール] は設定を変更する必要はありません。デフォルトの一致しないものフィルタを利用すれば、使用しているバックエンドの API に必要なものを転送できます。つまり、ロードバランサにあるすべてのトラフィックは、前の手順で定義したポート
8080(デフォルト ポート)の API に送信されるということです。 - [フロントエンドの設定] をクリックします。
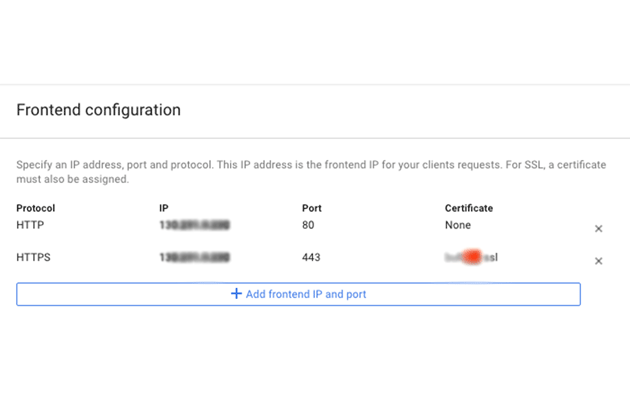
- [プロトコル] フィールドで、ロードバランサを経由してサポートするプロトコルを [HTTP]、[HTTPS] のいずれかから選択します。
- [IP] リストで、先ほど作成した外部 IP アドレスをクリックします。
- HTTPS プロトコルの場合は、SSL を使用する必要があります。[証明書] リストで、必要な証明書をクリックします。
- 別のプロトコルをサポートする場合は、[フロントエンドの IP とポートを追加] をクリックして、プロトコル、同じ外部 IP アドレス、別のポートを指定します。
- ロードバランサの構成を完了するため、[作成] をクリックします。[作成] ボタンが有効になっていない場合は、構成したコンポーネントを確認してください。各構成コンポーネントの横にチェックマークが表示されているはずです。チェックマークがない場合は、構成が完了していません。
- DNS の変更が反映されると、ロードバランサ経由でリクエストが API に送信されるようになります。
GKE
Google Kubernetes Engine(GKE)のドメインで API を提供するには、ドメインの DNS 設定に返された外部 IP アドレスを使用して、ESP をサービスとして公開する必要があります。ロード バランシングは GKE が自動的に行います。
API をサービスとして公開するには:
- まだ行っていない場合は、API バックエンドに Kubernetes サービスを構成します。サービス構成ファイル
service.yamlを次のような内容で作成します。apiVersion: v1 kind: Service metadata: name: echo spec: ports: - port: 80 targetPort: 8081 protocol: TCP selector: app: echo-app type: LoadBalancer - バックエンド ラベル(この例では
app: echo-app)に合わせてselectorラベルを変更します。 -
targetPortが、API バックエンドで構成された ESP が使用するポートと一致していることを確認します。デフォルトでは、ESP はポート8081を使用します。 - Kubernetes サービスをデプロイします。
kubectl apply -f service.yaml - 公開したサービスに割り当てられた外部 IP アドレスを表示します。
kubectl get servicesEXTERNAL-IPアドレスが表示されます。NAME CLUSTER-IP EXTERNAL-IP PORT(S) AGE hello-node 10.X.XXX.202 10X.XXX.XX.123 8080/TCP 1m - 生成されたエフェメラル外部 IP アドレスを静的アドレスに変更します。
- リストから外部 IP アドレスを選択します。
- [タイプ] リストで [静的] を選択します。
- ドメイン プロバイダのアカウントに移動し、ドメインの設定を変更します。データ フィールドに外部 IP アドレスを持つ API 名(
myapi.example.comなど)を含む A レコードを作成する必要があります。