This tutorial shows you how to configure and deploy a sample API and the Extensible Service Proxy (ESP) running in prebuilt Docker containers on Compute Engine. The sample code's REST API is described using the OpenAPI specification. The tutorial also shows you how to create an API key and use it in requests to the API.
For an overview of Cloud Endpoints, see About Endpoints and Endpoints architecture.
Objectives
Use the following high-level task list as you work through the tutorial. All tasks are required to successfully send requests to the API.
- Set up a Google Cloud project. See Before you begin.
- Create a Compute Engine VM instance. See Creating a Compute Engine instance.
- Download the sample code. See Getting the sample code.
- Configure the
openapi.yamlfile, which is used to configure Endpoints. See Configuring Endpoints. - Deploy the Endpoints configuration to create a Endpoints service. See Deploying the Endpoints configuration.
- Deploy the API and ESP on the Compute Engine VM. See Deploying the API backend.
- Send a request to the API by using an IP address. See Sending a request by using IP address.
- Configure a DNS record for the sample API. See Configuring DNS for Endpoints.
- Send a request to the API by using the fully qualified domain name. See Sending a request by using FQDN.
- Track API activity. See Tracking API activity.
- Avoid incurring charges to your Google Cloud account. See Clean up.
Costs
In this document, you use the following billable components of Google Cloud:
To generate a cost estimate based on your projected usage,
use the pricing calculator.
When you finish the tasks that are described in this document, you can avoid continued billing by deleting the resources that you created. For more information, see Clean up.
Before you begin
- Sign in to your Google Cloud account. If you're new to Google Cloud, create an account to evaluate how our products perform in real-world scenarios. New customers also get $300 in free credits to run, test, and deploy workloads.
-
In the Google Cloud console, on the project selector page, select or create a Google Cloud project.
Roles required to select or create a project
- Select a project: Selecting a project doesn't require a specific IAM role—you can select any project that you've been granted a role on.
-
Create a project: To create a project, you need the Project Creator
(
roles/resourcemanager.projectCreator), which contains theresourcemanager.projects.createpermission. Learn how to grant roles.
-
Verify that billing is enabled for your Google Cloud project.
-
In the Google Cloud console, on the project selector page, select or create a Google Cloud project.
Roles required to select or create a project
- Select a project: Selecting a project doesn't require a specific IAM role—you can select any project that you've been granted a role on.
-
Create a project: To create a project, you need the Project Creator
(
roles/resourcemanager.projectCreator), which contains theresourcemanager.projects.createpermission. Learn how to grant roles.
-
Verify that billing is enabled for your Google Cloud project.
- Make a note of the project ID because it's needed later.
-
You need an application to send requests to the sample API.
- Linux and macOS users: This tutorial provides an example of using
curl, which typically comes pre-installed on your operating system. If you don't havecurl, you can download it from thecurlReleases and downloads page. - Windows users: This tutorial provides an example using
Invoke-WebRequest, which is supported in PowerShell 3.0 and later.
- Linux and macOS users: This tutorial provides an example of using
- Download the Google Cloud CLI.
-
Update the gcloud CLI and install the Endpoints
components.
gcloud components update
-
Make sure that the Google Cloud CLI (
gcloud) is authorized to access your data and services on Google Cloud:gcloud auth login
-
Set the default project to your project ID.
gcloud config set project YOUR_PROJECT_ID
Replace YOUR_PROJECT_ID with your project ID. If you have other Google Cloud projects, and you want to use
gcloudto manage them, see Managing gcloud CLI configurations.
When you finish the tasks that are described in this document, you can avoid continued billing by deleting the resources that you created. For more information, see Clean up.
Creating a Compute Engine instance
- In the Google Cloud console, go to the Create an instance page.
- In the Firewall section, select Allow HTTP traffic and Allow HTTPS traffic.
- To create the VM, click Create.
- Make sure you that you can connect to your VM instance.
- In the list of virtual machine instances, click SSH in the row of the instance that you want to connect to.
- You can now use the terminal to run Linux commands on your Debian instance.
- Enter
exitto disconnect from the instance.
- Make a note the instance name, zone, and external IP address because they are needed later.
To create a Compute Engine instance:
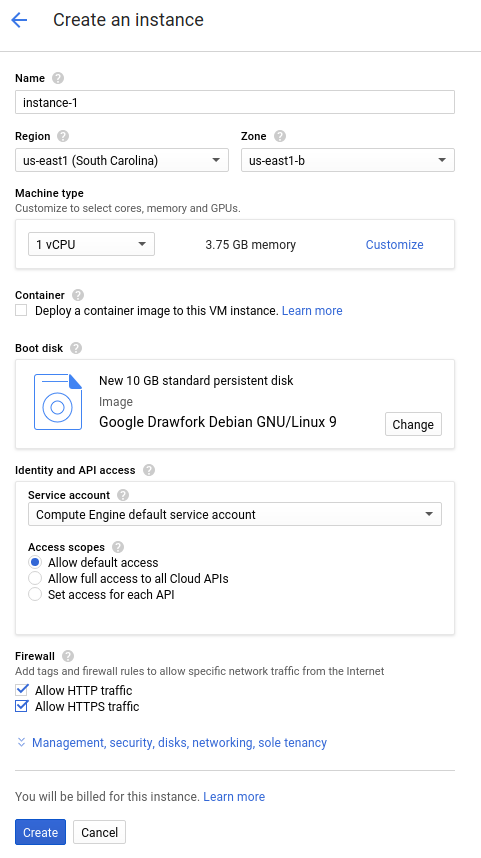
Allow a short time for the instance to start up. Once ready, it is listed on the VM Instances page with a green status icon.
Downloading the sample code
Download the sample code to your local machine.
To clone or download the sample API:
- Clone the sample app repository to your local machine:
git clone https://github.com/GoogleCloudPlatform/java-docs-samples
Alternatively, download the sample as a zip file and extract it.
- Change to the directory that contains the sample code:
cd java-docs-samples/endpoints/getting-started
To clone or download the sample API:
- Clone the sample app repository to your local machine:
git clone https://github.com/GoogleCloudPlatform/python-docs-samples
Alternatively, download the sample as a zip file and extract it.
- Change to the directory that contains the sample code:
cd python-docs-samples/endpoints/getting-started
To clone or download the sample API:
- Make sure your
GOPATHenvironment variable is set. - Clone the sample app repository to your local machine:
go get -d github.com/GoogleCloudPlatform/golang-samples/endpoints/getting-started
- Change to the directory that contains the sample code:
cd $GOPATH/src/github.com/GoogleCloudPlatform/golang-samples/endpoints/getting-started
To clone or download the sample API:
- Clone the sample app repository to your local machine:
git clone https://github.com/GoogleCloudPlatform/php-docs-samples
Alternatively, download the sample as a zip file and extract it.
- Change to the directory that contains the sample code:
cd php-docs-samples/endpoints/getting-started
To clone or download the sample API:
- Clone the sample app repository to your local machine:
git clone https://github.com/GoogleCloudPlatform/ruby-docs-samples
Alternatively, download the sample as a zip file and extract it.
- Change to the directory that contains the sample code:
cd ruby-docs-samples/endpoints/getting-started
To clone or download the sample API:
- Clone the sample app repository to your local machine:
git clone https://github.com/GoogleCloudPlatform/nodejs-docs-samples
Alternatively, download the sample as a zip file and extract it.
- Change to the directory that contains the sample code:
cd nodejs-docs-samples/endpoints/getting-started
Configuring Endpoints
The sample code includes the OpenAPI configuration file, openapi.yaml, which
is based on
OpenAPI Specification v2.0.
You configure and deploy openapi.yaml on your local machine.
To configure Endpoints:
- In the sample code directory, open the
openapi.yamlconfiguration file.Java Python Go PHP Ruby NodeJS Note the following:
- The configuration sample displays the lines near the
hostfield, which you need to modify. To deploy theopenapi.yamlfile to Endpoints, the complete OpenAPI document is required. - The example
openapi.yamlfile contains a section for configuring authentication that isn't needed for this tutorial. You don't need to configure the lines with YOUR-SERVICE-ACCOUNT-EMAIL and YOUR-CLIENT-ID. - OpenAPI is a language-agnostic specification. The same
openapi.yamlfile is in thegetting-startedsample in each language GitHub repository for convenience.
- The configuration sample displays the lines near the
- In the
hostfield, replace the text with the Endpoints service name, which should be in the following format:host: "echo-api.endpoints.YOUR_PROJECT_ID.cloud.goog"
Replace YOUR_PROJECT_ID with your Google Cloud project ID. For example:
host: "echo-api.endpoints.example-project-12345.cloud.goog"
Note that echo-api.endpoints.YOUR_PROJECT_ID.cloud.goog
is the Endpoints service name. It isn't the fully qualified
domain name (FQDN) that you use for sending requests to the API.
For information about the fields in the OpenAPI document that Endpoints requires, see Configuring Endpoints.
After you have finished all the following configuration steps such that you can
successfully send requests to the sample API by using an IP address, see
Configuring Endpoints DNS for
information on how to configure echo-api.endpoints.YOUR_PROJECT_ID.cloud.goog
to be the FQDN.
Deploying the Endpoints configuration
To deploy the Endpoints configuration, you use the gcloud endpoints
services deploy command. This command uses Service Management
to create a managed service.
To deploy the Endpoints configuration:
- Make sure you are in the
endpoints/getting-starteddirectory. - Upload the configuration and create a managed service:
gcloud endpoints services deploy openapi.yaml
The gcloud command then calls the Service Management
API to create a managed service with the name that you specified in the
host field of the openapi.yaml file.
Service Management configures the service according to the
settings in the openapi.yaml file. When you make changes to
openapi.yaml, you must redeploy the file to update the
Endpoints service.
As it is creating and configuring the service, Service Management
outputs information to the terminal. You can safely ignore the warnings about
the paths in the openapi.yaml file not requiring an API key.
When it finishes configuring the service, Service Management displays a
message with the service configuration ID and the service name, similar to the
following:
Service Configuration [2017-02-13r0] uploaded for service [echo-api.endpoints.example-project-12345.cloud.goog]
In the preceding example, 2017-02-13r0 is the service
configuration ID, and echo-api.endpoints.example-project-12345.cloud.goog is the
Endpoints service. The service configuration ID consists of a
date stamp followed by a revision number. If you deploy the
openapi.yaml file again on the same day, the revision
number is incremented in the service configuration ID. You can view
the Endpoints service configuration on the Endpoints >
Services page in the Google Cloud console.
If you get an error message, see Troubleshooting Endpoints configuration deployment.
Checking required services
At a minimum, Endpoints and ESP require the following Google services to be enabled:| Name | Title |
|---|---|
servicemanagement.googleapis.com |
Service Management API |
servicecontrol.googleapis.com |
Service Control API |
In most cases, the gcloud endpoints services deploy command enables these
required services. However, the gcloud command completes successfully but
doesn't enable the required services in the following circumstances:
If you used a third-party application such as Terraform, and you don't include these services.
You deployed the Endpoints configuration to an existing Google Cloud project in which these services were explicitly disabled.
Use the following command to confirm that the required services are enabled:
gcloud services list
If you do not see the required services listed, enable them:
gcloud services enable servicemanagement.googleapis.com
gcloud services enable servicecontrol.googleapis.com
Also enable your Endpoints service:
gcloud services enable ENDPOINTS_SERVICE_NAME
To determine the ENDPOINTS_SERVICE_NAME you can either:
After deploying the Endpoints configuration, go to the Endpoints page in the Cloud console. The list of possible ENDPOINTS_SERVICE_NAME are shown under the Service name column.
For OpenAPI, the ENDPOINTS_SERVICE_NAME is what you specified in the
hostfield of your OpenAPI spec. For gRPC, the ENDPOINTS_SERVICE_NAME is what you specified in thenamefield of your gRPC Endpoints configuration.
For more information about the gcloud commands, see
gcloud services.
Deploying the API backend
So far you have deployed the OpenAPI document to Service Management, but you haven't yet deployed the code that serves the API backend. This section walks you through getting Docker set up on your VM instance and running the API backend code and the ESP in a Docker container.
Checking required permissions
- In the Google Cloud console, go to the Compute Engine instances page.
- Select your instance from the list.
- You can see the associated service account and the permissions it has.
Grant required permissions to the service account:
gcloud projects add-iam-policy-binding PROJECT_ID

--member "serviceAccount:SERVICE_ACCOUNT"

--role roles/servicemanagement.serviceController
For more information, see What are roles and permissions?
Install Docker on the VM instance
To install Docker on the VM instance:
- Set the zone for your project by running the command:
gcloud config set compute/zone YOUR_INSTANCE_ZONE
Replace YOUR_INSTANCE_ZONE with the zone where your instance is running.
- Connect to your instance by using the following command:
gcloud compute ssh INSTANCE_NAME
Replace INSTANCE_NAME with your VM instance name.
- See the
Docker documentation
to set up the Docker repository. Make sure to follow the steps that match the version and architecture of your VM instance:
- Jessie or newer
- x86_64 / amd64
Run the API and ESP in a Docker container
The ESP is an nginx-based proxy that sits in front of
your backend code. It processes incoming traffic to provide authentication, API
key management, logging, and other Endpoints API management
features.
To install and run the sample API and ESP in a Docker container:
- Create your own container network called
esp_net.sudo docker network create --driver bridge esp_net
- Run the sample Echo server that serves the sample API:
Java sudo docker run --detach --name=echo --net=esp_net gcr.io/google-samples/echo-java:1.0
Python sudo docker run --detach --name=echo --net=esp_net gcr.io/google-samples/echo-python:1.0
Go sudo docker run --detach --name=echo --net=esp_net gcr.io/google-samples/echo-go:1.0
PHP sudo docker run --detach --name=echo --net=esp_net gcr.io/google-samples/echo-php:1.0
Ruby sudo docker run --detach --name=echo --net=esp_net gcr.io/google-samples/echo-ruby:1.0
NodeJS sudo docker run --detach --name=echo --net=esp_net gcr.io/google-samples/echo-node:1.0
- Run the pre-packaged public ESP Docker container.
In the ESP startup options, replace
SERVICE_NAME with the name of your service. This is
the same name that you configured in the
hostfield of your OpenAPI document.sudo docker run \ --name=esp \ --detach \ --publish=80:8080 \ --net=esp_net \ gcr.io/endpoints-release/endpoints-runtime:1 \ --service=SERVICE_NAME \ --rollout_strategy=managed \ --backend=echo:8080The
--rollout_strategy=managedoption configures ESP to use the latest deployed service configuration. When you specify this option, up to 5 minutes after you deploy a new service configuration, ESP detects the change and automatically begins using it. We recommend that you specify this option instead of a specific configuration ID for ESP to use. For information about the other ESP options used above, see ESP startup options.
If you get an error message, see Troubleshooting Endpoints on Compute Engine.
See Deploying the API Backend for additional information.
Sending a request by using an IP address
After the sample API and the ESP are running on the Compute Engine instance, you can send requests to the API from your local machine.
Create an API key and set an environment variable
The sample code requires an API key. To simplify the request, you set an environment variable for the API key.
In the same Google Cloud project that you used for your API, create an API key on the API credentials page. If you want to create an API key in a different Google Cloud project, see Enabling an API in your Google Cloud project.
- Click Create credentials, and then select API key.
- Copy the key to the clipboard.
- Click Close.
- On your local computer, paste the API key to assign it to an environment
variable:
- In Linux or macOS:
export ENDPOINTS_KEY=AIza... - In Windows PowerShell:
$Env:ENDPOINTS_KEY="AIza..."
- In Linux or macOS:
Send the request
Linux or mac OS
Use curl to send an HTTP request by using the ENDPOINTS_KEY environment
variable you set previously. Replace IP_ADDRESS with
the external IP address of your instance.
curl --request POST \
   --header "content-type:application/json" \
   --data '{"message":"hello world"}' \
   "http://IP_ADDRESS:80/echo?key=${ENDPOINTS_KEY}"
In the preceding curl:
- The
--dataoption specifies the data to post to the API. - The
--headeroption specifies that the data is in JSON format.
PowerShell
Use Invoke-WebRequest to send an HTTP request by using the ENDPOINTS_KEY
environment variable you set previously. Replace
IP_ADDRESS with the external IP address of your
instance.
(Invoke-WebRequest -Method POST -Body '{"message": "hello world"}' `
    -Headers @{"content-type"="application/json"} `
    -URI "http://IP_ADDRESS:80/echo?key=$Env:ENDPOINTS_KEY").Content
In the previous example, the first two lines end in a backtick. When you paste the example into PowerShell, make sure there isn't a space following the backticks. For information about the options used in the example request, see Invoke-WebRequest in the Microsoft documentation.
Third-party app
You can use a third-party application such as the Chrome browser extension Postman to send the request:
- Select
POSTas the HTTP verb. - For the header, select the key
content-typeand the valueapplication/json. - For the body, enter the following:
{"message":"hello world"} -
In the URL, use the actual API key rather than the environment variable.
For example:
http://192.0.2.0:80/echo?key=AIza...
The API echoes back the message that you send, and responds with the following:
{
  "message": "hello world"
}
If you didn't get a successful response, see Troubleshooting response errors.
You just deployed and tested an API in Endpoints!
Configuring DNS for Endpoints
Because the Endpoints service name for the API is in the
.endpoints.YOUR_PROJECT_ID.cloud.goog domain, you can
use it as the fully qualified domain name (FQDN) by making a small
configuration change in your openapi.yaml file. This way, you can
send requests to the sample API by using
echo-api.endpoints.YOUR_PROJECT_ID.cloud.goog
instead of the IP address.
To configure Endpoints DNS:
- Open your OpenAPI configuration file,
openapi.yaml, and add thex-google-endpointsproperty at the top level of the file (not indented or nested) as shown in the following snippet:host: "echo-api.endpoints.YOUR_PROJECT_ID.cloud.goog" x-google-endpoints: - name: "echo-api.endpoints.YOUR_PROJECT_ID.cloud.goog" target: "IP_ADDRESS" - In the
nameproperty, replace YOUR_PROJECT_ID with your project ID. - In the
targetproperty, replace IP_ADDRESS with the IP address that you used when you sent a request to the sample API. - Deploy your updated OpenAPI configuration file to Service Management:
gcloud endpoints services deploy openapi.yaml
For example, assume the openapi.yaml file has the following
configured:
host: "echo-api.endpoints.example-project-12345.cloud.goog"
x-google-endpoints:
- name: "echo-api.endpoints.example-project-12345.cloud.goog"
  target: "192.0.2.1"
When you deploy the openapi.yaml file by using the preceding
gcloud command, Service Management creates a DNS A-record,
echo-api.endpoints.my-project-id.cloud.goog, which resolves to the
target IP address, 192.0.2.1. It might take a few minutes for the
new DNS configuration to propagate.
Configuring SSL
For more details on how to configure DNS and SSL, see Enabling SSL for Endpoints.
Sending a request by using FQDN
Now that you have the DNS record configured for the sample API, send a request to it by using the FQDN (replace YOUR_PROJECT_ID with your project ID) and the ENDPOINTS_KEY environment variable set previously:- In Linux or mac OS:
curl --request POST \
    --header "content-type:application/json" \
    --data '{"message":"hello world"}' \
    "http://echo-api.endpoints.YOUR_PROJECT_ID.cloud.goog:80/echo?key=${ENDPOINTS_KEY}"
- In Windows PowerShell:
(Invoke-WebRequest -Method POST -Body '{"message": "hello world"}' -Headers @{"content-type"="application/json"} -URI "http://echo-api.endpoints.[YOUR_PROJECT_ID].cloud.goog:80/echo?key=$Env:ENDPOINTS_KEY").Content
Tracking API activity
To track API activity:
Look at the activity graphs for your API in the Endpoints > Services page.
Go to the Endpoints Services page
It may take a few moments for the request to be reflected in the graphs.Look at the request logs for your API in the Logs Explorer page.
Clean up
To avoid incurring charges to your Google Cloud account for the resources used in this tutorial, either delete the project that contains the resources, or keep the project and delete the individual resources.
- Delete the API:
gcloud endpoints services delete SERVICE_NAME
Replace
SERVICE_NAMEwith the name of your service. - In the Google Cloud console, go to the VM instances page.
- Select the checkbox for the instance that you want to delete.
- To delete the instance, click More actions, click Delete, and then follow the instructions.