참고: Looker 22.14에서는 GeoJSON 파일 지원이 map_layer 매개변수에 추가되었습니다.
Looker에는 여러 기본 제공 지도 레이어가 포함되어 있지만 커스텀 지도 리전을 정의하여 지리정보 데이터를 표시할 수도 있습니다. 다음과 같은 세 개 주변 지역의 평균 연령 테이블이 있다고 가정해 보겠습니다.
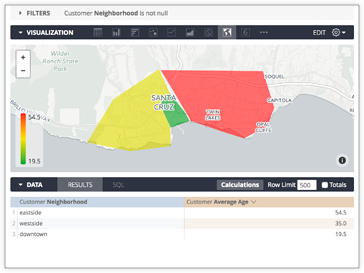
고객 주변 지역
고객 평균 연령
downtown
19.5292
eastside
54.4626
westside
34.9534
고객 주변 지역을 특정 지리적 리전에 매핑하여 지도에 시각화할 수 있습니다. 이 작업을 수행하려면 이 페이지에 설명된 단계를 따르세요.
리전 데이터 준비
리전 데이터를 준비하려면 각 리전의 지리적 형태와 해당 리전을 데이터베이스의 데이터와 연결하는 메타데이터가 포함된 데이터 파일이 필요합니다.
Looker는 TopoJSON이라는 형식을 사용하여 이 데이터를 간단한 방식으로 저장합니다. TopoJSON 파일은 여러 일반적인 shapefile 형식으로 쉽게 만들 수 있으며, shapefile을 TopoJSON으로 변환 커뮤니티 게시물에 설명된 대로 온라인 도구로 직접 만들 수도 있습니다.
이 예시의 경우 이미 이 매핑을 제공하는 TopoJSON 파일이 있습니다. TopoJSON 파일의 각 리전에는 neighborhood라는 속성이 있으며 이는 LookML 프로젝트에서 neighborhood라는 측정기준으로 정의되는 고객 주변 지역 필드의 값과 일치합니다.
리전 데이터 업로드
리전 데이터를 Looker로 가져오려면 TopoJSON 파일을 프로젝트의 파일 브라우저 섹션으로 드래그 앤 드롭하면 됩니다. 이 데이터는 LookML 코드와 함께 커밋되고 LookML 프로젝트의 다른 코드처럼 업데이트됩니다.
지도 레이어 만들기
이제 프로젝트에 리전 데이터가 있으므로 LookML 모델에 지도 레이어를 만들어야 합니다.
[[["이해하기 쉬움","easyToUnderstand","thumb-up"],["문제가 해결됨","solvedMyProblem","thumb-up"],["기타","otherUp","thumb-up"]],[["이해하기 어려움","hardToUnderstand","thumb-down"],["잘못된 정보 또는 샘플 코드","incorrectInformationOrSampleCode","thumb-down"],["필요한 정보/샘플이 없음","missingTheInformationSamplesINeed","thumb-down"],["번역 문제","translationIssue","thumb-down"],["기타","otherDown","thumb-down"]],["최종 업데이트: 2025-07-31(UTC)"],[],[],null,["# Creating custom map regions\n\n\u003cbr /\u003e\n\n\u003cbr /\u003e\n\n\u003e ***Note:** In Looker 22.14, support for GeoJSON files was added to the [`map_layer`](/looker/docs/reference/param-model-map-layer) parameter.*\n\n\nLooker includes several built-in [map layers](/looker/docs/reference/param-model-map-layer#built-in_map_layers), but you can also define custom map regions to display geographical data. Suppose you have a table of average ages for three neighborhoods, as follows:\n\n\nYou might want to map **Customer Neighborhood** to a particular geographic\nregion, so it can be visualized on a map. To accomplish this, follow the\nsteps described on this page.\n\n\u003cbr /\u003e\n\nPrepare region data\n-------------------\n\n\nTo prepare the region data, you need a data file that contains the geographic\nshapes of each region and also contains metadata that associates the region with\nthe data in the database.\n\n\nLooker uses a format called\n[TopoJSON](https://github.com/topojson/topojson) to store this data\nin a compact way. TopoJSON files can be easily created from many common shapefile\nformats, or you can draw one yourself with online tools, as detailed in the\n[Converting shapefiles to TopoJSON](https://community.looker.com/technical-tips-tricks-1021/converting-shapefiles-to-topojson-30011) Community post.\n\n\nFor the purposes of this example, there would already be a TopoJSON file prepared that provides this mapping. Each region in the TopoJSON file has a property called `neighborhood` that matches the values of the\n**Customer Neighborhood** field, which is defined in the LookML project as a dimension called `neighborhood`.\n\nUpload region data\n------------------\n\n\nTo import the region data into Looker, you can drag and drop the TopoJSON file into the **File Browser** section of the project. This data will be committed alongside the LookML code and updated like any other code in a LookML project.\n\n\nYour browser does not support the embedded video.\n\nCreate the map layer\n--------------------\n\n\nNow that you have the region data in the project, you need to create a map layer in the LookML model.\n\n\nYou can add a definition in the model file using the [`map_layer`](/looker/docs/reference/param-model-map-layer) parameter: \n\n```\nmap_layer: my_neighborhood_layer {\n file: \"neighborhoods.topojson\"\n property_key: \"neighborhood\"\n}\n```\n\n\nThe `file` parameter references the name of the file in the project that contains the region data, and the `property_key` is the property of the dataset that you want to expose within Looker. If you're not sure what the key is, simply omit the property key and Looker will attempt to select the appropriate key.\n\n\n\u003e **Tip:** You can also use a TopoJSON file that's hosted elsewhere online, by specifying `url` instead of `file` in the layer definition:\n\n\u003cbr /\u003e\n\n```\nmap_layer: my_neighborhood_layer {\n url: \"https://raw.githubusercontent.com/cooluser/JSON_Stuff/master/Neighborhoods.topoJSON\"\n property_key: \"neighborhood\"\n}\n```\n\nAssociate the map layer with data\n---------------------------------\n\n\nThe only thing left to do is to associate the dimension `neighborhood` in the view with the newly created map layer by applying the [`map_layer_name`](/looker/docs/reference/param-field-map-layer-name) parameter. \n\n```\ndimension: neighborhood {\n sql: ${TABLE}.neighborhood ;;\n map_layer_name: my_neighborhood_layer\n}\n \n```\n\n\nThis tells Looker that the values of this dimension are associated with the `property_key` exposed by the map layer. It also lets Looker know that it's possible to display this data on a map.\n\nViewing the map\n---------------\n\n\nThe queries that use the `neighborhood` dimension can now be displayed on a map from the Explore page:"]]