總覽
本指南說明如何使用多個節點的 GPU,在 Google Kubernetes Engine (GKE) 上提供最先進的大型語言模型 (LLM),例如 DeepSeek-R1 671B 或 Llama 3.1 405B。
本指南將示範如何使用可攜式開放原始碼技術 (Kubernetes、vLLM 和 LeaderWorkerSet (LWS) API),在 GKE 上部署及提供 AI/ML 工作負載,並充分運用 GKE 的精細控制、擴充性、復原能力、可攜性和成本效益。
閱讀本頁面之前,請先熟悉下列概念:
背景
本節說明本指南中使用的主要技術,包括本指南中做為範例的兩個 LLM:DeepSeek-R1 和 Llama 3.1 405B。
DeepSeek-R1
DeepSeek-R1 是 DeepSeek 開發的 6710 億參數大型語言模型,專為各種文字工作中的邏輯推論、數學推理和即時問題解決而設計。GKE 可處理 DeepSeek-R1 的運算需求,並透過可擴充的資源、分散式運算和高效網路,支援其功能。
詳情請參閱 DeepSeek 說明文件。
Llama 3.1 405B
Llama 3.1 405B 是 Meta 的大型語言模型,適用於各種自然語言處理工作,包括生成文字、翻譯和回答問題。GKE 提供強大的基礎架構,可支援這類模型的分散式訓練和服務需求。
詳情請參閱 Llama 說明文件。
GKE 代管 Kubernetes 服務
Google Cloud 提供各種服務,包括 GKE,非常適合部署及管理 AI/機器學習工作負載。GKE 是代管 Kubernetes 服務,可簡化容器化應用程式的部署、擴充及管理作業。GKE 提供必要的基礎架構,包括可調度資源、分散式運算和高效網路,可滿足 LLM 的運算需求。
如要進一步瞭解 Kubernetes 的重要概念,請參閱「開始學習 Kubernetes」。如要進一步瞭解 GKE,以及如何協助您自動處理、管理 Kubernetes 及調度資源,請參閱 GKE 總覽。
GPU
圖形處理單元 (GPU) 可加速處理特定工作負載,例如機器學習和資料處理。GKE 提供搭載這些強大 GPU 的節點,讓您設定叢集,在機器學習和資料處理工作方面獲得最佳效能。GKE 提供各種機器類型選項,可供節點設定使用,包括搭載 NVIDIA H100、L4 和 A100 GPU 的機器類型。
詳情請參閱「關於 GKE 中的 GPU」。
LeaderWorkerSet (LWS)
LeaderWorkerSet (LWS) 是 Kubernetes 部署 API,可處理 AI/機器學習多節點推論工作負載的常見部署模式。多節點服務會運用多個 Pod,每個 Pod 可能在不同節點上執行,以處理分散式推論工作負載。LWS 可將多個 Pod 視為一個群組,簡化分散式模型服務的管理作業。
vLLM 和多主機服務
提供需要大量運算的 LLM 時,建議使用 vLLM,並在 GPU 上執行工作負載。
vLLM 是經過高度最佳化的開放原始碼 LLM 服務架構,可提高 GPU 的服務輸送量,並提供下列功能:
- 使用 PagedAttention 實作最佳化轉換器
- 持續批次處理,提升整體放送輸送量
- 在多個 GPU 上分散式提供服務
對於無法放入單一 GPU 節點的運算密集型 LLM,您可以使用多個 GPU 節點來提供模型。vLLM 支援使用兩種策略跨 GPU 執行工作負載:
張量平行化會將 Transformer 層中的矩陣乘法運算拆分至多個 GPU。不過,由於 GPU 之間需要通訊,因此這項策略需要快速網路,較不適合在節點之間執行工作負載。
管線平行化會依層或垂直分割模型。這項策略不需要 GPU 之間持續通訊,因此在節點間執行模型時,是較好的選擇。
您可以在多節點服務中使用這兩種策略。舉例來說,使用兩個節點時,每個節點有八個 H100 GPU,您可以使用以下兩種策略:
- 雙向管道平行處理,可將模型分散到兩個節點
- 八向張量平行處理,將模型分散到每個節點的八個 GPU 上
詳情請參閱 vLLM 說明文件。
建立 GKE 叢集
您可以在 GKE Autopilot 或 Standard 叢集的多個 GPU 節點上,使用 vLLM 提供模型。建議您使用 Autopilot 叢集,享有全代管 Kubernetes 體驗。如要為工作負載選擇最合適的 GKE 作業模式,請參閱「選擇 GKE 作業模式」。
Autopilot
在 Cloud Shell 中執行下列指令:
  gcloud container clusters create-auto ${CLUSTER_NAME} \
    --project=${PROJECT_ID} \
    --location=${REGION} \
    --cluster-version=${CLUSTER_VERSION}
標準
建立具有兩個 CPU 節點的 GKE Standard 叢集:
gcloud container clusters create CLUSTER_NAME \
    --project=PROJECT_ID \
    --num-nodes=2 \
    --location=REGION \
    --machine-type=e2-standard-16
建立含有兩個節點的 A3 節點集區,每個節點有八個 H100:
gcloud container node-pools create gpu-nodepool \
    --node-locations=ZONE \
    --num-nodes=2 \
    --machine-type=a3-highgpu-8g \
    --accelerator=type=nvidia-h100-80gb,count=8,gpu-driver-version=LATEST \
    --placement-type=COMPACT \
    --cluster=CLUSTER_NAME
    --location=${REGION}
設定 kubectl 與叢集通訊
執行下列指令,設定 kubectl 與叢集通訊:
gcloud container clusters get-credentials CLUSTER_NAME --location=REGION
為 Hugging Face 憑證建立 Kubernetes 密鑰
使用下列指令建立包含 Hugging Face 權杖的 Kubernetes Secret:
kubectl create secret generic hf-secret \
  --from-literal=hf_api_token=${HF_TOKEN} \
  --dry-run=client -o yaml | kubectl apply -f -
安裝 LeaderWorkerSet
如要安裝 LWS,請執行下列指令:
kubectl apply --server-side -f https://github.com/kubernetes-sigs/lws/releases/latest/download/manifests.yaml
使用下列指令,驗證 LeaderWorkerSet 控制器是否在 lws-system 命名空間中執行:
kubectl get pod -n lws-system
輸出結果會與下列內容相似:
NAME                                     READY   STATUS    RESTARTS   AGE
lws-controller-manager-546585777-crkpt   1/1     Running   0          4d21h
lws-controller-manager-546585777-zbt2l   1/1     Running   0          4d21h
部署 vLLM 模型伺服器
如要部署 vLLM 模型伺服器,請按照下列步驟操作:
視要部署的 LLM 而定,套用資訊清單。
DeepSeek-R1
檢查
vllm-deepseek-r1-A3.yaml資訊清單。執行下列指令來套用資訊清單:
kubectl apply -f vllm-deepseek-r1-A3.yaml
Llama 3.1 405B
檢查
vllm-llama3-405b-A3.yaml資訊清單。執行下列指令來套用資訊清單:
kubectl apply -f vllm-llama3-405b-A3.yaml
等待模型檢查點下載完成。這項作業可能需要幾分鐘才能完成。
執行下列指令,查看執行中模型伺服器的記錄:
kubectl logs vllm-0 -c vllm-leader輸出內容應如下所示:
INFO 08-09 21:01:34 api_server.py:297] Route: /detokenize, Methods: POST
INFO 08-09 21:01:34 api_server.py:297] Route: /v1/models, Methods: GET
INFO 08-09 21:01:34 api_server.py:297] Route: /version, Methods: GET
INFO 08-09 21:01:34 api_server.py:297] Route: /v1/chat/completions, Methods: POST
INFO 08-09 21:01:34 api_server.py:297] Route: /v1/completions, Methods: POST
INFO 08-09 21:01:34 api_server.py:297] Route: /v1/embeddings, Methods: POST
INFO:     Started server process [7428]
INFO:     Waiting for application startup.
INFO:     Application startup complete.
INFO:     Uvicorn running on http://0.0.0.0:8080 (Press CTRL+C to quit)
提供模型
執行下列指令,設定模型的通訊埠轉送:
kubectl port-forward svc/vllm-leader 8080:8080
使用 curl 與模型互動
如要使用 curl 與模型互動,請按照下列操作說明進行:
DeepSeek-R1
在新的終端機中,將要求傳送至伺服器:
curl http://localhost:8080/v1/completions \
-H "Content-Type: application/json" \
-d '{
    "model": "deepseek-ai/DeepSeek-R1",
    "prompt": "I have four boxes. I put the red box on the bottom and put the blue box on top. Then I put the yellow box on top the blue. Then I take the blue box out and put it on top. And finally I put the green box on the top. Give me the final order of the boxes from bottom to top. Show your reasoning but be brief",
    "max_tokens": 1024,
    "temperature": 0
}'
畫面會顯示如下的輸出內容:
{
"id": "cmpl-f2222b5589d947419f59f6e9fe24c5bd",
"object": "text_completion",
"created": 1738269669,
"model": "deepseek-ai/DeepSeek-R1",
"choices": [
  {
    "index": 0,
    "text": ".\n\nOkay, let's see. The user has four boxes and is moving them around. Let me try to visualize each step. \n\nFirst, the red box is placed on the bottom. So the stack starts with red. Then the blue box is put on top of red. Now the order is red (bottom), blue. Next, the yellow box is added on top of blue. So now it's red, blue, yellow. \n\nThen the user takes the blue box out. Wait, blue is in the middle. If they remove blue, the stack would be red and yellow. But where do they put the blue box? The instruction says to put it on top. So after removing blue, the stack is red, yellow. Then blue is placed on top, making it red, yellow, blue. \n\nFinally, the green box is added on the top. So the final order should be red (bottom), yellow, blue, green. Let me double-check each step to make sure I didn't mix up any steps. Starting with red, then blue, then yellow. Remove blue from the middle, so yellow is now on top of red. Then place blue on top of that, so red, yellow, blue. Then green on top. Yes, that seems right. The key step is removing the blue box from the middle, which leaves yellow on red, then blue goes back on top, followed by green. So the final order from bottom to top is red, yellow, blue, green.\n\n**Final Answer**\nThe final order from bottom to top is \\boxed{red}, \\boxed{yellow}, \\boxed{blue}, \\boxed{green}.\n</think>\n\n1. Start with the red box at the bottom.\n2. Place the blue box on top of the red box. Order: red (bottom), blue.\n3. Place the yellow box on top of the blue box. Order: red, blue, yellow.\n4. Remove the blue box (from the middle) and place it on top. Order: red, yellow, blue.\n5. Place the green box on top. Final order: red, yellow, blue, green.\n\n\\boxed{red}, \\boxed{yellow}, \\boxed{blue}, \\boxed{green}",
    "logprobs": null,
    "finish_reason": "stop",
    "stop_reason": null,
    "prompt_logprobs": null
  }
],
"usage": {
  "prompt_tokens": 76,
  "total_tokens": 544,
  "completion_tokens": 468,
  "prompt_tokens_details": null
}
}
Llama 3.1 405B
在新的終端機中,將要求傳送至伺服器:
curl http://localhost:8080/v1/completions \
-H "Content-Type: application/json" \
-d '{
    "model": "meta-llama/Meta-Llama-3.1-405B-Instruct",
    "prompt": "San Francisco is a",
    "max_tokens": 7,
    "temperature": 0
}'
畫面會顯示如下的輸出內容:
{"id":"cmpl-0a2310f30ac3454aa7f2c5bb6a292e6c",
"object":"text_completion","created":1723238375,"model":"meta-llama/Llama-3.1-405B-Instruct","choices":[{"index":0,"text":" top destination for foodies, with","logprobs":null,"finish_reason":"length","stop_reason":null}],"usage":{"prompt_tokens":5,"total_tokens":12,"completion_tokens":7}}
設定自訂自動配置器
在本節中,您將設定水平 Pod 自動調度功能,以使用自訂 Prometheus 指標。您可以使用 vLLM 伺服器中的 Google Cloud Managed Service for Prometheus 指標。
詳情請參閱「Google Cloud Managed Service for Prometheus」。GKE 叢集應預設啟用這項功能。
在叢集上設定自訂指標 Stackdriver 轉接器:
kubectl apply -f https://raw.githubusercontent.com/GoogleCloudPlatform/k8s-stackdriver/master/custom-metrics-stackdriver-adapter/deploy/production/adapter_new_resource_model.yaml將「監控檢視者」角色新增至自訂指標 Stackdriver 轉接器使用的服務帳戶:
gcloud projects add-iam-policy-binding projects/PROJECT_ID \ --role roles/monitoring.viewer \ --member=principal://iam.googleapis.com/projects/PROJECT_NUMBER/locations/global/workloadIdentityPools/PROJECT_ID.svc.id.goog/subject/ns/custom-metrics/sa/custom-metrics-stackdriver-adapter將下列資訊清單儲存為
vllm_pod_monitor.yaml:將資訊清單套用至叢集:
kubectl apply -f vllm_pod_monitor.yaml
在 vLLM 端點上建立負載
在 vLLM 伺服器上建立負載,測試 GKE 如何使用自訂 vLLM 指標自動調度資源。
設定通訊埠轉送至模型:
kubectl port-forward svc/vllm-leader 8080:8080執行 bash 指令碼 (
load.sh),將N個並行要求傳送至 vLLM 端點:#!/bin/bash # Set the number of parallel processes to run. N=PARALLEL_PROCESSES # Get the external IP address of the vLLM load balancer service. export vllm_service=$(kubectl get service vllm-service -o jsonpath='{.status.loadBalancer.ingress[0].ip}') # Loop from 1 to N to start the parallel processes. for i in $(seq 1 $N); do # Start an infinite loop to continuously send requests. while true; do # Use curl to send a completion request to the vLLM service. curl http://$vllm_service:8000/v1/completions -H "Content-Type: application/json" -d '{"model": "meta-llama/Llama-3.1-70B", "prompt": "Write a story about san francisco", "max_tokens": 100, "temperature": 0}' done & # Run in the background done # Keep the script running until it is manually stopped. wait將 PARALLEL_PROCESSES 替換為要執行的平行程序數量。
執行 bash 指令碼:
nohup ./load.sh &
確認 Google Cloud Managed Service for Prometheus 是否會擷取指標
Google Cloud Managed Service for Prometheus 擷取指標後,您就可以在 Cloud Monitoring 中查看指標,並將負載新增至 vLLM 端點。
前往 Google Cloud 控制台的「指標探索器」頁面。
按一下「< > PromQL」。
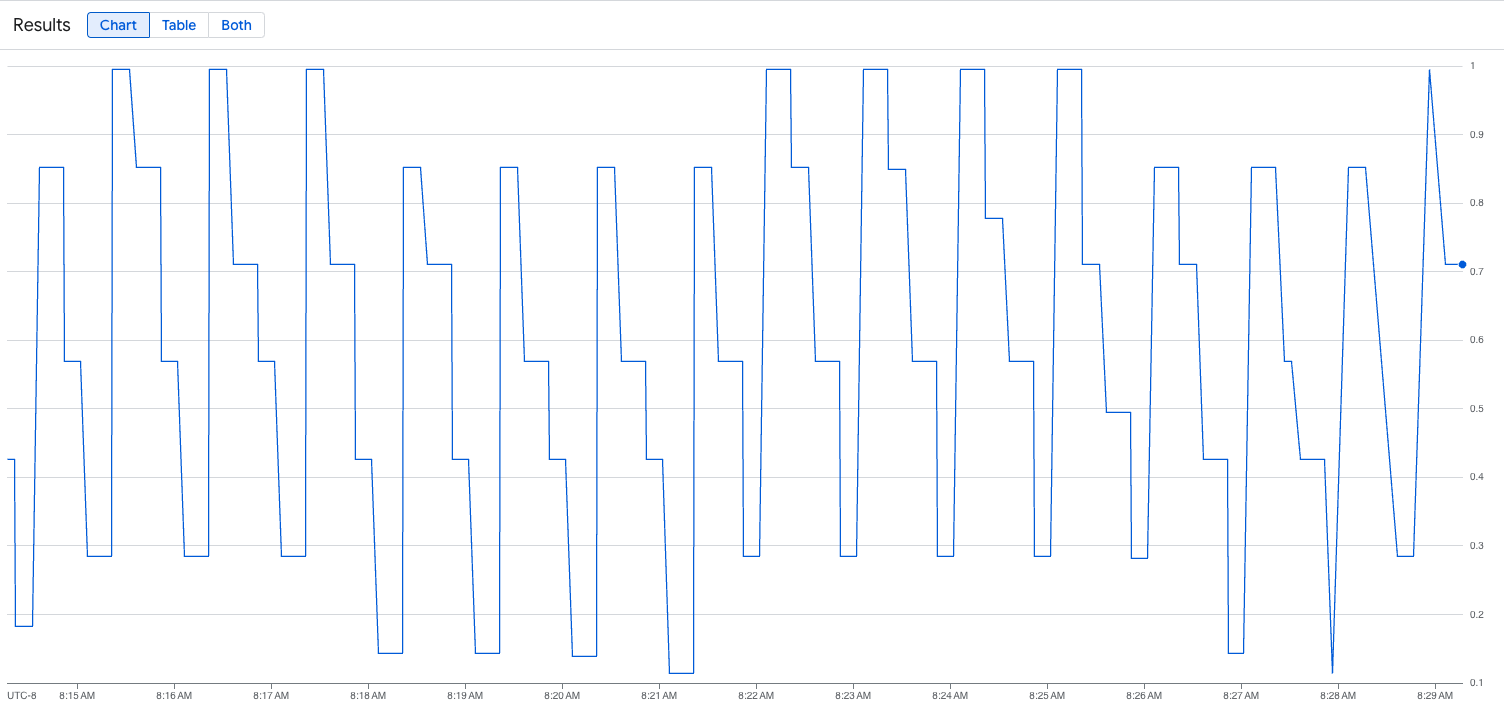
輸入下列查詢,觀察流量指標:
vllm:gpu_cache_usage_perc{cluster='CLUSTER_NAME'}
下圖為執行載入指令碼後的圖表範例。 這張圖表顯示,Google Cloud Managed Service for Prometheus 會因應 vLLM 端點新增的負載,擷取流量指標:
部署水平 Pod 自動調度資源設定
決定要根據哪個指標自動調度資源時,建議您使用下列 vLLM 指標:
num_requests_waiting:這項指標與模型伺服器佇列中等待的請求數量有關。當 kv 快取已滿時,這個數字就會開始明顯增加。gpu_cache_usage_perc:這項指標與 KV 快取使用率有關,直接影響模型伺服器在特定推論週期內處理的要求數量。
如果想盡量提高輸送量、降低成本,並在模型伺服器的最大輸送量下達成延遲目標,建議使用 num_requests_waiting。
如果工作負載對延遲時間很敏感,且以佇列為基礎的擴縮速度不夠快,無法滿足您的需求,建議使用 gpu_cache_usage_perc。
如需進一步說明,請參閱「使用 GPU 自動調度大型語言模型 (LLM) 推論工作負載的最佳做法」。
選取 HPA 設定的 averageValue 目標時,您需要透過實驗決定要根據哪個指標自動調度資源。如需更多實驗最佳化建議,請參閱「節省 GPU 費用:為 GKE 推論工作負載提供更智慧的自動調度資源功能」網誌文章。這篇網誌文章中使用的 profile-generator 也適用於 vLLM。
如要使用 num_requests_waiting 部署水平 Pod 自動配置器設定,請按照下列步驟操作:
將下列資訊清單儲存為
vllm-hpa.yaml:Google Cloud Managed Service for Prometheus 中的 vLLM 指標採用
vllm:metric_name格式。最佳做法: 使用
num_requests_waiting調整輸送量。針對延遲時間敏感的 GPU 用途,請使用gpu_cache_usage_perc。部署水平 Pod 自動調度資源設定:
kubectl apply -f vllm-hpa.yamlGKE 會排定部署另一個 Pod,這會觸發節點集區自動調度器新增第二個節點,然後再部署第二個 vLLM 副本。
查看 Pod 自動調度資源的進度:
kubectl get hpa --watch輸出結果會與下列內容相似:
NAME      REFERENCE              TARGETS   MINPODS   MAXPODS   REPLICAS   AGE
lws-hpa   LeaderWorkerSet/vllm   0/1       1         2         1          6d1h
lws-hpa   LeaderWorkerSet/vllm   1/1       1         2         1          6d1h
lws-hpa   LeaderWorkerSet/vllm   0/1       1         2         1          6d1h
lws-hpa   LeaderWorkerSet/vllm   4/1       1         2         1          6d1h
lws-hpa   LeaderWorkerSet/vllm   0/1       1         2         2          6d1h
使用 Google Cloud Hyperdisk ML 縮短模型載入時間
使用這類 LLM 時,vLLM 可能需要大量時間,才能在每個新副本上完成下載、載入及暖機。舉例來說,使用 Llama 3.1 405B 時,該程序可能需要約 90 分鐘。您可以直接將模型下載至 Hyperdisk ML 磁碟區,並將該磁碟區掛接至每個 Pod,藉此縮短時間 (使用 Llama 3.1 405B 時為 20 分鐘)。如要完成這項作業,本教學課程會使用 Hyperdisk ML 磁碟區和 Kubernetes Job。Kubernetes 中的 Job 控制器會建立一或多個 Pod,並確保這些 Pod 成功執行特定工作。
如要加快模型載入速度,請按照下列步驟操作:
將下列範例資訊清單儲存為
producer-pvc.yaml:kind: PersistentVolumeClaim apiVersion: v1 metadata: name: producer-pvc spec: # Specifies the StorageClass to use. Hyperdisk ML is optimized for ML workloads. storageClassName: hyperdisk-ml accessModes: - ReadWriteOnce resources: requests: storage: 800Gi將下列範例資訊清單儲存為
producer-job.yaml:DeepSeek-R1
Llama 3.1 405B
按照「使用 Hyperdisk ML 加速 AI/機器學習資料載入作業」一文中的說明,使用您在先前步驟中建立的兩個檔案。
完成這個步驟後,您已建立 Hyperdisk ML 磁碟區,並填入模型資料。
部署 vLLM 多節點 GPU 伺服器,並使用新建立的 Hyperdisk ML 磁碟區儲存模型資料。
DeepSeek-R1
Llama 3.1 405B