Apache Spark 用の BigQuery コネクタを使用すると、データ サイエンティストは、BigQuery のシームレスでスケーラブルな SQL エンジンの能力と Apache Spark の ML 機能を融合できます。このチュートリアルでは、Dataproc、BigQuery、Apache Spark ML を使用して、データセットに対して ML を実行する方法を示します。
目標
線形回帰を使用して次の 5 つの要素に基づく出生時体重のモデルを構築します。- 妊娠週
- 母親の年齢
- 父親の年齢
- 母親の妊娠中の体重増加
- アプガースコア
次のツールを使用します。
- BigQuery: Google Cloud プロジェクトに書き込まれる線形回帰入力テーブルを作成します。
- Python: BigQuery のデータをクエリおよび管理します。
- Apache Spark: 生成された線形回帰テーブルにアクセスします。
- Spark ML: モデルのビルドと評価を行います。
- Dataproc PySpark ジョブ: Spark ML 関数を呼び出します。
費用
このドキュメントでは、課金対象である次の Google Cloudコンポーネントを使用します。
- Compute Engine
- Dataproc
- BigQuery
料金計算ツールを使うと、予想使用量に基づいて費用の見積もりを生成できます。
始める前に
Dataproc クラスタには、Spark ML などの Spark コンポーネントがインストールされています。Dataproc クラスタをセットアップしてこの例で示すコードを実行するには、次のことを行う(またはすでに行っている)必要があります。
- Sign in to your Google Cloud account. If you're new to Google Cloud, create an account to evaluate how our products perform in real-world scenarios. New customers also get $300 in free credits to run, test, and deploy workloads.
-
In the Google Cloud console, on the project selector page, select or create a Google Cloud project.
Roles required to select or create a project
- Select a project: Selecting a project doesn't require a specific IAM role—you can select any project that you've been granted a role on.
-
Create a project: To create a project, you need the Project Creator
(
roles/resourcemanager.projectCreator), which contains theresourcemanager.projects.createpermission. Learn how to grant roles.
-
Enable the Dataproc, BigQuery, Compute Engine APIs.
Roles required to enable APIs
To enable APIs, you need the Service Usage Admin IAM role (
roles/serviceusage.serviceUsageAdmin), which contains theserviceusage.services.enablepermission. Learn how to grant roles. -
Install the Google Cloud CLI.
-
外部 ID プロバイダ(IdP)を使用している場合は、まず連携 ID を使用して gcloud CLI にログインする必要があります。
-
gcloud CLI を初期化するには、次のコマンドを実行します。
gcloud init -
In the Google Cloud console, on the project selector page, select or create a Google Cloud project.
Roles required to select or create a project
- Select a project: Selecting a project doesn't require a specific IAM role—you can select any project that you've been granted a role on.
-
Create a project: To create a project, you need the Project Creator
(
roles/resourcemanager.projectCreator), which contains theresourcemanager.projects.createpermission. Learn how to grant roles.
-
Enable the Dataproc, BigQuery, Compute Engine APIs.
Roles required to enable APIs
To enable APIs, you need the Service Usage Admin IAM role (
roles/serviceusage.serviceUsageAdmin), which contains theserviceusage.services.enablepermission. Learn how to grant roles. -
Install the Google Cloud CLI.
-
外部 ID プロバイダ(IdP)を使用している場合は、まず連携 ID を使用して gcloud CLI にログインする必要があります。
-
gcloud CLI を初期化するには、次のコマンドを実行します。
gcloud init - プロジェクト内で Dataproc クラスタを作成します。クラスタでは、Spark 2.0 以降(ML ライブラリが含まれているバージョン)の Dataproc バージョンを実行している必要があります。
プロジェクトにデータセットを作成します。
- BigQuery ウェブ UI に移動します。
- 左側のナビゲーション パネルでプロジェクト名をクリックし、続いて [データセットを作成] をクリックします。
- [データセットを作成] ダイアログで、次のように指定します。
- [データセット ID] に「natality_regression」と入力します。
- [データのロケーション] では、データセットのロケーションを選択できます。ロケーションのデフォルト値は、
US multi-regionです。データセットの作成後はロケーションを変更できません。 - [デフォルトのテーブルの有効期限] では、次のいずれかのオプションを選択します。
- [無期限](デフォルト): テーブルは手動で削除する必要があります。
- [日数]: テーブルは、作成日から指定した日数後に削除されます。
- [暗号化] では、次のいずれかのオプションを選択します。
- Google-owned and Google-managed encryption key(デフォルト)。
- [顧客管理の暗号鍵]: Cloud KMS 鍵でデータを保護するをご覧ください。
- [データセットを作成] をクリックします。
公表されている出生率データセットに対してクエリを実行し、クエリ結果をデータセット内の新しいテーブルに保存します。
- 次のクエリをコピーしてクエリエディタに貼り付け、[実行] をクリックします。
CREATE OR REPLACE TABLE natality_regression.regression_input as
SELECT
weight_pounds,
mother_age,
father_age,
gestation_weeks,
weight_gain_pounds,
apgar_5min
FROM
`bigquery-public-data.samples.natality`
WHERE
weight_pounds IS NOT NULL
AND mother_age IS NOT NULL
AND father_age IS NOT NULL
AND gestation_weeks IS NOT NULL
AND weight_gain_pounds IS NOT NULL
AND apgar_5min IS NOT NULL
- 約 1 分後にクエリが完了すると、結果がプロジェクトの
natality_regressionデータセットの「regression_input」BigQuery テーブルとして保存されます。
- 次のクエリをコピーしてクエリエディタに貼り付け、[実行] をクリックします。
Python および Python 用 Google Cloud クライアント ライブラリ(コードの実行に必要)をインストールする方法については、Python 開発環境の設定をご覧ください。Python
virtualenvをインストールして使用することをおすすめします。以下の
natality_tutorial.pyコードをコピーしてローカルマシンのpythonシェルに貼り付けます。シェルで<return>キーを押してコードを実行し、デフォルトのGoogle Cloud プロジェクトに「natality_regression」BigQuery データセットを作成します。「regression_input」テーブルには、公表されているnatalityデータのサブセットが入力されています。natality_regressionデータセットとregression_inputテーブルの作成を確認します。
ローカルマシンの新しい
natality_sparkml.pyファイルに、次のコードをコピーして貼り付けます。"""Run a linear regression using Apache Spark ML. In the following PySpark (Spark Python API) code, we take the following actions: * Load a previously created linear regression (BigQuery) input table into our Cloud Dataproc Spark cluster as an RDD (Resilient Distributed Dataset) * Transform the RDD into a Spark Dataframe * Vectorize the features on which the model will be trained * Compute a linear regression using Spark ML """ from pyspark.context import SparkContext from pyspark.ml.linalg import Vectors from pyspark.ml.regression import LinearRegression from pyspark.sql.session import SparkSession # The imports, above, allow us to access SparkML features specific to linear # regression as well as the Vectors types. # Define a function that collects the features of interest # (mother_age, father_age, and gestation_weeks) into a vector. # Package the vector in a tuple containing the label (`weight_pounds`) for that # row. def vector_from_inputs(r): return (r["weight_pounds"], Vectors.dense(float(r["mother_age"]), float(r["father_age"]), float(r["gestation_weeks"]), float(r["weight_gain_pounds"]), float(r["apgar_5min"]))) sc = SparkContext() spark = SparkSession(sc) # Read the data from BigQuery as a Spark Dataframe. natality_data = spark.read.format("bigquery").option( "table", "natality_regression.regression_input").load() # Create a view so that Spark SQL queries can be run against the data. natality_data.createOrReplaceTempView("natality") # As a precaution, run a query in Spark SQL to ensure no NULL values exist. sql_query = """ SELECT * from natality where weight_pounds is not null and mother_age is not null and father_age is not null and gestation_weeks is not null """ clean_data = spark.sql(sql_query) # Create an input DataFrame for Spark ML using the above function. training_data = clean_data.rdd.map(vector_from_inputs).toDF(["label", "features"]) training_data.cache() # Construct a new LinearRegression object and fit the training data. lr = LinearRegression(maxIter=5, regParam=0.2, solver="normal") model = lr.fit(training_data) # Print the model summary. print("Coefficients:" + str(model.coefficients)) print("Intercept:" + str(model.intercept)) print("R^2:" + str(model.summary.r2)) model.summary.residuals.show()
ローカルの
natality_sparkml.pyファイルをプロジェクトの Cloud Storage バケットにコピーします。gcloud storage cp natality_sparkml.py gs://bucket-name
Dataproc の [ジョブを送信] ページから回帰を実行します。
[メインの Python ファイル] フィールドで、
natality_sparkml.pyファイルのコピーが置かれている Cloud Storage バケットのgs://URI を挿入します。[ジョブタイプ] として
PySparkを選択します。gs://spark-lib/bigquery/spark-bigquery-latest_2.12.jarを [JAR ファイル] フィールドに挿入します。これにより、実行時に spark-bigquery-connector を PySpark アプリケーションで使用できるようになり、BigQuery データを Spark DataFrame に読み込めます。[ジョブ ID]、[リージョン]、[クラスタ] フィールドに入力します。
[送信] をクリックして、クラスタでジョブを実行します。
ローカルマシンの新しい
natality_sparkml.pyファイルに、次のコードをコピーして貼り付けます。"""Run a linear regression using Apache Spark ML. In the following PySpark (Spark Python API) code, we take the following actions: * Load a previously created linear regression (BigQuery) input table into our Cloud Dataproc Spark cluster as an RDD (Resilient Distributed Dataset) * Transform the RDD into a Spark Dataframe * Vectorize the features on which the model will be trained * Compute a linear regression using Spark ML """ from pyspark.context import SparkContext from pyspark.ml.linalg import Vectors from pyspark.ml.regression import LinearRegression from pyspark.sql.session import SparkSession # The imports, above, allow us to access SparkML features specific to linear # regression as well as the Vectors types. # Define a function that collects the features of interest # (mother_age, father_age, and gestation_weeks) into a vector. # Package the vector in a tuple containing the label (`weight_pounds`) for that # row. def vector_from_inputs(r): return (r["weight_pounds"], Vectors.dense(float(r["mother_age"]), float(r["father_age"]), float(r["gestation_weeks"]), float(r["weight_gain_pounds"]), float(r["apgar_5min"]))) sc = SparkContext() spark = SparkSession(sc) # Read the data from BigQuery as a Spark Dataframe. natality_data = spark.read.format("bigquery").option( "table", "natality_regression.regression_input").load() # Create a view so that Spark SQL queries can be run against the data. natality_data.createOrReplaceTempView("natality") # As a precaution, run a query in Spark SQL to ensure no NULL values exist. sql_query = """ SELECT * from natality where weight_pounds is not null and mother_age is not null and father_age is not null and gestation_weeks is not null """ clean_data = spark.sql(sql_query) # Create an input DataFrame for Spark ML using the above function. training_data = clean_data.rdd.map(vector_from_inputs).toDF(["label", "features"]) training_data.cache() # Construct a new LinearRegression object and fit the training data. lr = LinearRegression(maxIter=5, regParam=0.2, solver="normal") model = lr.fit(training_data) # Print the model summary. print("Coefficients:" + str(model.coefficients)) print("Intercept:" + str(model.intercept)) print("R^2:" + str(model.summary.r2)) model.summary.residuals.show()
ローカルの
natality_sparkml.pyファイルをプロジェクトの Cloud Storage バケットにコピーします。gcloud storage cp natality_sparkml.py gs://bucket-name
下に示すようにローカルマシンのターミナル ウィンドウから
gcloudコマンドを実行することにより、Pyspark ジョブを Dataproc サービスに送信します。- --jars フラグの値を指定することで、実行時に spark-bigquery-connector を PySpark ジョブで使用できるようになり、BigQuery データを Spark DataFrame に読み込めます。
gcloud dataproc jobs submit pyspark \
    gs://your-bucket/natality_sparkml.py \
    --cluster=cluster-name \
    --region=region \
    --jars=gs://spark-lib/bigquery/spark-bigquery-with-dependencies_SCALA_VERSION-CONNECTOR_VERSION.jar
- --jars フラグの値を指定することで、実行時に spark-bigquery-connector を PySpark ジョブで使用できるようになり、BigQuery データを Spark DataFrame に読み込めます。
- In the Google Cloud console, go to the Manage resources page.
- In the project list, select the project that you want to delete, and then click Delete.
- In the dialog, type the project ID, and then click Shut down to delete the project.
- Spark ジョブ調整のヒントを確認する
BigQuery natality データのサブセットを作成する
このセクションでは、プロジェクトにデータセットを作成し、そのデータセットにテーブルを作成して、公表されている出生率 BigQuery データセットから出生率データのサブセットをコピーします。このチュートリアルの後半では、このテーブルのサブセット データを使用して、母親の年齢、父親の年齢、妊娠週に基づいて出生体重を予測します。
データ サブセットは、 Google Cloud コンソールを使用するか、ローカルマシンで Python スクリプトを実行して作成できます。
コンソール
Python
このサンプルを試す前に、クライアント ライブラリを使用した Dataproc のクイックスタートにある Python の設定手順を行ってください。詳細については、Dataproc Python API のリファレンス ドキュメントをご覧ください。
Dataproc に対する認証を行うには、アプリケーションのデフォルト認証情報を設定します。詳細については、ローカル開発環境の認証の設定をご覧ください。
線形回帰を実行する
このセクションでは、 Google Cloud コンソールを使用して Dataproc サービスにジョブを送信するか、ローカル ターミナルから gcloud コマンドを実行して PySpark 線形回帰を実行します。
コンソール
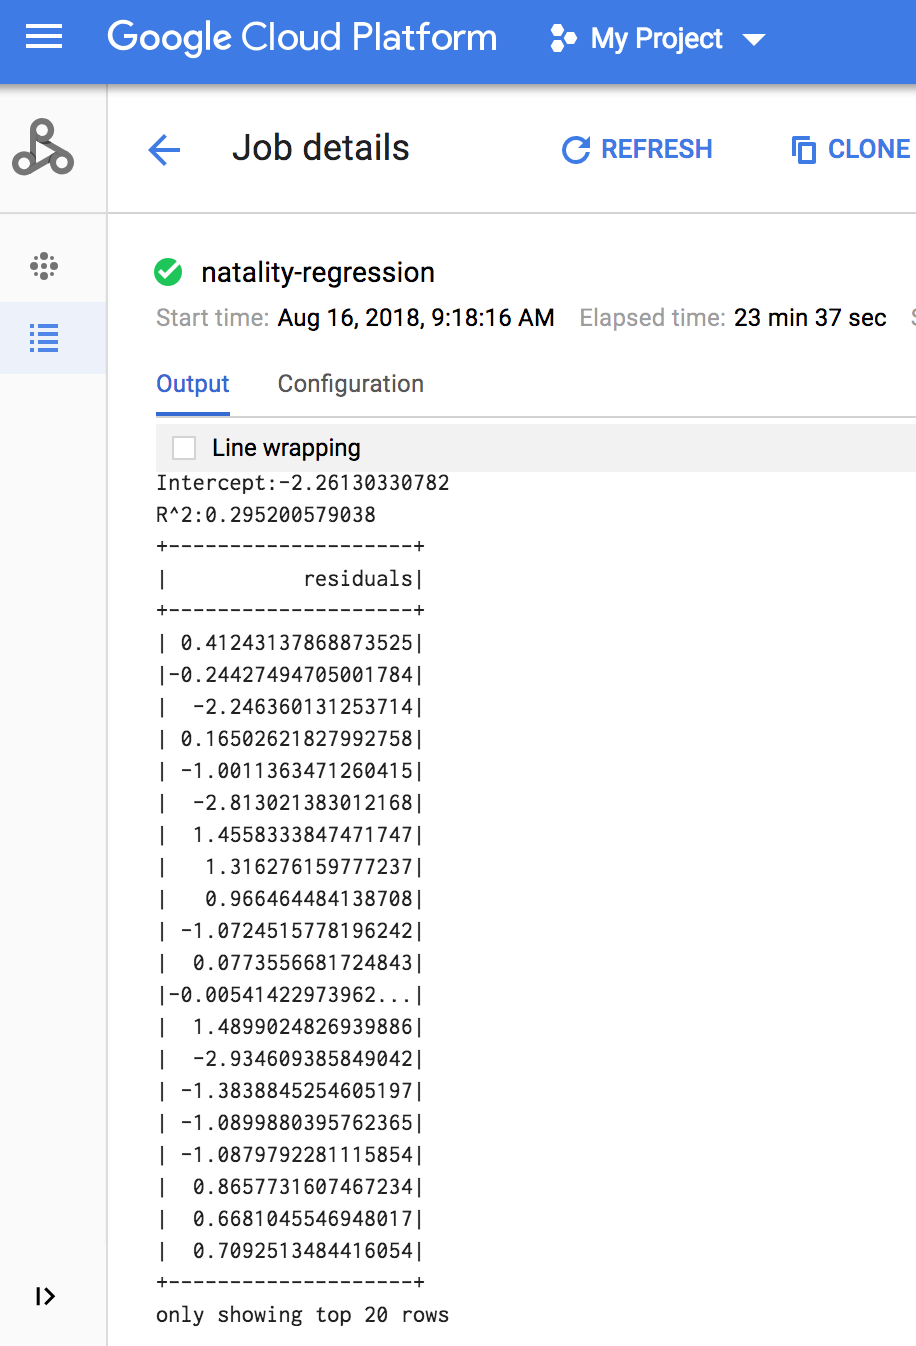
ジョブが完了すると、線形回帰出力モデルの概要が Dataproc の [ジョブの詳細] ウィンドウに表示されます。
gcloud
ジョブが完了すると、線形回帰出力(モデル概要)がターミナル ウィンドウに表示されます。
<<< # Print the model summary.
... print "Coefficients:" + str(model.coefficients)
Coefficients:[0.0166657454602,-0.00296751984046,0.235714392936,0.00213002070133,-0.00048577251587]
<<< print "Intercept:" + str(model.intercept)
Intercept:-2.26130330748
<<< print "R^2:" + str(model.summary.r2)
R^2:0.295200579035
<<< model.summary.residuals.show()
+--------------------+
|           residuals|
+--------------------+
| -0.7234737533344147|
|  -0.985466980630501|
| -0.6669710598385468|
|  1.4162434829714794|
|-0.09373154375186754|
|-0.15461747949235072|
| 0.32659061654192545|
|  1.5053877697929803|
|  -0.640142797263989|
|   1.229530260294963|
|-0.03776160295256...|
| -0.5160734239126814|
| -1.5165972740062887|
|  1.3269085258245008|
|  1.7604670124710626|
|  1.2348130901905972|
|   2.318660276655887|
|  1.0936947030883175|
|  1.0169768511417363|
| -1.7744915698181583|
+--------------------+
only showing top 20 rows.
Clean up
After you finish the tutorial, you can clean up the resources that you created so that they stop using quota and incurring charges. The following sections describe how to delete or turn off these resources.
Delete the project
The easiest way to eliminate billing is to delete the project that you created for the tutorial.
To delete the project:
Dataproc クラスタを削除する
クラスタを削除するをご覧ください。