This document teaches you how to access Cloud Billing Reports in the Google Cloud console and how to configure reports, providing details on how to use the various report settings, filters, and report features to track and understand your Google Cloud usage costs.
View your billing reports and cost trends
Use the Reports page to view and analyze your Google Cloud usage cost and cost trends using a variety of configurable settings and filters. The Reports page displays a chart that plots usage costs for a Cloud Billing account, including costs in all projects linked to the billing account. To help you view the cost trends that are important to you, you can select a data range, specify a time range, configure the chart filters, and group your data by a variety of options, such as by project, service, SKU, or location.
Cloud Billing reports can help you answer questions like these:
- How is my current month's Google Cloud spending trending?
- Which Google Cloud project cost the most last month?
- Which Google Cloud service (for example, Compute Engine or Cloud Storage) cost me the most?
- How do my daily costs per Google Cloud service compare over time?
- What are my forecasted future costs based on historical trends?
- How much am I spending by region?
- What was the cost of resources with label X?
Permissions required to access reports
Depending on your level of Cloud Billing access, you can view cost reports for a Cloud Billing account (including viewing the costs for more than one project linked to the billing account), or you can view cost reports for individual projects.
| View costs reports for a Cloud Billing account | View costs for an individual Google Cloud project |
|---|---|
|
To view all costs for a Cloud Billing account, you need permissions on the Cloud Billing account. Cloud Billing account permissions are granted using roles on the billing account. To view the cost reports for your Cloud Billing account, including viewing the cost information for all of the Google Cloud projects that are linked to the billing account, you need a role on your Cloud Billing account that includes the following permissions:
To gain these permissions using a predefined role, ask your administrator to grant you one of the following Cloud Billing IAM roles on your Cloud Billing account:
For more information about Cloud Billing permissions, see: |
To view all costs for an individual Google Cloud project, you need billing-specific permissions on the Google Cloud project. Project permissions are granted using roles on the Google Cloud project. To view the Cloud Billing reports for a project, you need a role on the Google Cloud project that includes the following permissions:
To gain these permissions using a predefined role, ask your administrator to grant you one of the following basic IAM roles on your Google Cloud projects:
For more information about Google Cloud project permissions, see: |
Access the reports page
To view the cost reports for your Cloud Billing account or project:
Using the procedure that fits your level of access to Cloud Billing accounts, go to your Cloud Billing account in the Billing section of the Google Cloud console:
Users with Cloud Billing account permissions Users with project-level permissions only If you have Cloud Billing account permissions, you can select from a list of billing accounts that you have permissions to access.
In the Google Cloud console, go to your Cloud Billing account.
Go to your Cloud Billing account- At the prompt, choose the Cloud Billing account
for which you'd like to view cost reports.
The Billing Overview page opens for the selected billing account.
If you only have project permissions, but don't have any permissions on your project's Cloud Billing account, you'll need to select your project before you navigate to the Billing section.
Sign in to the Google Cloud console dashboard and select a project.
Open Google Cloud console- Select a project for which you'd like to view cost reports.
- Next, navigate to Billing: Open the Google Cloud console Navigation
menu , and
then select Billing.
If you're prompted to choose which billing account you want to view and manage, click Go to linked billing account to view the billing account that's linked to your selected project.
The Billing Overview page opens for the selected billing account.
In the Cost management section of the Billing navigation menu, select Reports.
The Report page opens using default settings, displaying all costs for the current month, grouped by service.
- If you have billing-account-level permissions, you can see costs for all of the projects linked to the billing account. If you enabled Gemini Cloud Assist, you can use the Gemini Cloud Assist in Cloud Billing features on the Report.
- If you're a project user, and are accessing the Cloud Billing account using project-level permissions only, you can see costs for a single project – the project that you selected in the Google Cloud console before you accessed the Billing section. If you enabled the Gemini Cloud Assist API in the selected project, and you're granted the Gemini-specific IAM roles on the selected project, then you can use the Gemini Cloud Assist in Cloud Billing features on the Report.
About the default Cloud Billing report
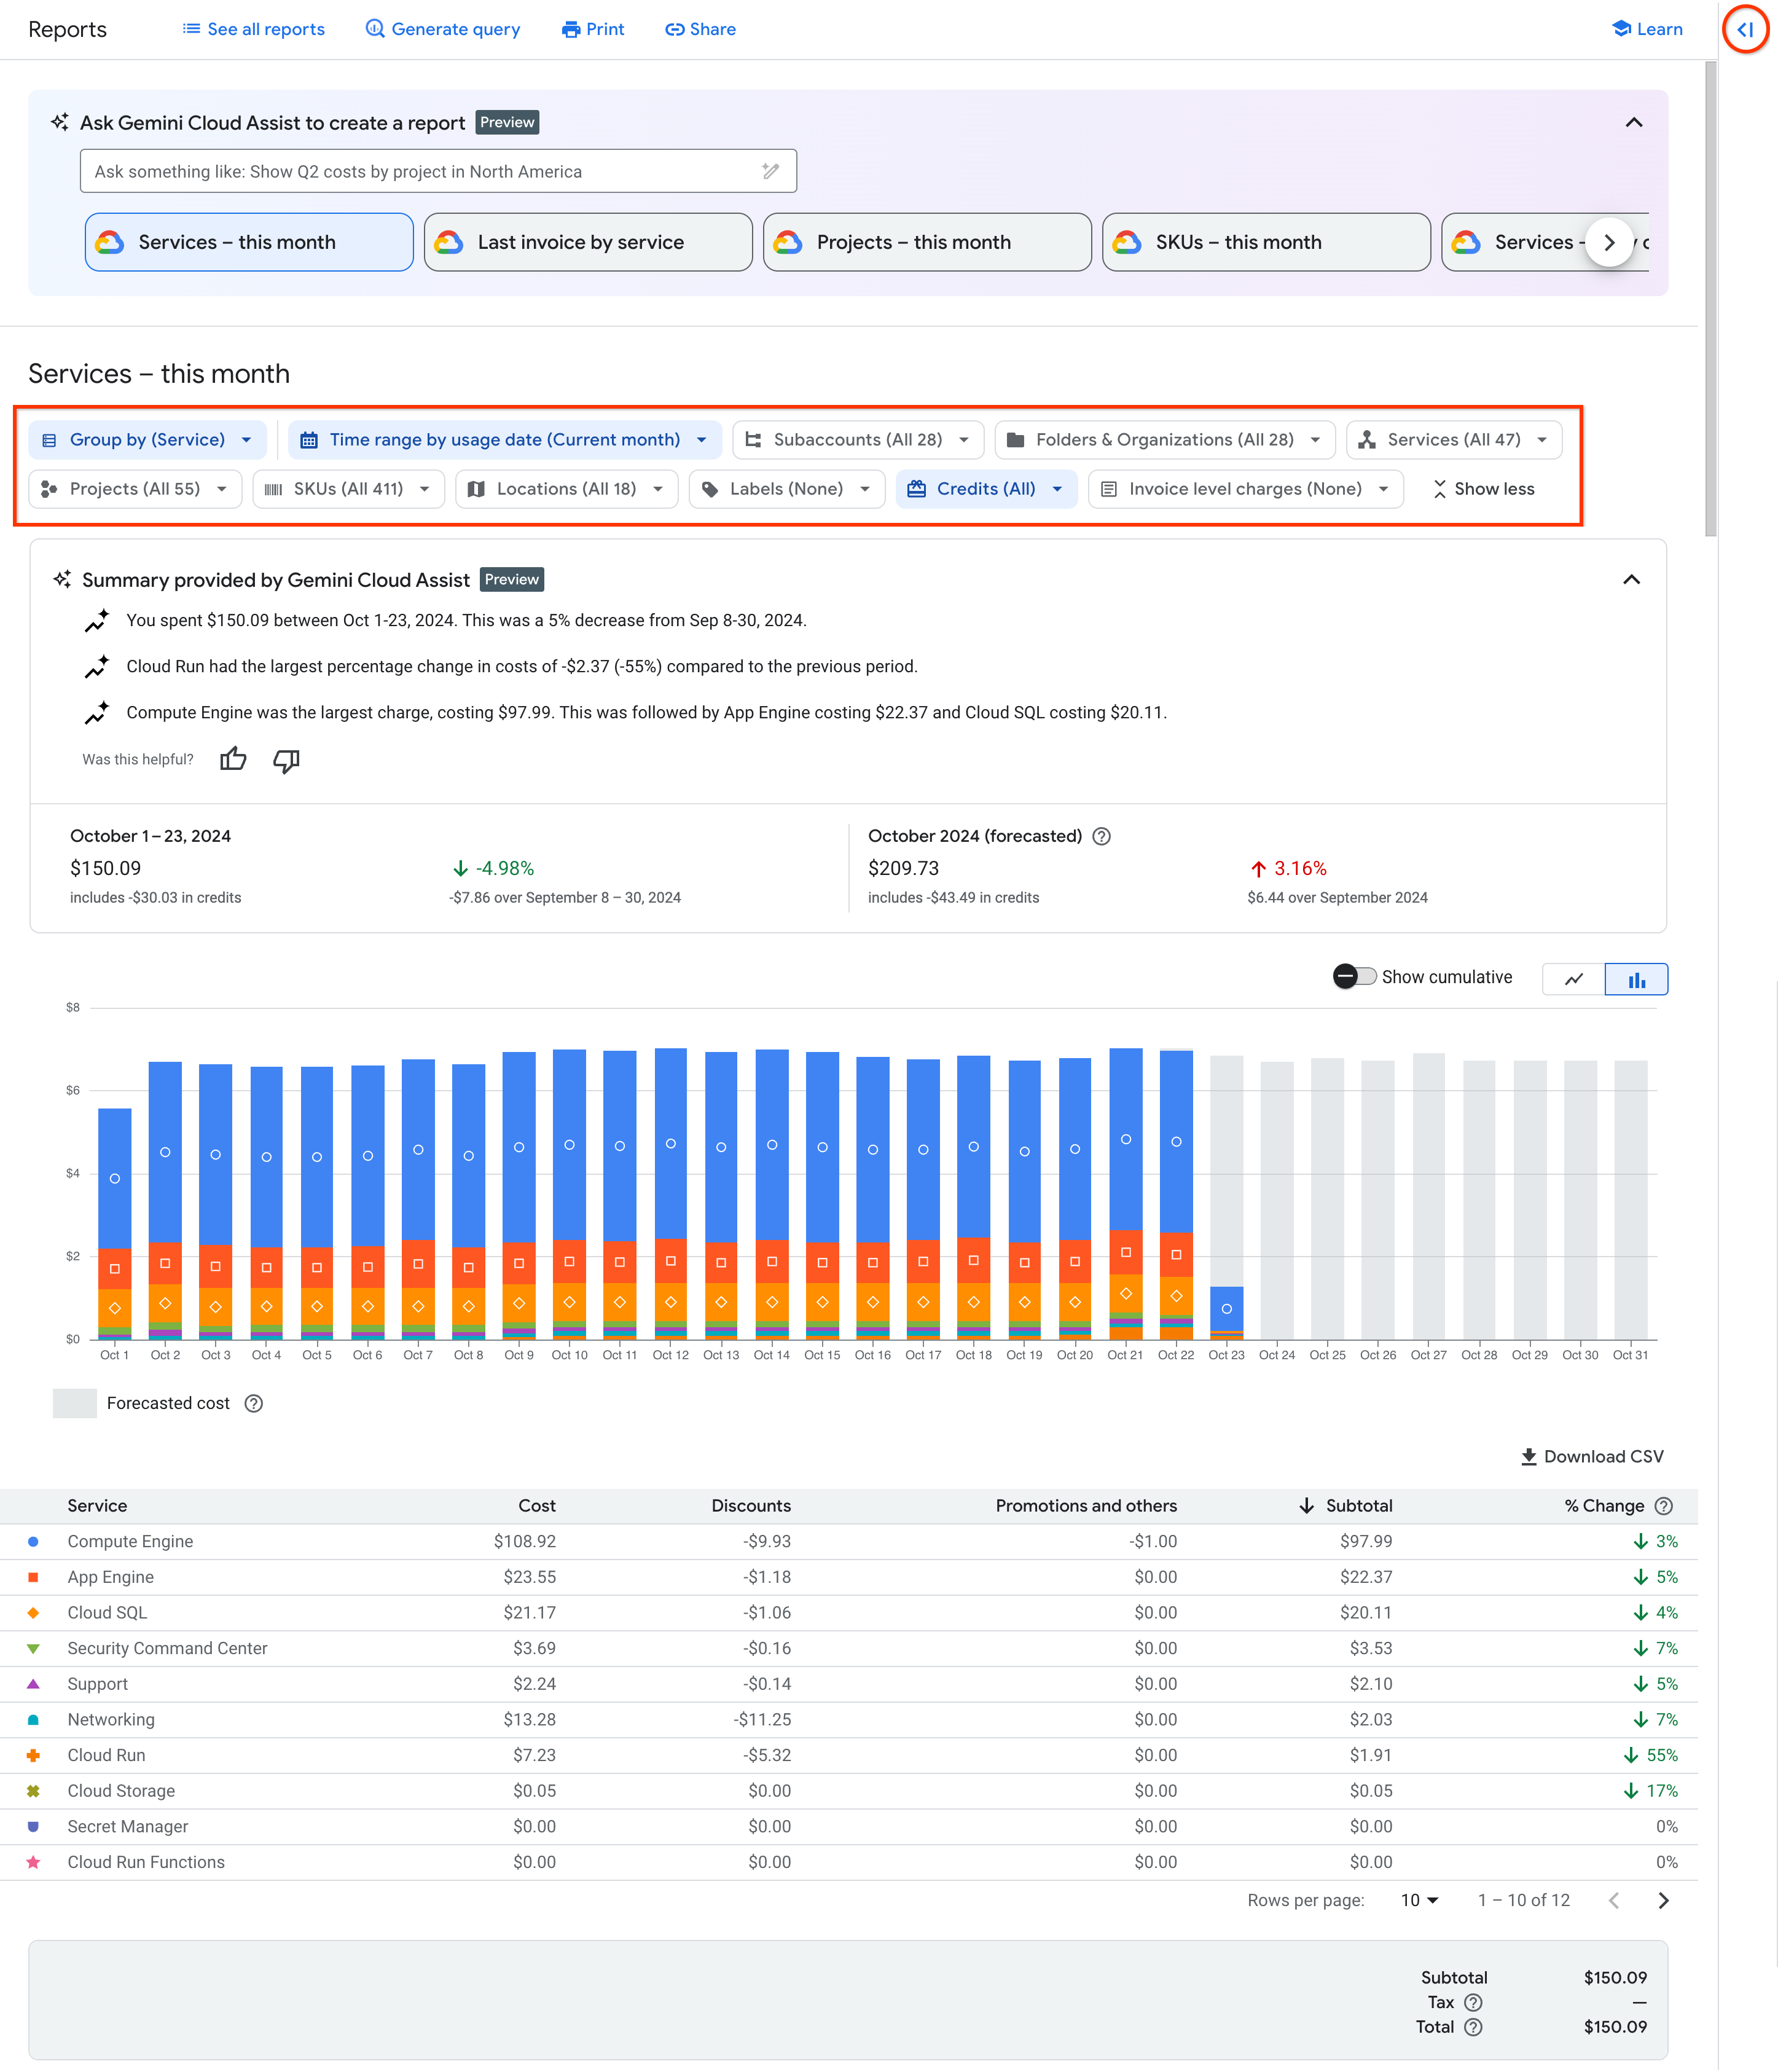
Based on your report filters and other settings, the report chart displays a stacked bar chart where each bar plots costs over time. The Group by setting determines what each stack in the bar represents — each grouping gets its own stack in the bar chart and row in the table.
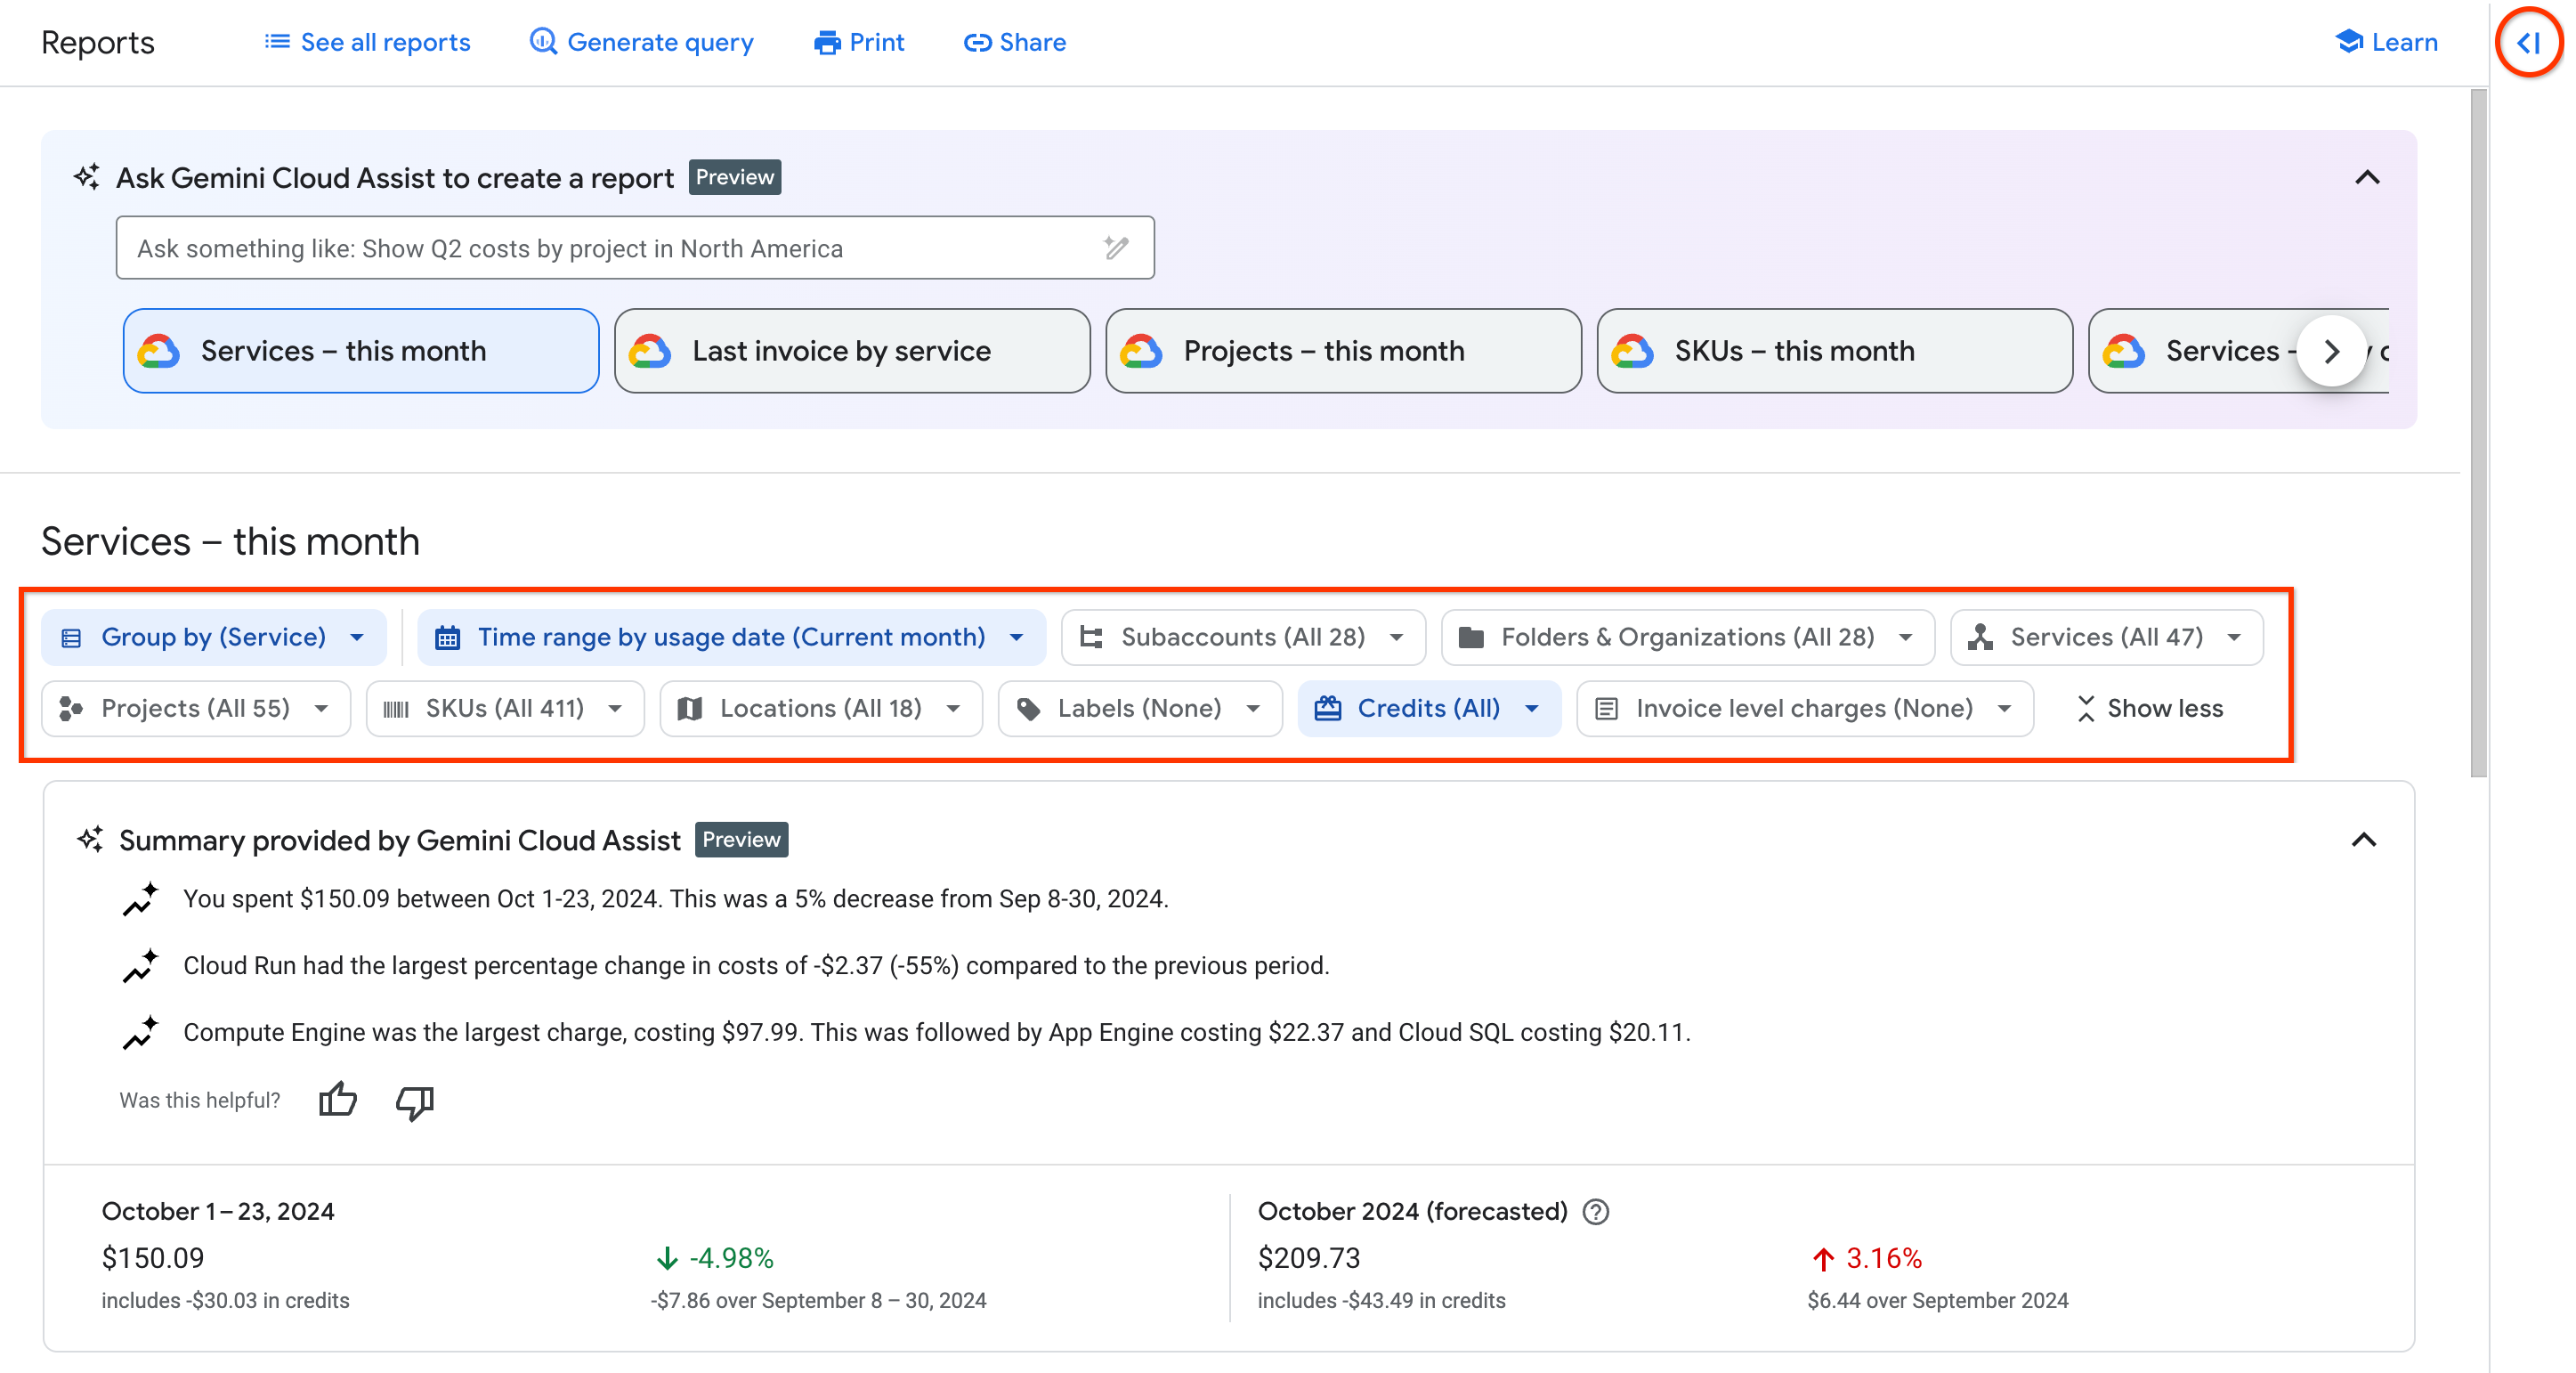
By default, the report uses the Services — this month preset report view, which returns a report showing the current calendar month's daily cost for all services and SKUs, grouped by Service.
If you have enabled Gemini Cloud Assist in Cloud Billing, the Gemini Cloud Assist features are available above the report header. Gemini features include saved reports, Gemini-assisted reports creation, and report summaries.
The following information explains how to interpret the different sections of the report when using the default report view:
For a quick view of your actual cost totals compared to forecasted costs, use the report header above the report chart. The report header includes the following information:
- Actual cost-to-date for the current month, including total savings, and a percent change indicator to show you if your overall costs are trending up or down compared to the previous time period.
- Total forecasted cost for the entire current month, including forecasted savings, and a percent change indicator to show you how your forecasted costs are trending compared to the previous time period.
For a daily summary and breakdown of costs by service, view the report chart. The chart displays the current month's daily usage-specific costs grouped by service (for all Google Cloud projects), including any usage-specific savings applied.
The chart also includes forecasted costs, indicated in the chart in light gray, helping you visualize how your forecasted costs are trending.
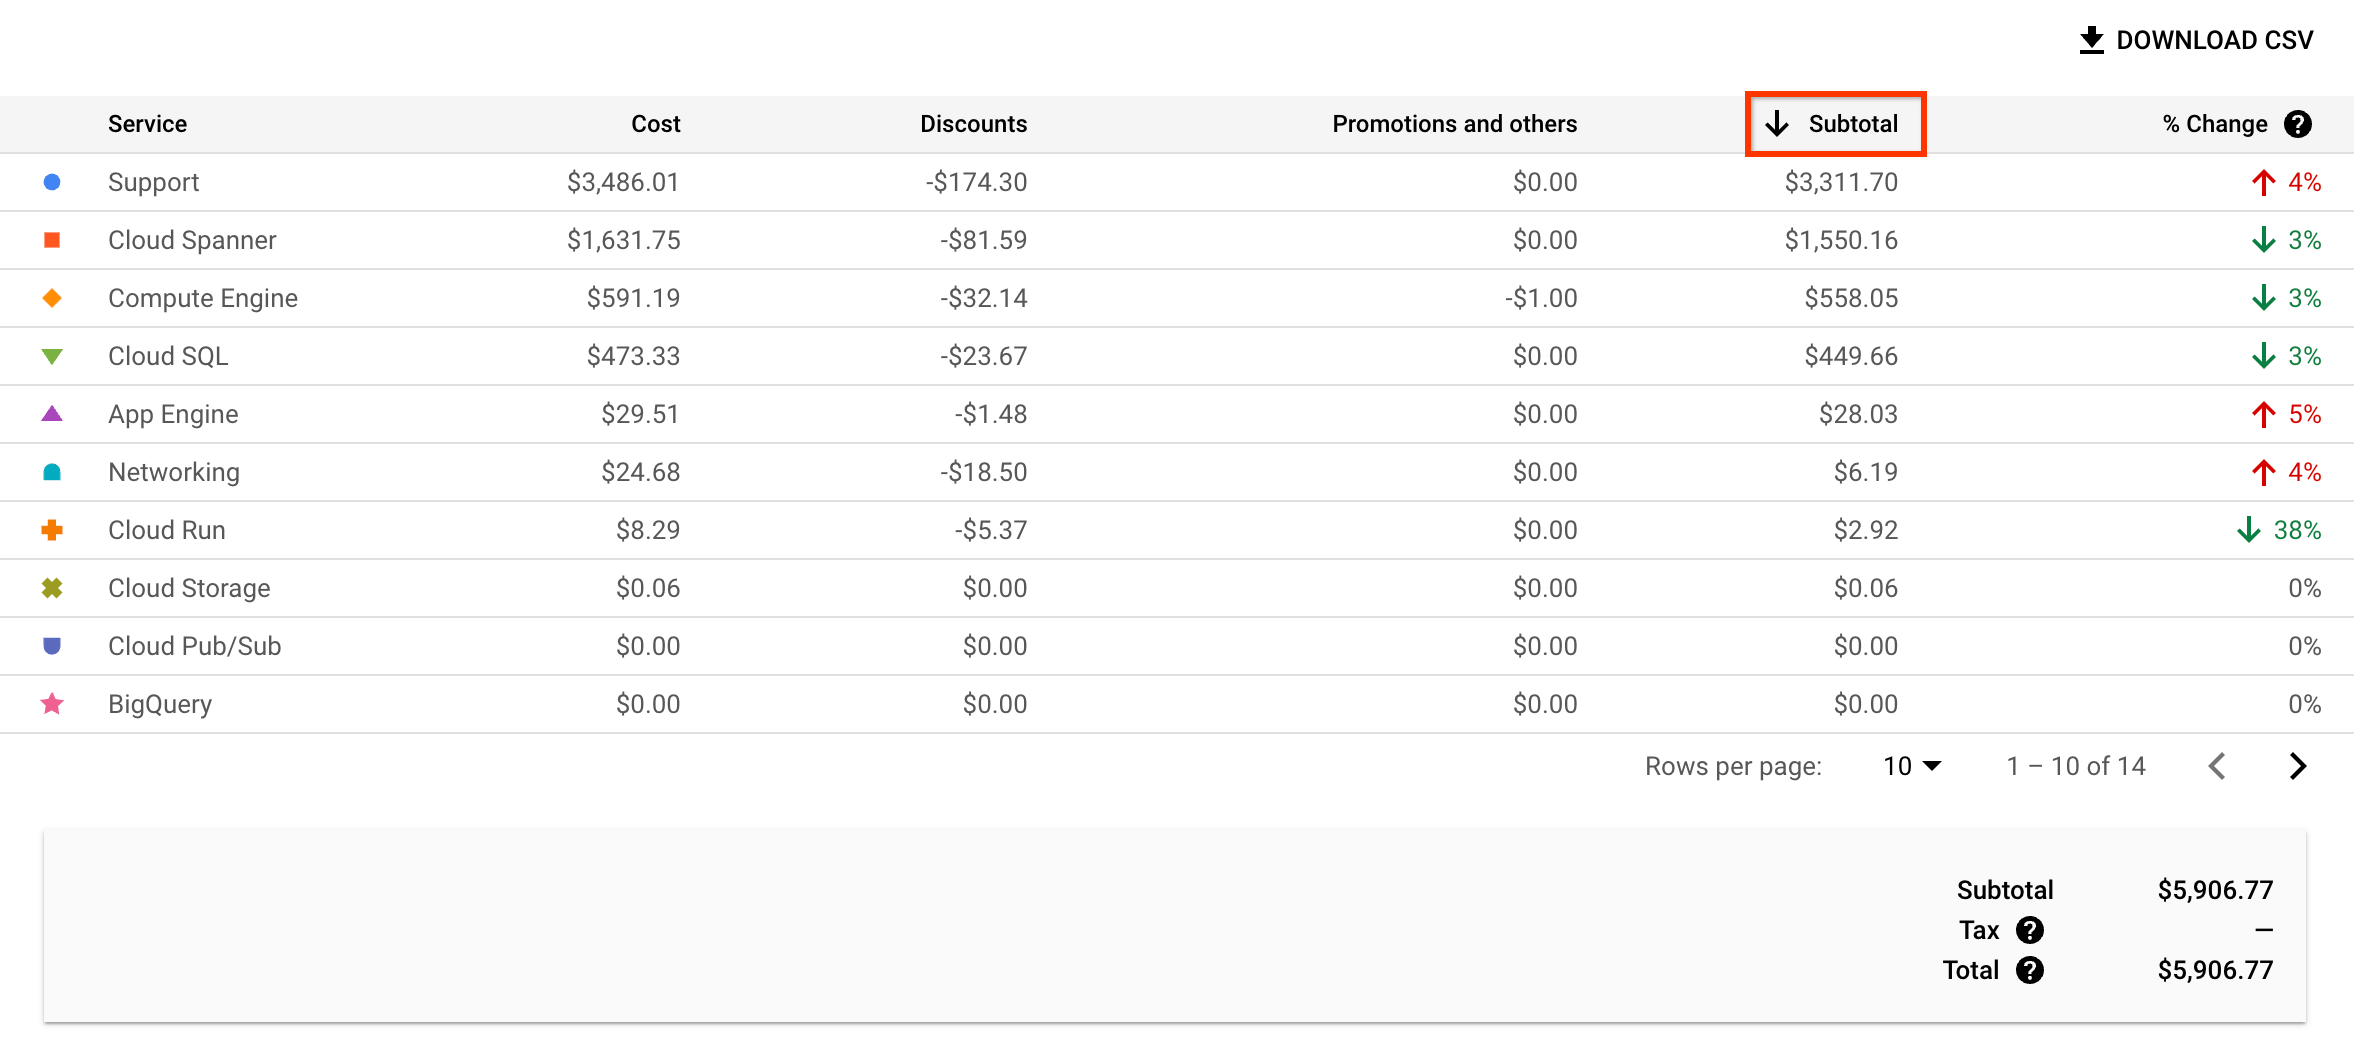
Each stacked bar in the chart (and row in the table) corresponds to the service, ranked largest to smallest by subtotal.
For cost totals by service, view the report table. The table shows a row for each service that incurred usage-specific costs and savings for the month, sorted by the Subtotal column in descending order.
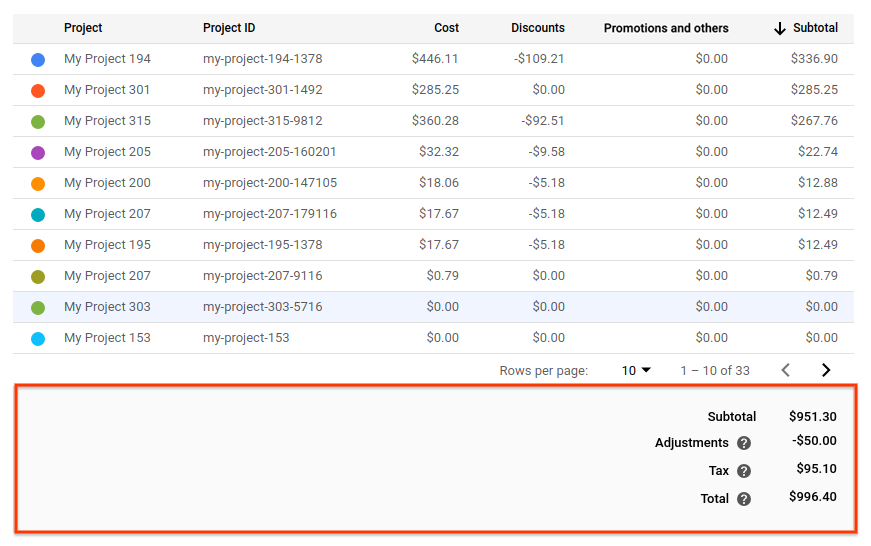
For a quick view of your actual, usage-specific cost totals, look at the report footer, below the table.
The values that display in the footer depend on the report's time range settings, filters, and your permission level for viewing costs in the Cloud Billing account. When viewing the report using an Invoice month time range, the footer totals can include invoice-level costs and credits such as taxes and adjustments. If your permissions limit your billing report access to viewing costs for a single project, you won't see invoice-level charges.

Note that the report's default settings are different if you access the report from the Budget and alerts page—the report's timeframe and filters are configured using the budget's scope settings. For details, see Viewing a budget in your report.
Manage report settings and filters
Use the various report settings and filters to customize the report view. You can select a preset report or saved report, and you can further refine the data displayed in the report by adjusting the Time range, Group by, and the various report Filters. If Gemini Cloud Assist in Cloud Billing is enabled, you can ask Gemini Cloud Assist to create a report.
|
|
Ask Gemini Cloud Assist to find or create a report
If you enabled Gemini Cloud Assist in Cloud Billing, you can ask Gemini Cloud Assist to create a report. When prompted, Gemini interprets your request and automatically configures the report settings and filters to create the report for you.

Use preset reports for quick configuration
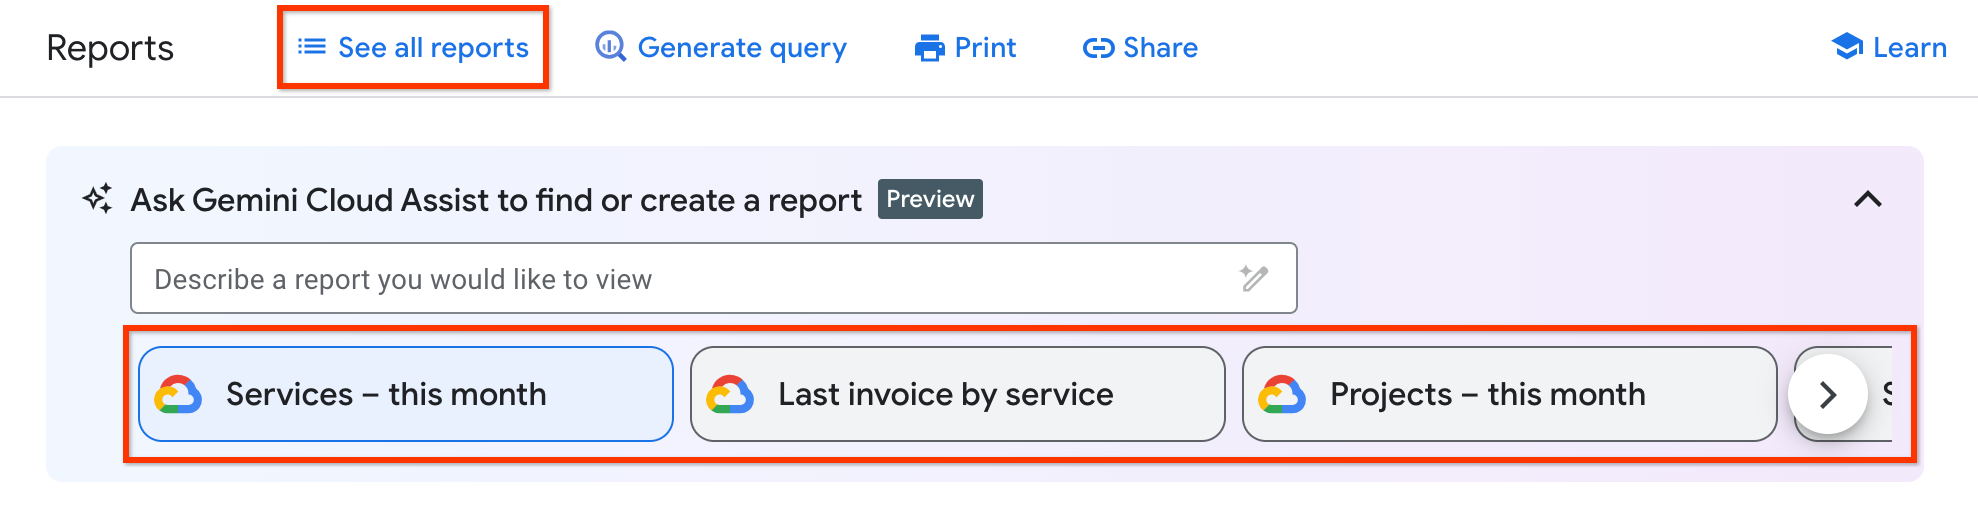
Cloud Billing provides several recommended reports with preconfigured settings that you can select for efficient access to your usage and cost data.
- Select See all reports to open a comprehensive list of reports, including your custom saved reports and the Google Cloud-created, recommended preset reports.
- Also, for customers who have enabled Gemini Cloud Assist in Cloud Billing, the preset reports and your custom saved reports are accessible in a carousel that displays below the Ask Gemini Cloud Assist prompt field. The most frequently viewed reports (from both your custom saved reports and the preset reports) appear in the carousel. You can scroll the reports carousel left and right to select a report.
The following Google Cloud-created, preconfigured report views are available:
| Preset reports using a Usage date time range | |
|---|---|
| Services — this month (default) | Time range: Current month. Group by: Service.
Description: The current calendar month's daily cost for all services and SKUs, grouped by Service (for example, Compute Engine or Cloud Storage), including any usage-specific savings applied, but not including invoice-level charges or credits such as taxes and adjustments. |
| Projects — this month | Time range: Current month. Group by: Project.
Description: The current calendar month's daily cost for all services and SKUs, grouped by Project, including any usage-specific savings applied, but not including invoice-level charges and credits such as taxes and adjustments. |
| SKUs — this month | Time range: Current month. Group by: SKU.
Description: The current calendar month's daily cost for all services and SKUs, grouped by SKU, including any usage-specific savings applied, but not including invoice-level charges and credits such as taxes and adjustments. |
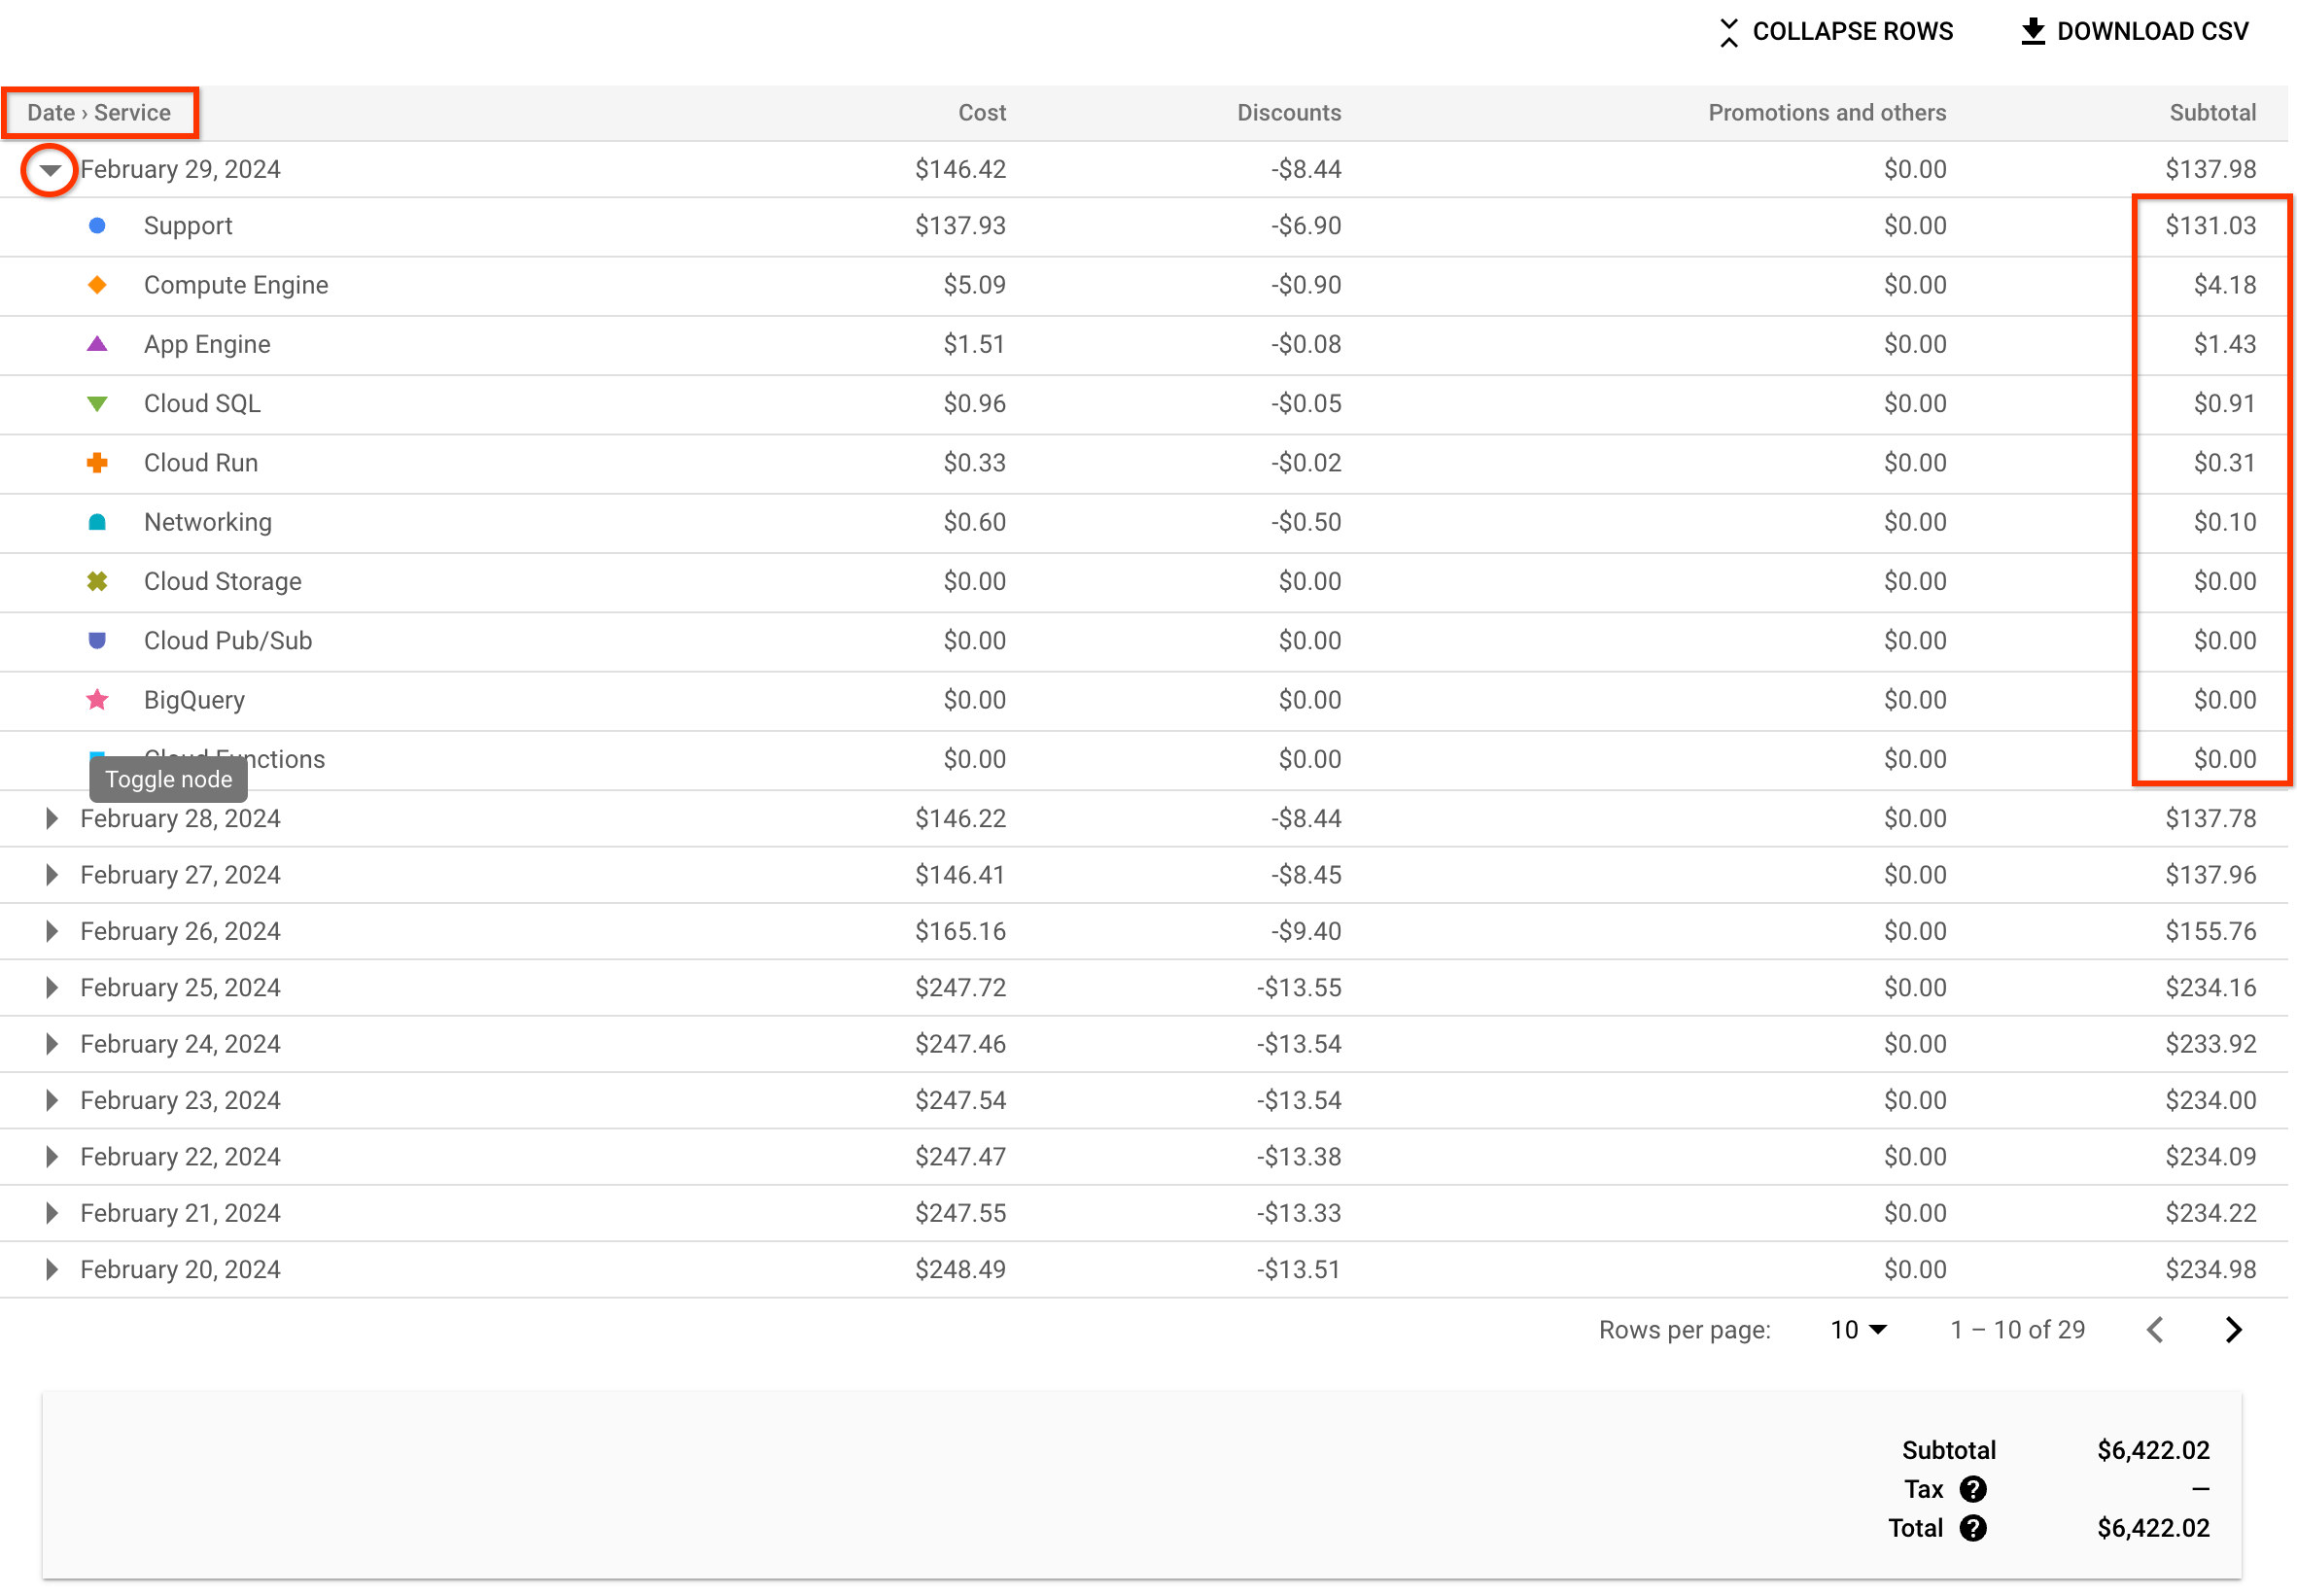
| Services — daily costs this month | Time range: Current month. Group by: Date > Service.
Description: The current calendar month's daily cost for all services and SKUs, grouped by Date > Service, including any usage-specific savings applied. In the report table, expand the row for a day to see your daily costs summarized per service. This view doesn't include invoice-level charges and credits such as taxes and adjustments. |
| Projects — daily costs this month | Time range: Current month. Group by: Date > Project.
Description: The current calendar month's daily cost for all services and SKUs, grouped by Date > Project, including any usage-specific savings applied. In the report table, expand the row for a day to see your daily costs summarized per project. This view doesn't include invoice-level charges and credits such as taxes and adjustments. |
| SKUs — daily costs this month | Time range: Current month. Group by: Date > SKU.
Description: The current calendar month's daily cost for all services and SKUs, grouped by Date > SKU, including any usage-specific savings applied. In the report table, expand the row for a day to see your daily costs summarized per SKU. This view doesn't include invoice-level charges and credits such as taxes and adjustments. |
| Services — daily costs L7D | Time range: Last seven days. Group by: Date > Service.
Description: The daily costs for the last seven days (L7D) for all services and SKUs, grouped by Date > Service, including any usage-specific savings applied. In the report table, expand the row for a day to see your daily costs summarized per service. This view doesn't include invoice-level charges and credits such as taxes and adjustments. |
| Preset reports using an Invoice month time range | |
|---|---|
| Last invoice by service | Time range: Most recent invoice month. Group by: Service.
The most recent, complete invoice month's daily cost for all services and SKUs, grouped by Service; including savings and invoice-level charges, such as tax; aggregated by total invoice costs for the invoice month, not by individual invoices*. If your permissions limit your billing report access to viewing costs for a single project, you won't see invoice-level charges. |
| Last invoice by project | Time range: Most recent invoice month. Group by: Project.
The most recent, complete invoice month's daily cost for all services and SKUs, grouped by Project; including savings and invoice-level charges, such as tax; aggregated by total invoice costs for the invoice month, not by individual invoices*. If your permissions limit your billing report access to viewing costs for a single project, you won't see invoice-level charges. |
| Last invoice by SKU | Time range: Most recent invoice month. Group by: SKU.
The most recent, complete invoice month's daily cost for all services and SKUs, grouped by SKU; including savings and invoice-level charges, such as tax; aggregated by total invoice costs for the invoice month, not by individual invoices*. If your permissions limit your billing report access to viewing costs for a single project, you won't see invoice-level charges. |
Set the Time range for the report data
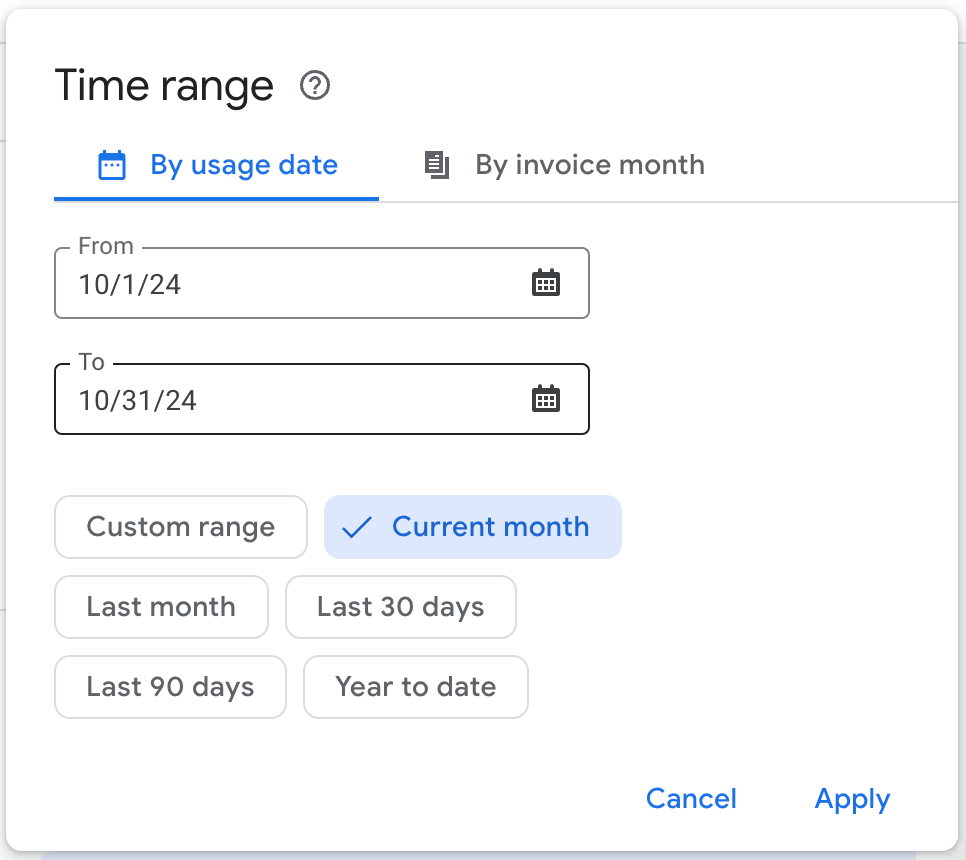
The type of Time range that you select, and the time period that you configure, affects your ability to view certain types of costs on the report (such as forecasted costs or invoice-level charges).
You can select between Usage date or Invoice month time range types, then set a date or month range to view the Google Cloud costs incurred during the specified time period.
When you select Usage date, you can choose a preset or custom time range for charting cost data (available back to January 2017). If you select Invoice month, you can set a time range based on complete months (available back to May 2019).
A 24-hour time period in the Cloud Billing report starts at midnight US and Canadian Pacific Time (UTC-8), and observes daylight saving time shifts in the United States.
| Time range options | |
|---|---|
By Usage date |
|
By Invoice month |
|
Use Group by to summarize costs
Costs in the report are summarized by the Group by option that you select.

- The Group by option that you select determines the columns and rows that appear in the report table, and affects how the data is presented in the report chart.
- When using a single-dimension Group by option, you can change the sort order of the rows in the report table by clicking on a column header. When using a multiple-dimension Group by option (such as Date > Project), the sort order of the rows in the report table is fixed and you can't change the order.
- Depending on the Time range set on the report, when you choose a single-dimension Group by option, the data that is displayed in the report chart is first grouped by date or month, and then by the single-dimension Group by (such as service, project, or SKU). In the report table, when using a single-dimension Group by option, each row summarizes the costs for the selected option (such as service, project, or SKU).
- Each grouping gets its own bar (or line) in the chart and row in the table.
- The Group by option also affects the report data that you can download to a CSV file.
The Group by options include the following:
| Single dimension | Multiple dimension by date | Multiple dimension by month |
|---|---|---|
|
Subaccount Project Project Hierarchy Service SKU Application Location: Region or multi-region* Label keys No grouping (show total cost only) |
Date > Subaccount Date > Project Date > Project Hierarchy Date > Service Date > SKU Date > Application Date > Location: Region or multi-region* |
Month > Subaccount Month > Project Month > Project Hierarchy Month > Service Month > SKU Month > Application Month > Location: Region or multi-region* |
Single-dimension Group by options |
||||||||||||||||||
|---|---|---|---|---|---|---|---|---|---|---|---|---|---|---|---|---|---|---|
When using a single-dimension Group by option, the report
table and the report chart display the data differently.
|
||||||||||||||||||
|
Multiple-dimension Group by options |
||||
|---|---|---|---|---|
When using a multiple-dimension Group by option, both the report
table and the report chart display the cost data summarized by
date or month, and then broken out by the additional Group by
dimension.
|
||||
|
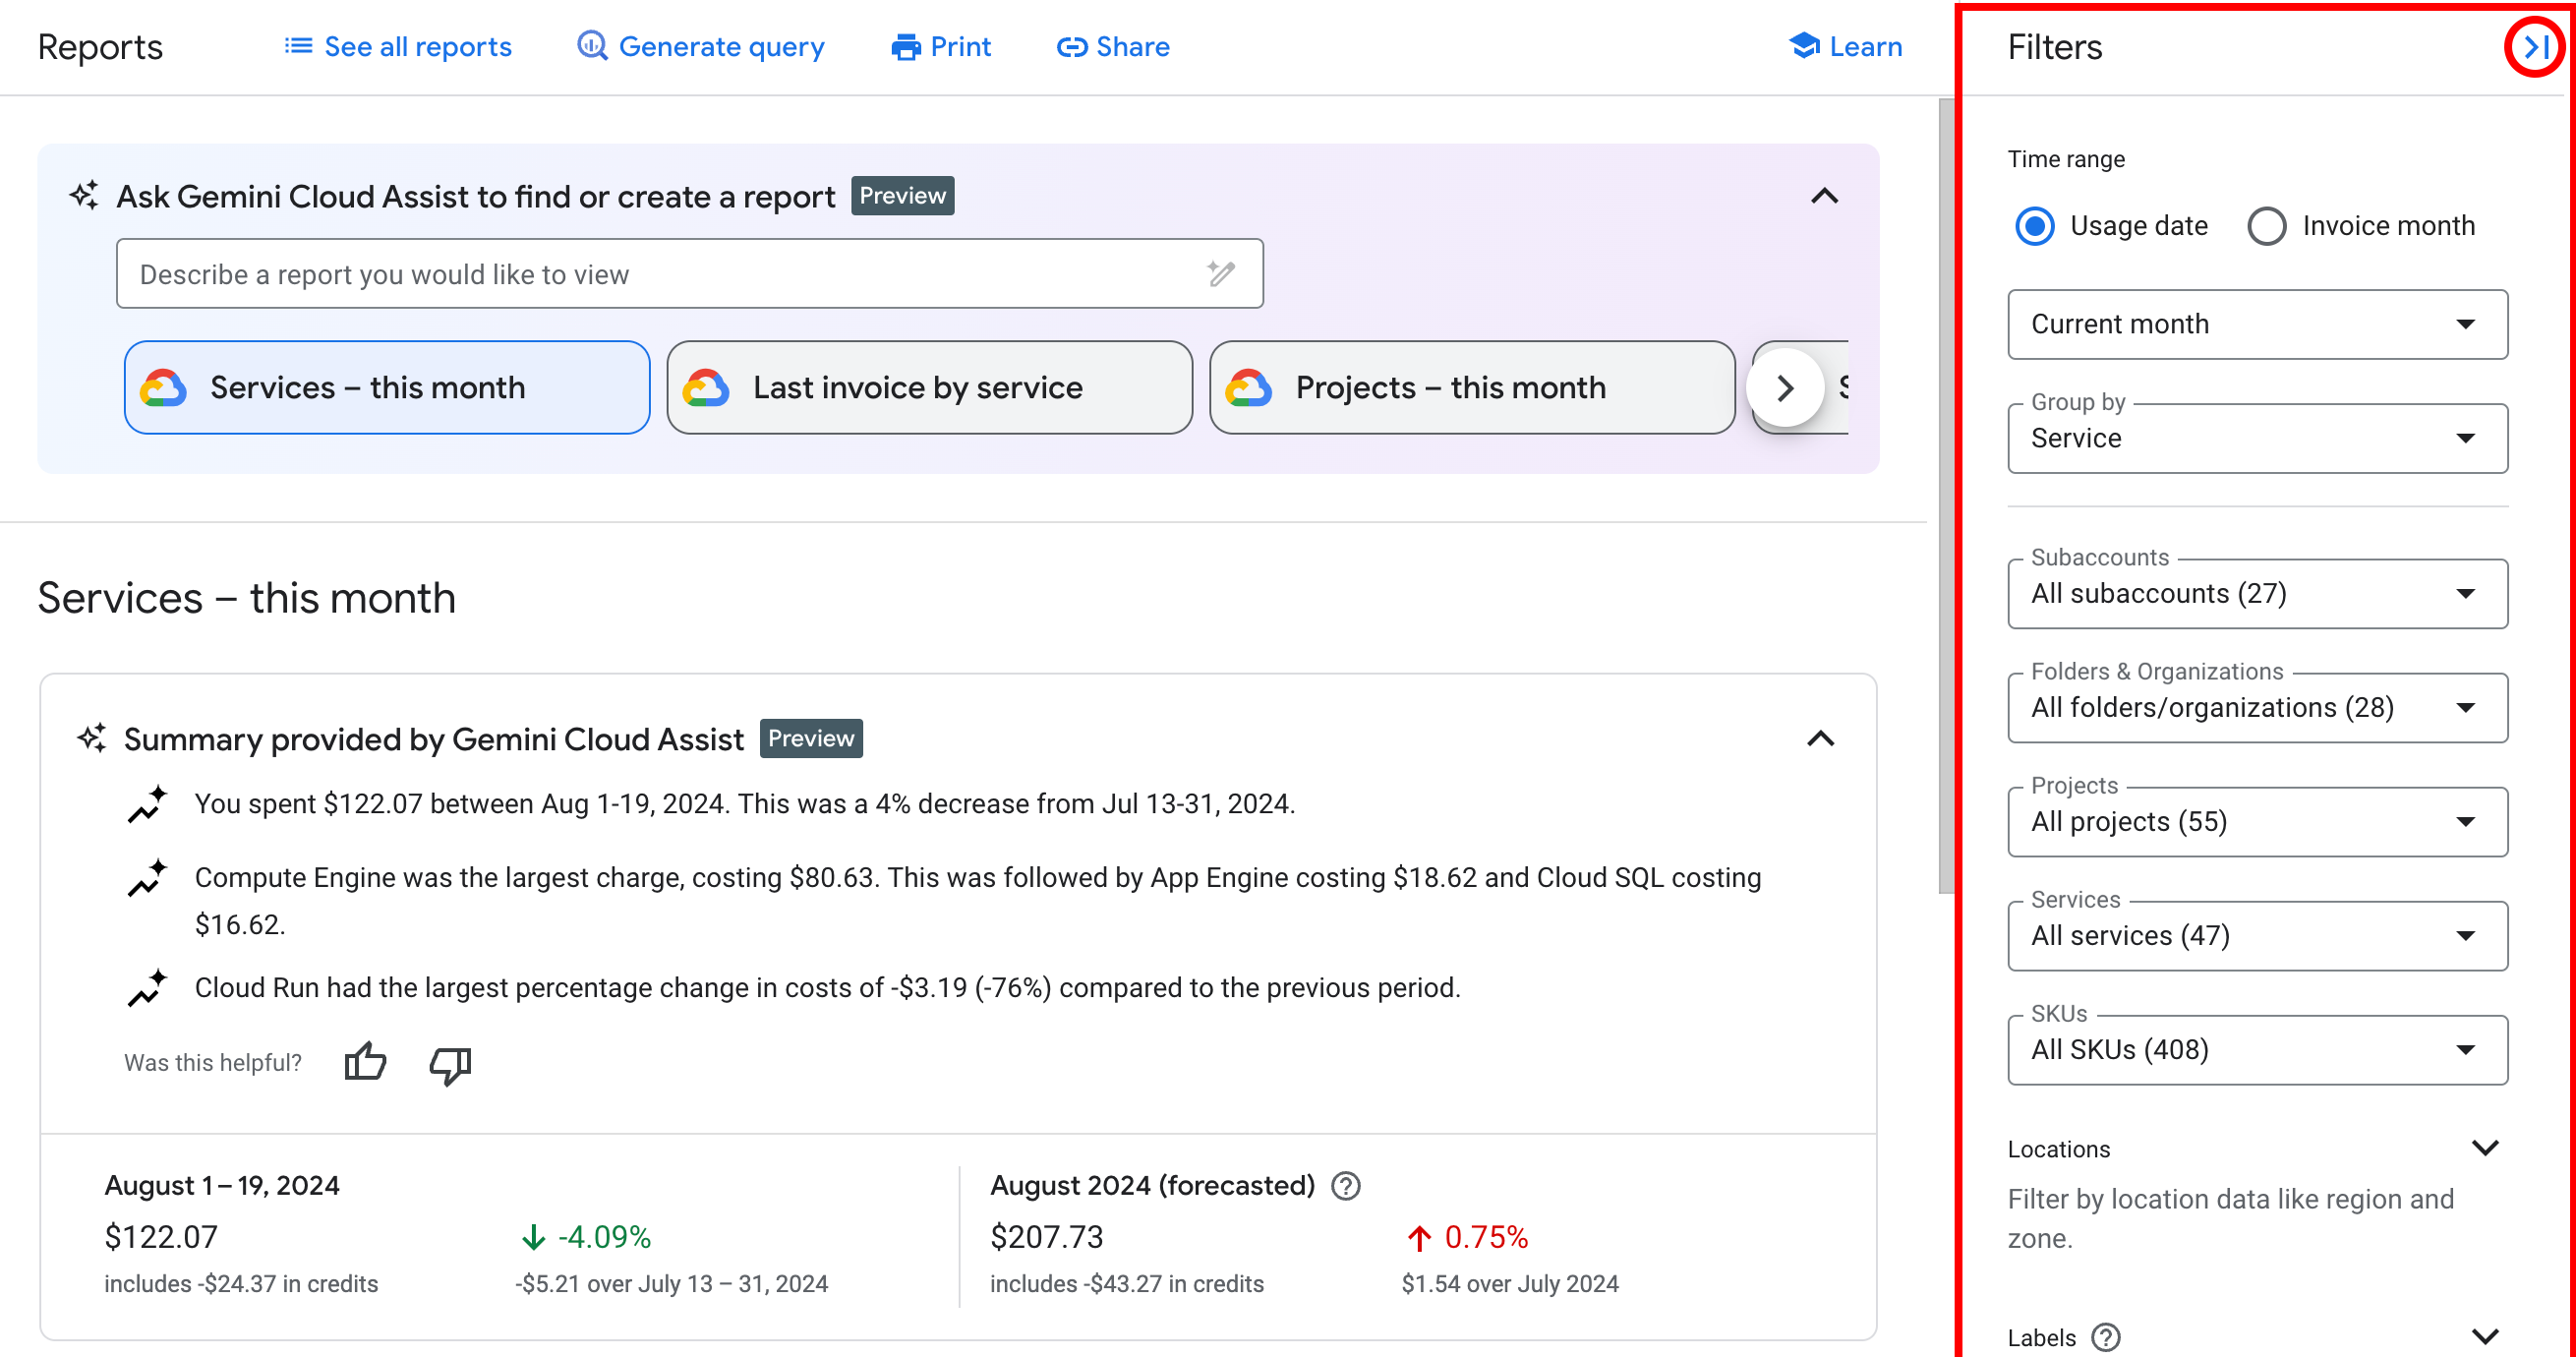
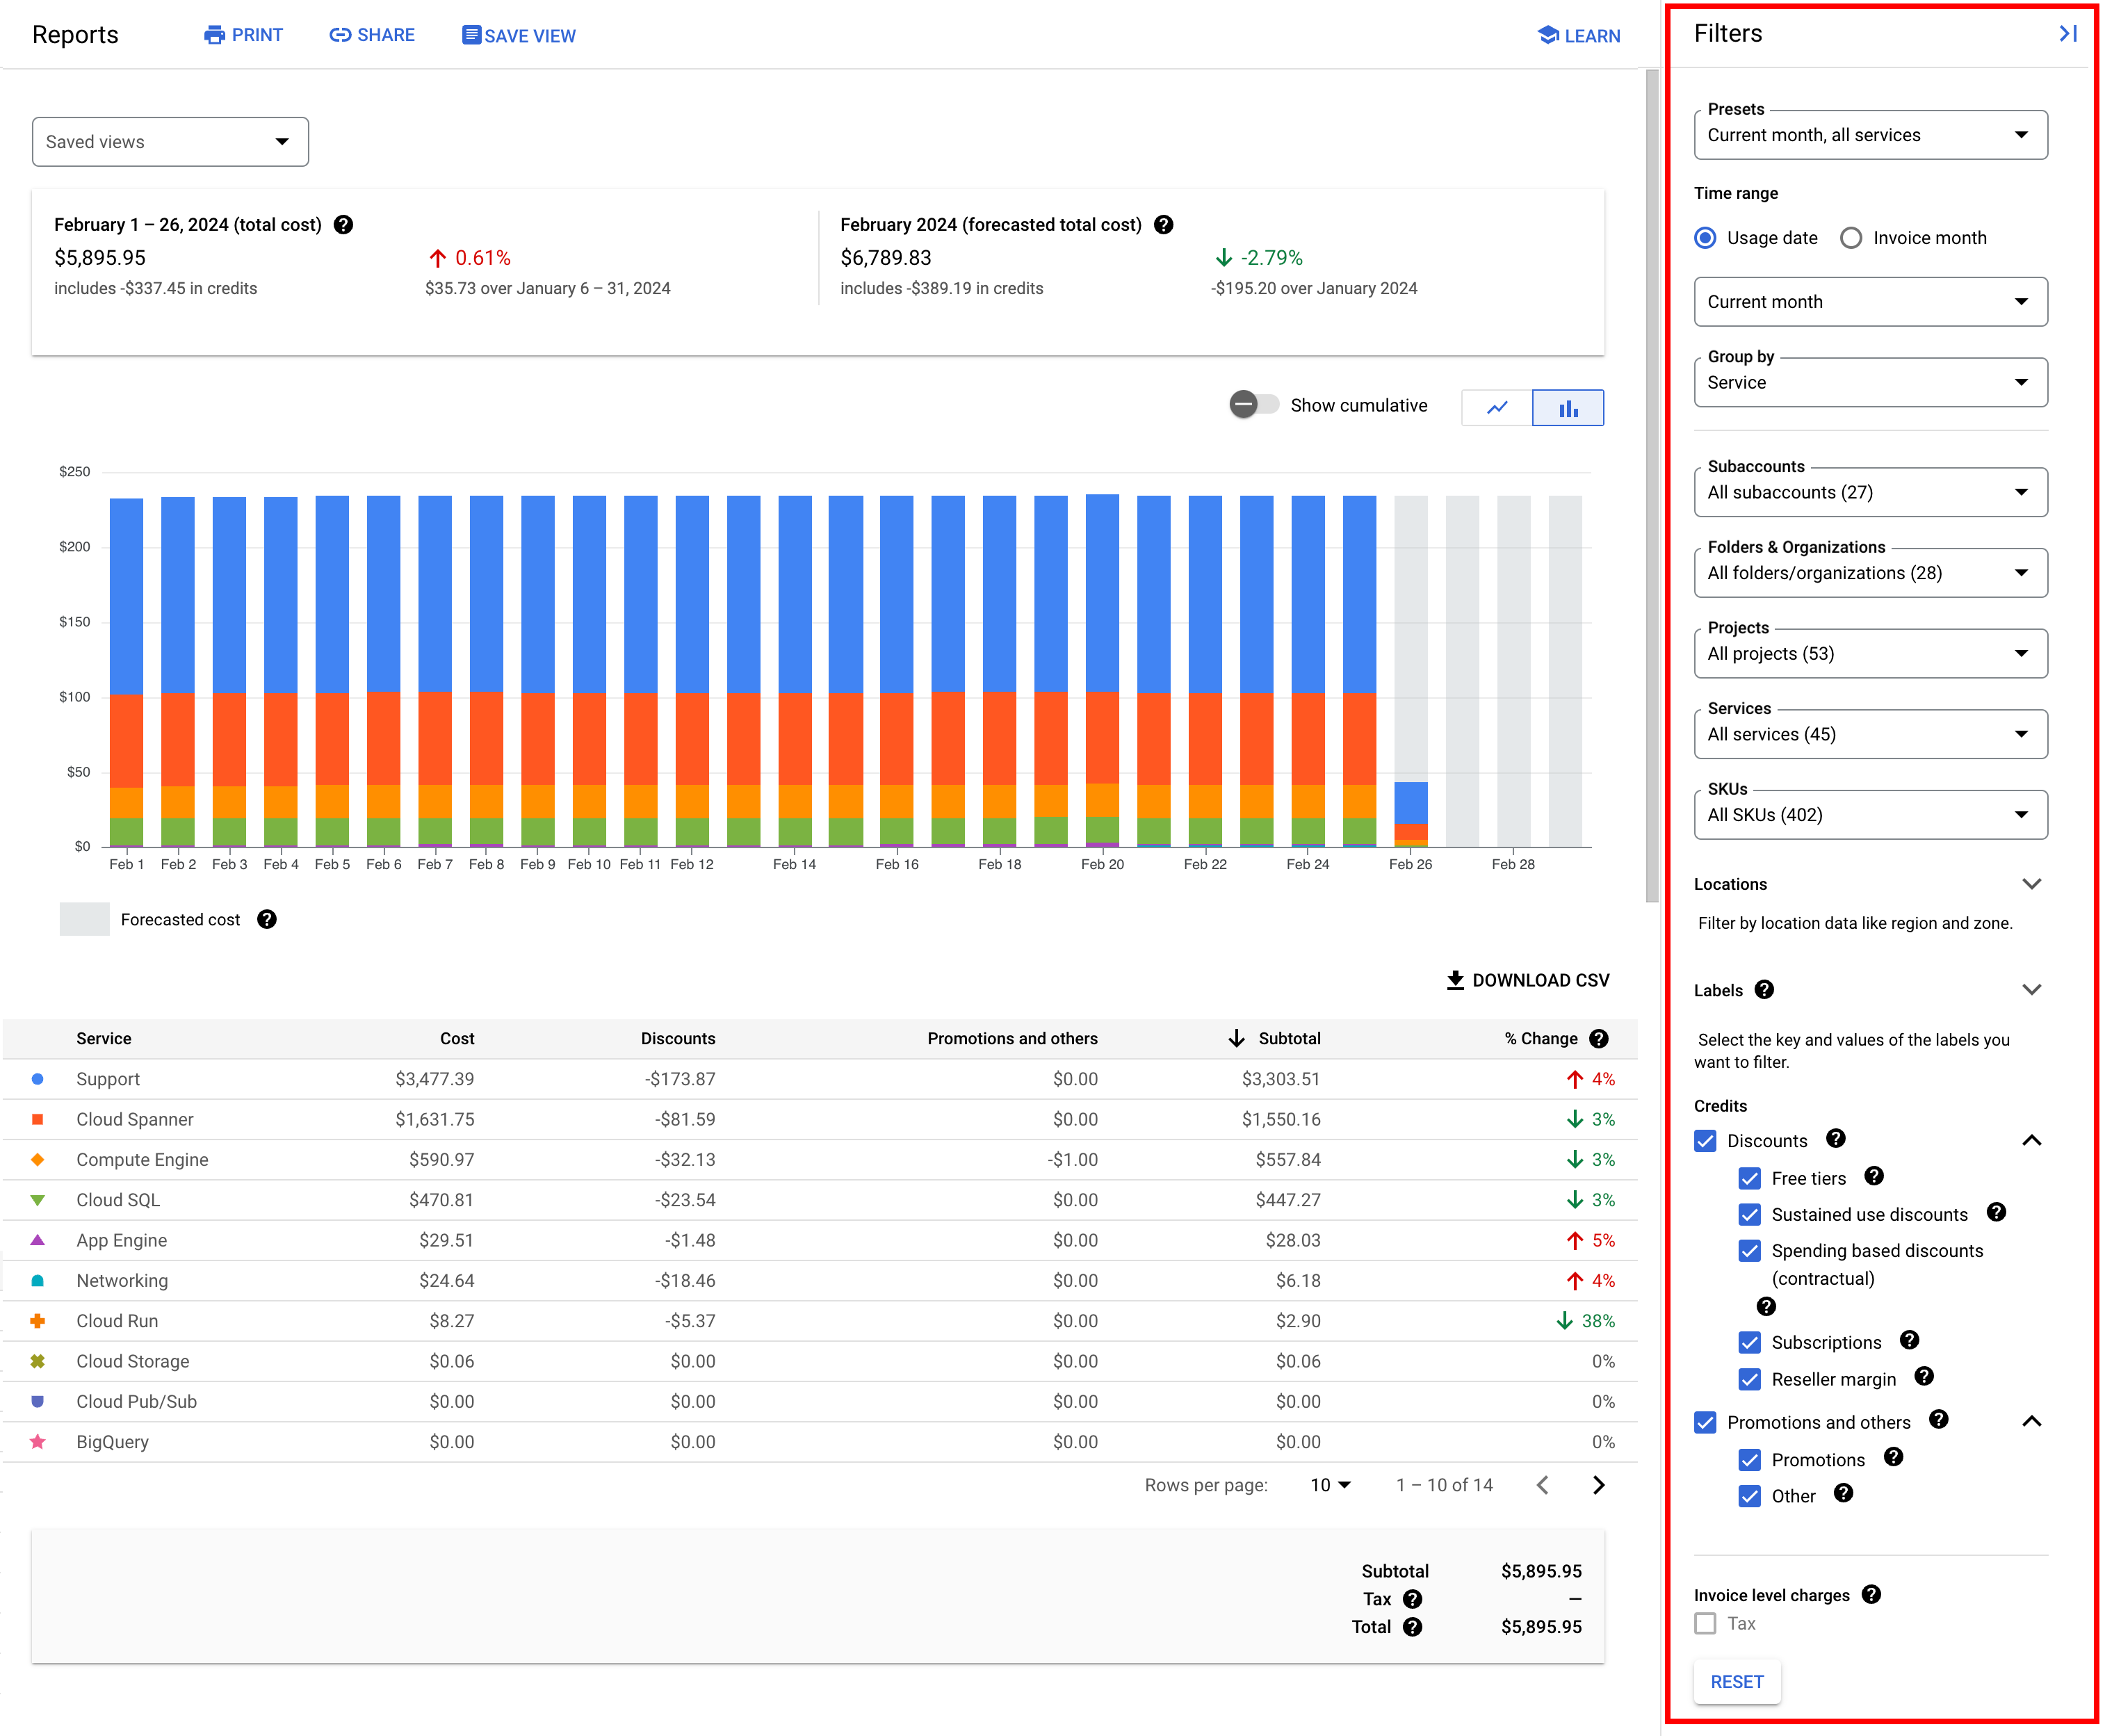
Use Filters to refine data
Filters refine the data that is returned to your report. In Reports, you can access your filters in two ways:
| Two ways to access Report Filters | |
|---|---|
Use the filter tiles that are displayed horizontally above the report.
|
|
Use the Filters panel to access and update the filters.
|
|

| Filters | |||||||||||||||||||
|---|---|---|---|---|---|---|---|---|---|---|---|---|---|---|---|---|---|---|---|
Subaccounts |
If you're viewing a primary billing account with subaccounts you can select all subaccounts (default) or select a subset of subaccounts by clicking them in the list. In the list, you can find subaccounts by Subaccount name and by billing account ID, with the account IDs displayed below each Subaccount name. | ||||||||||||||||||
Folders & Organizations |
Folders and organizations are part of a project hierarchy, the resource hierarchy mapping of a project. If you configure the Time range filter to start on or after January 1, 2022, you can select all folders or organizations (default) that are associated with the projects that are linked to the Cloud Billing account, or select a subset of folders or organizations. The values in the selector are listed in alphabetical order by resource name. To determine if a value is an organization or a folder, look at the ID number displayed below each name. ID numbers are prefaced with folders/ or organizations/ to indicate the type of resource. For the Cloud Billing account you're viewing, if none of
the
linked projects
are associated with any folders or organizations, then this filter
option isn't displayed. You can still
group by Project hierarchy.
For projects that don't have any ancestors, the Project hierarchy
column displays
|
||||||||||||||||||
Projects |
You can select all Google Cloud projects linked to the Cloud Billing account (default) or select a subset of projects by clicking them in the list. In the list, you can find Projects by Project name and by Project ID, with the Project IDs displayed below each Project name. If a project is shut down or deleted, the project is listed only by project number. Some costs, such as Support costs, aren't related to a project, and
are shown as If you're viewing the report using project permissions only, the Projects filter is limited to a single project – the project that you selected in the Google Cloud console before you accessed the Billing section. You can't select a different project. If you want to view the Billing Report for a different project, then you must exit the Billing section, select a different project using the Google Cloud console project selector, and then access the Billing section again. |
||||||||||||||||||
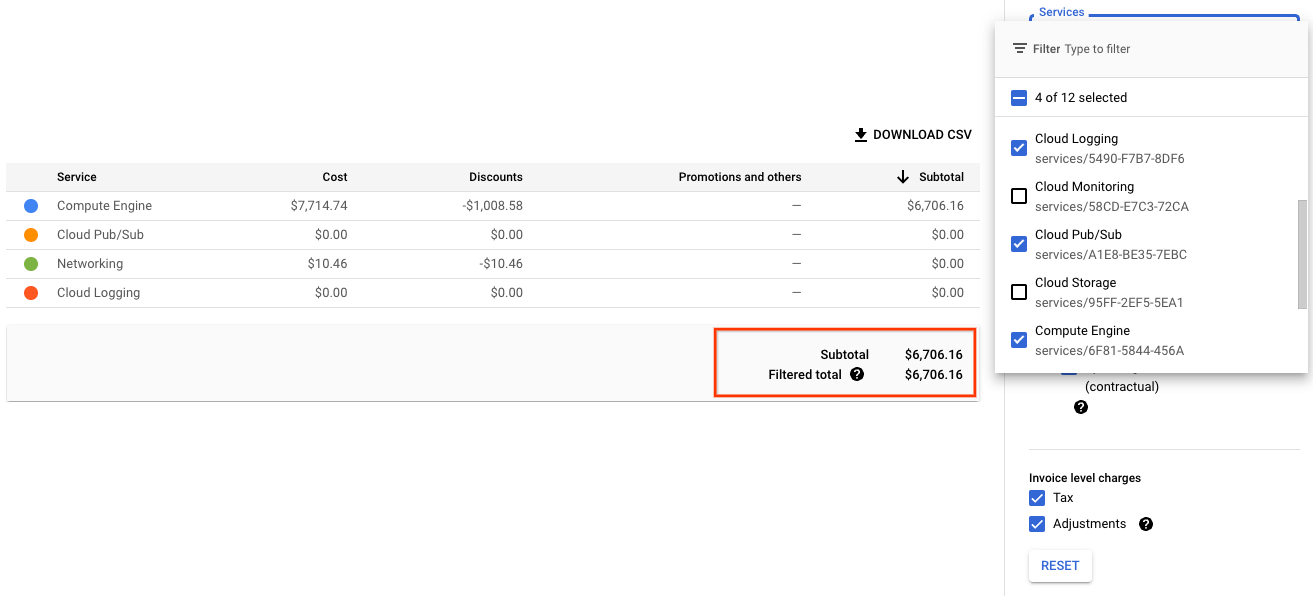
Services |
You can select all services (default) or select a subset of services by clicking them in the list. In the list, you can identify the services by Service name and Service ID, with the ID number displayed below each Service name. | ||||||||||||||||||
SKUs |
You can select all SKUs (default) or select a subset of SKUs by
clicking them in the list. In the list, you can find SKUs by SKU name
and also by service ID/SKU ID, with the
ID numbers displayed below each SKU name.
To learn more about SKUs, see the pricing table report. |
||||||||||||||||||
Applications |
You can select all App Hub Applications (default) or select a subset of Applications by clicking them in the list. App Hub applications might incur usage and costs in more than one billing account and associated projects. Cost data filtered by application might be based on partial data, limited to projects and costs for the Cloud Billing account that you're actively viewing. To filter on costs that aren't part of an App Hub application, select [Charges not specific to an application]. |
||||||||||||||||||
Locations |
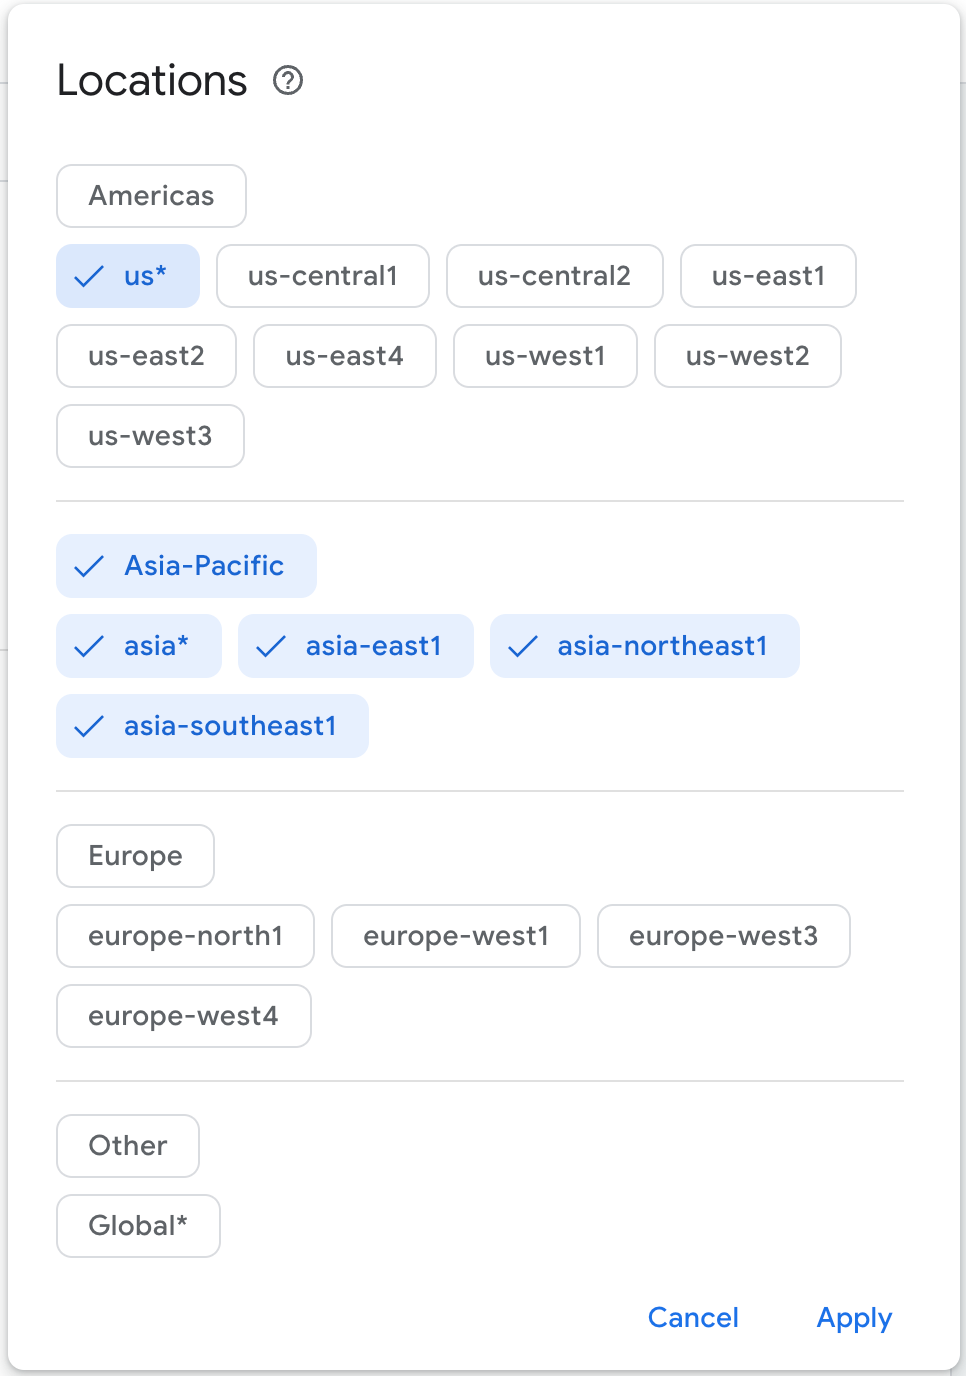
By default, all locations are enabled. Click the location tiles to filter on a subset of locations by geography (such as Americas, Asia-Pacific, or Europe), multi-regions (such as Global*), or regions (such as us-east1). Specifically, the report costs are filtered by the regions and multi-regions you select. Use the geography tiles to quickly select (or deselect) all
regions and multi-regions in that geography. Multi-regions tiles are
marked with an asterisk (for example, Learn more about geography and regions. |
||||||||||||||||||
Labels |
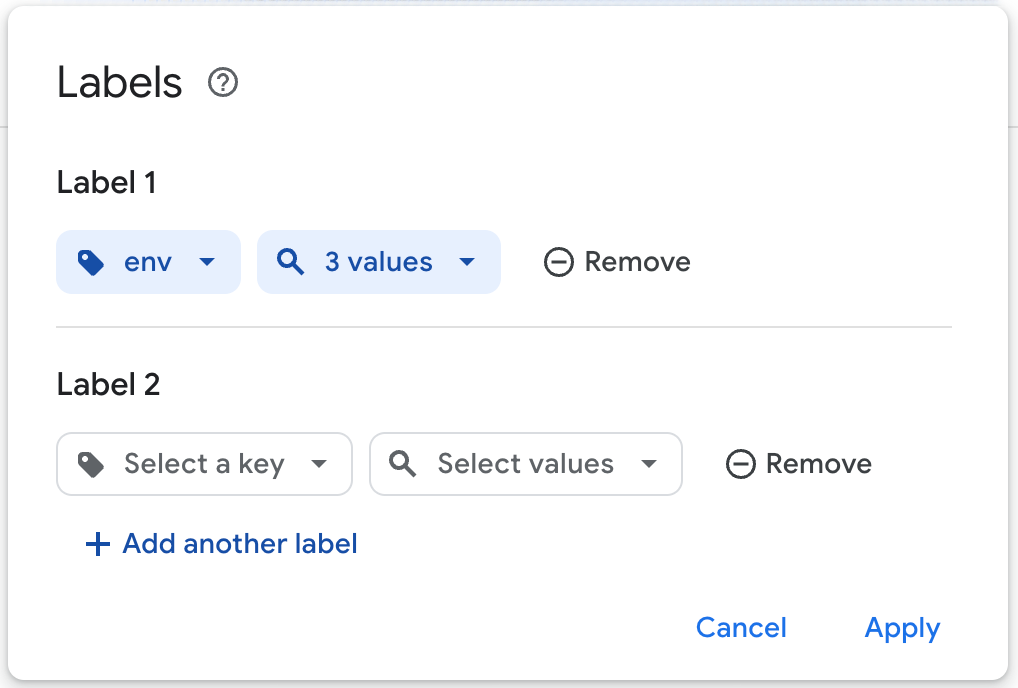
Labels are key-value pairs you attach to resource usage (for example, Compute Engine, Cloud Storage, or Google Kubernetes Engine). To filter usage costs by label, follow these steps:
To add another label with a different key, click + Add label, and then select the key and values for the label filter. To remove a label filter, to the right of the label fields click Remove or the delete icon (). When filtering by label keys, you can't select labels applied to a project. You can select other user-created labels that you set up and applied to Google Cloud services. For more information about labels, see common uses of labels and best practices for using labels.
|
||||||||||||||||||
Savings |

You can select all applicable Savings options (default) to include in the cost calculations, or you can clear some or all of the Savings options to exclude credits, discounts, and other savings from the cost calculations. The Savings filter displays only the specific types of savings that you incurred in your Google Cloud costs. If a particular type of credit or discount doesn't apply to your Cloud Billing account, you won't see that Savings option in the list. Learn more about viewing your Savings. |
||||||||||||||||||
Invoice level charges |
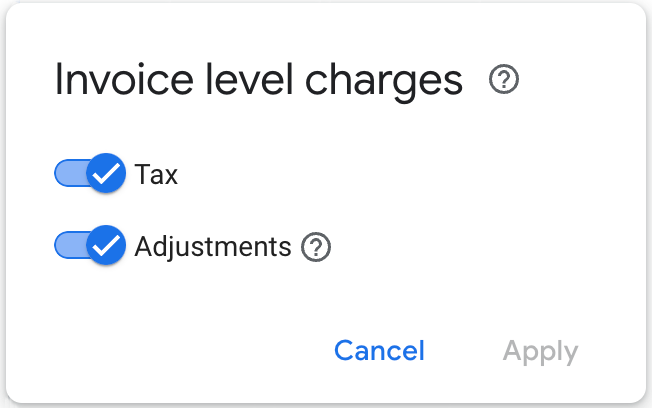
If you configure the Time range filter to use the Invoice month type, you can select all invoice-level charges (default) to include in the cost calculation totals, or you can clear some or all of the invoice-level options. Invoice-level charges display in the report header above the chart and in the report footer below the table. Learn more about viewing your charges by invoice. |
||||||||||||||||||
Adjust chart settings
The chart settings affect the display of report data in the online view of the report chart. The chart settings don't change the data that is downloaded to CSV.
Costs aggregated over time
Time aggregation affects the display of data in the report chart. The report chart is designed to always display cost data summarized by a time variable and a secondary Group by dimension. Based on the time range setting you select, the report chart shows cost totals aggregated by day or month. You can also specify a preferred time aggregation using the date-based and month-based Group by options.
In the chart, the sort order by time shows the time range in ascending order, from earliest to latest dates or months, when the chart is read from left to right.
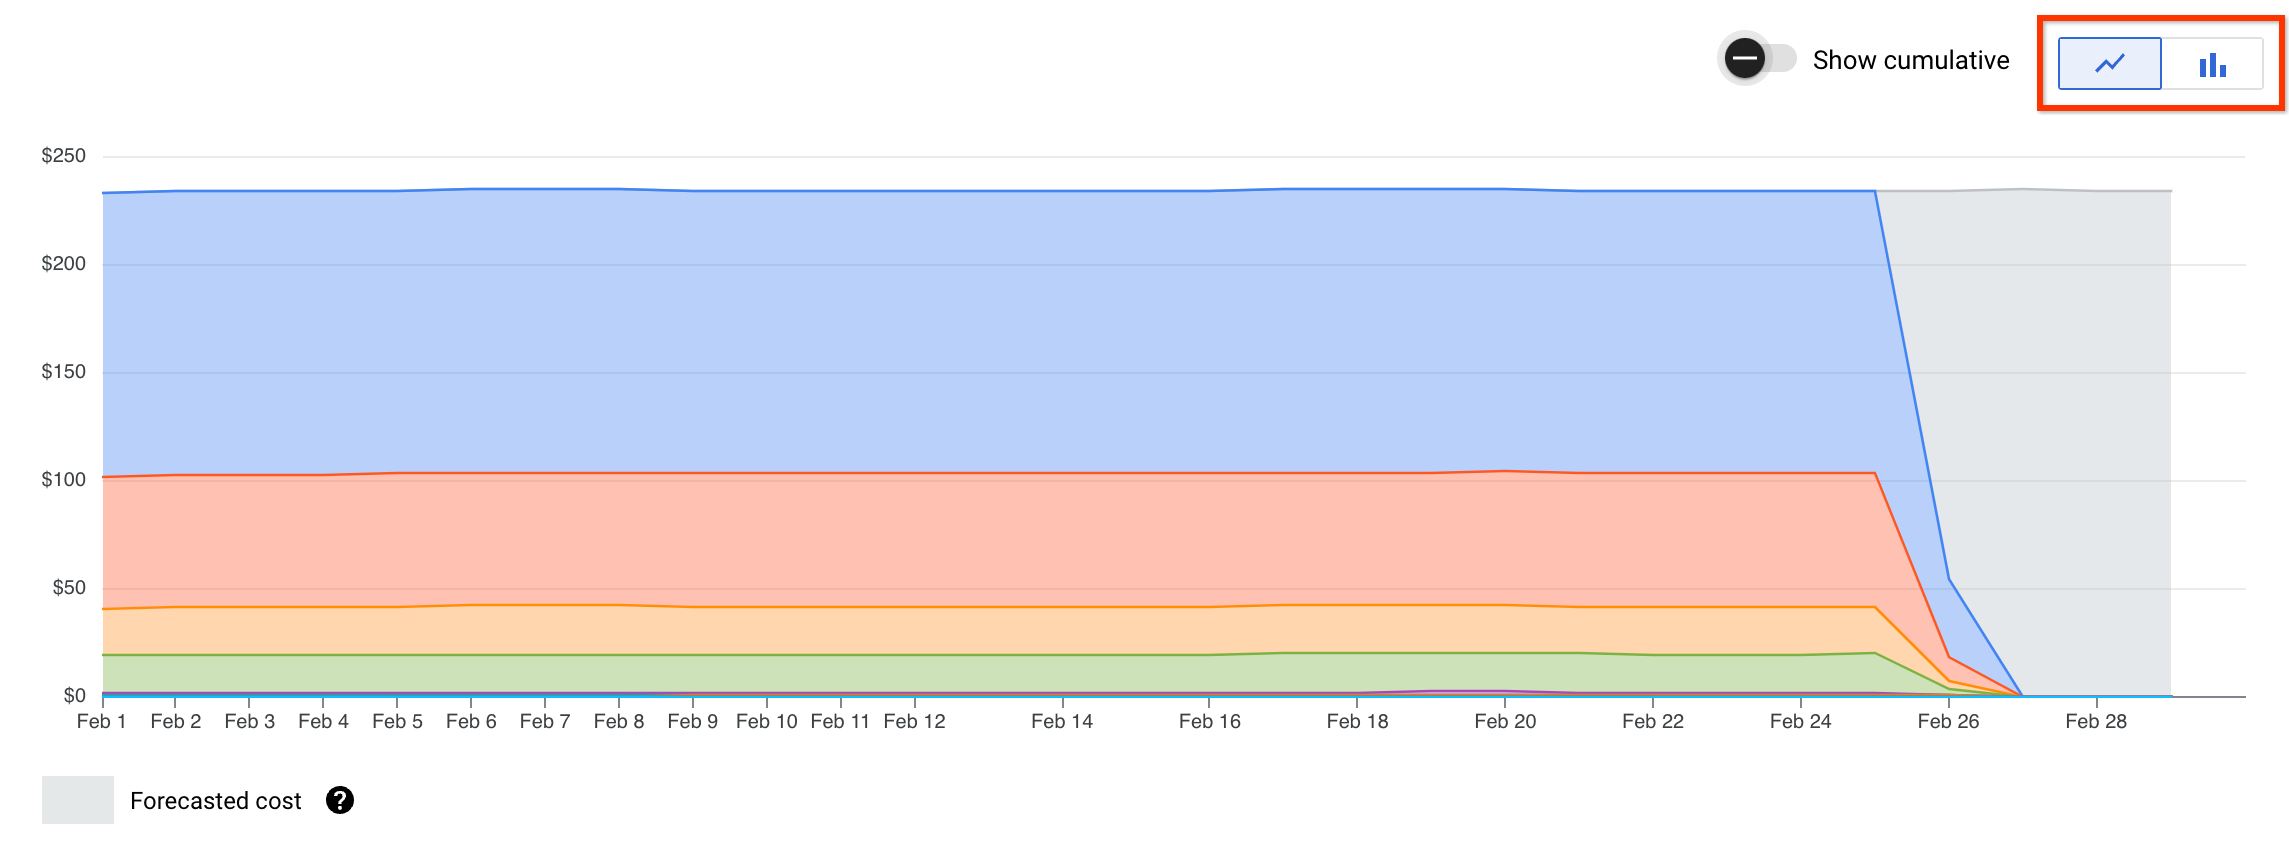
To change the chart view to visualize how the costs are accumulating over time, select the Show cumulative option for the chart.
A Daily time period in the Cloud Billing report starts at midnight US and Canadian Pacific Time (UTC-8), and observes daylight saving time shifts in the United States.
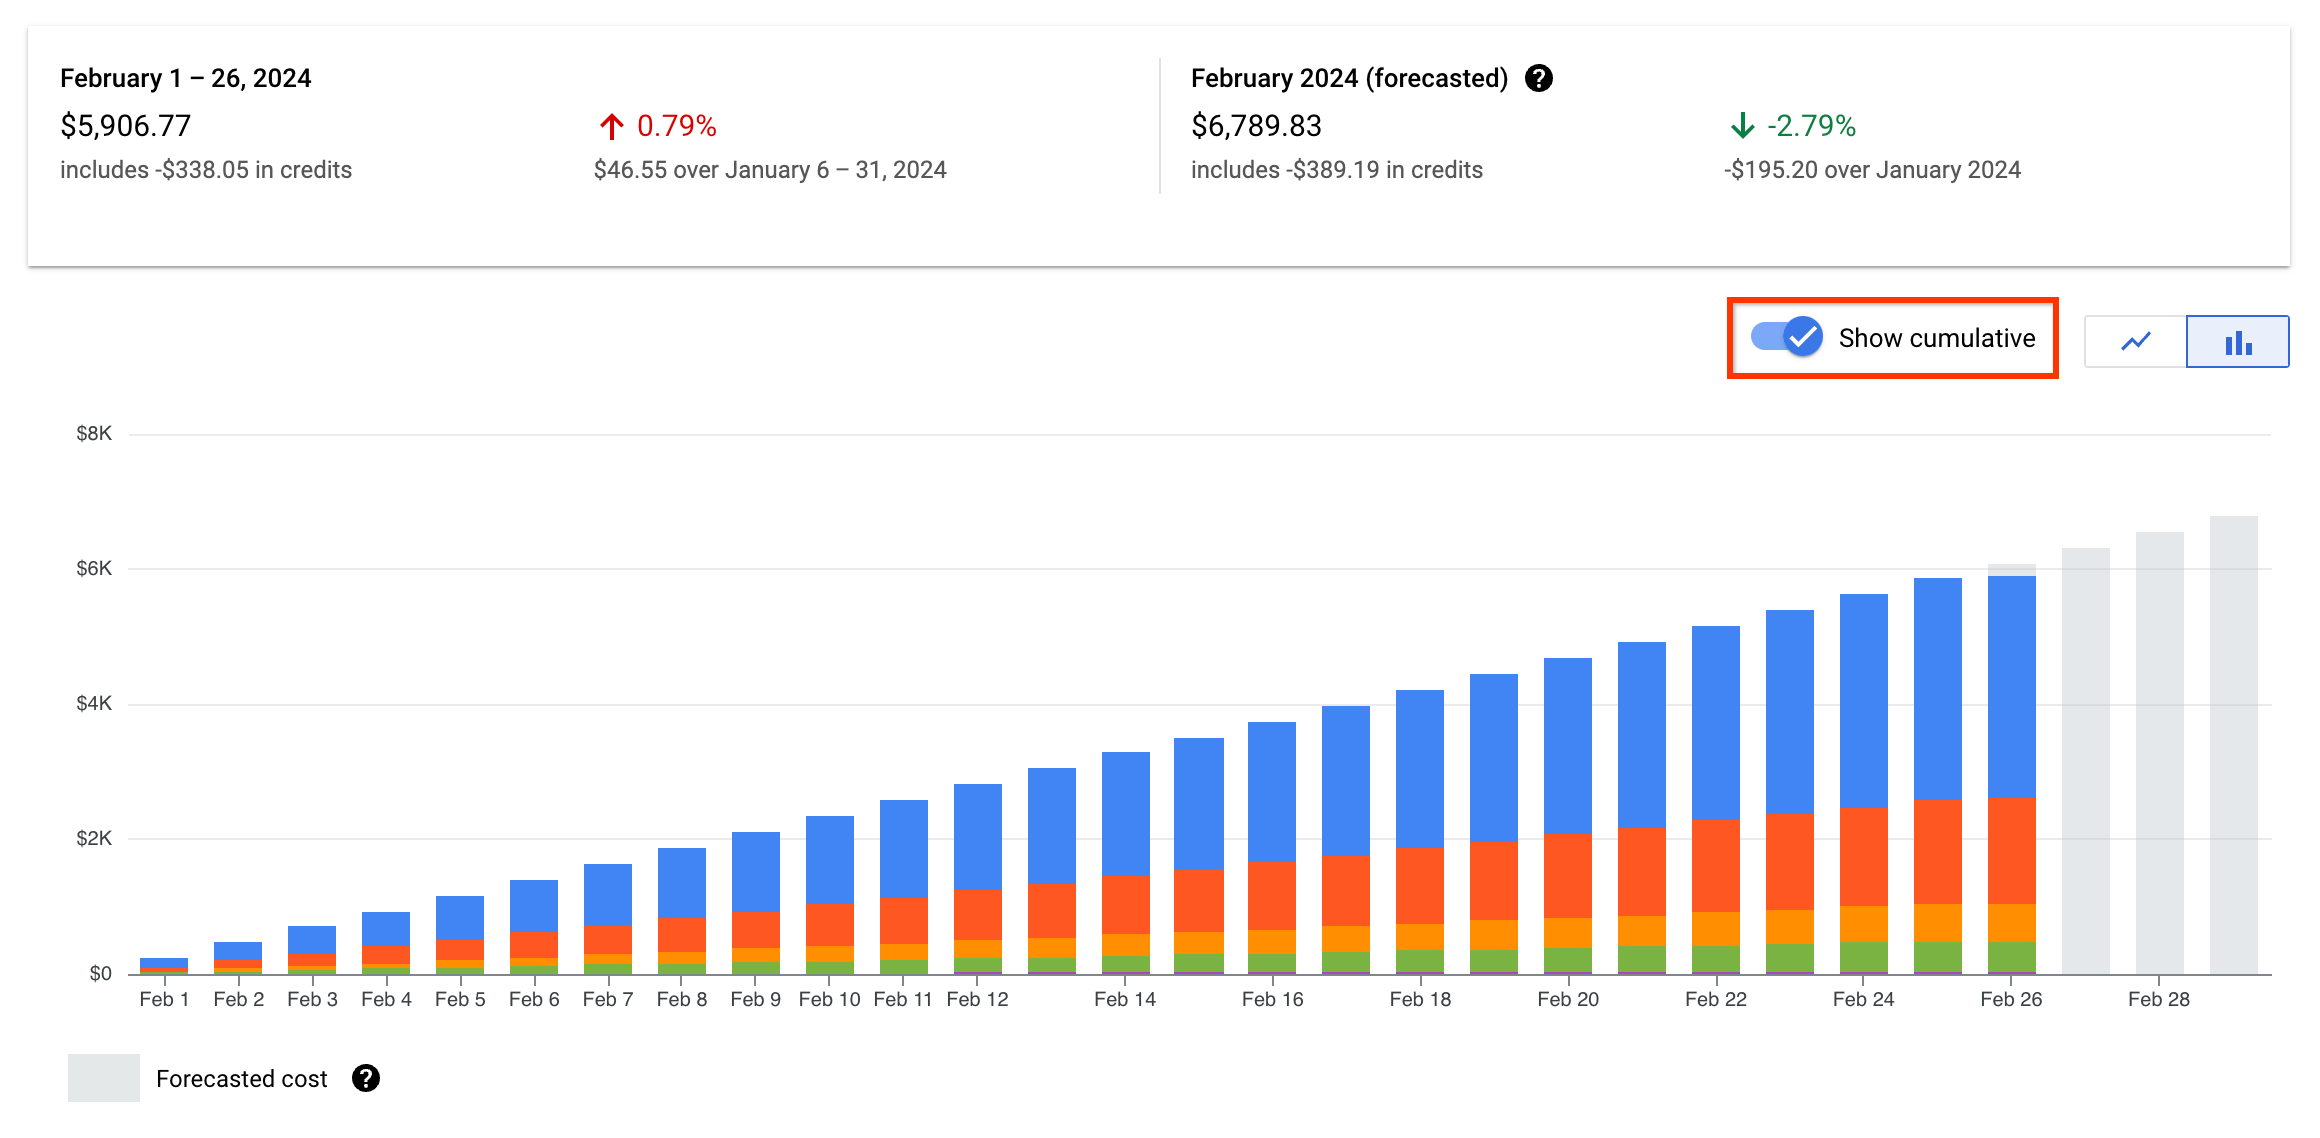
Chart style
You can specify a different chart display style using the Line Chart/Bar Chart selector above the chart.
- The line chart option creates a stacked area chart, with lines plotted over time for each Group by option.
- The bar chart option creates a stacked bar chart, with bars plotted over time. Each bar in the chart is divided into a number of stacked sub-bars, each one corresponding to a Group by option.
Data order
The data order in the report chart and the report table depends on the type of Group by option that you choose to use in the report settings.
Single-dimension Group by options: When using a single-dimension Group by option (for example, Service, Project, or SKU), the order of the data displayed in the stacked line or bar chart is controlled by the data category you're sorting by in the report table – indicated by an arrow in the table's column headers. The default sort order is set on the Subtotal column, sorting rows in descending order, from largest to smallest costs.
You can change the sort order of the data by clicking on a different column header. The direction of the arrow indicates if you're sorting in descending order – largest to smallest (down arrow ), or ascending order – smallest to largest (up arrow ). To reverse the sort order on the selected column, click the column header again.
Multiple-dimension Group by options: When using a multiple-dimension Group by option (for example, Date > Service or Month > Project), the sort order of rows in the report table is set in descending order, by newest to oldest date or month. If you expand a row to view the costs summarized by the additional dimension, the cost breakdown is sorted on the subtotal column in descending order, from largest to smallest costs.
You can't change the sort order of the report data when you're using a multiple-dimension Group by option.
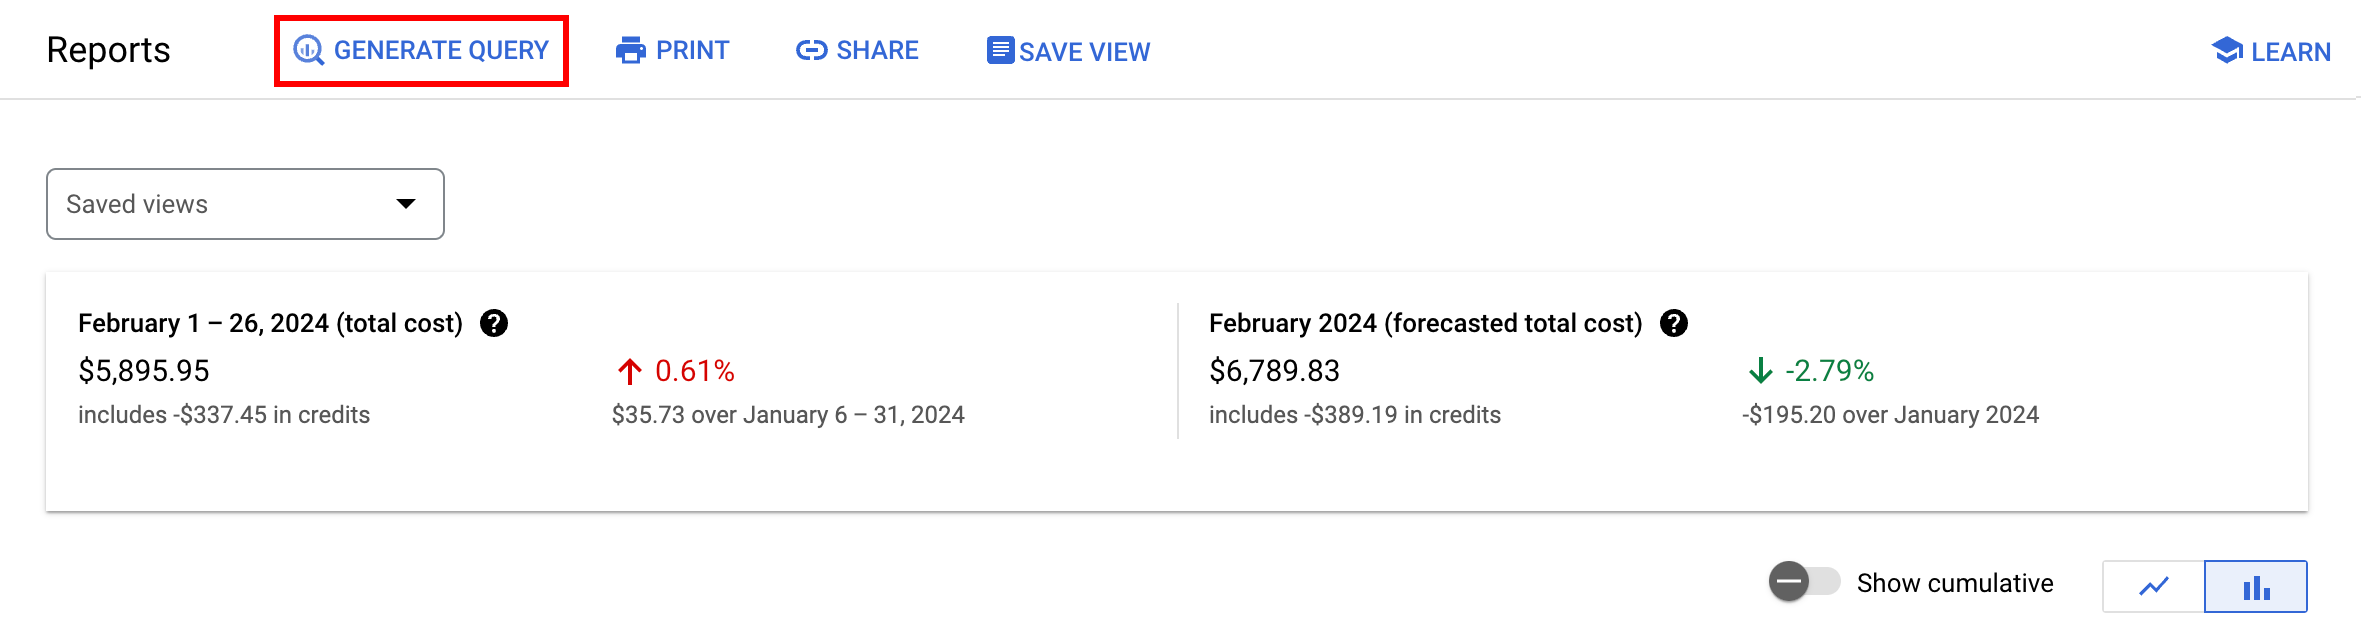
Generate and run a SQL query against your exported billing data
On the Reports page, you use the report settings and filters to refine the data returned to your report. If you enabled Cloud Billing data export to BigQuery, you can generate a SQL query in BigQuery that's configured to use the equivalent Billing Report settings and filters to query your exported billing data. When run against your exported billing data, the generated query returns the equivalent results in BigQuery as the results in the Billing Report.
Prerequisites to generate and run a query
To generate a query from a Cloud Billing Report, ensure you and your Cloud Billing account meet the following requirements:
On your Cloud Billing account, Cloud Billing data export to BigQuery must be enabled, for either the standard usage cost data or detailed usage cost data.
You must have permissions to view costs for your Cloud Billing account. If you're viewing the report using project-level permissions that limit you to accessing costs for a single project, you can't generate a query.
To run the query in BigQuery, you need the following permission:
You need the BigQuery User role for the Google Cloud project that contains the BigQuery dataset being used to store the Cloud Billing data.
If using custom roles to grant permissions to the billing export project, your custom role must include the
bigquery.jobs.createpermission.
You generate a SQL query from a Cloud Billing report. The query is generated to and run in BigQuery. You might have permissions on your Cloud Billing account that allow you to configure a report and generate a query, without you having the BigQuery permissions that are required to run the query.
Cost of use to generate and run queries
- In Billing Reports, when you Generate a SQL query from a billing report, you're not charged for this action.
- However, in BigQuery Studio, when you Run the query to produce results, you are charged for that action. The cost depends on the amount of data you query.
For more information about the cost of using BigQuery to store and analyze your Cloud Billing data, see Cost of use.
Generate a query
To create a SQL query to run against your billing data exported to BigQuery, that returns results equivalent to the console report, do the following:
- Go to the Cloud Billing Reports in the Google Cloud console.
- Set your preferred report Time range, Group by, and other Filters to create a report.
Click Generate query.
A new browser window opens for BigQuery Studio, and a SQL query is generated, configured to query your exported billing data with the equivalent parameters in use on your Billing Report. In BigQuery Studio, the project selected is the same project set up in your Billing export configuration.
About the generated query
The generated SQL query consists of five clauses, creating a query that returns the equivalent results of the source Billing Report.
- SELECT - Defines the columns that the query will return, including expressions to calculate the values in each column.
- FROM - The full path to the
data table that contains the Cloud Billing data exported to BigQuery,
specified using three values separated by dots:
project-ID.BQ_dataset_name.BQ_table_name - WHERE - Equivalent to the Report's Time range setting and includes any specific, non-default filter settings you selected on the report.
- GROUP BY - Equivalent to the Report's Group by setting.
- ORDER BY - Equivalent to the default data order setting for the report (which is based on the selected Group by option).
Run the query
After you generate a query from a Billing Report, you must run the query to view its results in BigQuery Studio.
- Follow the Generate a query procedure to create a SQL query in BigQuery Studio.
In BigQuery Studio, click Run to run the query and view the query results.
After you run the query, you can save the query results using a variety of options, such as CSV, JSON, a BigQuery table, or Google Sheets. Select Save results to see the available save options.
You can also explore the data with tools such as Sheets, Looker, or Python. Select Explore data to see the available explore options.
Learn more about BigQuery
- Introduction to SQL in BigQuery
- Overview of BigQuery analytics
- Explore using BigQuery in the Google Cloud console
- About BigQuery IAM roles and permissions
- Control access to BigQuery resources with IAM
- Estimating BigQuery storage and query costs
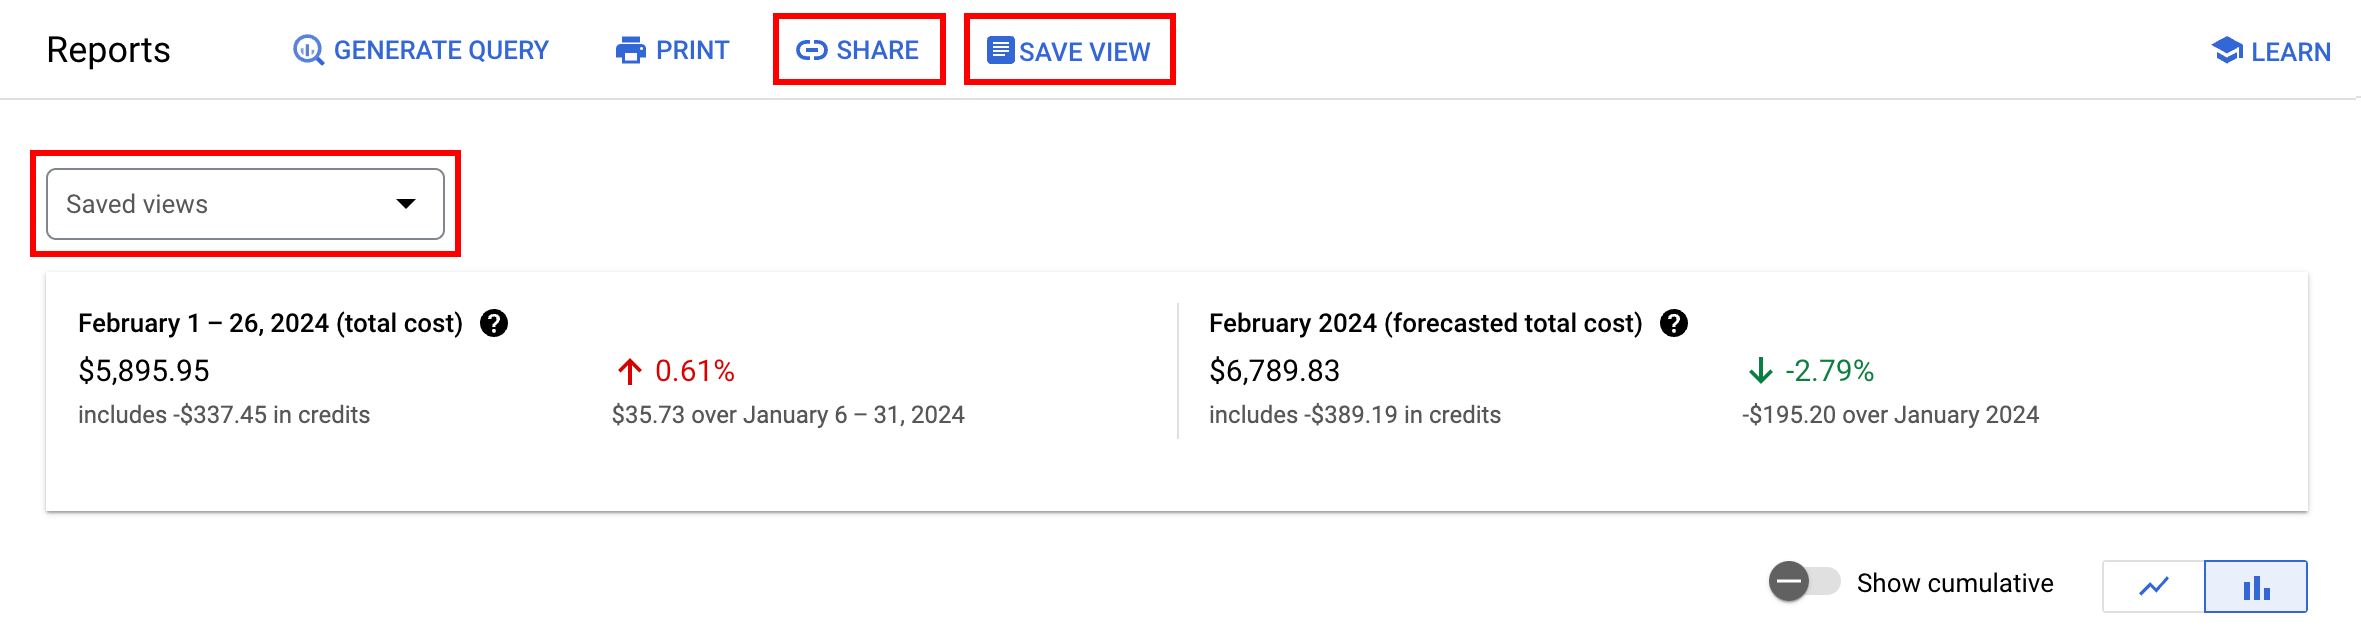
Save and share report views
You can set many options to customize your online reports. After configuring your report settings to create a customized view, you might want to save your settings to be reused later by you or someone else in your organization who has the required level of permissions to view reports for the Cloud Billing account. You can use these options to save and share your customized report views:
Saved reports: You can select Save as new to save the chart settings and the Group by and filter settings you selected when configuring your report. Saved reports are saved to the All reports page and are available for viewing by users in your organization with Cloud Billing account-level access, who can view reports for all costs and projects for the Cloud Billing account.
- Select See all reports to open a comprehensive list of reports, including your custom saved reports and the Google Cloud-created, recommended preset reports.
- Also, for customers who have enabled Gemini Cloud Assist in Cloud Billing, your custom saved reports and the preset reports are accessible in a carousel that displays below the Ask Gemini Cloud Assist prompt field. The most frequently viewed reports (from both your custom saved reports and the preset reports) appear in the carousel. You can scroll the reports carousel left and right to select a report.
Share: Optionally, you can share the URL of a customized report using the Share button. Share is a quick option to send the URL of a customized report to a recipient of your choice, outside of the Reports UI. As you configure your report by setting filters and groupings, your browser URL updates to include your selections. You can share the report by copying the URL. The Share feature is available to customers with Cloud Billing account-level access, as well as to Project Owners, Project Editors, and Project Viewers who can view Cloud Billing reports for their specific Google Cloud projects.
Permissions required to create or access a saved report
The Saved reports feature is available in the Reports page to customers who have the correct level of permissions on the Cloud Billing account. To interact with the Saved reports feature, you must have permissions with Cloud Billing account-level access. The roles with the necessary permissions are Billing Account Administrator, Billing Account Costs Manager or Billing Account Viewer on your Cloud Billing account.
- Billing Account Administrators and Billing Account Costs Managers have full access to the Saved reports feature, and can create a new, custom saved report, open any saved report, and update, rename, and delete custom saved reports.
- Billing Account Viewers have access to open a previously created saved report, but can't create new saved reports, or update, rename, or delete any saved reports.
- If you are a Project Owner, Project Editor, or Project Viewer, you can view Cloud Billing reports for your specific Google Cloud projects, including using Google Cloud-provided preset reports. However, because this level of billing access doesn't allow you to view all costs for all projects linked to the Cloud Billing account, you can't create or access custom saved reports in the All reports page. Instead, you can use the Share feature to copy and share the URL of a report you have customized.
For more information about Cloud Billing permissions, see Overview of Cloud Billing access control.
Save a new report view
- Go to the Cloud Billing Reports in the Google Cloud console.
- Set your preferred chart settings and report Group by and other Filters.
- Next to the report name, click Save as new.
- Enter a name for your saved report (required). By default, a name is autofilled based on the selected filters.
- Click Save as new.
Open a saved report
- Go to the Cloud Billing Reports in the Google Cloud console.
- Click See all reports in the Reports toolbar.
- Your custom, saved reports are categorized in the Your reports list. You can choose one of your reports, or one of the Google Cloud-provided preset reports.
- Click a saved report to open the report with the saved settings and filters. If you have many saved reports, you can Filter for a report by report name to narrow down the list of reports to choose from.
Alternatively, if your custom saved report is one that you frequently view, then that report might appear in the reports carousel. Note that to use the reports carousel, you must enable Gemini Cloud Assist in Cloud Billing. Your frequently accessed custom saved reports and the Google Cloud-provided preset reports are accessible in the carousel that displays below the Ask Gemini Cloud Assist prompt field.
Update a custom saved report to use different report settings
- Go to the Cloud Billing Reports in the Google Cloud console.
- Click See all reports in the Reports toolbar.
- Click one of your saved reports to open your report with the saved settings and filters.
- Update the chart settings and report Group by and other Filters to produce a different report view.
- Next to the report name, click Save.
Select Save changes to save the report with the updated settings.
Your updated filter settings are now saved to your existing saved report using the original name of the saved report. If you want to rename your saved report to reflect the updated setting and filters, follow the steps to rename your saved report.
Create a new saved report based on an existing saved report
- Go to the Cloud Billing Reports in the Google Cloud console.
- Click See all reports in the Reports toolbar.
- Click one of your saved reports to open your report with the saved settings and filters.
- Update the chart settings and report Group by and other Filters to produce a different report view.
- Next to the report name, click Save, then select Save as new.
- Enter a name for your saved Report (required). By default, a name is autofilled based on the previous report name.
- Click Save as new.
Rename a saved report
- Go to the Cloud Billing Reports in the Google Cloud console.
- Click See all reports in the Reports toolbar.
- Click one of your reports to open the saved report that you want to rename. Note that you can't rename any of the Google Cloud-provided preset reports.
- To the right of the report name, select the actions menu ().
- Select Edit report name.
- Update the name of your report, and then click Save.
Delete a saved report
- Go to the Cloud Billing Reports in the Google Cloud console.
- Click See all reports in the Reports toolbar.
- Click one of your reports to open the saved report that you want to delete. Note that you can't delete any of the Google Cloud-provided preset reports.
- To the right of the report name, select the actions menu ().
- Select Delete report.
- Select Delete to permanently delete the saved report. This action can't be undone.
Share or bookmark the URL of a customized report
In addition to using the Saved views feature, you can bookmark or share the URL of a report you have customized. As you configure your report by setting Filters and the Group by option, your report page URL updates to include your selections.
- You can share the report by copying the URL. Click Share to copy the URL to your clipboard.
- Optionally, in your browser, you can bookmark the URL to save the URL with your report settings.
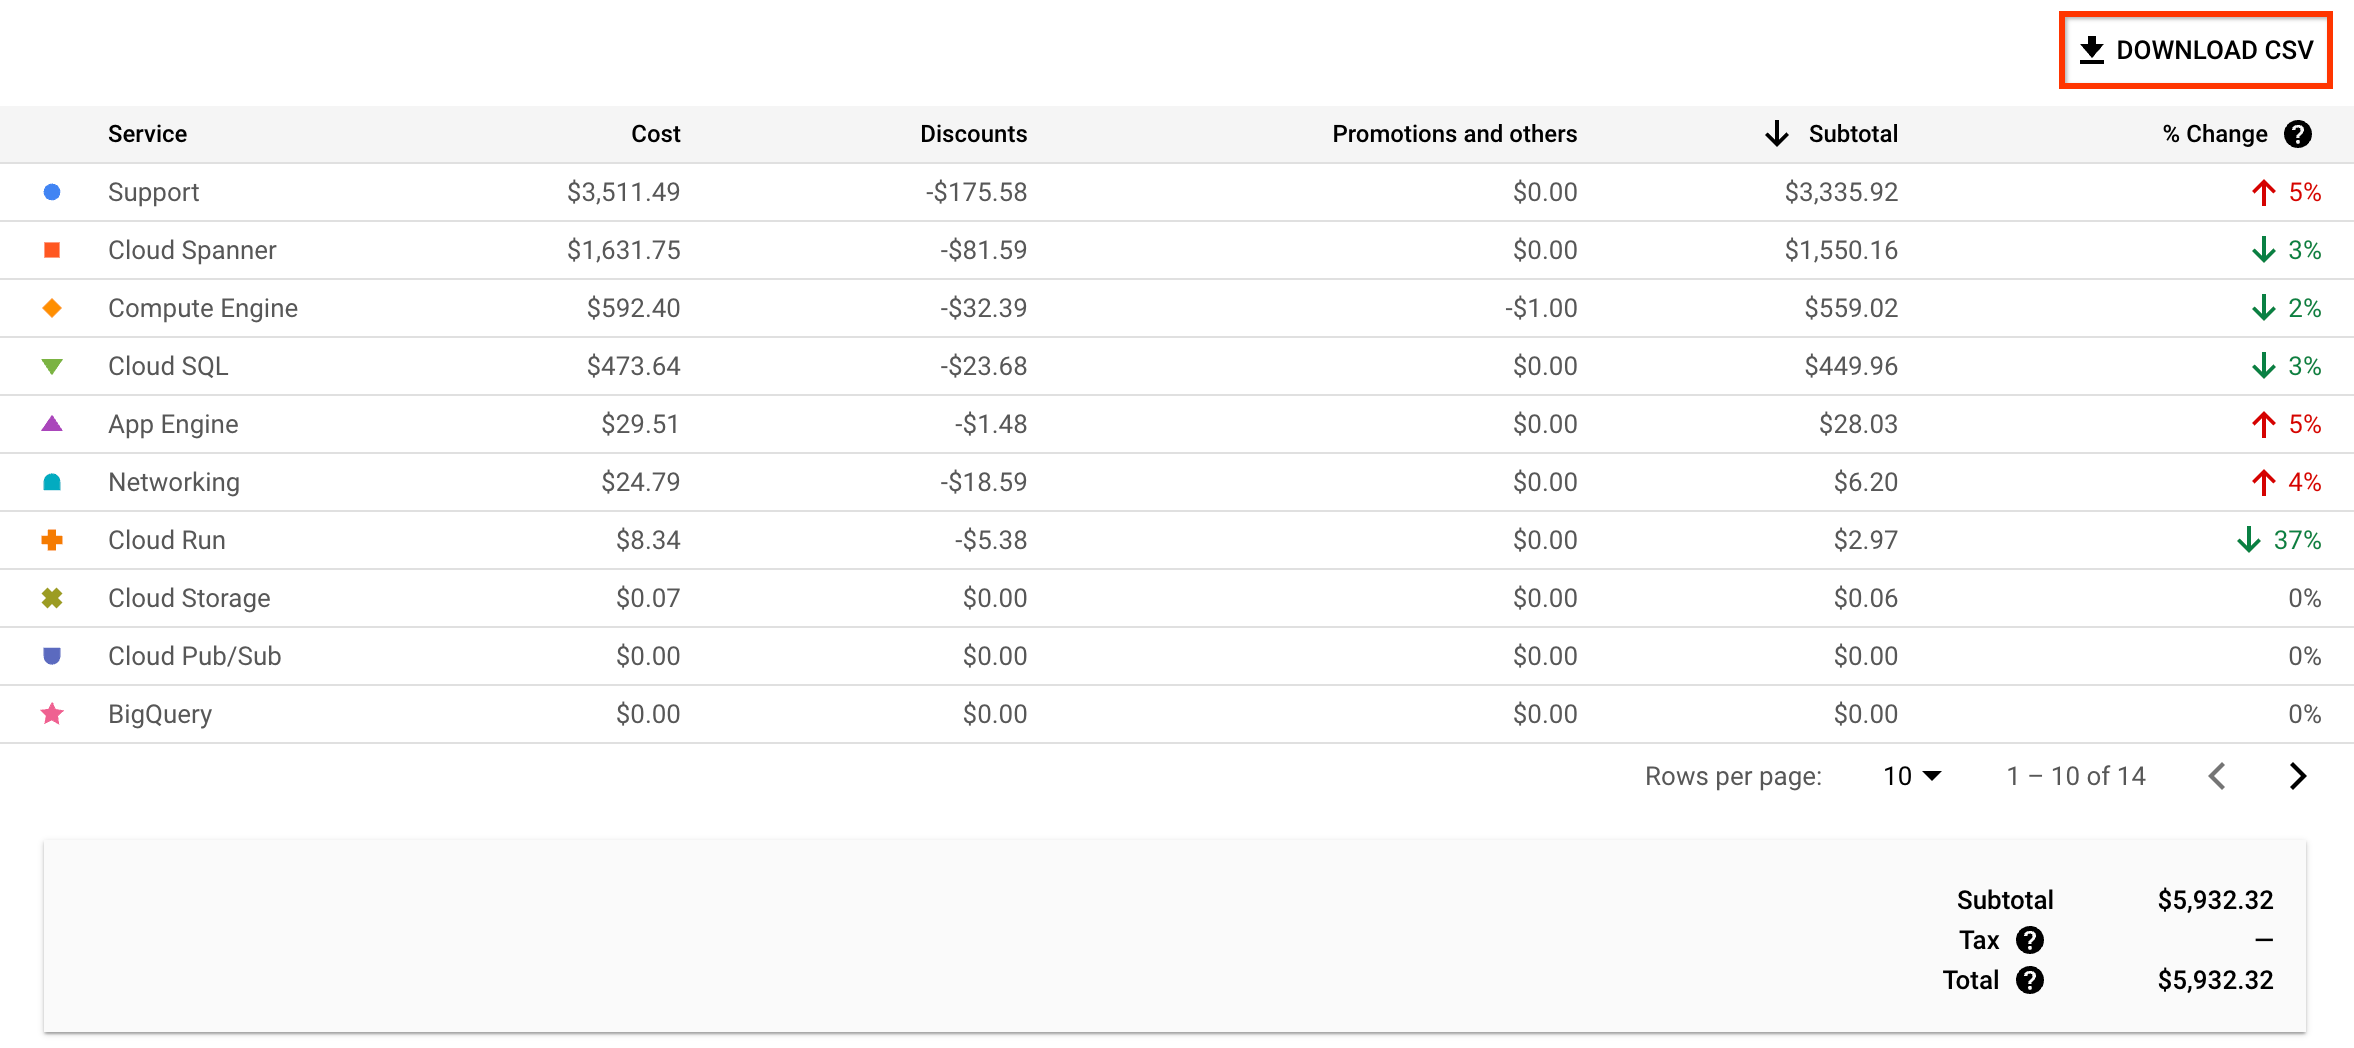
Download filtered report data to a CSV file
You can download the report data to a comma-separated values (CSV) file using the Download CSV selector located above the summary table. The data that downloads is limited by any filters that you have set and includes all of the rows and columns in the report table, plus additional columns, depending on the Group by setting you select.
CSV file name
For the Reports data, the file name follows this pattern:
[Billing Account name]_Reports, [YYYY-MM-DD] — [YYYY-MM-DD].csv
For example, a CSV file of the Reports data downloaded for a Cloud Billing account named My Billing Account, for a date range of October 1 to December 31, 2022, is named:
My Billing Account_Reports, 2022-10-01 - 2022-12-31.csv
Duplicate report names
If you download a report with the same date range multiple times, then the default report name will be the same. If you configured your report with a specific set of parameters, you might want to rename the CSV file to something that will help you differentiate between reports run using the same date range but using different report settings or filters.
Columns in the CSV file download
The columns of data in a CSV file depend on the Group by setting. Every CSV file includes data for the following charges and savings columns, with amounts aggregated by the selected Group by option:
- Cost or List cost: This is the cost of usage at the on-demand rate (list price) before any savings are applied. Cost or List cost is equivalent to the Usage cost column that appears in the report table. If your Cloud Billing account is associated with a custom pricing contract and your report settings result in the display of the Negotiated savings column, you will see a List cost column in your CSV download. Otherwise, if your report doesn't include a Negotiated savings column, you see a Cost column in your CSV download.
- Negotiated savings: If your Cloud Billing account is associated with a custom pricing contract, you'll see the Negotiated savings column.
- Savings programs: Includes credits and discounts for your committed use discounts.
- Other savings: Includes promotional credits, sustained use discounts (SUDs), and other savings.
- Unrounded subtotal: The calculated cost of the usage to a precision of up to six decimal places, which can be helpful when analyzing your cost details and understanding the source of any discrepancies due to rounding.
- Subtotal: The calculated cost of the usage rounded to two decimal places.
- Percent change in subtotal compared to previous period: If your report table displays this column, then the percent change values are included in the CSV download. This column isn't included in the CSV download for reports using a multiple-dimension Group by option, such as Date > Service or Month > Project.
Each currency-column label includes a symbol for the currency of the Cloud Billing account (for example, $ for USD or £ for GBP).
Group by setting
In addition to the charges and savings columns, the Group by option and the Time range settings affect which columns of data are downloaded, and the Group by option affects the granularity of the report. The more granular the report, the more rows are returned.
| Group by setting | Rows in report | Additional columns included in CSV download |
|---|---|---|
| Date-based Group by (for example, Date > Service) | One row for each dimension, broken down by date. For example, if you choose Date > Project, the CSV has one row for the daily costs of each project. When you select a date-based option, the CSV file doesn't include the Percent change column. | Date |
| Month-based Group by (for example, Month > Service) | One row for each dimension, broken down by month. For example, if you choose Month > Project, the CSV has one row for the monthly costs of each project. When you select a month-based option, the CSV doesn't include the Percent change column. | Month |
| Project | One row with costs summed per each project, with an additional row for costs not specific to a project. | Project name, Project ID, Project number |
| Project Hierarchy | One row with costs summed per each project hierarchy, with an additional row for costs not specific to a project, and a row for costs not included in a project hierarchy. | Project name, Project ID, Project number, Project hierarchy |
| Service | One row with costs summed per each service (such as Compute Engine, Cloud Run, App Engine). | Service description, Service ID |
| SKU | One row with usage and cost details for each SKU. This Group by setting returns the most granular details in the cost reports. | Service description, Service ID, SKU description, SKU ID, Usage amount, Usage unit |
| Subaccount | One row with costs summed per each billing account, including the parent account and its subaccounts. | Billing account name, Billing account ID |
| Location: Region or multiregion | One row with costs summed per each unique region where usage occurred, including a row for charges not specific to a location. | Region |
| Label keys | When grouping by label, you can select one label key at a time.
The report returns one row for each unique label key:value pair
for the selected label key, and a row for charges for other
usage. |
Label |
Additional notes about the CSV
The filters you set customize the rows that are displayed in the table, and the data that is downloaded to CSV.
The costs and savings data in the report table is aggregated for the specified time range.
The report CSV has header information that includes the Cloud Billing account name and the date range set on the report.
The report CSV includes the footer details that appear below the report table. The footer details might include invoice-level costs such as Tax and Adjustments if you configured your report to show the invoice details.
View your forecasted costs
You can use the forecast feature to see how your costs are trending and how much you're projected to spend, up to 12 months in the future.
If you're viewing your Cloud Billing report using a date range that ends in a future date, your Cloud Billing report chart displays both actual costs and forecasted costs:
- The report header above the chart provides a split view of cost: actual cost-to-date calculated from the starting date, and the total forecasted cost for the entire date range.
- Your forecasted cost is indicated in the chart using light grey in the stacked bar or line chart.
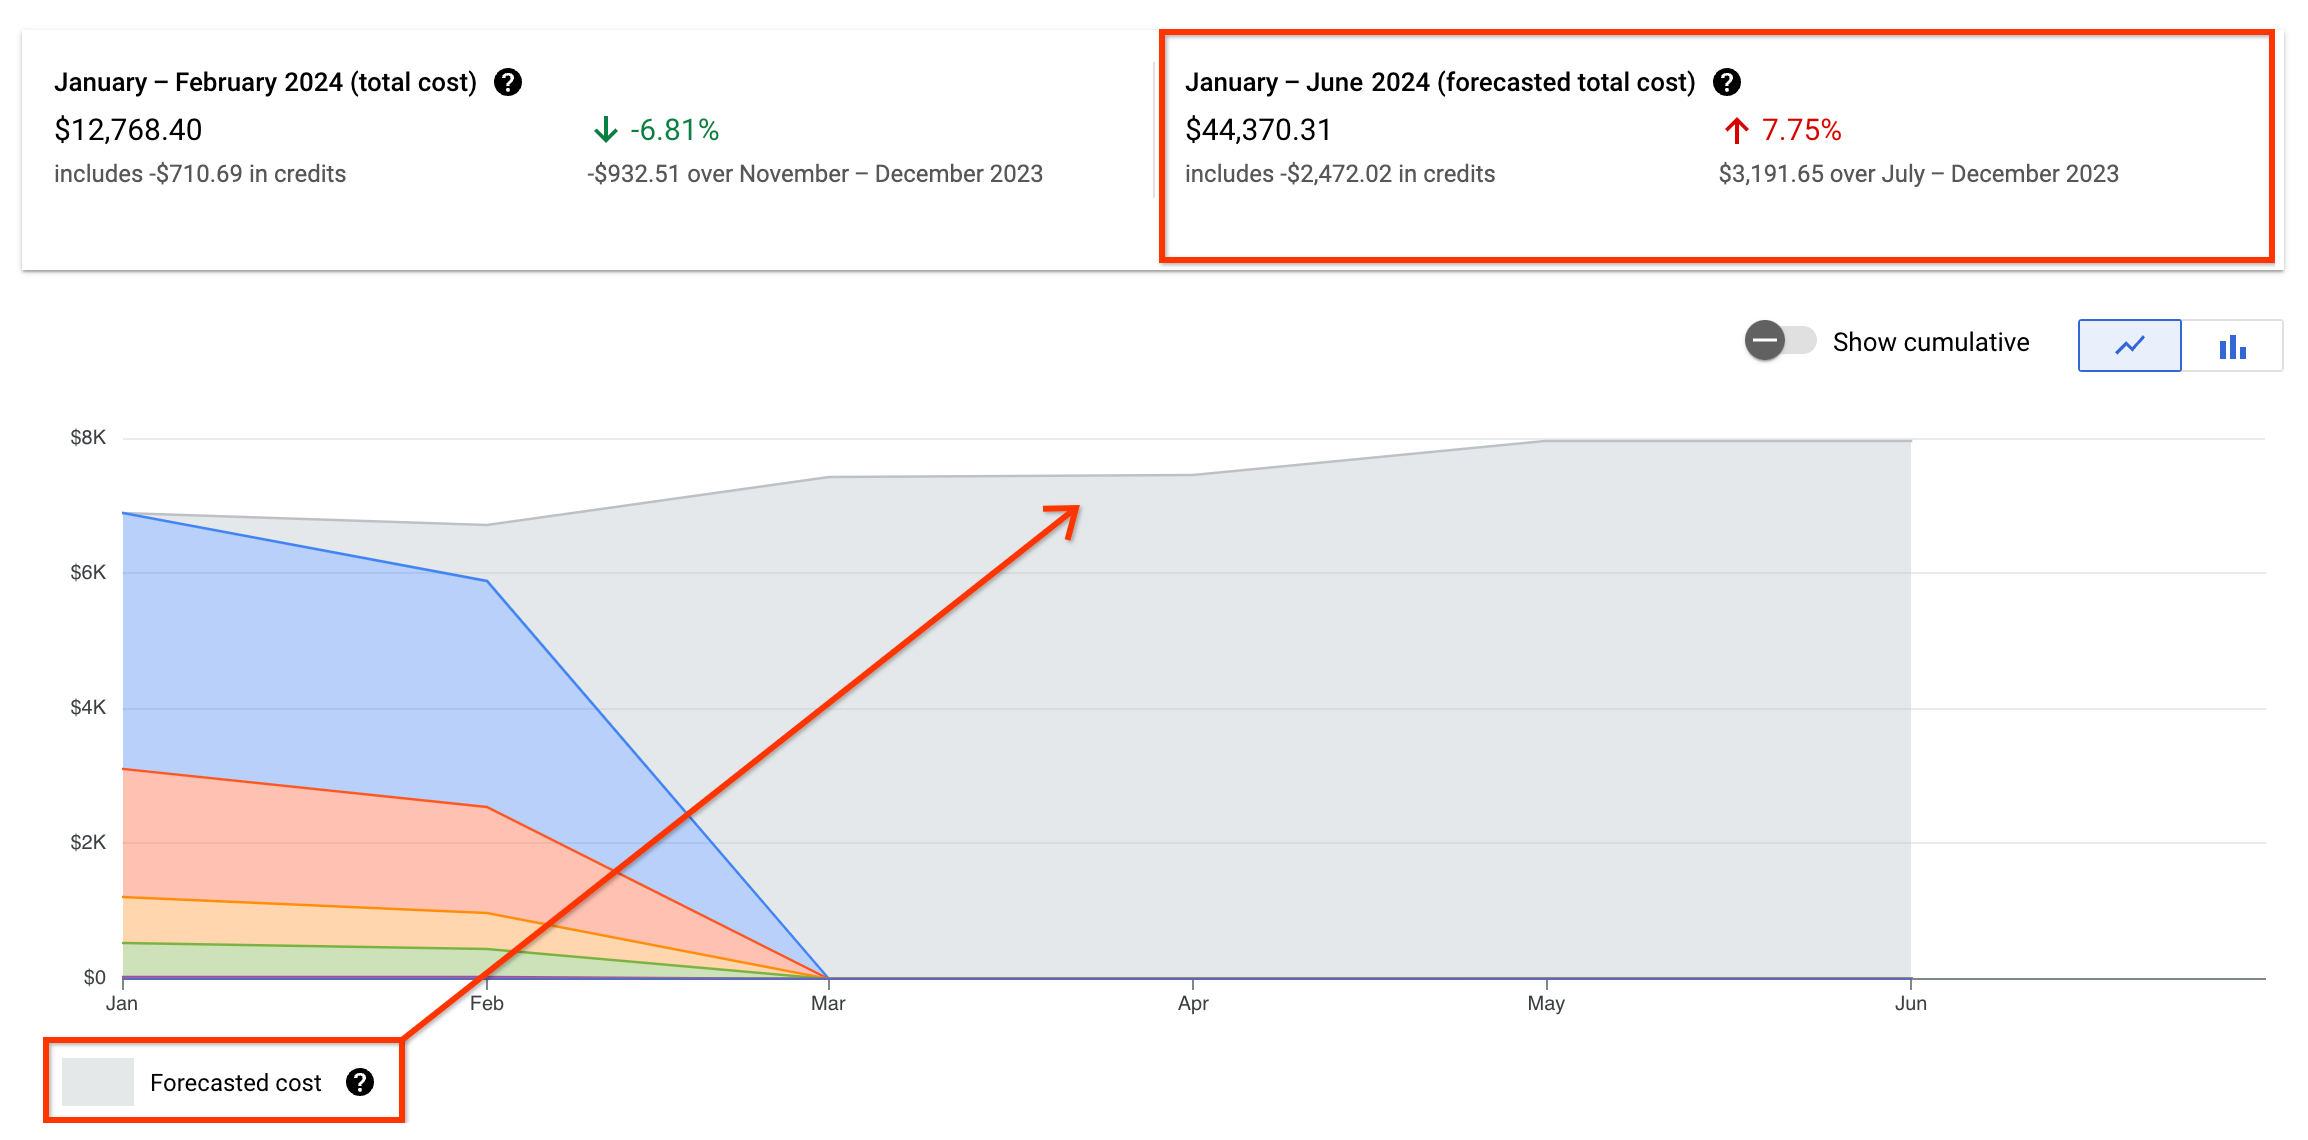
How to view your cost forecasts
In reports, forecasts are available for:
- Any combination of filters (except for an Invoice month Time range).
Any Usage date Time range that ends with a future date. (Forecasts aren't available for an Invoice month Time range.)
- If you're viewing the report for the Current month time range, the default end date is the last day of the current month.
If you choose to specify a custom time range, select Usage date, and configure a date range with the To: date set for a future date.
You can see your forecasted spend up to 12 months in the future.
The cost prediction is driven by AI
The cost forecasting model applies advanced machine learning techniques designed to understand complex cost patterns and handle real-world data imperfections to provide you with more reliable and actionable cost predictions. The cost trend is determined by:
- Gathering historical data: Based on the report filters you select, the forecasting model collects all of your historical Google Cloud spend.
- Smart data preparation: Using a comprehensive suite of data pre-processing steps, high-quality data is prepared that intelligently handles outlier costs (such as unexpected cost spikes), more accurately fills in gaps in usage data, and detects significant shifts in your spending patterns to adapt the forecast accordingly (for example, due to new project launches or major architectural changes).
- Accounting for seasonality and trends: The machine learning engine is designed to recognize and adapt to multiple layers of seasonality and underlying trends in your cost data, detecting and modeling various recurring patterns, such as daily, weekly, and monthly cycles in your cloud spend.
- Comprehensive data regularization: The forecasting model consistently structures your cost data over time, enabling reliable time-series analysis by our machine learning models. This generates a forecast that intelligently captures complex trends, multiple seasonalities, and handles data anomalies.
The total forecasted cost combines the following costs:
- The total actual cost to date for the selected time period.
- The predicted cost for each future day in the selected time period.
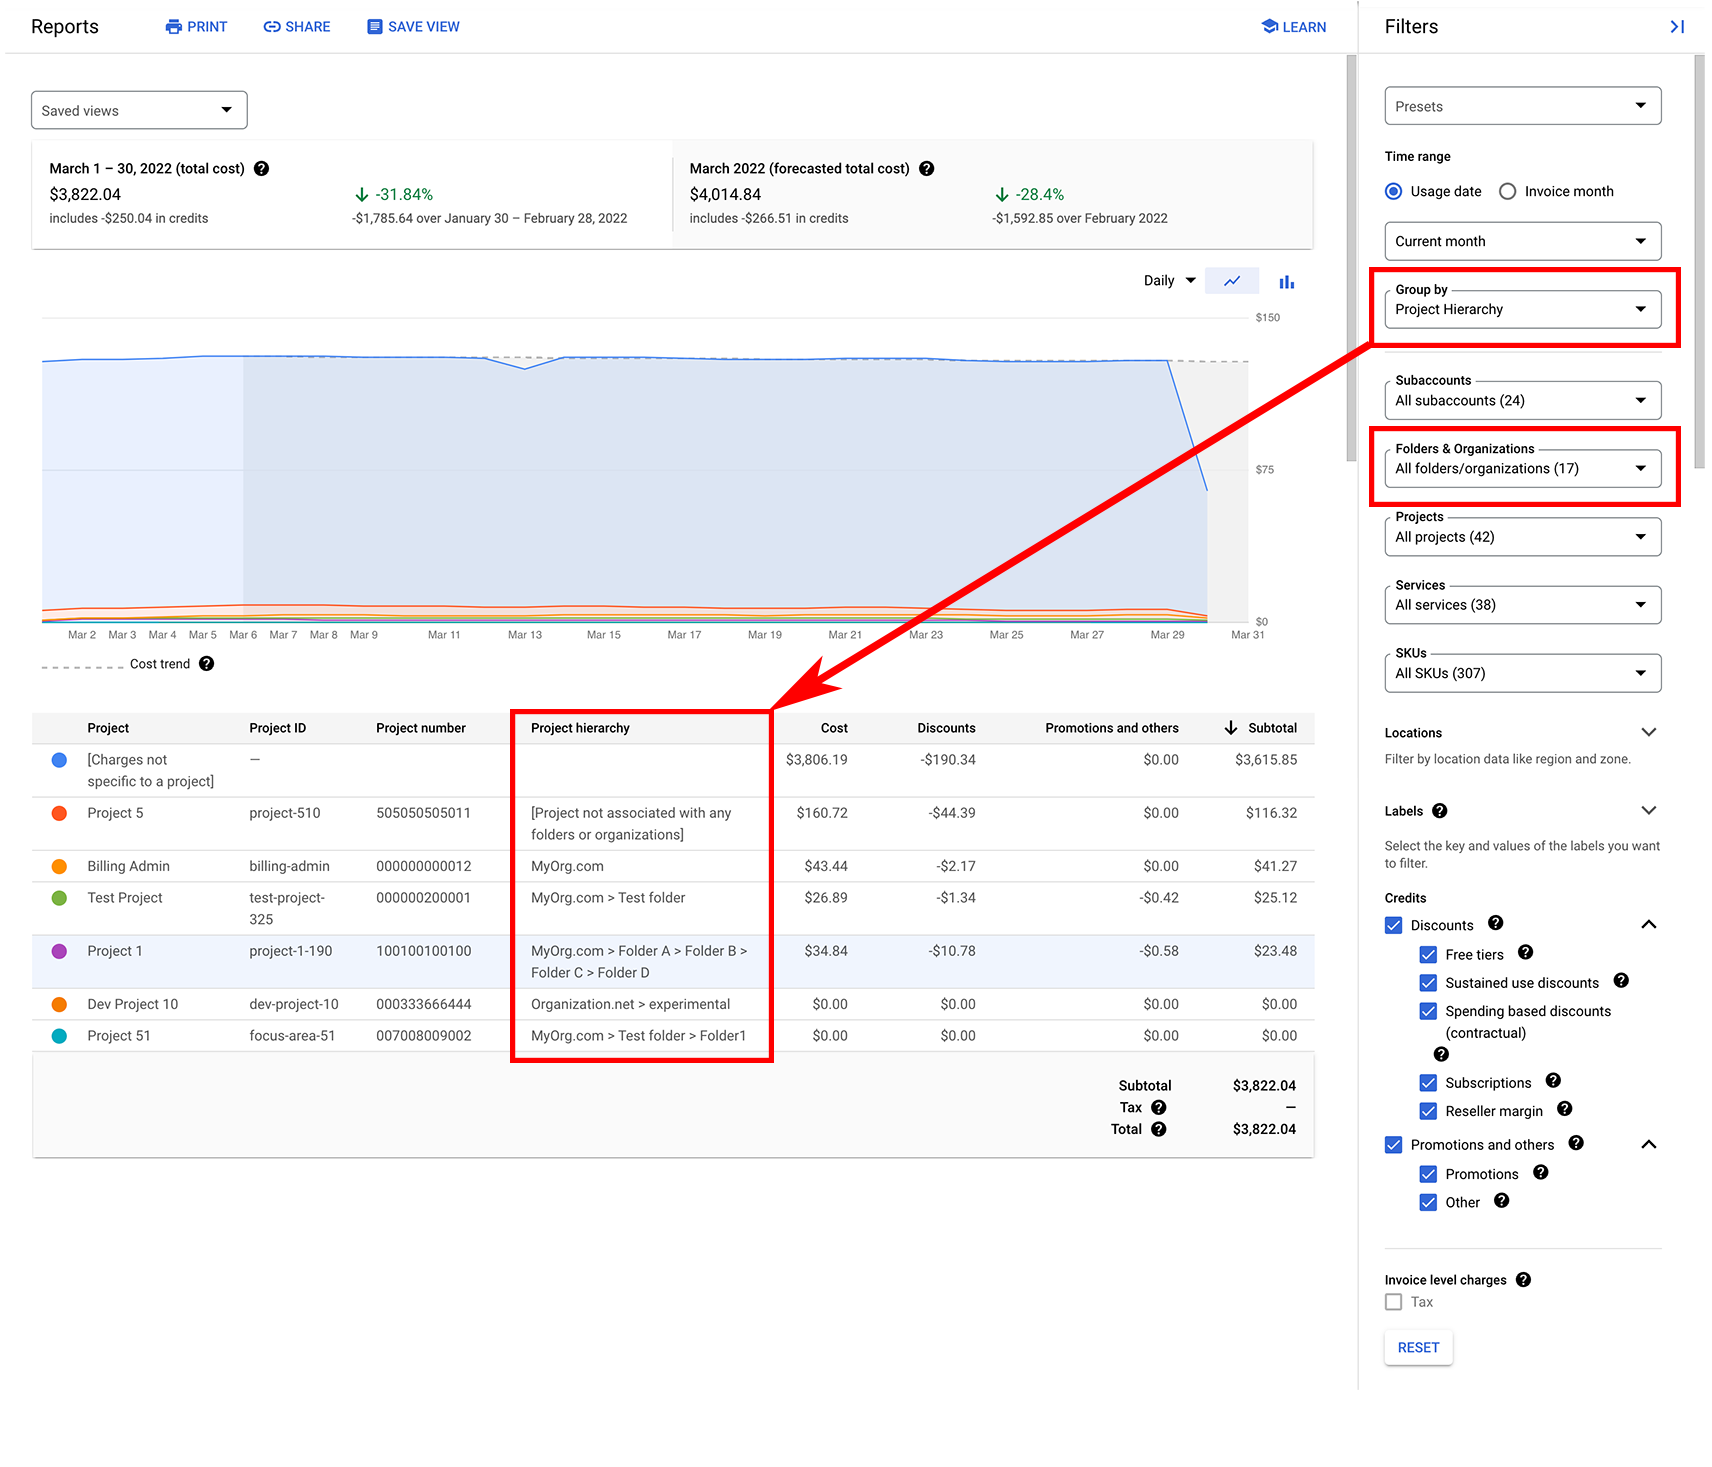
View your costs by project hierarchy
Viewing your costs by project hierarchy helps you analyze costs by folder or organization. For example, if you use folders in an organization to represent cost centers, you can effectively configure your report to group all costs by those cost centers.
To analyze your costs by project hierarchy, including costs by Organizations or costs by Folders, set the Group by option to Project hierarchy. You can also use the Folders & Organizations filter to select specific folders and organizations to focus the data returned in the report.
About project and resource hierarchy
Projects form the basis for creating, enabling, and using all Google Cloud services. Folders are used to group projects under the organization node in a resource hierarchy. A folder can contain projects, other folders, or a combination of both. Each resource has exactly one parent.
The Google Cloud resource hierarchy is analogous to a file system in mainstream operating systems, organizing and managing entities in a hierarchical manner. From a cost management perspective, you might use folders in an organization to represent cost centers (such as Devops or Finance). You can view your costs by project hierarchy to analyze your costs by folder.
Project hierarchy is the ancestry of a project, the resource hierarchy mapping of the project (Organization > Folder > Project). Projects can stand alone (not be associated with any folders or organizations) or be the child of an Organization or Folder. Project hierarchy tracks the current and historical project ancestry. For example, changing a project's name, or moving a project to a different folder or organization, affects the historical project ancestry.
To gain a deeper understanding about resource hierarchy and Cloud Billing, refer to Cloud Billing concepts, Resource hierarchy.
Configure your report to show project hierarchy
To view your costs by project hierarchy (organization > folder > project), take the following steps:
- In the Google Cloud console, open the Reports page for the Cloud Billing account you want to analyze.
- In the report Filters, set a Time range to use a starting date on or after January 1, 2022.
In the Group by selector, choose Project hierarchy.
The report returns a row for each unique combination of Organization > Folder > Project, and the table includes columns for Project, Project ID, Project number, and Project hierarchy.
The values listed in the Project hierarchy column show Organization name > Folder name.
Analyze the report when grouped by Project hierarchy
You can sort the table data on different columns to view the project hierarchy costs in different ways:
- To visualize all of the projects that have the same project hierarchy, sort the table by the Project hierarchy column.
- To visualize if you have the same project associated with more than one ancestry, sort the table by the Project ID column.
You can narrow the report's project hierarchy results using the Folders & Organizations filter.
While you're viewing the report grouped by Project hierarchy, if you change the report's Time range to include a starting date prior to January 1, 2022, the Group by selection is automatically updated to group by Project.
If you select some folders or organizations in the filter, and then update the Time range to include a starting date prior to January 1, 2022, the folder and organization selections are removed.
Understand and analyze changes in project ancestry
For the time range you're analyzing, it's possible for the same Project to be listed in more than one row in the report table. This can occur if something related to the project's ancestry has changed. Changes that affect a project's ancestry include the following:
- Changing the project's name
- Moving the project to a different organization or folder
- Changing a parent folder's name
- Moving a parent folder into another folder or organization
To see if you have projects associated with more than one ancestry, sort the table data by the Project ID column.
View project hierarchy examples showing different scenarios where something related to the project's ancestry was changed, and how that change impacts the results in the report, depending on how you Group the results.
View and analyze your savings
You can use the Savings filters to change the view of your cost calculations. You can select all applicable savings options (default) to be included in the cost calculations, or you can clear some or all of the discounts and credit options to exclude those savings from the cost calculations.
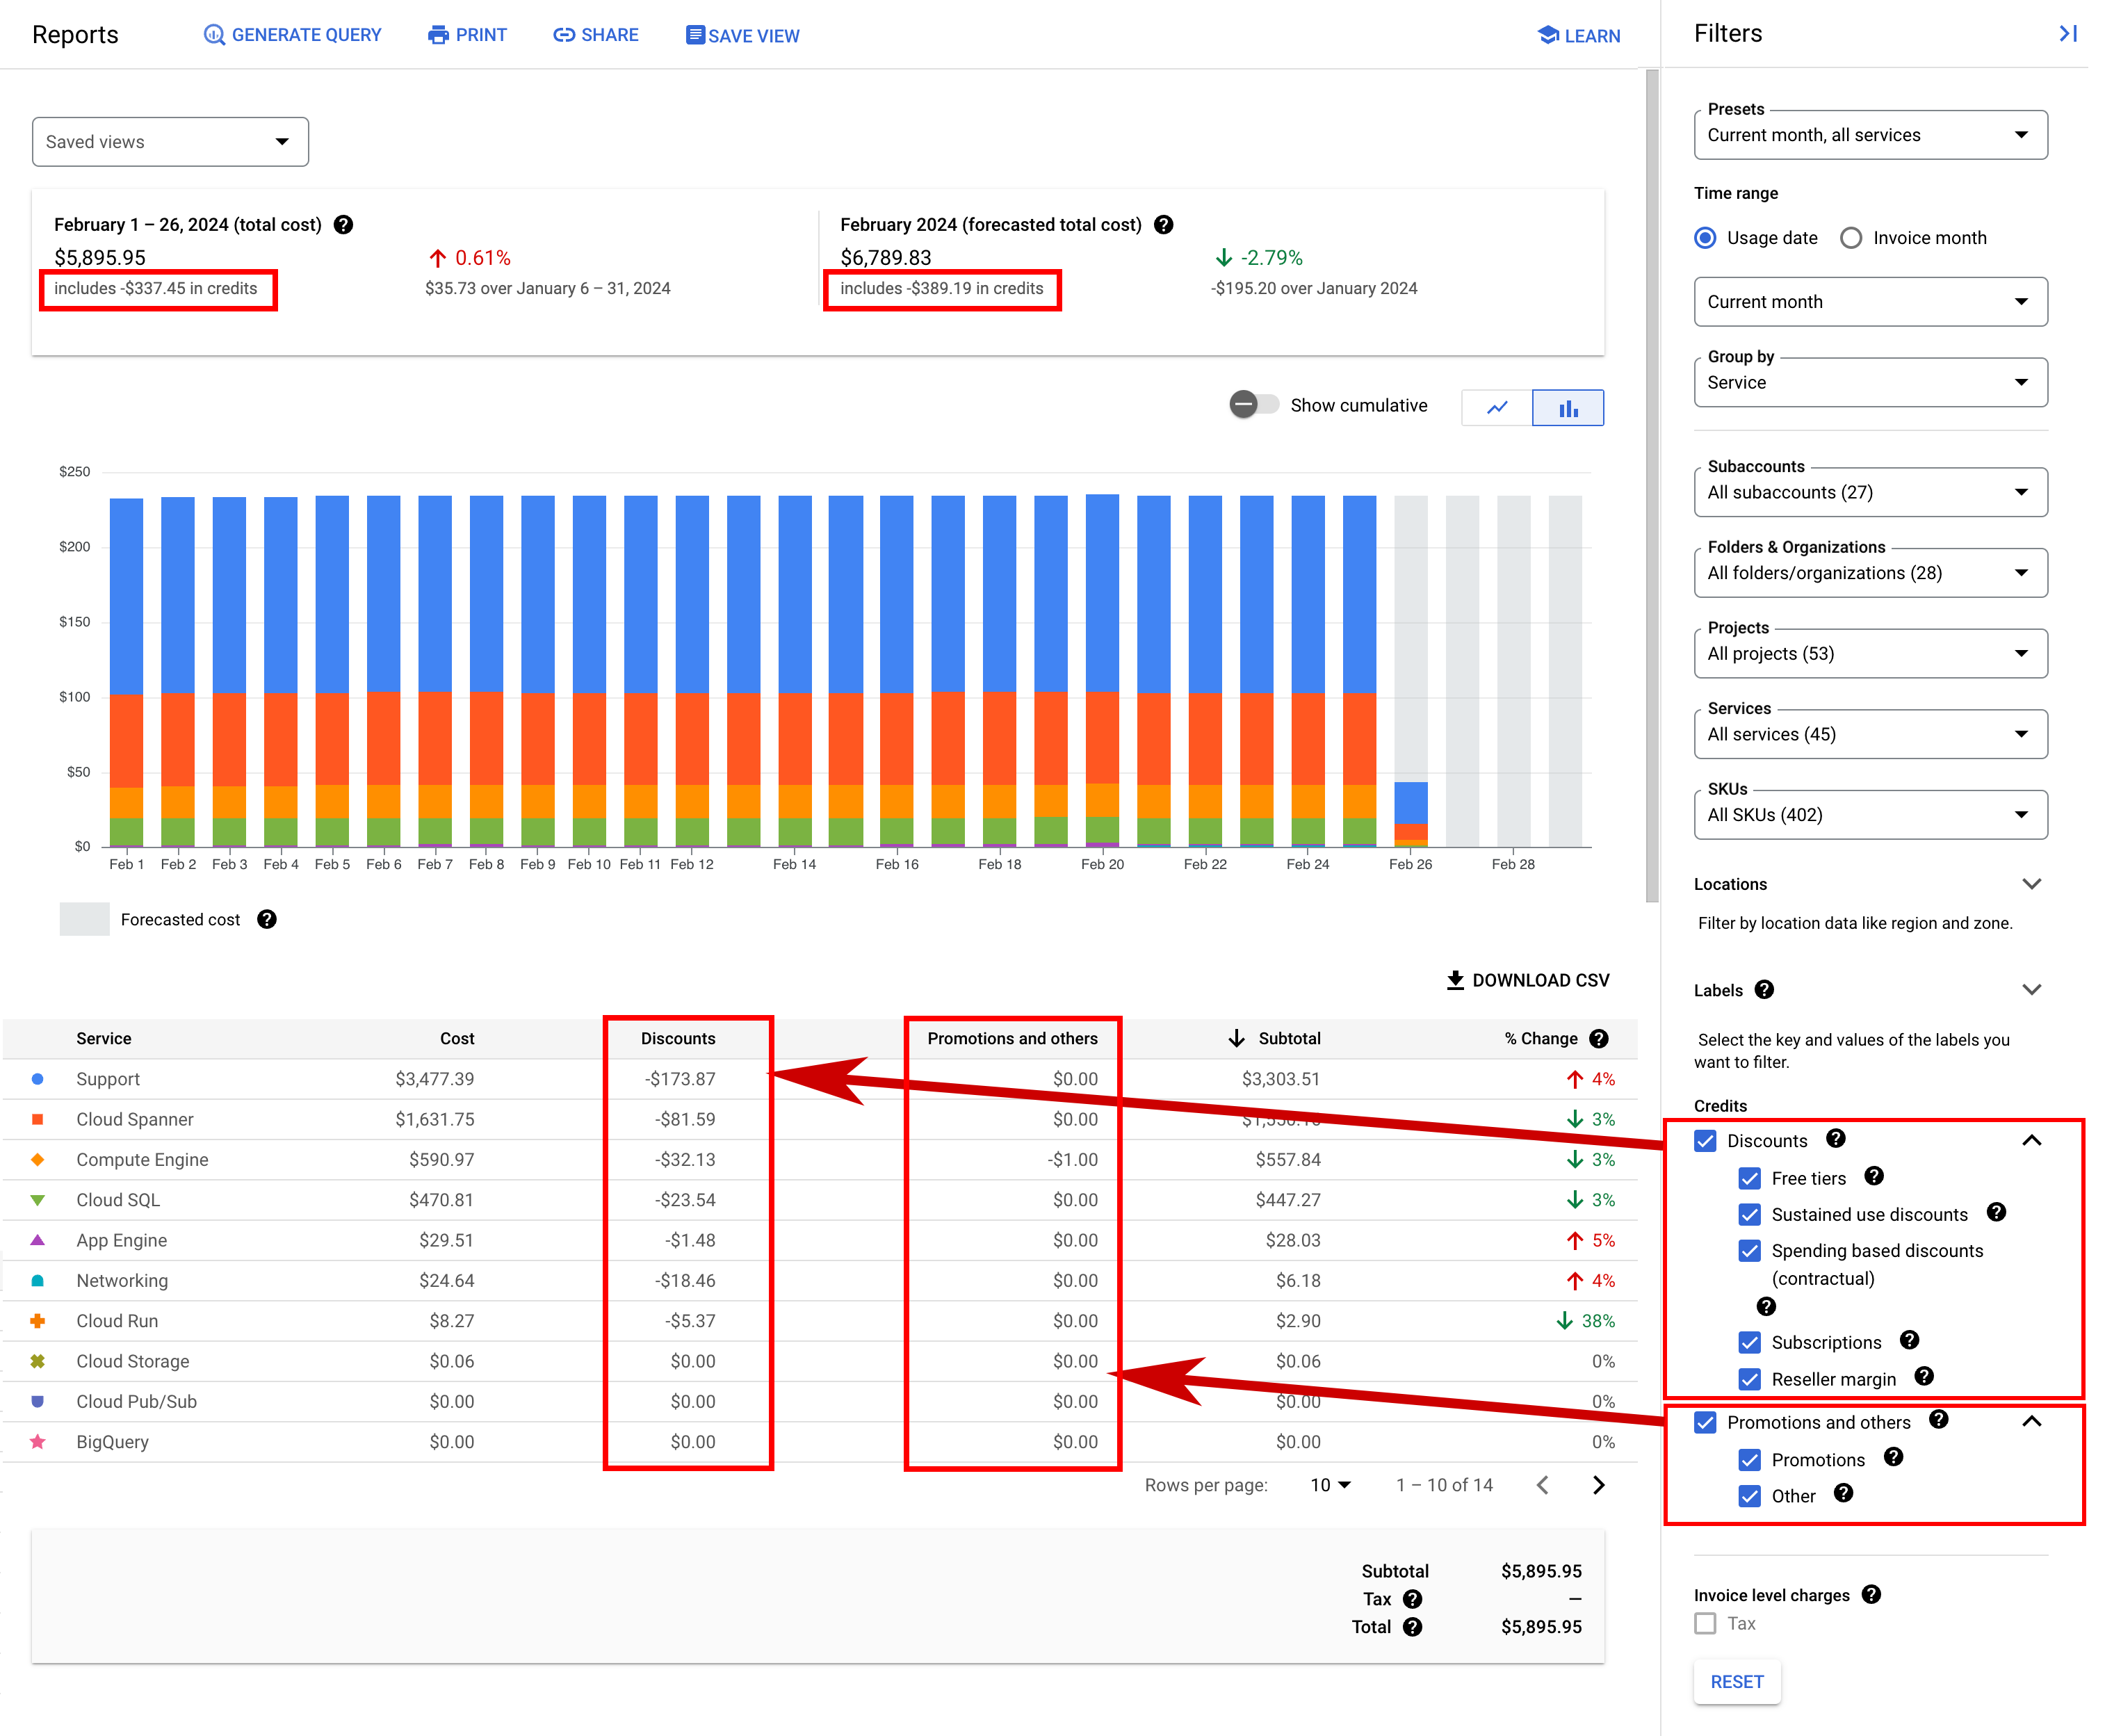
Usage-specific savings are listed in separate columns in the table, and impact the Subtotal value. There are two categories of usage-specific savings: Savings programs and Other savings.
For Cloud Billing accounts associated with a custom pricing contract, you also see a Negotiated savings column.
Savings programs
Savings programs include the various committed use discounts (CUDs) options, which lower the cost of your Google Cloud usage by offering discounts and credits tied to your resource usage or spending.
- Spend-based CUD discounts: Spend-based committed use discounts (CUDs) provide discounted prices on certain Google Cloud services when you commit to spending a minimum amount during a specified term. The discounted price is determined by the consumption model that applies to the SKU usage.
- Legacy spend-based CUD credits: For spend-based committed use discounts (CUDs) that aren't part of the new pricing model, this is the credit earned in exchange for your commitment to spend a minimum amount for a service in a particular region.
- Resource-based CUD credits: Resource-based committed use discounts (CUDs) provide credits on Compute Engine virtual machines (VMs) when you commit to using eligible resources during a specified term.
View the details of your committed use discounts (CUDs)
CUDs reduce the usage costs of Compute Engine and certain other Google Cloud services. The fees and credits from your purchased commitments are applied to your Cloud Billing account using attribution, which describes how they're spread across the account's projects that consumed the eligible discounts. To understand how your commitment fees and credits are applied to your Cloud Billing account and projects, see Attribution of committed use discount fees and credits.
To comprehensively view the details of your CUDs, you should access your Cloud Billing account report using billing-account-level permissions. If you try to analyze your CUDs while your Cloud Billing access is limited to viewing costs for one project at a time, you won't be able to view charges or credits that aren't in the project you're viewing.
Analyze Spend-based CUD discounts
Spend-based CUD discounts provide discounted prices on certain Google Cloud services when you commit to spending a minimum amount during a specified term.
Spend-based CUD discounts are a new CUD model that became available starting July 15, 2025. Starting January 21, 2026, all customers who have purchased Legacy spend-based CUD credits for affected products will be migrated to the new Spend-based CUD discounts model.
Spend-based CUD discounts use consumption models to help track your cloud spending, promotional offers and discounts. To analyze your Spend-based CUD discounts in reports, we recommend that you view the Cost table report or the Cost breakdown report.
Analyze Resource-based CUD credits and Legacy spend-based CUD credits
When analyzing your Google Cloud costs, it's useful to understand how your purchased commitments are impacting your costs. For example, to understand your ongoing Compute Engine costs, you need to know your VM core and RAM usage costs as well as the sustained use discounts and committed use discounts generated by your core and RAM usage.
Resource-based and Legacy spend-based CUDs consist of three components using a balance sheet format on your bill:
- Commitment fee is the discounted cost of your covered usage.
- On-demand costs are the usage costs for the resources that you consume, billed at the standard list price.
- Committed use discount credits are negative costs that offset the eligible on-demand charges covered by the commitment.
The net impact of these three components is that you receive a discount on the usage covered by your commitment. The sum of your commitment fee (1) and committed use discount credits (3) equals the savings from your CUDs. For more information, see Understanding your invoice or statement.
To configure the report to display the individual components that contain your CUDs, group your costs by SKU. The default report view (not grouped by SKU) doesn't break out the CUD components but instead includes the net of the three components.
To view only your ongoing commitment fees, limit the report results to the relevant commitment fee SKUs using the SKUs filter. For example, select the SKUs filter and type
Commitment [YOUR COMMITMENT TYPE].
Depending on the SKU for which you purchased commitments, the fees and credits are applied to your Cloud Billing account using either proportional attribution or prioritized attribution. To understand how your commitment fees and credits are attributed to your Cloud Billing account and projects, see Attribution of committed use discounts.
Other savings
Other savings offer additional discounts and credits on your Google Cloud usage. Other savings might be recurring or one-time use and reduce the cost of your Google Cloud usage. If applicable to your Cloud Billing account, there are various types of other savings you might earn, such as the following:
- Free tier credits: Some services offer free resource usage up to specified limits. For these services, credits are applied to implement the free tier usage.
Promotional credits: Promotional credits are things like spend-based milestone credits, Google Cloud Free Trial, and marketing campaign credits, or other grants to use Google Cloud. Promotional credits are typically considered a form of payment. When available, promotional credits are automatically applied to reduce your total bill.
Promotional credits for custom pricing contracts: If you have a custom pricing contract with Google Cloud, and received promotional credits that apply to costs at list prices, your report includes a service called
Invoice, with a SKU calledContract billing adjustment. This SKU adjusts your promotional credits so that they apply to the costs at list price. View details about contract billing adjustments in the Cloud Billing data export.To check if your promotional credits apply at list prices, refer to the terms of your contract.
Sustained use discounts: When you run eligible Compute Engine resources throughout the billing month, you automatically earn sustained use discounts (SUDs) credits.
Reseller margin: For resellers only, this is the Reseller Program Discount credit you receive for selling eligible Google Cloud products.
Spending-based discounts: Spending-based discounts offer progressively larger discounts based on your total spend over a defined period, or discounts that are applied after a contractual spending threshold is reached.
Subscription credits: Long-term subscriptions to services that are purchased in exchange for discounts. These credits are typically applied to Base + Overage subscriptions, also known as Non-Unified Commitment Service (Non-UCS) subscriptions.
Others: Other credits or discounts that aren't associated with the current categories.
Negotiated savings
Negotiated savings is a credit type that displays for Cloud Billing accounts that are associated with a custom pricing contract. You receive these savings from custom pricing you've negotiated with Google. The Negotiated savings amount represents your cost savings computed using this equation:
Negotiated savings = Costs at Contract price - Costs at List price
- For usage costs incurred before May 1, 2021, your on-demand rate is based on your contract prices, and includes the savings you earned compared to list prices. When you configure the report using a starting Time range set prior to May 1, 2021, the Negotiated savings column isn't displayed. In these instances, the Usage cost column shows the gross cost of your cloud usage calculated using your contract prices.
For usage costs incurred after May 1, 2021, your on-demand rate is based on the publicly available list prices, and the Usage cost column shows the gross cost of your cloud usage calculated using list prices. The savings you earn with your custom contract prices (compared to list prices) is displayed on the report as a negotiated savings credit.
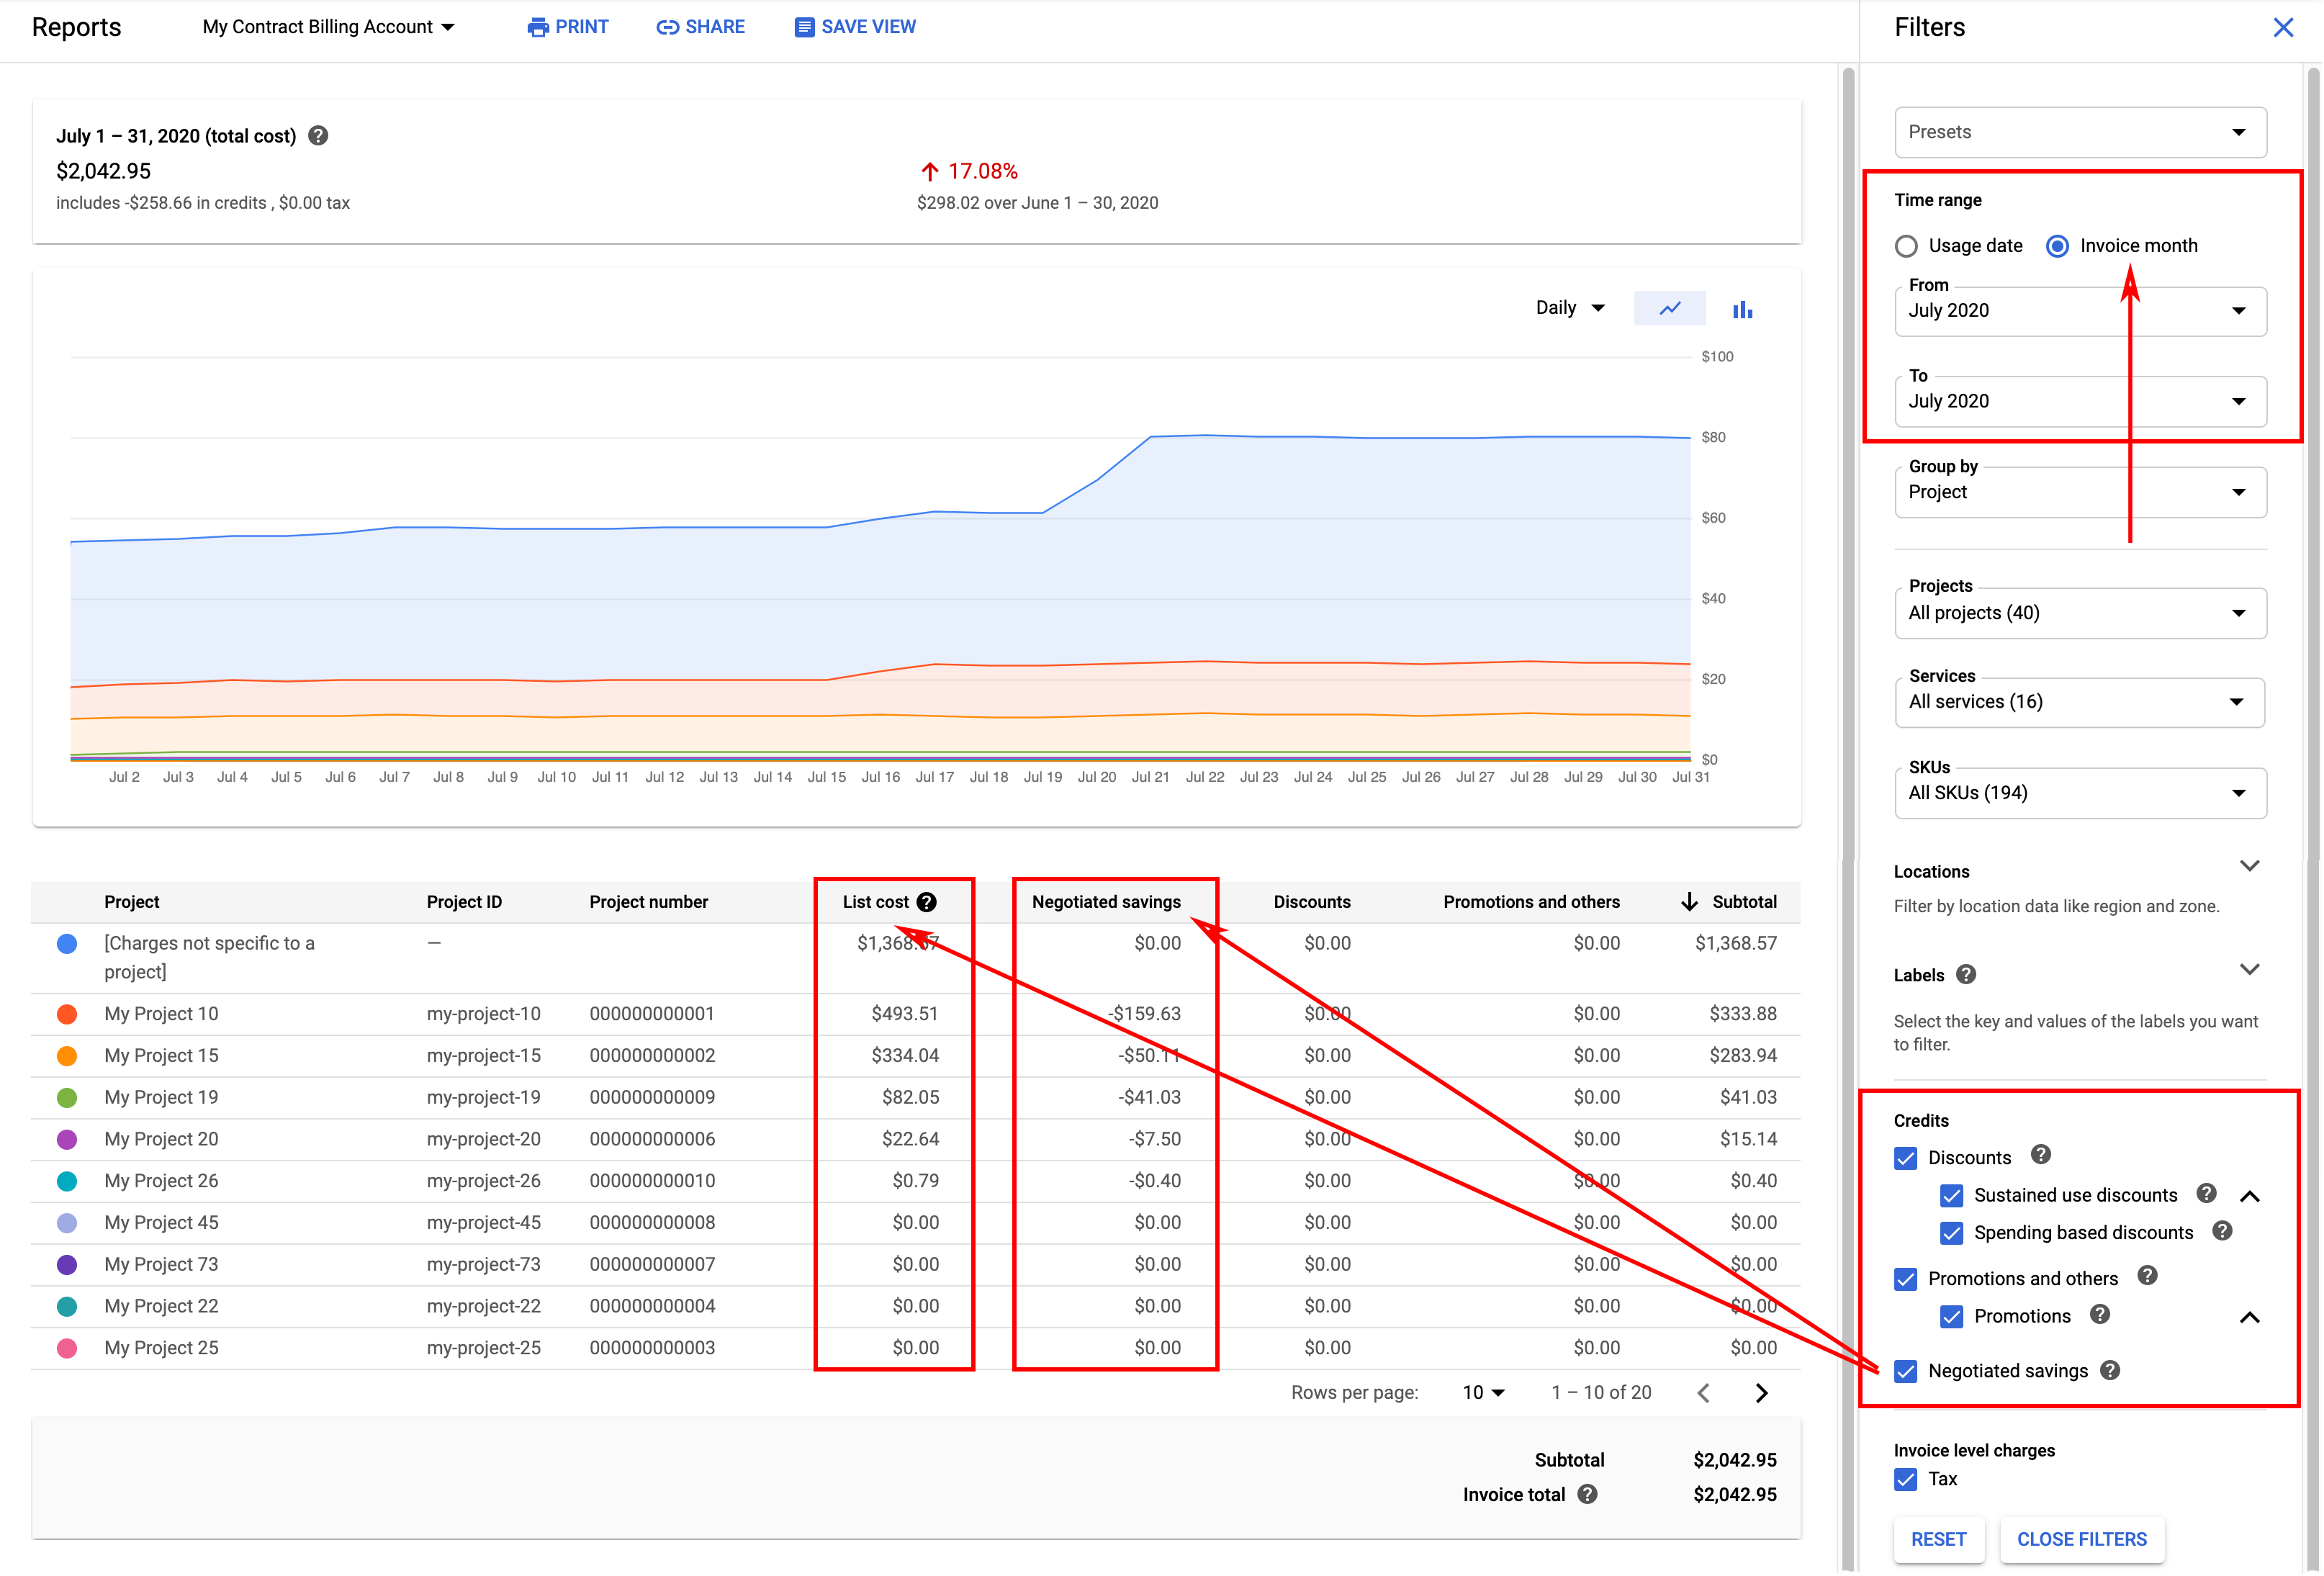
Example of a billing report for a Cloud Billing account that's associated with a custom pricing contract, configured with a Time range starting after May 1, 2021.
Related report
To see an overview of how much your usage-based credits and discounts are saving you, view the Cost Breakdown report.
View a budget in your report
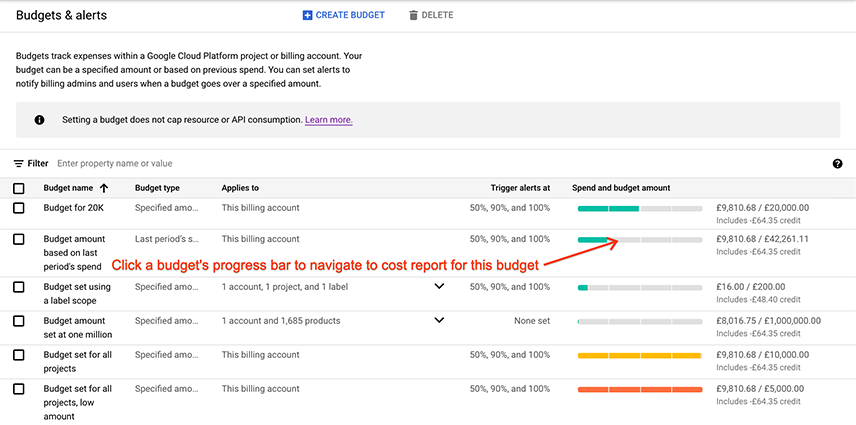
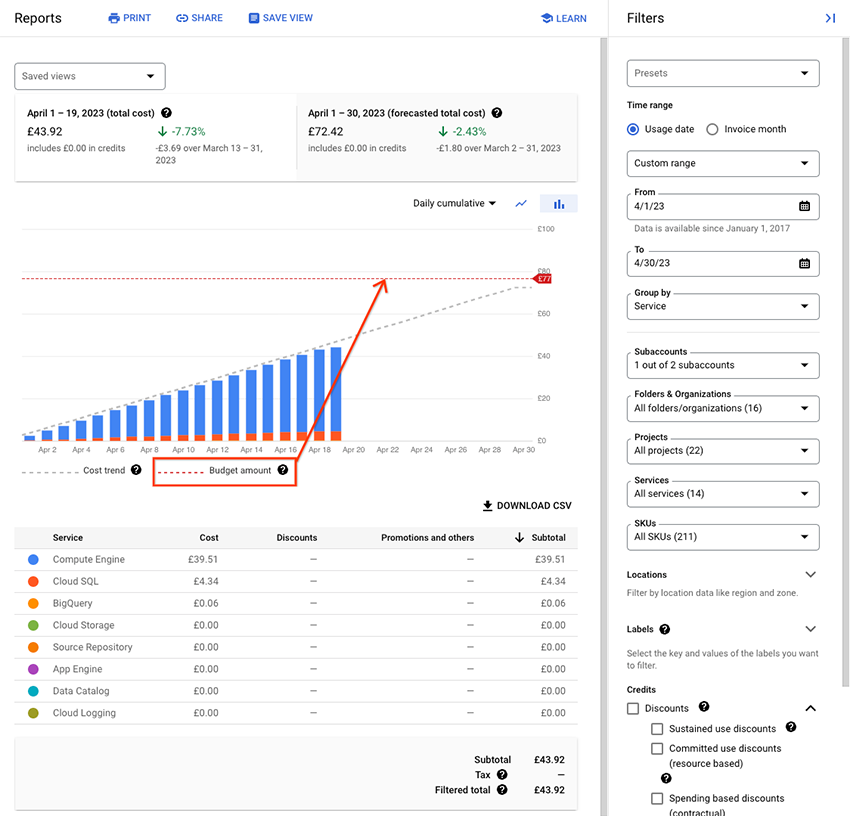
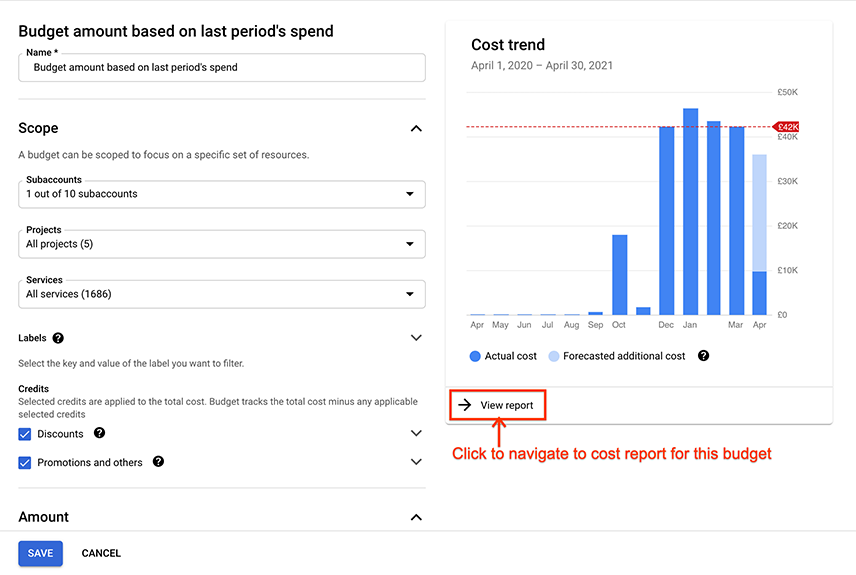
When you open the report from an existing budget, the report's filters are configured based on the scope of the budget, and you can view the budget's amount in your report. The budget's target amount appears in the report chart as a red, dashed, horizontal line, helping you to visualize the budget while you're analyzing the specific costs that are tracked by the budget.
You have these options to view a budget amount in a report:
- View the cost report for the current month, with report filters matching your budget scope.
- View the cost report for the previous 12 months, with report filters matching your budget scope.
| View a budget in your cost report showing costs for the current month | |
|---|---|
To view a budget in your cost report for the current month, take the following steps:
|
|
The cost report opens with the following settings:
|
|
| View a budget in your cost report showing costs for the previous 12 months | |
|---|---|
To view a budget in your cost report for the previous 12 months, take the following steps:
|
|
The cost report opens with the following settings:
|

|
Analyze the report when the budget amount line is visible
The budget amount line is removed from the report if you adjust most of the report settings. However, you can adjust the following settings in the report and the budget amount line will remain visible.
- Group by setting: You can switch the Group by setting to use any of the available options.
- Chart style setting: You can switch the Chart style setting between bar chart and line chart.
- Credits setting: You can select or clear the Credits filters to change the view of your cost calculations to include or exclude credits, helping you see how credits impact the cost calculations compared to your budget target amount.
If you change any other report settings, the budget amount line is removed. These settings include the report's time range settings, the report chart time aggregation settings, and the report filters, including Subaccounts, Projects, Services, SKUs, Locations, and Labels.
To restore the budget amount line, re-open the report from a budget.
Understand the differences between budget scopes and report filters
Budget scopes and report filters behave slightly differently. In each of the scopes in a budget, you can select from a list of all possible items available in a given scope. In each of the report filters, you can select from a list of items that incurred usage costs in the Cloud Billing account you're viewing. This means that the items selectable in your budget scopes might not match up exactly to the items selectable in your cost report filters.
Review the following examples for more information:
Projects: budget scope versus cost report filter
For the Cloud Billing account, assume the following regarding projects:
- 20 currently active projects incurring costs.
- 10 inactive projects that previously incurred costs.
- This Cloud Billing account is also incurring charges that aren't specific to a project, such as the cost of a support plan.
- You have billing-account-level permissions to access the Cloud Billing account.
| Budget | Cost Report |
|---|---|
| On your budget, in your Projects scope, you can select from the 20 currently active projects. You can't select inactive projects or select [Charges not specific to a project]. | On the cost report, your Projects filter list includes all projects for which you have incurred usage costs, both active projects and inactive projects. Your Projects filter also includes the option to select and view [Charges not specific to a project]. |
| On your budget, you set the Project scope to "All projects (20)" — where "20" indicates 20 active projects. | When you open the cost report from the budget, the value in the report's Projects filter displays "All projects (31)" — where "31" indicates that you have 31 projects that have incurred costs in the Cloud Billing account you're viewing, including active and inactive projects, and [Charges not specific to a project]. |
| When you open the cost report from the budget's cost trend chart, if your budget scope is set for all projects, and your Cloud Billing account is incurring charges not specific to a project, you might notice that your costs appear higher in the cost report than in the budget's cost trend chart. | |
Services: budget scope versus cost report filter
For the Cloud Billing account, assume the following regarding services:
- There are 200 possible services or products that you could use.
- The Cloud Billing account has incurred costs for 16 out of the 200 possible services.
| Budget | Cost Report |
|---|---|
| On your budget, in your Services scope, you can see and select from all 200 possible services, even if you haven't incurred any usage or costs for those services. | On the cost report, your Services filter list includes only those services or products for which you have incurred usage costs. |
| On your budget, you set the Services scope to "All services (200)" — where "200" indicates all possible services. | When you open the cost report from the budget, the value in the report's Services filter displays "All services (16)" — where "16" indicates that you only have 16 services that have incurred costs in your Cloud Billing account. |
View the charges on your invoices
You can change the report view to display charges by invoice month, including invoice-level charges (for example, taxes, contractual credits, adjustments, or surcharges). If you receive more than one invoice for a month, the report view aggregates all invoice costs for the invoice month. In Billing Reports, you can't view the report by individual invoice.
If you want to view detailed costs by individual invoice, see the Cost table report. Using the Cost table report, you can view invoice costs by invoice number and download the report to CSV for offline analysis.
To view the cost report for the invoice month, in the Time range section of the Filters panel, select Invoice month, then set your From and To month range.
The Invoice level charges section (below the Savings section in the Filters panel) shows Tax and Adjustments by default.
The report summary, above the chart, displays taxes when Invoice month is selected.
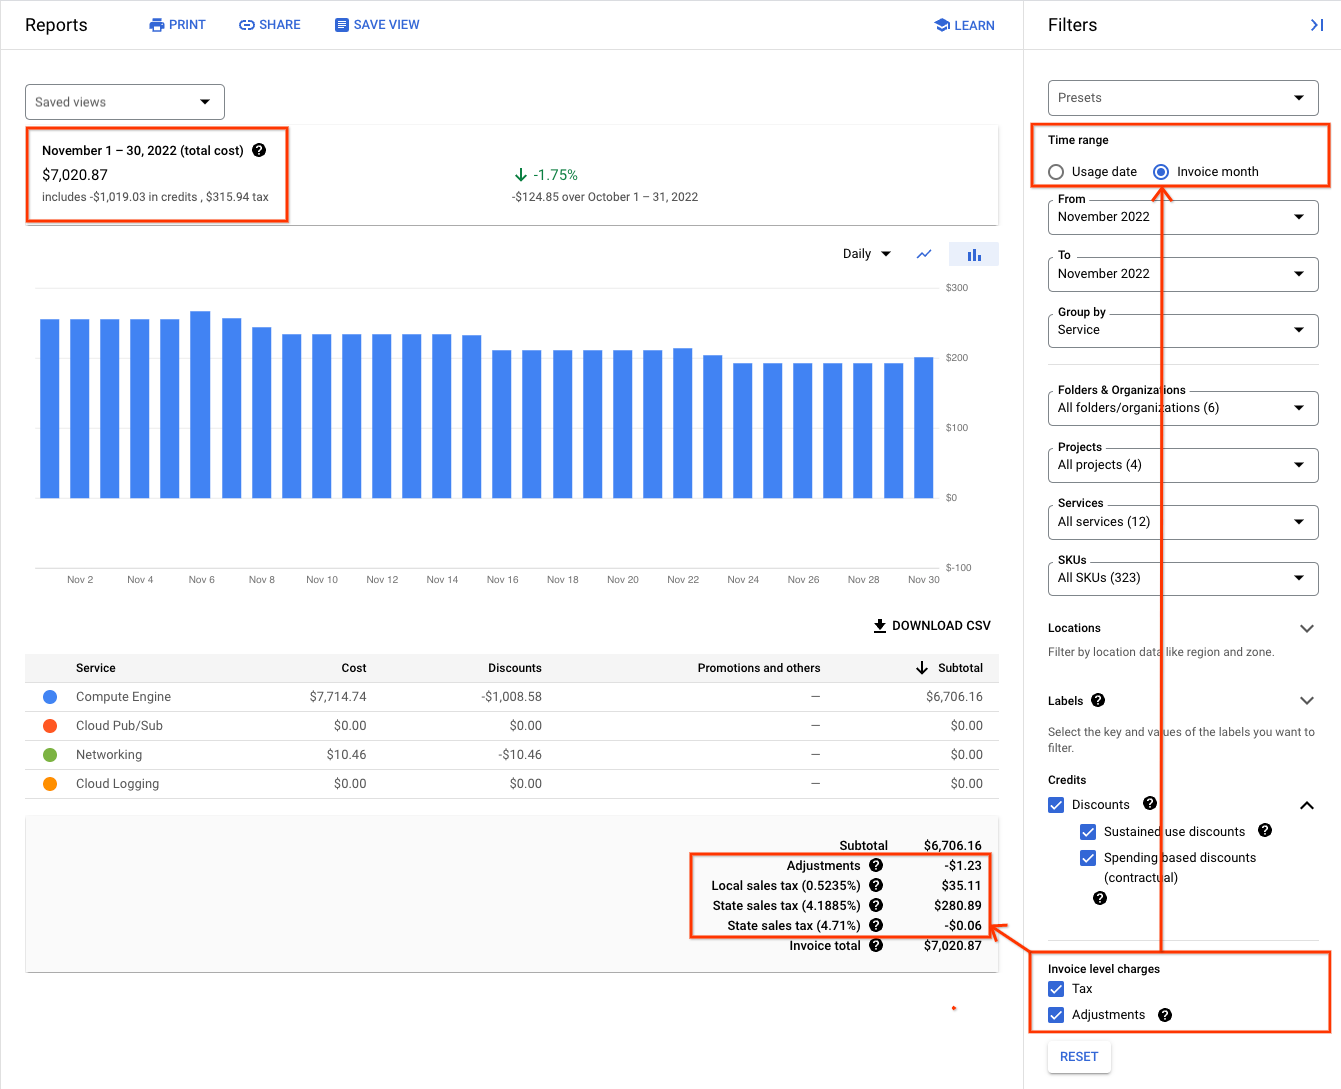
- The summary footer, below the table, displays the cost breakdown based on your filter selections. Invoice-level charges (tax and adjustments) are not displayed when the Time range setting is by Usage date, or when you set other report filters, such as Projects, Services, or SKUs.
View invoice charges for the most recent invoice month
To view all invoice charges for the most recent invoice month, in the Filters panel, expand the Presets dropdown and select Last invoice month. This preset option automatically sets the report filters as follows:
- In the Time range section in the filters panel, Invoice month is selected, and the From and To month range is set for the most recent complete invoice month (for example, February 2023).
- The Group by filter is set to group costs by Service.
- All other report filters are set to use their default configurations (for example, ALL projects, services, SKUs, and savings options).
Using the Last invoice month preset, you can quickly view a report with totals that map to your most recent invoice or statement, showing costs for all services and SKUs, grouped by Service, and including discounts, credits and invoice-level charges (such as taxes, contractual credits, adjustments, or surcharges).
Billing Reports aggregates all invoice costs for the invoice month, and not by individual invoice. If you receive more than one invoice in a month, your invoice month totals might not map to the totals of an individual invoice issued in the same month. If you want to view detailed costs per individual invoice, see the cost table report.
View invoice charges for a specific invoice month
To view all invoice charges for a specific invoice month, do the following:
- In the Time range section in the filters panel, select Invoice month, then set your From and To month range for the same month (for example, January 2023).
- Select your preferred Group by setting (for example, Project, Service, or SKU).
Ensure no other filters are set. That is, you should view the report for ALL filter options (such as projects, services, SKUs, and savings options).
In the summary footer, the cost breakdown displays:
- Subtotal: The sum of the Group by costs, after Savings discounts and credits.
- Adjustments: The sum of credit or debit memos and other adjustments applied to your Cloud Billing account due to billing corrections or contractual requirements, as reported from the invoices issued for the invoice month. Adjustments might be issued in a different month than the invoice month to which they are applied. For more details on adjustments, see Understand memos and adjustments. You won't see this line item if you have no adjustments applied to your invoices.
- Tax: Sum of all taxes reported from all of the invoices for the invoice month.
Invoice total: Includes all savings, adjustments, taxes, and rounding errors, aggregated for all invoices issued for the invoice month.
Invoice total versus Filtered total
In the summary footer of the report, the display of invoice-level costs and the type of report total depends on how your report filters are configured.
Invoice total: Invoice total includes all costs and savings for the invoice month, as well as invoice-level charges such as taxes, adjustments, and rounding errors, aggregated for all invoices issued during the invoice month. To view the invoice total, set the Time range to Invoice month, and ensure all of the other filters are set to show all options (such as all Projects, Services, SKUs, and Savings).

Filtered total: When your time range is set to invoice month, the filtered total summarizes your charges based on the filter selections you have chosen (such as filtering on a subset of Projects, Services, or SKUs), excluding tax, adjustments, and rounding errors. When you see a Filtered total in the report, invoice-level charges aren't displayed in the summary footer and aren't included in the calculation of the filtered total. A filtered total doesn't match the total on your monthly invoice or statement.
Related reports
- Cost Table report: A detailed, tabular view of your monthly costs for a given invoice or statement, which can be filtered and downloaded.
- Cost Breakdown report: An at-a-glance waterfall view of your usage costs calculated using the on-demand price for your Google Cloud usage, how discounts and credits saved you money, and any invoice-level charges applied (if you're viewing the cost breakdown for an invoice month time range).
Data availability
The data availability information in this section applies to customers who are accessing a Cloud Billing account using billing-account-level permissions. If your access to a billing account is limited to project-level permissions, you might not be able to view all available cost data or report configuration options for a Cloud Billing account.
- In Cloud Billing reports, usage cost data is available back to January 2017 at the SKU level.
- Cost data viewed by invoice month is available back to May 2019 at the SKU level.
- Data at the sub-SKU level (for example, by resource ID) isn't available.
As of January 2017, the following data is included in Cloud Billing reports:
SKU usage: This is reported in the pricing units shown on the pricing table report, for example, gibibyte month.
SKU cost: The SKU cost is based on the list price or custom contract price for that usage, whichever price is applicable to your Cloud Billing account. The cost is reported in the currency that your Cloud Billing account is charged in.
Usage-specific savings: This includes any credits or discounts that were applied directly to the SKU usage, such as sustained use discounts,committed use discounts, or free trial and other promotional credits that were applied.
Location data: This includes costs incurred by region or multi-region.
As of May 2019, the following data is available in the Cloud Billing reports:
Taxes: Taxes that were applied to your invoices are reported by Invoice month selected.
Account-level billing modifications: Sum of credits or surcharges applied at the account level due to Cloud Billing corrections or contractual requirements. Reported as Adjustments when viewing reports by Invoice month. The month that an adjustment is issued might differ from the month when the adjustment is applied. For guidance on how to analyze adjustments, see Understand memos and adjustments.
Invoice details: You can graph or group usage by Invoice month. We don't display the invoice number in this report view.
When viewing costs by Invoice month, the following data is available in the Cloud Billing reports:
Invoices generally include all costs incurred during a given calendar month, but the cost for some services' usage at the very end of a calendar month might roll over to the next month's invoice. As a result, your invoice might include costs for more than one calendar month. Usage is reported by actual usage date when viewing your invoice details and online reports.
Other data specific to an invoice includes the totals of any taxes and adjustments.
- For a detailed breakdown of the taxes on an invoice, view the cost table report, or view the details of your invoice.
- For guidance on understanding and analyzing any adjustments, see Understand memos and adjustments.
As of May 2021, the following data is available in the Cloud Billing reports:
Negotiated savings: Viewable for Cloud Billing accounts that are associated with a custom pricing contract, Negotiated savings shows the difference in cost between your contract price compared to the current list price. The Negotiated savings column is displayed when viewing your report for a Time range that starts after May 1, 2021.
Prior to May 1, 2021, your costs are calculated using your custom contract price, resulting in a single Usage cost column that includes your negotiated savings in the cost calculations.
As of January 1, 2022, the following data is available in the Cloud Billing reports:
- Project hierarchy: Project hierarchy is the project's ancestry, the resource hierarchy mapping of a project (Organization > Folder > Project). When viewing your report with a starting time range of January 1, 2022, you can group your data by project hierarchy.
- Folders & Organizations: Folders and organizations are components of a project hierarchy. When viewing your report with a starting time range of January 1, 2022, you can filter your data by folders and organizations.
FAQs
How do I get access to the granular data behind Cloud Billing reports?
You can configure your Cloud Billing account to export data to BigQuery and then use BigQuery or your own tools to analyze the exported cost line items. For example, you can visualize your costs with Looker Studio, or from your BigQuery tables, you can choose to export your BigQuery data as CSV (or other formats) to a Cloud Storage bucket. The Cloud Billing data exported to BigQuery is the same data that your Cloud Billing reports use.
Can I save or share my Cloud Billing report view?
Multiple options are available.
- Save a report view: You can save customized report views using the Saved reports feature. Saved reports are available in the All reports page to anyone who has Cloud Billing account-level access to view billing reports.
- Share a report: You can Share a report by copying and sharing the URL of your customized Cloud Billing report.
Bookmark a report: You can save a customized Cloud Billing report view to be accessible in your browser by bookmarking the report URL. The URL includes the report settings you selected.
Print a report: You can Print the Cloud Billing report.
Download report CSV: You can download the report data to a CSV file using the Download CSV selector at the top right of the summary table.
Create a custom report: You can recreate the report using queries of your exported Cloud Billing data.
How do I filter or group costs by zone, region, or multi-region?
You can group your costs by region or multi-region, and you can filter on locations (regions and multi-regions). The Cloud Billing reports don't support filtering or grouping by zone.
Why are my usage date costs different than my invoice month costs?
Google Cloud products report usage and cost data to Cloud Billing processes at varying intervals. As a result, you might see a delay between your use of Google Cloud services, and the usage and costs being available to view in Cloud Billing. Typically, your costs are available within a day, but can sometimes take more than 24 hours.
At the end of a calendar month, late-reported usage might not be included on that month's invoice and instead might roll over to the next month's invoice.
When you view your online reports, usage is shown by the actual usage date, which might be different from the invoice month.
Related topics
- Export Cloud Billing data to BigQuery
- Understand your savings with cost breakdown reports
- View your cost and payment history
- Create, modify, or close your Cloud Billing account