이 페이지에서는 IntelliJ 및 다른 JetBrains 제품에서 Spanner 데이터베이스에 연결하는 방법을 설명합니다.
IntelliJ IDEA는 Java, Kotlin, Groovy, 기타 JVM 기반 언어로 소프트웨어를 개발하기 위한 통합 개발 환경입니다.
이 페이지에서는 IntelliJ 또는 다른 JetBrains IDE가 이미 컴퓨터에 설치되어 있다고 가정합니다.
Spanner에 연결
IntelliJ를 Spanner 데이터베이스에 연결하면 IntelliJ에서 직접 Spanner 데이터베이스에 대해 쿼리 및 기타 SQL 문을 실행할 수 있습니다. 또한 코드에서 테이블 및 열 이름에 대해 코드 완성 및 검증을 사용 설정할 수 있습니다.
다음 단계에 따라 GoogleSQL 언어 데이터베이스 및 PostgreSQL 언어 데이터베이스에 연결할 수 있습니다.
IntelliJ에서 메뉴 옵션
File > New > Datasource > Google Spanner를 클릭합니다. 이전에 이 드라이버를 사용하지 않았으면Google Spanner드라이버가Other하위 메뉴에 있습니다.데이터 소스 창에서 프로젝트, 인스턴스, 데이터베이스 ID를 입력합니다.
선택사항: 서비스 계정을 사용하여 인증하려는 서비스 계정 키 파일을 선택합니다. 기본 사용자 인증 정보를 사용하려면 사용자 인증 정보 드롭다운에서
No Auth를 선택합니다.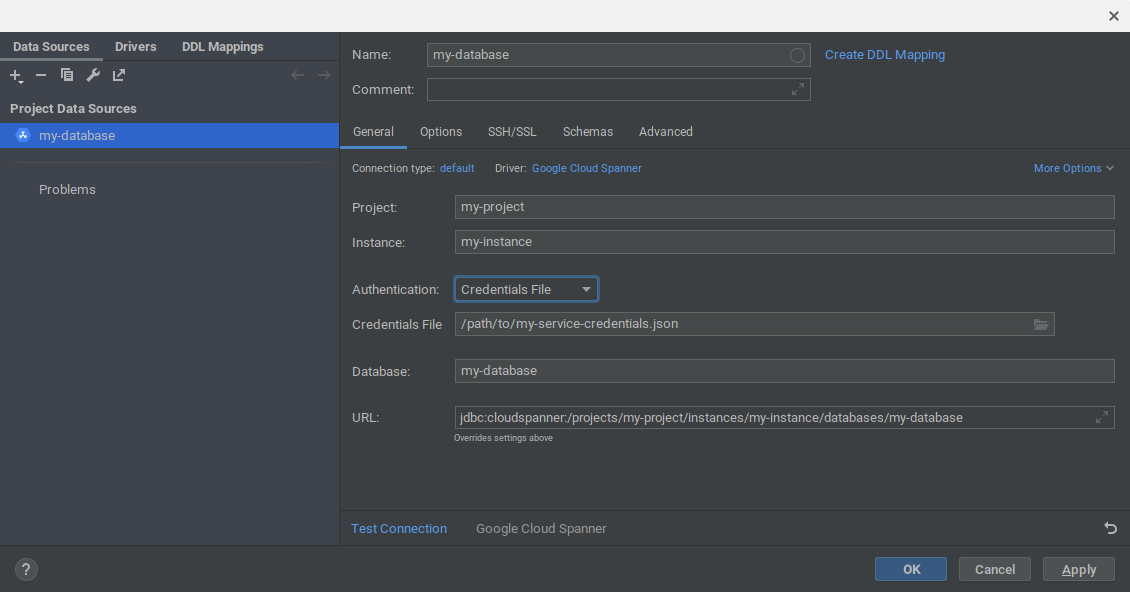
확인을 클릭하여 데이터 소스를 만듭니다. Spanner 데이터베이스가 IntelliJ에서 데이터베이스 창에 추가됩니다.
데이터베이스 창에서 바로 전에 추가한 데이터 소스를 확장합니다. 그런 후
No schemas selected텍스트 옆에 있는...버튼을 클릭합니다.IntelliJ가 데이터베이스에서 모든 스키마를 검사하도록 하려면
All schemas옵션을 선택합니다. 그러면 IntelliJ가 데이터베이스 뷰에 데이터베이스의 모든 테이블 및 뷰를 채웁니다.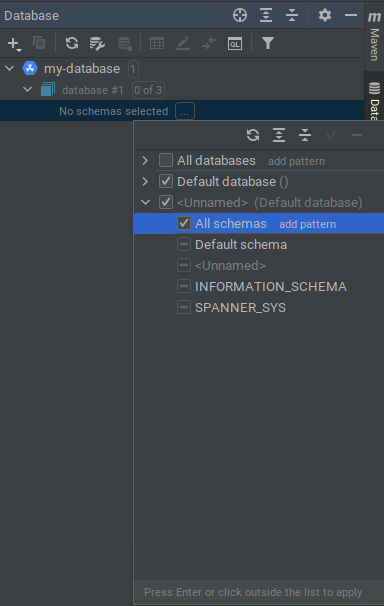
Spanner 에뮬레이터에 연결
Spanner 에뮬레이터에서 IntelliJ를 데이터베이스에 연결할 수도 있습니다.
먼저 다음 명령어 중 하나로 에뮬레이터를 시작합니다.
gcloud emulators spanner startdocker run -p 9010:9010 -p 9020:9020 gcr.io/cloud-spanner-emulator/emulator
메뉴 옵션
File > New > Datasource > Google Spanner를 클릭합니다. 이전에 이 드라이버를 사용하지 않았으면Google Spanner드라이버가Other하위 메뉴에 있습니다.프로젝트, 인스턴스, 데이터베이스 ID를 입력합니다. 참고: 프로젝트, 인스턴스, 데이터베이스가 에뮬레이터에 있지 않아도 됩니다.
사용자 인증 정보 드롭다운에서
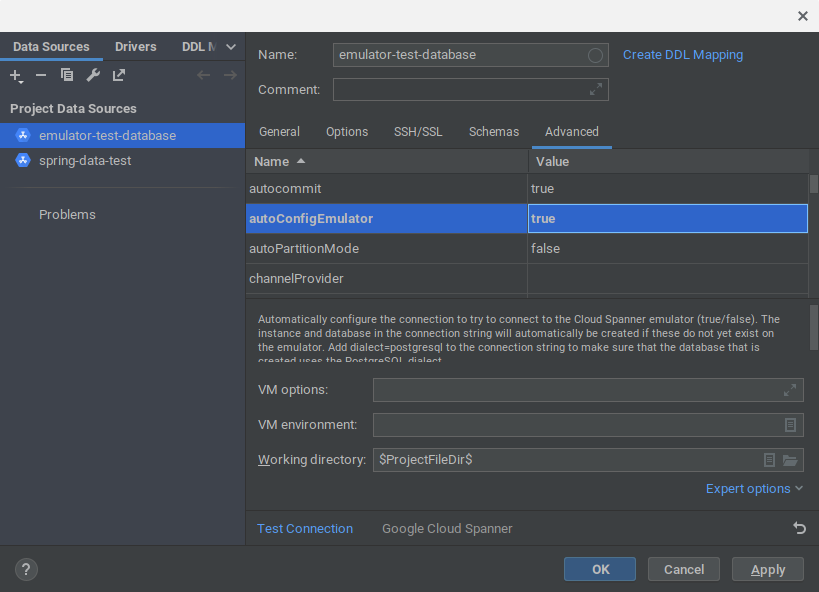
No Auth를 선택합니다.데이터 소스 창에서
Advanced탭을 클릭합니다.autoConfigEmulator값을true로 수정합니다.확인을 클릭하여 모든 변경사항을 수락합니다. 프로젝트, 인스턴스, 데이터베이스가 아직 없으면 에뮬레이터에 자동으로 생성됩니다.
데이터베이스 창에서 바로 전에 추가한 데이터 소스를 확장합니다.
No schemas selected텍스트 옆에 있는...버튼을 클릭합니다.IntelliJ가 데이터베이스에서 모든 스키마를 검사하도록 하려면
All schemas옵션을 선택합니다. 그러면 IntelliJ가 데이터베이스 뷰에 데이터베이스의 모든 테이블 및 뷰를 채웁니다.
다음 단계
- IntelliJ에서 데이터 소스를 추가하고 작업하는 방법은 IntelliJ 데이터 소스를 참조하세요.
- Spanner 에뮬레이터 자세히 알아보기