使用 API 创建用户定义的指标

本文档介绍了如何创建用户定义的指标,以及如何使用 Cloud Monitoring API 写入此指标数据。用户定义的指标使用的元素与内置 Cloud Monitoring 指标使用的元素相同:

  • 一组数据点。
  • 指标类型信息,用于说明数据点代表什么。
  • 受监控的资源信息,告知您数据点的来源。

用户定义的指标(有时称为自定义指标)的使用方式与内置指标相同。也就是说,您可以为此指标数据创建图表和提醒。

如需对应用进行插桩,我们建议您使用开源的供应商中立插桩框架(例如 OpenTelemetry),而不是特定于供应商和产品的 API 或客户端库。如需了解如何对应用进行插桩,请参阅 插桩和可观测性

准备工作

如需了解所有指标的底层结构,请参阅指标、时序和资源

若要使用 Cloud Monitoring,您必须有启用了结算功能的 Google Cloud 项目。如有必要,请执行以下操作:

  1. 在 Google Cloud Console 中的项目选择器页面上,选择或创建一个 Google Cloud 项目

    转到“项目选择器”

  2. 确保您的 Google Cloud 项目已启用结算功能

  3. 确保已启用 Monitoring API。如需了解详情,请参阅启用 Monitoring API
  4. 对于在 Google Cloud 外部运行的应用,您的 Google Cloud 项目必须对应用进行身份验证。通常,您可以通过为项目创建服务账号并配置环境变量来配置身份验证。

    对于在 Amazon Elastic Compute Cloud (Amazon EC2) 实例上运行的应用,请为该实例的 AWS 连接器项目创建服务帐号。

    如需了解如何创建服务账号,请参阅身份验证使用入门

创建用户定义的指标类型

如需创建用户定义的指标,您可以定义一个 MetricDescriptor 对象来指定与指标相关的各种信息,也可以写入指标数据。当您写入指标数据时,Monitoring 会根据您提供的数据结构为您创建指标描述符。如需了解如何设计指标描述符,请参阅用户定义的指标的指标描述符

自动创建指标描述符

如果您在用户定义的指标的指标描述符尚不存在的情况下写入指标数据,则系统会自动创建指标描述符。但是,这个新的指标描述符可能不是您想要的;系统在自动创建指标描述符时会做出一些假设,并使用默认值。

Cloud Monitoring 创建一个新的MetricDescriptor时间TimeSeries对象包含在调用timeSeries.create引用Metric指定不存在的对象指标类型名称。Cloud Monitoring 使用以下规则来填充 MetricDescriptor

  • type:类型是从 Metric 对象的 type 字段中复制的。
  • name:名称是根据方法调用中的项目 ID 以及 Metric 对象中 type 的值创建的。
  • labelsMetric 对象中显示的标签。新指标描述符中的每个标签描述符都具备以下字段:
    • keyMetric 对象中的标签键。
    • valueTypeSTRING
    • description:未设置
  • metricKind:除非您指定 TimeSeries 对象的 metricKind 参数,否则指标种类设置为 GAUGE。指定 metricKind 时,新指标将具备该参数指定的种类。您只能指定 GAUGECUMULATIVE 种类。
  • valueType:值类型取自写入的 Point 的值类型。值类型必须是 BOOLINT64DOUBLEDISTRIBUTION。如果您在 TimeSeriesvalueType 字段中指定值类型,则该类型必须与 Point 的类型匹配。
  • unit:未设置
  • description"Auto created custom metric."
  • displayName:未设置

单次 timeSeries.create 调用可以包含多个引用同一个不存在的指标类型的 TimeSeries 对象。在这种情况下,新指标描述符中的标签包含对 create 的本次调用中所有时序中的 Metric 对象的所有标签的集合。

后续步骤:请参阅编写用户定义的指标

手动创建指标描述符

如需创建指标描述符,请执行以下操作:

  1. 确定指标描述符的结构。如需有关如何进行上述选择的更多帮助,您可以浏览内置指标以及查看时序数据

    1. 为用户定义的指标选择一个指标名称

    2. 选择指标的显示名和说明。显示名会在 Google Cloud 控制台中使用。

    3. 选择要定义用户定义的指标并写入其时序数据的项目。如果您需要在多个项目中使用相同的指标,请在每个项目中为指标提供相同的定义。

      如需从 AWS 帐号管理的资源写入用户定义的指标,请在该帐号的 AWS 连接器项目中创建指标描述符。

    4. 确定指标的种类、值类型和(可选)单位。用户定义的指标并非支持所有的值类型和指标种类。如需详细了解这些字段,请参阅值类型和指标种类

    5. 选择指标的标签 - 其名称、值类型和说明。

  2. 确定针对其写入指标数据的受监控的资源。请从以下列表中选择:

  3. 创建一个 MetricDescriptor 对象,然后将其作为参数传递给对 metricDescriptors.create 方法的调用。

使用与现有指标描述符相同的类型名称调用 metricDescriptors.create 通常会导致错误。但是,如果新 MetricDescriptor 对象的所有字段都与现有描述符的字段完全匹配,则不会出现错误,但不会产生任何效果。

在以下示例中,您将创建一个刻度盘指标。

协议

要创建指标描述符,请使用 metricDescriptors.create 方法。您可以使用方法参考页面上的 API Explorer 微件来执行此方法。如需了解详情,请参阅 API Explorer

以下是 metricDescriptors.create 的示例参数:

  • 名称(网址):projects/[PROJECT_ID]
  • 请求正文:提供一个 MetricDescriptor 对象,如下所示:

    {
      "name": "",
      "description": "Daily sales records from all branch stores.",
      "displayName": "Sales",
      "type": "custom.googleapis.com/stores/sales",
      "metricKind": "GAUGE",
      "valueType": "DOUBLE",
      "unit": "{USD}",
      "labels": [
        {
          "key": "store_id",
          "valueType": "STRING",
          "description": "The ID of the store."
        },
      ],
    }
    

在微件字段中提供这些值,将 [PROJECT_ID 替换为您的项目 ID:
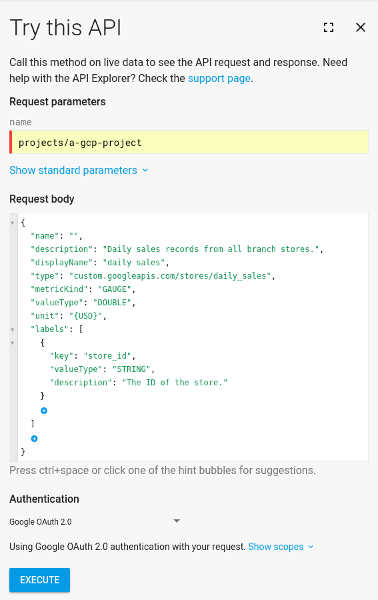
填充了请求正文的“使用此 API ”对话框,用于创建指标描述符。

点击执行按钮以运行该方法。

试试看!

创建新指标时,MetricDescriptor 中的 name 字段会被忽略,可以省略。create 方法将返回已填充 name 字段的新指标描述符,在本示例中,该字段如下所示:

"name": "projects/[PROJECT_ID]/metricDescriptors/custom.googleapis.com/stores/daily_sales"

例如,如果要获取指标的描述符,请使用此名称。

C#

如需向 Monitoring 进行身份验证,请设置应用默认凭据。 如需了解详情,请参阅为本地开发环境设置身份验证

        public static object CreateMetric(string projectId,
            string metricType = "custom.googleapis.com/stores/daily_sales")
        {
            // Create client.
            MetricServiceClient metricServiceClient = MetricServiceClient.Create();

            // Prepare custom metric descriptor.
            MetricDescriptor metricDescriptor = new MetricDescriptor();
            metricDescriptor.DisplayName = "Daily Sales";
            metricDescriptor.Description = "Daily sales records from all branch stores.";
            metricDescriptor.MetricKind = MetricKind.Gauge;
            metricDescriptor.ValueType = MetricDescriptor.Types.ValueType.Double;
            metricDescriptor.Type = metricType;
            metricDescriptor.Unit = "{USD}";
            LabelDescriptor labels = new LabelDescriptor();
            labels.Key = "store_id";
            labels.ValueType = LabelDescriptor.Types.ValueType.String;
            labels.Description = "The ID of the store.";
            metricDescriptor.Labels.Add(labels);
            CreateMetricDescriptorRequest request = new CreateMetricDescriptorRequest
            {
                ProjectName = new ProjectName(projectId),
            };
            request.MetricDescriptor = metricDescriptor;
            // Make the request.
            MetricDescriptor response = metricServiceClient.CreateMetricDescriptor(request);
            Console.WriteLine("Done creating metric descriptor:");
            Console.WriteLine(JObject.Parse($"{response}").ToString());
            return 0;
        }

Go

如需向 Monitoring 进行身份验证,请设置应用默认凭据。 如需了解详情,请参阅为本地开发环境设置身份验证


import (
	"context"
	"fmt"
	"io"

	monitoring "cloud.google.com/go/monitoring/apiv3"
	"cloud.google.com/go/monitoring/apiv3/v2/monitoringpb"
	"google.golang.org/genproto/googleapis/api/label"
	"google.golang.org/genproto/googleapis/api/metric"
	metricpb "google.golang.org/genproto/googleapis/api/metric"
)

// createCustomMetric creates a custom metric specified by the metric type.
func createCustomMetric(w io.Writer, projectID, metricType string) (*metricpb.MetricDescriptor, error) {
	ctx := context.Background()
	c, err := monitoring.NewMetricClient(ctx)
	if err != nil {
		return nil, err
	}
	defer c.Close()
	md := &metric.MetricDescriptor{
		Name: "Custom Metric",
		Type: metricType,
		Labels: []*label.LabelDescriptor{{
			Key:         "environment",
			ValueType:   label.LabelDescriptor_STRING,
			Description: "An arbitrary measurement",
		}},
		MetricKind:  metric.MetricDescriptor_GAUGE,
		ValueType:   metric.MetricDescriptor_INT64,
		Unit:        "s",
		Description: "An arbitrary measurement",
		DisplayName: "Custom Metric",
	}
	req := &monitoringpb.CreateMetricDescriptorRequest{
		Name:             "projects/" + projectID,
		MetricDescriptor: md,
	}
	m, err := c.CreateMetricDescriptor(ctx, req)
	if err != nil {
		return nil, fmt.Errorf("could not create custom metric: %w", err)
	}

	fmt.Fprintf(w, "Created %s\n", m.GetName())
	return m, nil
}

Java

如需向 Monitoring 进行身份验证,请设置应用默认凭据。 如需了解详情,请参阅为本地开发环境设置身份验证

// Your Google Cloud Platform project ID
final String projectId = System.getProperty("projectId");

try (final MetricServiceClient client = MetricServiceClient.create();) {
  ProjectName projectName = ProjectName.of(projectId);

  MetricDescriptor descriptor =
      MetricDescriptor.newBuilder()
          .setType(type)
          .addLabels(
              LabelDescriptor.newBuilder()
                  .setKey("store_id")
                  .setValueType(LabelDescriptor.ValueType.STRING))
          .setDescription("This is a simple example of a custom metric.")
          .setMetricKind(MetricDescriptor.MetricKind.GAUGE)
          .setValueType(MetricDescriptor.ValueType.DOUBLE)
          .build();

  CreateMetricDescriptorRequest request =
      CreateMetricDescriptorRequest.newBuilder()
          .setName(projectName.toString())
          .setMetricDescriptor(descriptor)
          .build();

  descriptor = client.createMetricDescriptor(request);
  System.out.println("Created descriptor " + descriptor.getName());
}

Node.js

如需向 Monitoring 进行身份验证,请设置应用默认凭据。 如需了解详情,请参阅为本地开发环境设置身份验证

// Imports the Google Cloud client library
const monitoring = require('@google-cloud/monitoring');

// Creates a client
const client = new monitoring.MetricServiceClient();

/**
 * TODO(developer): Uncomment and edit the following lines of code.
 */
// const projectId = 'YOUR_PROJECT_ID';
async function createMetricDescriptor() {
  const request = {
    name: client.projectPath(projectId),
    metricDescriptor: {
      description: 'Daily sales records from all branch stores.',
      displayName: 'Daily Sales',
      type: 'custom.googleapis.com/stores/daily_sales',
      metricKind: 'GAUGE',
      valueType: 'DOUBLE',
      unit: '{USD}',
      labels: [
        {
          key: 'store_id',
          valueType: 'STRING',
          description: 'The ID of the store.',
        },
      ],
    },
  };

  // Creates a custom metric descriptor
  const [descriptor] = await client.createMetricDescriptor(request);
  console.log('Created custom Metric:\n');
  console.log(`Name: ${descriptor.displayName}`);
  console.log(`Description: ${descriptor.description}`);
  console.log(`Type: ${descriptor.type}`);
  console.log(`Kind: ${descriptor.metricKind}`);
  console.log(`Value Type: ${descriptor.valueType}`);
  console.log(`Unit: ${descriptor.unit}`);
  console.log('Labels:');
  descriptor.labels.forEach(label => {
    console.log(`  ${label.key} (${label.valueType}) - ${label.description}`);
  });
}
createMetricDescriptor();

PHP

如需向 Monitoring 进行身份验证,请设置应用默认凭据。 如需了解详情,请参阅为本地开发环境设置身份验证

use Google\Api\LabelDescriptor;
use Google\Api\MetricDescriptor;
use Google\Cloud\Monitoring\V3\Client\MetricServiceClient;
use Google\Cloud\Monitoring\V3\CreateMetricDescriptorRequest;

/**
 * Create a new metric in Stackdriver Monitoring.
 * Example:
 * ```
 * create_metric($projectId);
 * ```
 *
 * @param string $projectId Your project ID
 */
function create_metric($projectId)
{
    $metrics = new MetricServiceClient([
        'projectId' => $projectId,
    ]);

    $projectName = 'projects/' . $projectId;

    $descriptor = new MetricDescriptor();
    $descriptor->setDescription('Daily sales records from all branch stores.');
    $descriptor->setDisplayName('Daily Sales');
    $descriptor->setType('custom.googleapis.com/stores/daily_sales');
    $descriptor->setMetricKind(MetricDescriptor\MetricKind::GAUGE);
    $descriptor->setValueType(MetricDescriptor\ValueType::DOUBLE);
    $descriptor->setUnit('{USD}');
    $label = new LabelDescriptor();
    $label->setKey('store_id');
    $label->setValueType(LabelDescriptor\ValueType::STRING);
    $label->setDescription('The ID of the store.');
    $labels = [$label];
    $descriptor->setLabels($labels);
    $createMetricDescriptorRequest = (new CreateMetricDescriptorRequest())
        ->setName($projectName)
        ->setMetricDescriptor($descriptor);

    $descriptor = $metrics->createMetricDescriptor($createMetricDescriptorRequest);
    printf('Created a metric: ' . $descriptor->getName() . PHP_EOL);
}

Python

如需向 Monitoring 进行身份验证,请设置应用默认凭据。 如需了解详情,请参阅为本地开发环境设置身份验证

from google.api import label_pb2 as ga_label
from google.api import metric_pb2 as ga_metric
from google.cloud import monitoring_v3

client = monitoring_v3.MetricServiceClient()
project_name = f"projects/{project_id}"
descriptor = ga_metric.MetricDescriptor()
descriptor.type = "custom.googleapis.com/my_metric" + str(uuid.uuid4())
descriptor.metric_kind = ga_metric.MetricDescriptor.MetricKind.GAUGE
descriptor.value_type = ga_metric.MetricDescriptor.ValueType.DOUBLE
descriptor.description = "This is a simple example of a custom metric."

labels = ga_label.LabelDescriptor()
labels.key = "TestLabel"
labels.value_type = ga_label.LabelDescriptor.ValueType.STRING
labels.description = "This is a test label"
descriptor.labels.append(labels)

descriptor = client.create_metric_descriptor(
    name=project_name, metric_descriptor=descriptor
)
print("Created {}.".format(descriptor.name))

Ruby

如需向 Monitoring 进行身份验证,请设置应用默认凭据。 如需了解详情,请参阅为本地开发环境设置身份验证

# Your Google Cloud Platform project ID
# project_id = "YOUR_PROJECT_ID"

# Example metric type
# metric_type = "custom.googleapis.com/my_metric"

client = Google::Cloud::Monitoring.metric_service
project_name = client.project_path project: project_id

descriptor = Google::Api::MetricDescriptor.new(
  type:        metric_type,
  metric_kind: Google::Api::MetricDescriptor::MetricKind::GAUGE,
  value_type:  Google::Api::MetricDescriptor::ValueType::DOUBLE,
  description: "This is a simple example of a custom metric."
)

result = client.create_metric_descriptor name:              project_name,
                                         metric_descriptor: descriptor
p "Created #{result.name}"
p result

如果遇到困难,请参阅 API 调用问题排查

后续步骤:请参阅编写用户定义的指标

写入用户定义的指标

对于用户定义的指标,您只能将数据写入指标类型。要写入数据,请使用 timeSeries.create 方法。如果时序已存在,则此方法会将新数据点附加到现有时序。如果时序不存在,则此方法将创建时序并附加数据。

您可以通过将 TimeSeries 对象列表传递到 timeSeries.create 来写入数据点。列表大小上限为 200,列表中的每个对象都必须指定不同的时序:

  • metricresource 字段的值用于标识特定 TimeSeries 对象。这些字段表示数据的指标类型以及从中收集数据的受监控资源。
  • 省略字段 metricKindvalueType;写入数据点时,系统会忽略这两个字段。
  • 每个 TimeSeries 对象只能包含一个 Point 个对象:

    • 该点的值和时段必须与指标类型的定义一致。如需了解不同指标种类的时间间隔,请参阅 TimeInterval
    • 该点的时段必须晚于时序中已有的点。
    • 时段的结束时间不得早于 25 小时之前,也不得晚于 5 分钟后。
  • 如需将多个数据点写入相同的时序,请对每个数据点单独调用 timeSeries.create 方法。请勿将数据写入速度超过每 5 秒 1 个数据点的单个时序。将数据点添加到不同的时序时,没有速率限制。

协议

要写入数据,请使用 timeSeries.create 方法。您可以使用方法参考页面上的 API Explorer 微件来执行此方法。如需了解详情,请参阅 API Explorer

如需向在手动创建指标描述符中创建的 stores/daily_sales 指标写入一个点,请执行以下操作:

  1. 转到 timeSeries.create 的参考页面
  2. 将以下参数提供给 API Explorer 微件。
  3. 点击执行按钮。

使用以下示例参数:

  • 名称projects/[PROJECT_ID]
  • 请求正文:包含 TimeSeries 对象列表。在以下示例中,列表中只有一个时序。

    {
     "timeSeries": [
      {
       "metric": {
        "type": "custom.googleapis.com/my_metric",
        "labels": {
         "my_label": "my_value"
        }
       },
       "resource": {
        "type": "gce_instance",
        "labels": {
         "project_id": "[PROJECT_ID]",
         "instance_id": "1234567890123456789",
         "zone": "us-central1-f"
        }
       },
       "points": [
        {
         "interval": {
          "endTime": "2018-06-01T10:00:00-04:00"
         },
         "value": {
          "doubleValue": 123.45
         }
        }
       ]
      }
     ]
    }
    

试试看!

C#

如需向 Monitoring 进行身份验证,请设置应用默认凭据。 如需了解详情,请参阅为本地开发环境设置身份验证

        public static object WriteTimeSeriesData(string projectId)
        {
            // Create client.
            MetricServiceClient metricServiceClient = MetricServiceClient.Create();
            // Initialize request argument(s).
            ProjectName name = new ProjectName(projectId);
            // Prepare a data point.
            Point dataPoint = new Point();
            TypedValue salesTotal = new TypedValue();
            salesTotal.DoubleValue = 123.45;
            dataPoint.Value = salesTotal;
            Timestamp timeStamp = new Timestamp();
            timeStamp.Seconds = (long)(DateTime.UtcNow - s_unixEpoch).TotalSeconds;
            TimeInterval interval = new TimeInterval();
            interval.EndTime = timeStamp;
            dataPoint.Interval = interval;

            // Prepare custom metric.
            Metric metric = new Metric();
            metric.Type = "custom.googleapis.com/stores/daily_sales";
            metric.Labels.Add("store_id", "Pittsburgh");

            // Prepare monitored resource.
            MonitoredResource resource = new MonitoredResource();
            resource.Type = "global";
            resource.Labels.Add("project_id", projectId);

            // Create a new time series using inputs.
            TimeSeries timeSeriesData = new TimeSeries();
            timeSeriesData.Metric = metric;
            timeSeriesData.Resource = resource;
            timeSeriesData.Points.Add(dataPoint);

            // Add newly created time series to list of time series to be written.
            IEnumerable<TimeSeries> timeSeries = new List<TimeSeries> { timeSeriesData };
            // Write time series data.
            metricServiceClient.CreateTimeSeries(name, timeSeries);
            Console.WriteLine("Done writing time series data:");
            Console.WriteLine(JObject.Parse($"{timeSeriesData}").ToString());
            return 0;
        }

Go

如需向 Monitoring 进行身份验证,请设置应用默认凭据。 如需了解详情,请参阅为本地开发环境设置身份验证


// writeTimeSeriesValue writes a value for the custom metric created
func writeTimeSeriesValue(projectID, metricType string) error {
	ctx := context.Background()
	c, err := monitoring.NewMetricClient(ctx)
	if err != nil {
		return err
	}
	defer c.Close()
	now := &timestamp.Timestamp{
		Seconds: time.Now().Unix(),
	}
	req := &monitoringpb.CreateTimeSeriesRequest{
		Name: "projects/" + projectID,
		TimeSeries: []*monitoringpb.TimeSeries{{
			Metric: &metricpb.Metric{
				Type: metricType,
				Labels: map[string]string{
					"environment": "STAGING",
				},
			},
			Resource: &monitoredres.MonitoredResource{
				Type: "gce_instance",
				Labels: map[string]string{
					"instance_id": "test-instance",
					"zone":        "us-central1-f",
				},
			},
			Points: []*monitoringpb.Point{{
				Interval: &monitoringpb.TimeInterval{
					StartTime: now,
					EndTime:   now,
				},
				Value: &monitoringpb.TypedValue{
					Value: &monitoringpb.TypedValue_Int64Value{
						Int64Value: rand.Int63n(10),
					},
				},
			}},
		}},
	}
	log.Printf("writeTimeseriesRequest: %+v\n", req)

	err = c.CreateTimeSeries(ctx, req)
	if err != nil {
		return fmt.Errorf("could not write time series value, %w ", err)
	}
	return nil
}

Java

如需向 Monitoring 进行身份验证,请设置应用默认凭据。 如需了解详情,请参阅为本地开发环境设置身份验证

String projectId = System.getProperty("projectId");

// Prepares an individual data point
TimeInterval interval =
    TimeInterval.newBuilder()
        .setEndTime(Timestamps.fromMillis(System.currentTimeMillis()))
        .build();
TypedValue value = TypedValue.newBuilder().setDoubleValue(123.45).build();
Point point = Point.newBuilder().setInterval(interval).setValue(value).build();

List<Point> pointList = new ArrayList<>();
pointList.add(point);

ProjectName name = ProjectName.of(projectId);

// Prepares the metric descriptor
Map<String, String> metricLabels = new HashMap<>();
Metric metric =
    Metric.newBuilder()
        .setType("custom.googleapis.com/my_metric")
        .putAllLabels(metricLabels)
        .build();

// Prepares the monitored resource descriptor
Map<String, String> resourceLabels = new HashMap<>();
resourceLabels.put("instance_id", "1234567890123456789");
resourceLabels.put("zone", "us-central1-f");

MonitoredResource resource =
    MonitoredResource.newBuilder().setType("gce_instance").putAllLabels(resourceLabels).build();

// Prepares the time series request
TimeSeries timeSeries =
    TimeSeries.newBuilder()
        .setMetric(metric)
        .setResource(resource)
        .addAllPoints(pointList)
        .build();

List<TimeSeries> timeSeriesList = new ArrayList<>();
timeSeriesList.add(timeSeries);

CreateTimeSeriesRequest request =
    CreateTimeSeriesRequest.newBuilder()
        .setName(name.toString())
        .addAllTimeSeries(timeSeriesList)
        .build();

// Writes time series data
try (final MetricServiceClient client = MetricServiceClient.create();) {
  client.createTimeSeries(request);
}
System.out.println("Done writing time series value.");

Node.js

如需向 Monitoring 进行身份验证,请设置应用默认凭据。 如需了解详情,请参阅为本地开发环境设置身份验证

// Imports the Google Cloud client library
const monitoring = require('@google-cloud/monitoring');

// Creates a client
const client = new monitoring.MetricServiceClient();

async function writeTimeSeriesData() {
  /**
   * TODO(developer): Uncomment and edit the following lines of code.
   */
  // const projectId = 'YOUR_PROJECT_ID';

  const dataPoint = {
    interval: {
      endTime: {
        seconds: Date.now() / 1000,
      },
    },
    value: {
      doubleValue: 123.45,
    },
  };

  const timeSeriesData = {
    metric: {
      type: 'custom.googleapis.com/stores/daily_sales',
      labels: {
        store_id: 'Pittsburgh',
      },
    },
    resource: {
      type: 'global',
      labels: {
        project_id: projectId,
      },
    },
    points: [dataPoint],
  };

  const request = {
    name: client.projectPath(projectId),
    timeSeries: [timeSeriesData],
  };

  // Writes time series data
  const result = await client.createTimeSeries(request);
  console.log('Done writing time series data.', result);
}
writeTimeSeriesData();

PHP

如需向 Monitoring 进行身份验证,请设置应用默认凭据。 如需了解详情,请参阅为本地开发环境设置身份验证

use Google\Api\Metric;
use Google\Api\MonitoredResource;
use Google\Cloud\Monitoring\V3\Client\MetricServiceClient;
use Google\Cloud\Monitoring\V3\CreateTimeSeriesRequest;
use Google\Cloud\Monitoring\V3\Point;
use Google\Cloud\Monitoring\V3\TimeInterval;
use Google\Cloud\Monitoring\V3\TimeSeries;
use Google\Cloud\Monitoring\V3\TypedValue;
use Google\Protobuf\Timestamp;

/**
 * Example:
 * ```
 * write_timeseries($projectId);
 * ```
 *
 * @param string $projectId Your project ID
 */
function write_timeseries($projectId)
{
    $metrics = new MetricServiceClient([
        'projectId' => $projectId,
    ]);

    $projectName = 'projects/' . $projectId;

    $endTime = new Timestamp();
    $endTime->setSeconds(time());
    $interval = new TimeInterval();
    $interval->setEndTime($endTime);

    $value = new TypedValue();
    $value->setDoubleValue(123.45);

    $point = new Point();
    $point->setValue($value);
    $point->setInterval($interval);
    $points = [$point];

    $metric = new Metric();
    $metric->setType('custom.googleapis.com/stores/daily_sales');
    $labels = ['store_id' => 'Pittsburg'];
    $metric->setLabels($labels);

    $resource = new MonitoredResource();
    $resource->setType('global');
    $labels = ['project_id' => $projectId];
    $resource->setLabels($labels);

    $timeSeries = new TimeSeries();
    $timeSeries->setMetric($metric);
    $timeSeries->setResource($resource);
    $timeSeries->setPoints($points);
    $createTimeSeriesRequest = (new CreateTimeSeriesRequest())
        ->setName($projectName)
        ->setTimeSeries([$timeSeries]);

    $metrics->createTimeSeries($createTimeSeriesRequest);

    printf('Done writing time series data.' . PHP_EOL);
}

Python

如需向 Monitoring 进行身份验证,请设置应用默认凭据。 如需了解详情,请参阅为本地开发环境设置身份验证

from google.cloud import monitoring_v3

client = monitoring_v3.MetricServiceClient()
project_name = f"projects/{project_id}"

series = monitoring_v3.TimeSeries()
series.metric.type = "custom.googleapis.com/my_metric" + str(uuid.uuid4())
series.resource.type = "gce_instance"
series.resource.labels["instance_id"] = "1234567890123456789"
series.resource.labels["zone"] = "us-central1-c"
series.metric.labels["TestLabel"] = "My Label Data"
now = time.time()
seconds = int(now)
nanos = int((now - seconds) * 10**9)
interval = monitoring_v3.TimeInterval(
    {"end_time": {"seconds": seconds, "nanos": nanos}}
)
point = monitoring_v3.Point({"interval": interval, "value": {"double_value": 3.14}})
series.points = [point]
client.create_time_series(name=project_name, time_series=[series])

Ruby

如需向 Monitoring 进行身份验证,请设置应用默认凭据。 如需了解详情,请参阅为本地开发环境设置身份验证

# Your Google Cloud Platform project ID
# project_id = "YOUR_PROJECT_ID"

# Example metric type
# metric_type = "custom.googleapis.com/my_metric"

client = Google::Cloud::Monitoring.metric_service
project_name = client.project_path project: project_id

series = Google::Cloud::Monitoring::V3::TimeSeries.new
series.metric = Google::Api::Metric.new type: metric_type

resource = Google::Api::MonitoredResource.new type: "global"
resource.labels["project_id"] = project_id
series.resource = resource

point = Google::Cloud::Monitoring::V3::Point.new
point.value = Google::Cloud::Monitoring::V3::TypedValue.new double_value: 3.14
now = Time.now
end_time = Google::Protobuf::Timestamp.new seconds: now.to_i, nanos: now.nsec
point.interval = Google::Cloud::Monitoring::V3::TimeInterval.new end_time: end_time
series.points << point

client.create_time_series name: project_name, time_series: [series]
p "Time series created."

如果遇到困难,请参阅 API 调用问题排查

删除用户定义的指标

如需删除用户定义的指标,请删除其指标描述符。您无法删除存储在 Google Cloud 项目中的时间序列数据;但是,删除指标描述符会导致数据无法访问。数据会根据数据保留政策过期并被系统删除。

您无法删除内置指标的指标描述符。

如需删除指标描述符,请调用 metricDescriptors.delete 方法。

协议

要删除指标描述符,请使用 metricDescriptors.delete 方法。您可以使用方法参考页面上的 API Explorer 微件来执行此方法。如需了解详情,请参阅 API Explorer

如需删除在手动创建指标描述符中创建的 stores/daily_sales 指标,请执行以下操作:

  1. 转到 metricDescriptors.delete 的参考页面
  2. 将指标描述符的名称提供给 API Explorer 微件:

    名称projects/[PROJECT_ID]/metricDescriptors/custom.googleapis.com/stores/daily_sales

  3. 点击执行按钮。

试试看!

C#

如需向 Monitoring 进行身份验证,请设置应用默认凭据。 如需了解详情,请参阅为本地开发环境设置身份验证

public static object DeleteMetric(string projectId, string metricType)
{
    // Create client.
    MetricServiceClient metricServiceClient = MetricServiceClient.Create();
    // Initialize request argument(s).
    MetricDescriptorName name = new MetricDescriptorName(projectId, metricType);
    // Make the request.
    metricServiceClient.DeleteMetricDescriptor(name);
    Console.WriteLine($"Done deleting metric descriptor: {name}");
    return 0;
}

Go

如需向 Monitoring 进行身份验证,请设置应用默认凭据。 如需了解详情,请参阅为本地开发环境设置身份验证


import (
	"context"
	"fmt"
	"io"

	monitoring "cloud.google.com/go/monitoring/apiv3"
	"cloud.google.com/go/monitoring/apiv3/v2/monitoringpb"
)

// deleteMetric deletes the given metric. name should be of the form
// "projects/PROJECT_ID/metricDescriptors/METRIC_TYPE".
func deleteMetric(w io.Writer, name string) error {
	ctx := context.Background()
	c, err := monitoring.NewMetricClient(ctx)
	if err != nil {
		return err
	}
	defer c.Close()
	req := &monitoringpb.DeleteMetricDescriptorRequest{
		Name: name,
	}

	if err := c.DeleteMetricDescriptor(ctx, req); err != nil {
		return fmt.Errorf("could not delete metric: %w", err)
	}
	fmt.Fprintf(w, "Deleted metric: %q\n", name)
	return nil
}

Java

如需向 Monitoring 进行身份验证,请设置应用默认凭据。 如需了解详情,请参阅为本地开发环境设置身份验证

final String projectId = System.getProperty("projectId");
try (final MetricServiceClient client = MetricServiceClient.create();) {
  MetricDescriptorName metricName = MetricDescriptorName.of(projectId, type);
  client.deleteMetricDescriptor(metricName);
  System.out.println("Deleted descriptor " + type);
}

Node.js

如需向 Monitoring 进行身份验证,请设置应用默认凭据。 如需了解详情,请参阅为本地开发环境设置身份验证

// Imports the Google Cloud client library
const monitoring = require('@google-cloud/monitoring');

// Creates a client
const client = new monitoring.MetricServiceClient();

async function deleteMetricDescriptor() {
  /**
   * TODO(developer): Uncomment and edit the following lines of code.
   */
  // const projectId = 'YOUR_PROJECT_ID';
  // const metricId = 'custom.googleapis.com/stores/daily_sales';

  const request = {
    name: client.projectMetricDescriptorPath(projectId, metricId),
  };

  // Deletes a metric descriptor
  const [result] = await client.deleteMetricDescriptor(request);
  console.log(`Deleted ${metricId}`, result);
}
deleteMetricDescriptor();

PHP

如需向 Monitoring 进行身份验证,请设置应用默认凭据。 如需了解详情,请参阅为本地开发环境设置身份验证

use Google\Cloud\Monitoring\V3\Client\MetricServiceClient;
use Google\Cloud\Monitoring\V3\DeleteMetricDescriptorRequest;

/**
 * Example:
 * ```
 * delete_metric($projectId, $databaseId);
 * ```
 *
 * @param string $projectId Your project ID
 * @param string $metricId  The ID of the Metric Descriptor to delete
 */
function delete_metric($projectId, $metricId)
{
    $metrics = new MetricServiceClient([
        'projectId' => $projectId,
    ]);

    $metricPath = $metrics->metricDescriptorName($projectId, $metricId);
    $deleteMetricDescriptorRequest = (new DeleteMetricDescriptorRequest())
        ->setName($metricPath);
    $metrics->deleteMetricDescriptor($deleteMetricDescriptorRequest);

    printf('Deleted a metric: ' . $metricPath . PHP_EOL);
}

Python

如需向 Monitoring 进行身份验证,请设置应用默认凭据。 如需了解详情,请参阅为本地开发环境设置身份验证

from google.cloud import monitoring_v3

client = monitoring_v3.MetricServiceClient()
client.delete_metric_descriptor(name=descriptor_name)
print("Deleted metric descriptor {}.".format(descriptor_name))

Ruby

如需向 Monitoring 进行身份验证,请设置应用默认凭据。 如需了解详情,请参阅为本地开发环境设置身份验证

# Your Google Cloud Platform project ID
# project_id = "YOUR_PROJECT_ID"

# Example metric type
# metric_type = "custom.googleapis.com/my_metric"

client = Google::Cloud::Monitoring.metric_service
metric_name = client.metric_descriptor_path project:           project_id,
                                            metric_descriptor: metric_type

client.delete_metric_descriptor name: metric_name
p "Deleted metric descriptor #{metric_name}."

如果遇到困难,请参阅 API 调用问题排查

修改用户定义的指标

如需修改用户定义的指标,您必须更新定义该指标的 MetricDescriptor 对象。唯一支持的修改操作是添加标签。

如需向用户定义的现有指标添加标签,请使用 timeSeries.create 方法,并将新标签与时间序列数据一起添加。如果您尝试写入的标签有效且标签总数小于 30,则标签会添加到指标描述符中。

然后写入时序数据,就好像标签从一开始就存在一样。

如果您要执行添加新标签以外的操作,必须删除并重新创建指标描述符。在这种情况下,您将丢失先前为旧指标描述符收集的所有时序数据。如需了解详情,请参阅删除用户定义的指标

您无法重命名指标。

后续步骤