このガイドでは、Webhook を使用して、エージェントをより動的にする方法について説明します。Cloud Functions は、そのシンプルさのために Webhook をホストするために使用されますが、Webhook サービスはその他のさまざまな方法でホストできます。この例では Go プログラミング言語を使用していますが、Cloud Functions でサポートされている任意の言語を使用できます。このガイドのコードを編集する必要はありません。
サンプルの Webhook コードは次のことを行います。
- Webhook リクエストからパラメータ値を読み取ります。
- Webhook レスポンスにパラメータ値を書き込みます。
- Webhook レスポンスでテキスト レスポンスを提供します。
準備
Webhook の使用を予定していない場合は、このクイックスタートをスキップできます。
このガイドを読む前に、次の手順を行ってください。
- フローの基本をご覧ください。
- 手順に沿って設定してください。
- フローを使用してエージェントを作成するクイックスタート ガイドの手順で操作します。同じエージェントで次の手順を続行します。現在そのエージェントがない場合は、エージェントをダウンロードして復元できます。
Cloud Functions の関数を作成する
Cloud Functions は Google Cloud Console で作成できます(ドキュメントに移動して、コンソールを開きます)。このガイドの関数を作成するには:
- 会話エージェント(Dialogflow CX)エージェントと関数の両方が同じプロジェクト内にあることが重要です。これは、会話エージェント(Dialogflow CX)が関数に安全にアクセスするための最も簡単な方法です。プロジェクトを選択するには、プロジェクト セレクタに移動します。
- Cloud Functions の概要ページに移動します。
- [関数を作成] をクリックして、次のフィールドを設定します。
- 環境: 第 1 世代
- 関数名: shirts-agent-webhook
- リージョン: エージェントにリージョンを指定した場合は、同じリージョンを使用します。
- HTTP トリガータイプ: HTTP
- URL: ここのコピーボタンをクリックして、値を保存します。Webhook を構成するときに、この URL が必要になります。
- 認証: 認証が必要です
- HTTPS が必須: チェックボックスをオンにする
- [保存] をクリックします。
- [次へ] をクリックします(特別なランタイム、ビルド、接続、セキュリティ設定は必要ありません)。
- 次のフィールドを設定します。
- ランタイム: 最新の Go ランタイムを選択します。
- ソースコード: インライン エディタ
- エントリ ポイント: HandleWebhookRequest
コードを次のように置き換えます。
// Package cxwh contains an example Dialogflow CX webhook
package cxwh

import (
	"encoding/json"
	"fmt"
	"log"
	"net/http"
)

type fulfillmentInfo struct {
	Tag string `json:"tag"`
}

type sessionInfo struct {
	Session    string                 `json:"session"`
	Parameters map[string]interface{} `json:"parameters"`
}

type text struct {
	Text []string `json:"text"`
}

type responseMessage struct {
	Text text `json:"text"`
}

type fulfillmentResponse struct {
	Messages []responseMessage `json:"messages"`
}

// webhookRequest is used to unmarshal a WebhookRequest JSON object. Note that
// not all members need to be defined--just those that you need to process.
// As an alternative, you could use the types provided by the Dialogflow protocol buffers:
// https://pkg.go.dev/google.golang.org/genproto/googleapis/cloud/dialogflow/cx/v3#WebhookRequest
type webhookRequest struct {
	FulfillmentInfo fulfillmentInfo `json:"fulfillmentInfo"`
	SessionInfo     sessionInfo     `json:"sessionInfo"`
}

// webhookResponse is used to marshal a WebhookResponse JSON object. Note that
// not all members need to be defined--just those that you need to process.
// As an alternative, you could use the types provided by the Dialogflow protocol buffers:
// https://pkg.go.dev/google.golang.org/genproto/googleapis/cloud/dialogflow/cx/v3#WebhookResponse
type webhookResponse struct {
	FulfillmentResponse fulfillmentResponse `json:"fulfillmentResponse"`
	SessionInfo         sessionInfo         `json:"sessionInfo"`
}

// confirm handles webhook calls using the "confirm" tag.
func confirm(request webhookRequest) (webhookResponse, error) {
	// Create a text message that utilizes the "size" and "color"
	// parameters provided by the end-user.
	// This text message is used in the response below.
	t := fmt.Sprintf("You can pick up your order for a %s %s shirt in 5 days.",
		request.SessionInfo.Parameters["size"],
		request.SessionInfo.Parameters["color"])

	// Create session parameters that are populated in the response.
	// The "cancel-period" parameter is referenced by the agent.
	// This example hard codes the value 2, but a real system
	// might look up this value in a database.
	p := map[string]interface{}{"cancel-period": "2"}

	// Build and return the response.
	response := webhookResponse{
		FulfillmentResponse: fulfillmentResponse{
			Messages: []responseMessage{
				{
					Text: text{
						Text: []string{t},
					},
				},
			},
		},
		SessionInfo: sessionInfo{
			Parameters: p,
		},
	}
	return response, nil
}

// handleError handles internal errors.
func handleError(w http.ResponseWriter, err error) {
	w.WriteHeader(http.StatusInternalServerError)
	fmt.Fprintf(w, "ERROR: %v", err)
}

// HandleWebhookRequest handles WebhookRequest and sends the WebhookResponse.
func HandleWebhookRequest(w http.ResponseWriter, r *http.Request) {
	var request webhookRequest
	var response webhookResponse
	var err error

	// Read input JSON
	if err = json.NewDecoder(r.Body).Decode(&request); err != nil {
		handleError(w, err)
		return
	}
	log.Printf("Request: %+v", request)

	// Get the tag from the request, and call the corresponding
	// function that handles that tag.
	// This example only has one possible tag,
	// but most agents would have many.
	switch tag := request.FulfillmentInfo.Tag; tag {
	case "confirm":
		response, err = confirm(request)
	default:
		err = fmt.Errorf("Unknown tag: %s", tag)
	}
	if err != nil {
		handleError(w, err)
		return
	}
	log.Printf("Response: %+v", response)

	// Send response
	if err = json.NewEncoder(w).Encode(&response); err != nil {
		handleError(w, err)
		return
	}
}
[デプロイ] をクリックします。
ステータス インジケーターが関数が正常にデプロイされたことを示すまで待ちます。待機中に、デプロイしたコードを確認します。コードコメントには重要な詳細が記述されています。
Webhook を作成する
Webhook が Cloud Functions の関数として存在するようになったので、この Webhook をエージェントに関連付けます。エージェントの Webhook を作成するには:
- Dialogflow CX コンソールを開きます。
- ご自身の Google Cloud プロジェクトを選択します。
- エージェントを選択します。
- [Manage] タブを選択します。
- [Webhooks] をクリックします。
- [作成] をクリックします。
- 次のフィールドに値を入力します。
- 表示名: shirts-agent-webhook
- Webhook URL: 関数の作成時に保存した Webhook URL を指定します。
- サブタイプ: 標準。
- 他のすべてのフィールドはデフォルト値を使用します。
- [保存] をクリックします。
Webhook を使用する
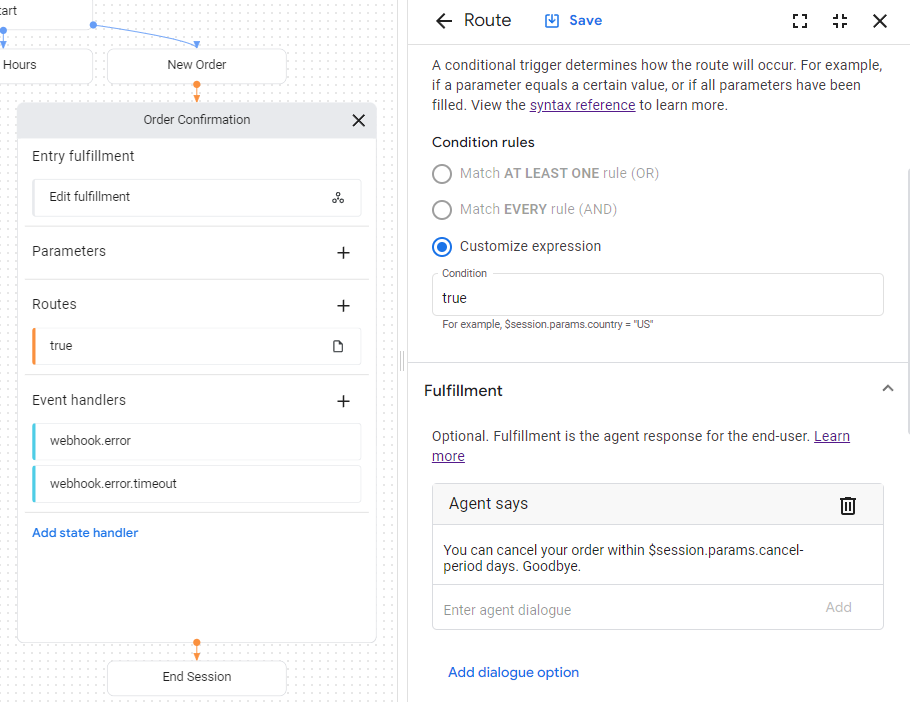
これでエージェントで Webhook を使用できるようになったので、フルフィルメントで Webhook を使用します。[注文確認] ページには、エントリのフルフィルメントが表示されます。現時点で、ここには静的テキスト レスポンスが含まれています。Webhook を使用するようにフルフィルメントを更新するには:
- [ビルド] タブを選択します。
- [注文確認] ページをクリックして、エージェント ビルダー グラフでページを展開します。
- このページの [Entry Fulfillment] フィールドをクリックして、フルフィルメント パネルを開きます。
- [Agent said] 見出しにある既存のテキスト レスポンスを削除します。テキストにカーソルを合わせると、削除 delete ボタンが表示されます。
- [Webhook を有効にする] をクリックします。
- [Webhook] プルダウン メニューから
shirts-agent-webhookオプションを選択します。 - [タグ] フィールドに「
confirm」と入力します。 - [保存] をクリックします。
- フルフィルメント パネルを閉じます。

デプロイされた Webhook コードは、cancel-period という名前のパラメータを作成するレスポンスを送信します。同じ [注文確認] ページの最終的なエージェント レスポンスで、このパラメータを参照するようにエージェントを更新します。
true条件とともに表示される条件ルートをクリックして、ルートパネルを開きます。- ルートパネルの [Fulfillment] セクションまで下にスクロールし、[Agent said] という見出しの下に次のテキスト レスポンスを追加します。
You can cancel your order within $session.params.cancel-period days. Goodbye. - [保存] をクリックします。
- ルートパネルを閉じます。
シミュレータでエージェントをテストする
エージェントと Webhook は、シミュレータでテストできます。
- [エージェントをテストする] をクリックします。
- 「
I want to buy a large red shirt」と入力して Enter キーを押します。
サイズと色の両方を指定しているため、シャツの注文の作成に必要なすべてのものをエージェントに渡したことになり、エージェントは直接 [注文確認] ページに移動します。
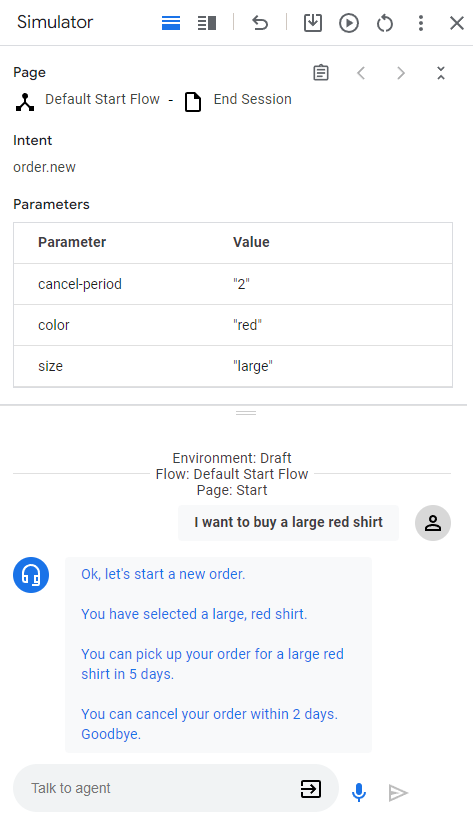
エージェントのレスポンスは次のとおりです。
| レスポンス | 説明 |
|---|---|
| 新しい注文を開始しましょう。 | [新しい注文] ページがアクティブになったときに、エントリのフルフィルメントが呼び出されました。このフルフィルメントから応答がトリガーされました。 |
| ラージサイズの赤いシャツを選択しました。 | [新しい注文] ページですべてのフォーム パラメータを指定すると、フォームの完了をチェックする条件ルートが呼び出されます。このルートのフルフィルメントからレスポンスがトリガーされました。このルートは [注文確認] ページにも移行されます。 |
| ご注文いただいたラージサイズの赤いシャツは、5 日以内にお受け取りいただけます。 | [注文確認] ページのエントリ フルフィルメントが Webhook を呼び出します。Webhook コードの confirm 関数をご覧ください。この関数がこのテキスト レスポンスを作成し、Webhook リクエストで指定されたパラメータを使用します。 |
| 2 日以内であれば注文をキャンセルできます。よろしくお願いいたします。 | [注文確認] ページには、常に true になる条件を含む条件ルートがあります。このレスポンスは、そのルートのフルフィルメントによってトリガーされます。レスポンスでは、Webhook レスポンスで Webhook によって設定されたパラメータが使用されます。 |