Connect to a VPC network
We recommend using Direct VPC egress to send traffic to a VPC network—with no connector required.
However, if Direct VPC egress isn't an option for you, you can configure a Serverless VPC Access connector instead. This page shows you how to connect a Cloud Run service or job to your VPC network with a connector, allowing egress (outbound) traffic from Cloud Run to Compute Engine VM instances, Memorystore instances, and any other resources with an internal IP address.
Before you begin
If you don't already have a VPC network in your project, create one.
If you use Shared VPC, see the documentation that specifically covers configuration of Serverless VPC Access for your product.
- Cloud Run: Connecting to a Shared VPC network
- Cloud Run functions: Connecting to a Shared VPC network
- App Engine: Connecting to a Shared VPC network
If you have an organizational policy constraint that prevents the use of Cloud Deployment Manager, you won't be able to create or delete Serverless VPC Access connectors. Creating or deleting a connector requires Deployment Manager functionality.
If you have a trusted image policy set up for your project, make sure to allow the
serverless-vpc-access-imagesproject in theconstraints/compute.trustedimageProjectsorganization policy.Connector subnet requirements
Each connector requires its own dedicated,
PRIVATE-purpose subnet with a/28primary IPv4 address range. This subnet cannot be used by other resources, such as VMs, Private Service Connect, or load balancers. After creating the connector, the subnet cannot be expanded. It must stay as a/28.To create a connector in a service project that uses a Shared VPC network in a host project, a network administrator for the Shared VPC network must manually create the connector's subnet before you can create the connector.
To determine if an existing, manually created subnet can be used by a connector, describe the subnet:
gcloud compute networks subnets describe SUBNET --region=REGION
Replace SUBNET with the subnet's name and REGION with the region that contains the subnet.
In the output, verify the following:
- The subnet is a regular subnet. In the Google Cloud CLI, this means that
the value for purpose is
PRIVATE. - The subnet's primary IPv4 address range,
ipCidrRange, is a/28.
- The subnet is a regular subnet. In the Google Cloud CLI, this means that
the value for purpose is
If you need to create a Serverless VPC Access connector in the same project that contains the VPC network used by the connector, you can either manually create the connector's subnet before creating the connector, or Google Cloud can create the subnet for the connector automatically.
When Google Cloud creates a subnet for a connector, note the following:
Automatically created subnets for connectors aren't visible when you list subnets, regardless of whether you use the Google Cloud console, the Google Cloud CLI, or the Compute Engine API.
Automatically created subnets for connectors cannot be described.
Automatically created subnets are included in the list of subnets that is presented when you describe a VPC network.
For more information about subnets, including how to list existing ones to determine which IP address ranges are already used, see Work with subnets.
Limitations
IPv6 traffic is not supported.
Create a connector
To send requests to your VPC network and receive the corresponding responses without using the public internet, you can use a Serverless VPC Access connector.
If your connector is located in the same project as its VPC network, you can either create a connector using an existing subnet or create a connector and a new subnet.
If your connector is located in a service project and uses a Shared VPC network, the connector and its associated VPC network are in different projects. When a connector and its VPC network are in different projects, a Shared VPC network administrator must create the connector's subnet in the Shared VPC network before you can create the connector, and you must create the connector using an existing subnet.
To learn more about subnet requirements, see connector subnet requirements.
To learn about connector throughput, including machine type and scaling, see Throughput and scaling.
You can create a connector by using the Google Cloud console, Google Cloud CLI, or Terraform.
Console
Go to the Serverless VPC Access overview page.
Click Create connector.
In the Name field, enter a name for your connector, matching Compute Engine naming conventions, with the additional requirements that the name must be less than 21 characters long, and that hyphens (-) count as two characters.
In the Region field, select a region for your connector. This must match the region of your serverless service.
If your service or job is in the region
us-centraloreurope-west, useus-central1oreurope-west1.In the Network field, select the VPC network to attach your connector to.
In the Subnet field, select one of the following options:
Create a connector using an existing subnet: Select the existing subnet in the Subnet field.
Create a connector and a new subnet: Select Custom IP range in the Subnet field. Then, enter the first address in an unused
/28CIDR (for example10.8.0.0/28) to use as the primary IPv4 address range of a new subnet that Google Cloud creates in the connector's VPC network. Ensure that the IP range does not conflict with any existing routes in the connector's VPC network. The name of the new subnet begins with the "aet-" prefix.
(Optional) To set scaling options for additional control over the connector, click Show Scaling Settings to display the scaling form.
- Set the minimum and maximum number of instances for your connector,
or use the defaults, which are 2 (min) and 10 (max). The
connector scales up to the maximum specified if traffic usage requires
it, but the connector does not scale back down when traffic
decreases. You must use values between
2and10. - In the Instance Type menu, choose the machine type to be
used for the connector, or use the default
e2-micro. Notice the cost sidebar on the right when you choose the instance type, which displays bandwidth and cost estimations.
- Set the minimum and maximum number of instances for your connector,
or use the defaults, which are 2 (min) and 10 (max). The
connector scales up to the maximum specified if traffic usage requires
it, but the connector does not scale back down when traffic
decreases. You must use values between
Click Create.
A green check mark will appear next to the connector's name when it is ready to use.
gcloud
-
In the Google Cloud console, activate Cloud Shell.
At the bottom of the Google Cloud console, a Cloud Shell session starts and displays a command-line prompt. Cloud Shell is a shell environment with the Google Cloud CLI already installed and with values already set for your current project. It can take a few seconds for the session to initialize.
Update
gcloudcomponents to the latest version:gcloud components update
Ensure that the Serverless VPC Access API is enabled for your project:
gcloud services enable vpcaccess.googleapis.com
Create the connector using one of the following options:
For more details and optional arguments, see the
gcloudreference.Create a connector using an existing subnet:
gcloud compute networks vpc-access connectors create CONNECTOR_NAME \
 --region REGION \
 --subnet SUBNET_NAME \
 --subnet-project HOST_PROJECT_ID \
 --min-instances MIN \
 --max-instances MAX \
 --machine-type MACHINE_TYPE
Replace the following:
CONNECTOR_NAME: a name for your connector, matching Compute Engine naming conventions, with the additional requirements that the name must be less than 21 characters long, and that hyphens (-) count as two characters.REGION: a region for your connector, matching the region of your serverless service or job. If your service or job is inus-centraloreurope-west, useus-central1oreurope-west1.SUBNET_NAME: the name of the existing subnet.HOST_PROJECT_ID: the Shared VPC host project ID. If the connector and existing subnet are located the same project, omit the--subnet-projectflag.MIN: the minimum number of instances to use for the connector. Use an integer between2(the default) and9.MAX: the maximum number of instances to use for the connector. Use an integer between3and10(the default). If the connector scales up to the maximum number of instances, it does not scale back down.MACHINE_TYPE: must be one of the following:f1-micro,e2-micro, ore2-standard-4.
Create a connector and a new subnet:
gcloud compute networks vpc-access connectors create CONNECTOR_NAME \
 --region REGION \
 --network VPC_NETWORK \
 --range IP_RANGE
 --min-instances MIN \
 --max-instances MAX \
 --machine-type MACHINE_TYPE
Replace the following:
CONNECTOR_NAME: a name for your connector, matching Compute Engine naming conventions, with the additional requirements that the name must be less than 21 characters long, and that hyphens (-) count as two characters.REGION: a region for your connector, matching the region of your serverless service or job. If your service or job is inus-centraloreurope-west, useus-central1oreurope-west1.VPC_NETWORK: the name of the VPC network to attach your connector to. The connector and VPC network must be located in the same project.IP_RANGE: provide an unused/28CIDR (for example10.8.0.0/28) to use as the primary IPv4 address range of a new subnet that Google Cloud creates in the connector's VPC network. Ensure that the IP range does not conflict with any existing routes in the connector's VPC network. The name of the new subnet begins with the "aet-" prefix.MIN: the minimum number of instances to use for the connector. Use an integer between2(the default) and9.MAX: the maximum number of instances to use for the connector. Use an integer between3and10(the default). If the connector scales up to the maximum number of instances, it does not scale back down.MACHINE_TYPE: must be one of the following:f1-micro,e2-micro, ore2-standard-4.
Verify that your connector is in the
READYstate before using it:gcloud compute networks vpc-access connectors describe CONNECTOR_NAME \ --region REGION
Replace the following:
CONNECTOR_NAME: the name of your connector; this is the name that you specified in the previous step.REGION: the region of your connector; this is the region that you specified in the previous step.
The output should contain the line
state: READY.
Terraform
You can use a Terraform resource
to enable the vpcaccess.googleapis.com API.
You can use Terraform modules to create a VPC network and subnet and then create the connector.
Configure your serverless environment to use a connector
After you create a Serverless VPC Access connector, configure your serverless environment to use the connector by following the instructions for your serverless environment:
Configure Cloud Run to use a connector
When you create a new service or deploy a new revision, you can configure the service to use a connector by using the Google Cloud console, Google Cloud CLI, a YAML file, or a Terraform resource.
Console
In the Google Cloud console, go to Cloud Run:
Select Services from the Cloud Run navigation menu, and click Deploy container to configure a new service. If you are configuring an existing service, click the service, then click Edit and deploy new revision.
If you are configuring a new service, fill out the initial service settings page, then click Container(s), Volumes, Networking, Security to expand the service configuration page.
Click the Connections tab.
- In the VPC Connector field, select a connector to use or select None to disconnect your service from a VPC network.
Click Create or Deploy.
gcloud
-
In the Google Cloud console, activate Cloud Shell.
At the bottom of the Google Cloud console, a Cloud Shell session starts and displays a command-line prompt. Cloud Shell is a shell environment with the Google Cloud CLI already installed and with values already set for your current project. It can take a few seconds for the session to initialize.
To specify a connector during deployment, use the
--vpc-connectorflag:gcloud run deploy SERVICE --image IMAGE_URL --vpc-connector CONNECTOR_NAME
- Replace
SERVICEwith the name of your service. - Replace
IMAGE_URL. - Replace
CONNECTOR_NAMEwith the name of your connector. If your connector is in the host project of a Shared VPC, this must be the fully specified name, for example:projects/HOST_PROJECT_ID/locations/CONNECTOR_REGION/connectors/CONNECTOR_NAME
To attach, update, or remove a connector for an existing service, use the
gcloud run services updatecommand with either of the following flags as needed:For example to attach or update a connector:
gcloud run services update SERVICE --vpc-connector CONNECTOR_NAME
- Replace
SERVICEwith the name of your service. - Replace
CONNECTOR_NAMEwith the name of your connector.
- Replace
YAML
If you are creating a new service, skip this step. If you are updating an existing service, download its YAML configuration:
gcloud run services describe SERVICE --format export > service.yaml
Add or update the
run.googleapis.com/vpc-access-connectorattribute under theannotationsattribute under the top-levelspecattribute:apiVersion: serving.knative.dev/v1 kind: Service metadata: name: SERVICE spec: template: metadata: annotations: run.googleapis.com/vpc-access-connector: CONNECTOR_NAME
- Replace
SERVICEwith the name of your Cloud Run service. - Replace
CONNECTOR_NAMEwith the name of your connector. If your connector is in the host project of a Shared VPC, this must be the fully specified name, for example:projects/HOST_PROJECT_ID/locations/CONNECTOR_REGION/connectors/CONNECTOR_NAME
- Replace
Replace the service with its new configuration using the following command:
gcloud beta run services replace service.yaml
Terraform
You can use a Terraform resource to create a service and configure it to use your connector.
Configure Cloud Run functions to use a connector
You can configure a function to use a connector from the Google Cloud console or the Google Cloud CLI:
Console
Go to the Cloud Run functions overview page in the Google Cloud console:
Click Create function. Alternatively, click an existing function to go to its details page, and click Edit.
Expand the advanced settings by clicking RUNTIME, BUILD AND CONNECTIONS SETTINGS.
In the Connections tab under Egress settings, enter the name of your connector in the VPC connector field.
gcloud
-
In the Google Cloud console, activate Cloud Shell.
At the bottom of the Google Cloud console, a Cloud Shell session starts and displays a command-line prompt. Cloud Shell is a shell environment with the Google Cloud CLI already installed and with values already set for your current project. It can take a few seconds for the session to initialize.
Use the
gcloud functions deploycommand to deploy the function and specify the--vpc-connectorflag:gcloud functions deploy FUNCTION_NAME \ --vpc-connector CONNECTOR_NAME \ FLAGS...
where:
FUNCTION_NAMEis the name of your function.CONNECTOR_NAMEis the name of your connector. If your connector is in the host project of a Shared VPC, this must be the fully specified name, for example:projects/HOST_PROJECT_ID/locations/CONNECTOR_REGION/connectors/CONNECTOR_NAME
FLAGS...refers to other flags you pass during function deployment.
For more control over which requests are routed through the connector, see Egress settings.
Configure App Engine to use a connector
Python 2
Discontinue use of the App Engine URL Fetch service.
By default, all requests are routed through URL Fetch service. This causes requests to your VPC network to fail. To disable this default, see Disabling URL Fetch from handling all outbound requests.
You can still use the
urlfetchlibrary directly for individual requests if needed, however this is not recommended.Add the Serverless VPC Access field to your
app.yamlfile:vpc_access_connector: name: projects/PROJECT_ID/locations/REGION/connectors/CONNECTOR_NAME
Replace the following:
PROJECT_IDwith your Google Cloud project ID. If your connector is in the host project of a Shared VPC, this must be the ID of the host project.REGIONwith the region that your connector is in.CONNECTOR_NAMEwith the name of your connector.
Deploy the service:
gcloud app deploy
After you deploy your service, it is able to send requests to internal IP addresses in order to access resources in your VPC network.
Java 8
Discontinue use of the App Engine URL Fetch service
URLFetchService.Add the Serverless VPC Access element to your service's
appengine-web.xmlfile:<vpc-access-connector> <name>projects/PROJECT_ID/locations/REGION/connectors/CONNECTOR_NAME</name> </vpc-access-connector>
Replace the following:
PROJECT_IDwith your Google Cloud project ID. If your connector is in the host project of a Shared VPC, this must be the ID of the host project.REGIONwith the region that your connector is in.CONNECTOR_NAMEwith the name of your connector.
Deploy the service:
gcloud app deploy WEB-INF/appengine-web.xml
After you deploy your service, it is able to send requests to internal IP addresses in order to access resources in your VPC network.
Go 1.11
Discontinue use of the App Engine URL Fetch service.
Serverless VPC Access does not support URL Fetch, and requests made using URL Fetch will ignore Serverless VPC Access settings. Make outbound connections with sockets instead.
Add the Serverless VPC Access field to your
app.yamlfile:vpc_access_connector: name: projects/PROJECT_ID/locations/REGION/connectors/CONNECTOR_NAME
Replace the following:
PROJECT_IDwith your Google Cloud project IDREGIONwith the region that your connector is inCONNECTOR_NAMEwith the name of your connector
Deploy the service:
gcloud app deploy
After you deploy your service, it is able to send requests to internal IP addresses in order to access resources in your VPC network.
All other runtimes
Add the Serverless VPC Access field to your
app.yamlfile:vpc_access_connector: name: projects/PROJECT_ID/locations/REGION/connectors/CONNECTOR_NAME
Replace the following:
PROJECT_IDwith your Google Cloud project ID. If your connector is in the host project of a Shared VPC, this must be the ID of the host project.REGIONwith the region that your connector is in.CONNECTOR_NAMEwith the name of your connector.
Deploy the service:
gcloud app deploy
After you deploy your service, it is able to send requests to internal IP addresses in order to access resources in your VPC network.
Configure firewall rules for connectors
Required firewall rules for connectors in service projects
If you create a connector in a standalone VPC network or in the host project of a Shared VPC network, Google Cloud creates all necessary firewall rules for the connector's operation. For more information, see Firewall rules for connectors in standalone VPC networks or Shared VPC host projects.
However, if you create a connector in a service project and the connector targets a Shared VPC network in the host project, you must add firewall rules to allow necessary traffic for the connector's operation from the following ranges:
- Serverless infrastructure IP range:
35.199.224.0/19 - Health check probe IP ranges:
35.191.0.0/16,35.191.192.0/18, and130.211.0.0/22
These ranges are used by the Google infrastructure underlying Cloud Run, Cloud Run functions, and App Engine standard environment. All requests from these IP addresses originate from Google infrastructure to make sure that each serverless resource only communicates with the connector that it's connected to.
You must also allow traffic from the connector's subnet to resources in your VPC network.
To perform these steps, you must have one of the following roles on the host project:
- Owner role (
roles/owner) - Compute Security Admin role (
roles/compute.securityAdmin) - Custom Identity and Access Management (IAM) role with the
compute.firewalls.createpermission enabled
For a basic configuration, apply the rules to allow serverless resources in any service project connected to the Shared VPC network to send requests to any resource in the network.
To apply these rules, run the following commands in the host project:
Create firewall rules that allow requests from Google's serverless infrastructure and health check probes to reach all connectors in the network. In these commands, UDP and TCP ports are used as proxies and for HTTP health checks, respectively. Don't change the specified ports.
gcloud compute firewall-rules create serverless-to-vpc-connector \
    --allow tcp:667,udp:665-666,icmp \
    --source-ranges=35.199.224.0/19 \
    --direction=INGRESS \
    --target-tags vpc-connector \
    --network=VPC_NETWORK
gcloud compute firewall-rules create vpc-connector-to-serverless \
    --allow tcp:667,udp:665-666,icmp \
    --destination-ranges=35.199.224.0/19 \
    --direction=EGRESS \
    --target-tags vpc-connector \
    --network=VPC_NETWORK
gcloud compute firewall-rules create vpc-connector-health-checks \
    --allow tcp:667 \
    --source-ranges=35.191.0.0/16,35.191.192.0/18,130.211.0.0/22 \
    --direction=INGRESS \
    --target-tags vpc-connector \
    --network=VPC_NETWORK
Replace
VPC_NETWORKwith the name of the VPC network to attach your connector to.Create an ingress firewall rule on your VPC network to allow requests from connectors that target this network:
gcloud compute firewall-rules create vpc-connector-requests \
    --allow tcp,udp,icmp \
    --direction=INGRESS \
    --source-tags vpc-connector \
    --network=VPC_NETWORK
This rule gives the connector access to every resource in the network. To limit the resources that your serverless environment can reach by using Serverless VPC Access, see Restrict connector VM access to VPC network resources.
Create firewall rules for specific connectors
Following the procedure in Required firewall rules for connectors in service projects results in firewall rules that apply to all connectors, both current ones and ones created in the future. If you don't want this, but instead want to create rules for specific connectors only, you can scope the rules so that they apply only to those connectors.
To limit the scope of the rules to specific connectors, you can use one of the following mechanisms:
- Network tags: Every connector has two network tags:
vpc-connectorandvpc-connector-REGION-CONNECTOR_NAME. Use the latter format to limit the scope of your firewall rules to a specific connector. - IP ranges: Use this for the egress rules only, because it doesn't work for ingress rules. You can use the IP range of the connector subnet to limit the scope of your firewall rules to a single VPC connector.
Restrict connector VM access to VPC network resources
You can restrict your connector's access to resources in its target VPC network by using VPC firewall rules or rules in firewall policies. You can accomplish these restrictions using one of the following strategies:
- Create ingress rules whose targets represent the resources that you want to limit connector VM access to and whose sources represent the connector VMs.
- Create egress rules whose targets represent the connector VMs and whose destinations represent the resources that you want to limit connector VM access to.
The following examples illustrate each strategy.
Restrict access using ingress rules
Choose either network tags or CIDR ranges to control the incoming traffic to your VPC network.
Network tags
The following steps show how to create ingress rules that restrict a connector's access to your VPC network based on the connector network tags.
Ensure that you have the required permissions to insert firewall rules. You must have one of the following Identity and Access Management (IAM) roles:
- Compute Security Admin role
- Custom IAM role with the
compute.firewalls.createpermission enabled
Deny connector traffic across your VPC network.
Create an ingress firewall rule with priority lower than 1000 on your VPC network to deny ingress from the connector network tag. This overrides the implicit firewall rule that Serverless VPC Access creates on your VPC network by default.
gcloud compute firewall-rules create RULE_NAME \
--action=DENY \
--rules=PROTOCOL \
--source-tags=VPC_CONNECTOR_NETWORK_TAG \
--direction=INGRESS \
--network=VPC_NETWORK \
--priority=PRIORITY
Replace the following:
RULE_NAME: the name of your new firewall rule. For example,
deny-vpc-connector.PROTOCOL: one or more protocols that you want to allow from your VPC connector. Supported protocols are
tcporudp. For example,tcp:80,udpallows TCP traffic through port 80 and UDP traffic. For more information, see the documentation for theallowflag.For security and validation purposes, you can also configure deny rules to block traffic for the following unsupported protocols:
ah,all,esp,icmp,ipip, andsctp.VPC_CONNECTOR_NETWORK_TAG: the universal connector network tag if you want to restrict access for all connectors (including any connectors made in the future), or the unique network tag if you want to restrict access for a specific connector.
- Universal network tag:
vpc-connector Unique network tag:
vpc-connector-REGION-CONNECTOR_NAMEReplace:
- REGION: the region of the connector that you want to restrict
- CONNECTOR_NAME: the name of the connector that you want to restrict
To learn more about connector network tags, see Network tags.
- Universal network tag:
VPC_NETWORK: the name of your VPC network
PRIORITY: an integer between 0-65535. For example, 0 sets the highest priority.
Allow connector traffic to the resource that should receive connector traffic.
Use the
allowandtarget-tagsflags to create an ingress firewall rule targeting the resource in your VPC network that you want the VPC connector to access. Set the priority for this rule to be a lower value than the priority of the rule you made in the previous step.gcloud compute firewall-rules create RULE_NAME \ --allow=PROTOCOL \ --source-tags=VPC_CONNECTOR_NETWORK_TAG \ --direction=INGRESS \ --network=VPC_NETWORK \ --target-tags=RESOURCE_TAG \ --priority=PRIORITY
Replace the following:
RULE_NAME: the name of your new firewall rule. For example,
allow-vpc-connector-for-select-resources.PROTOCOL: one or more protocols that you want to allow from your VPC connector. Supported protocols are
tcporudp. For example,tcp:80,udpallows TCP traffic through port 80 and UDP traffic. For more information, see the documentation for theallowflag.VPC_CONNECTOR_NETWORK_TAG: the universal connector network tag if you want to restrict access for all connectors (including any connectors made in the future), or the unique network tag if you want to restrict access for a specific connector. This must match the network tag that you specified in the previous step.
- Universal network tag:
vpc-connector Unique network tag:
vpc-connector-REGION-CONNECTOR_NAMEReplace:
- REGION: the region of the connector that you want to restrict
- CONNECTOR_NAME: the name of the connector that you want to restrict
To learn more about connector network tags, see Network tags.
- Universal network tag:
VPC_NETWORK: the name of your VPC network
RESOURCE_TAG: the network tag for the VPC resource that you want your VPC connector to access
PRIORITY: an integer less than the priority you set in the previous step. For example, if you set the priority for the rule you created in the previous step to 990, try 980.
For more information about the required and optional flags for creating
firewall rules, refer to the
documentation for gcloud compute firewall-rules create.
CIDR range
The following steps show how to create ingress rules that restrict a connector's access to your VPC network based on the connector's CIDR range.
Ensure that you have the required permissions to insert firewall rules. You must have one of the following Identity and Access Management (IAM) roles:
- Compute Security Admin role
- Custom IAM role with the
compute.firewalls.createpermission enabled
Deny connector traffic across your VPC network.
Create an ingress firewall rule with priority lower than 1000 on your VPC network to deny ingress from the connector's CIDR range. This overrides the implicit firewall rule that Serverless VPC Access creates on your VPC network by default.
gcloud compute firewall-rules create RULE_NAME \
--action=DENY \
--rules=PROTOCOL \
--source-ranges=VPC_CONNECTOR_CIDR_RANGE \
--direction=INGRESS \
--network=VPC_NETWORK \
--priority=PRIORITY
Replace the following:
RULE_NAME: the name of your new firewall rule. For example,
deny-vpc-connector.PROTOCOL: one or more protocols that you want to allow from your VPC connector. Supported protocols are
tcporudp. For example,tcp:80,udpallows TCP traffic through port 80 and UDP traffic. For more information, see the documentation for theallowflag.For security and validation purposes, you can also configure deny rules to block traffic for the following unsupported protocols:
ah,all,esp,icmp,ipip, andsctp.VPC_CONNECTOR_CIDR_RANGE: the CIDR range for the connector whose access you are restricting
VPC_NETWORK: the name of your VPC network
PRIORITY: an integer between 0-65535. For example, 0 sets the highest priority.
Allow connector traffic to the resource that should receive connector traffic.
Use the
allowandtarget-tagsflags to create an ingress firewall rule targeting the resource in your VPC network that you want the VPC connector to access. Set the priority for this rule to be a lower value than the priority of the rule you made in the previous step.gcloud compute firewall-rules create RULE_NAME \ --allow=PROTOCOL \ --source-ranges=VPC_CONNECTOR_CIDR_RANGE \ --direction=INGRESS \ --network=VPC_NETWORK \ --target-tags=RESOURCE_TAG \ --priority=PRIORITY
Replace the following:
RULE_NAME: the name of your new firewall rule. For example,
allow-vpc-connector-for-select-resources.PROTOCOL: one or more protocols that you want to allow from your VPC connector. Supported protocols are
tcporudp. For example,tcp:80,udpallows TCP traffic through port 80 and UDP traffic. For more information, see the documentation for theallowflag.VPC_CONNECTOR_CIDR_RANGE: the CIDR range for the connector you whose access you are restricting
VPC_NETWORK: the name of your VPC network
RESOURCE_TAG: the network tag for the VPC resource that you want your VPC connector to access
PRIORITY: an integer less than the priority you set in the previous step. For example, if you set the priority for the rule you created in the previous step to 990, try 980.
For more information about the required and optional flags for creating
firewall rules, see the
documentation for gcloud compute firewall-rules create.
Restrict access using egress rules
The following steps show how to create egress rules to restrict connector access.
Ensure that you have the required permissions to insert firewall rules. You must have one of the following Identity and Access Management (IAM) roles:
- Compute Security Admin role
- Custom IAM role with the
compute.firewalls.createpermission enabled
Deny egress traffic from your connector.
Create an egress firewall rule on your Serverless VPC Access connector to prevent it from sending outgoing traffic, with the exception of established responses, to any destination.
gcloud compute firewall-rules create RULE_NAME \
--action=DENY \
--rules=PROTOCOL \
--direction=EGRESS \
--target-tags=VPC_CONNECTOR_NETWORK_TAG \
--network=VPC_NETWORK \
--priority=PRIORITY
Replace the following:
RULE_NAME: the name of your new firewall rule. For example,
deny-vpc-connector.PROTOCOL: one or more protocols that you want to allow from your VPC connector. Supported protocols are
tcporudp. For example,tcp:80,udpallows TCP traffic through port 80 and UDP traffic. For more information, see the documentation for theallowflag.For security and validation purposes, you can also configure deny rules to block traffic for the following unsupported protocols:
ah,all,esp,icmp,ipip, andsctp.VPC_CONNECTOR_NETWORK_TAG: the universal VPC connector network tag if you want the rule to apply to all existing VPC connectors and any VPC connectors made in the future. Or, the unique VPC connector network tag if you want to control a specific connector.
VPC_NETWORK: the name of your VPC network
PRIORITY: an integer between 0-65535. For example, 0 sets the highest priority.
Allow egress traffic when the destination is in the CIDR range that you want your connector to access.
Use the
allowanddestination-rangesflags to create a firewall rule allowing egress traffic from your connector for a specific destination range. Set the destination range to the CIDR range of the resource in your VPC network that you want your connector to be able to access. Set the priority for this rule to be a lower value than the priority of the rule you made in the previous step.gcloud compute firewall-rules create RULE_NAME \ --allow=PROTOCOL \ --destination-ranges=RESOURCE_CIDR_RANGE \ --direction=EGRESS \ --network=VPC_NETWORK \ --target-tags=VPC_CONNECTOR_NETWORK_TAG \ --priority=PRIORITY
Replace the following:
RULE_NAME: the name of your new firewall rule. For example,
allow-vpc-connector-for-select-resources.PROTOCOL: one or more protocols that you want to allow from your VPC connector. Supported protocols are
tcporudp. For example,tcp:80,udpallows TCP traffic through port 80 and UDP traffic. For more information, see the documentation for theallowflag.RESOURCE_CIDR_RANGE: the CIDR range for the connector whose access you are restricting
VPC_NETWORK: the name of your VPC network
VPC_CONNECTOR_NETWORK_TAG: the universal VPC connector network tag if you want the rule to apply to all existing VPC connectors and any VPC connectors made in the future. Or, the unique VPC connector network tag if you want to control a specific connector. If you used the unique network tag in the previous step, use the unique network tag.
PRIORITY: an integer less than the priority you set in the previous step. For example, if you set the priority for the rule you created in the previous step to 990, try 980.
For more information about the required and optional flags for creating firewall
rules, refer to the
documentation for gcloud compute firewall-rules create.
Update a connector
You can update and monitor the following attributes of your connector by using the Google Cloud console, Google Cloud CLI, or the API:
- Machine (instance) type
- Minimum and maximum number of instances
- Recent throughput, number of instances, and CPU utilization
Update machine type
Console
Go to the Serverless VPC Access overview page.
Select the connector you want to edit and click Edit.
In the Instance type list, select your preferred machine (instance) type. To learn about available machine types, see the documentation on Throughput and scaling.
gcloud
-
In the Google Cloud console, activate Cloud Shell.
At the bottom of the Google Cloud console, a Cloud Shell session starts and displays a command-line prompt. Cloud Shell is a shell environment with the Google Cloud CLI already installed and with values already set for your current project. It can take a few seconds for the session to initialize.
To update the connector machine type, run the following command in your terminal:
gcloud beta compute networks vpc-access connectors update CONNECTOR_NAME --region=REGION --machine-type=MACHINE_TYPE
CONNECTOR_NAME: the name of your connectorREGION: the name of your connector's regionMACHINE_TYPE: your preferred machine type. To learn about available machine types, see the documentation on Throughput and scaling.
Decrease minimum and maximum number of instances
To decrease the number of minimum and maximum number of instances, you must do the following:
- Create a new connector with your preferred values.
- Update your service or function to use the new connector.
- Delete the old connector when you've moved its traffic.
Increase minimum and maximum number of instances
Console
Go to the Serverless VPC Access overview page.
Select the connector you want to edit and click Edit.
In the Minimum instances field, select your preferred minimum number of instances.
The smallest possible value for this field is the current value. The largest possible value for this field is the current value in the Maximum instances field minus 1. For example, if the value in the Maximum instances field is 8, then the largest possible value for the Minimum instances field is 7.
In the Maximum instances field, select your preferred maximum number of instances.
The smallest possible value for this field is the current value. The largest possible value for this field is 10.
gcloud
-
In the Google Cloud console, activate Cloud Shell.
At the bottom of the Google Cloud console, a Cloud Shell session starts and displays a command-line prompt. Cloud Shell is a shell environment with the Google Cloud CLI already installed and with values already set for your current project. It can take a few seconds for the session to initialize.
To increase the minimum or maximum number of instances for the connector, run the following command in your terminal:
gcloud beta compute networks vpc-access connectors update CONNECTOR_NAME --region=REGION --min-instances=MIN_INSTANCES --max-instances=MAX_INSTANCES
CONNECTOR_NAME: the name of your connectorREGION: the name of your connector's regionMIN_INSTANCES: your preferred minimum number of instances.- Smallest possible value for this field is the current value of
min_instances. To find the current value, see Find the current attribute values. - Largest possible value for this field is the current
max_instancesvalue minus 1, becausemin_instancesmust be less thanmax_instances. For example, ifmax_instancesis 8, the largest possible value for this field is 7. If your connector uses the defaultmax-instancesvalue of 10, the largest possible value of this field is 9. To find the value ofmax-instances, see Find the current attribute values.
- Smallest possible value for this field is the current value of
MAX_INSTANCES:- Smallest possible value for this field is the current value of
max_instances. To find the current value, see Find the current attribute values. - Largest possible value for this field is 10.
If you only want to increase the minimum number of instances but not the maximum, you must still specify the maximum number of instances. Conversely, if you only want to update the maximum number of instances but not the minimum, you must still specify the minimum number of instances. To keep either the minimum or maximum number of instances at their current value, specify their current value. To find their current value, see Find the current attribute values.
- Smallest possible value for this field is the current value of
Find the current attribute values
To find the current attribute values for your connector, run the following in your terminal:
gcloud compute networks vpc-access connectors describe CONNECTOR_NAME --region=REGION --project=PROJECT
CONNECTOR_NAME: the name of your connectorREGION: the name of your connector's regionPROJECT: the name of your Google Cloud project
Monitor connector usage
Monitoring usage over time can help you determine when to adjust a connector's settings. For example, if CPU utilization spikes, you might try increasing the maximum number of instances for better results. Or if you are maxing out throughput, you might decide to switch to a larger machine type.
To display charts for the connector's throughput, number of instances, and CPU utilization metrics over time by using the Google Cloud console:
Go to the Serverless VPC Access overview page.
Click the name of the connector you want to monitor.
Select the number of days you want to display between 1 and 90 days.
In the Throughput chart, hold the pointer over the chart to view the connector's recent throughput.
In the Number of instances chart, hold the pointer over the chart to view the number of instances recently used by the connector.
In the CPU Utilization chart, hold the pointer over the chart to view the connector's recent CPU usage. The chart displays the CPU usage distributed across instances for the 50th, 95th, and 99th percentiles.
Delete a connector
Before you delete a connector, you must remove it from any serverless resources that still use it. Deleting a connector before removing it from your serverless resources prohibits you from deleting the VPC network later.
For Shared VPC users who set up connectors in the Shared VPC
host project, you can use the command
gcloud compute networks vpc-access connectors describe
to list the projects in which there are serverless resources that use a given
connector.
To delete a connector, use the Google Cloud console or the Google Cloud CLI:
Console
Go to the Serverless VPC Access overview page in the Google Cloud console:
Select the connector you want to delete.
Click Delete.
gcloud
-
In the Google Cloud console, activate Cloud Shell.
At the bottom of the Google Cloud console, a Cloud Shell session starts and displays a command-line prompt. Cloud Shell is a shell environment with the Google Cloud CLI already installed and with values already set for your current project. It can take a few seconds for the session to initialize.
Use the following
gcloudcommand to delete a connector:gcloud compute networks vpc-access connectors delete CONNECTOR_NAME --region=REGION
Replace the following:
- CONNECTOR_NAME with the name of the connector you want to delete
- REGION with the region where the connector is located
Manage custom constraints for projects
This section describes how to create custom constraints for Serverless VPC Access connectors and enforce them at the project level. For information about custom organization policies, see Creating and managing custom organization policies.
Google Cloud Organization Policy gives you centralized, programmatic control over your organization's resources. As the organization policy administrator, you can define an organization policy, which is a set of restrictions called constraints that apply to Google Cloud resources and descendants of those resources in the Google Cloud resource hierarchy. You can enforce organization policies at the organization, folder, or project level.
Organization Policy provides predefined constraints for various Google Cloud services. However, if you want more granular, customizable control over the specific fields that are restricted in your organization policies, you can also create custom organization policies.
Benefits
Serverless VPC Access lets you write any number of custom constraints using most user-configured fields in the Serverless VPC Access API. For example, you can create a custom constraint specifying which subnets a Serverless VPC Access connector can use.
Once applied, requests that violate a policy that enforces a custom constraint show an error message in the gcloud CLI and in Serverless VPC Access logs. The error message contains the constraint ID and description of the violated custom constraint.
Policy inheritance
By default, organization policies are inherited by the descendants of the resources that you enforce the policy on. For example, if you enforce a policy on a folder, Google Cloud enforces the policy on all projects in the folder. To learn more about this behavior and how to change it, refer to Hierarchy evaluation rules.
Limitations
Specifying machine type, minimum instances, or maximum instances is not supported.
Before you begin
Ensure that you know your organization ID.
Required roles
To get the permissions that
you need to manage organization policies,
ask your administrator to grant you the
Organization policy administrator (roles/orgpolicy.policyAdmin)
IAM role on the organization resource.
For more information about granting roles, see Manage access to projects, folders, and organizations.
You might also be able to get the required permissions through custom roles or other predefined roles.
Create a custom constraint
A custom constraint is defined in a YAML file by the resources, methods, conditions, and actions that are supported by the service that you are enforcing the organization policy on. Conditions for your custom constraints are defined using Common Expression Language (CEL). For more information about how to build conditions in custom constraints using CEL, see the CEL section of Creating and managing custom constraints.
To create a YAML file for a Serverless VPC Access custom constraint, refer to the following example:
name: organizations/ORGANIZATION_ID/customConstraints/CONSTRAINT_NAME
resourceTypes:
- vpcaccess.googleapis.com/Connector
methodTypes:
- CREATE
condition: "CONDITION"
actionType: ACTION
displayName: DISPLAY_NAME
description: DESCRIPTION
Replace the following:
ORGANIZATION_ID: your organization ID, such as123456789.CONSTRAINT_NAME: the name you want for your new custom constraint. A custom constraint must start withcustom., and can only include uppercase letters, lowercase letters, or numbers, for example, custom.defaultNetworkConstraint. The maximum length of this field is 70 characters, not counting the prefix.CONDITION: a CEL condition that is written against a representation of a supported service resource. This field has a maximum length of 1000 characters. For example,"resource.network == default".ACTION: the action to take if theconditionis met. This can be eitherALLOWorDENY.DISPLAY_NAME: a human-friendly name for the constraint. This field has a maximum length of 200 characters.DESCRIPTION: a human-friendly description of the constraint to display as an error message when the policy is violated, for example,"Require network to not be set to default."This field has a maximum length of 2000 characters.
For more information about how to create a custom constraint, see Defining custom constraints.
Set up a custom constraint
After you have created the YAML file for a new custom constraint, you must set it up to make it available for organization policies in your organization. To set up a custom constraint, use thegcloud org-policies set-custom-constraint command:
gcloud org-policies set-custom-constraint CONSTRAINT_PATH
CONSTRAINT_PATH with the full path to your
custom constraint file. For example, /home/user/customconstraint.yaml.
Once completed, your custom constraints are available as organization policies
in your list of Google Cloud organization policies.
To verify that the custom constraint exists, use the
gcloud org-policies list-custom-constraints command:
gcloud org-policies list-custom-constraints --organization=ORGANIZATION_ID
ORGANIZATION_ID with the ID of your organization resource.
For more information, see
Viewing organization policies.
Enforce a custom constraint
You can enforce a constraint by creating an organization policy that references it, and then applying that organization policy to a Google Cloud resource.Console
- In the Google Cloud console, go to the Organization policies page.
- From the project picker, select the project for which you want to set the organization policy.
- From the list on the Organization policies page, select your constraint to view the Policy details page for that constraint.
- To configure the organization policy for this resource, click Manage policy.
- On the Edit policy page, select Override parent's policy.
- Click Add a rule.
- In the Enforcement section, select whether enforcement of this organization policy is on or off.
- Optional: To make the organization policy conditional on a tag, click Add condition. Note that if you add a conditional rule to an organization policy, you must add at least one unconditional rule or the policy cannot be saved. For more information, see Setting an organization policy with tags.
- Click Test changes to simulate the effect of the organization policy. Policy simulation isn't available for legacy managed constraints. For more information, see Test organization policy changes with Policy Simulator.
- To finish and apply the organization policy, click Set policy. The policy requires up to 15 minutes to take effect.
gcloud
To create an organization policy with boolean rules, create a policy YAML file that references the constraint:
      name: projects/PROJECT_ID/policies/CONSTRAINT_NAME
      spec:
        rules:
        - enforce: true
Replace the following:
-
PROJECT_ID: the project on which you want to enforce your constraint. -
CONSTRAINT_NAME: the name you defined for your custom constraint. For example,custom.defaultNetworkConstraint.
To enforce the organization policy containing the constraint, run the following command:
gcloud org-policies set-policy POLICY_PATH
Replace POLICY_PATH with the full path to your organization policy
YAML file. The policy requires up to 15 minutes to take effect.
Test the custom constraint
To test the example that restricts ingress settings, deploy a
connector in the project with network set to default:
gcloud compute networks vpc-access connectors create org-policy-test \
    --project=PROJECT_ID \
    --region=REGION_ID \
    --network=default
The output is the following:
Operation denied by custom org policies: ["customConstraints/custom.defaultNetworkConstraint": "Require network to not be set to default."]
Example custom organization policies for common use cases
The following table provides examples of custom constraints that you might find useful with Serverless VPC Access connectors:
| Description | Constraint syntax |
|---|---|
| Require that Serverless VPC Access connectors can only use a specific network. |
name: organizations/ORGANIZATION_ID/customConstraints/custom.allowlistNetworks resourceTypes: - vpcaccess.googleapis.com/Connector methodTypes: - CREATE condition: "resource.network == 'allowlisted-network'" actionType: ALLOW displayName: allowlistNetworks description: Require connectors to use a specific network. |
| Description | Constraint syntax |
| Require that Serverless VPC Access connectors have access to only a specific subnet. |
name: organizations/ORGANIZATION_ID/customConstraints/custom.restrictSubnetForProject resourceTypes: - vpcaccess.googleapis.com/Connector methodTypes: - CREATE condition: "resource.subnet.name == 'allocated-subnet'" actionType: ALLOW displayName: restrictSubnetForProject description: This project is only allowed to use the subnet "allocated-subnet". |
Configure your Cloud Run environment to use Direct VPC instead of a connector
You can enable your Cloud Run service to send egress (outbound) traffic directly to a VPC network, allowing access to Compute Engine VM instances, Memorystore instances, and any other resources with an internal IP address.
Configure your service to use Direct VPC
Direct VPC egress allows your Cloud Run service to send traffic to a VPC network without a Serverless VPC Access connector. Network costs scale to zero just like the service itself. You can also add network tags directly on Cloud Run service revisions for more granular network security, such as applying VPC firewall rules.
You can configure Direct VPC egress with a service by using the Google Cloud console, Google Cloud CLI, YAML, or Terraform.
Console
Click Create Service if you are configuring a new service you are deploying to. If you are configuring and deploying an existing service, click the service, then click Edit and deploy new revision.
If you are configuring a new service, fill out the initial service settings page as needed, then click Container(s), Volumes, Networking, Security to expand the service configuration page.
Click the Networking tab.
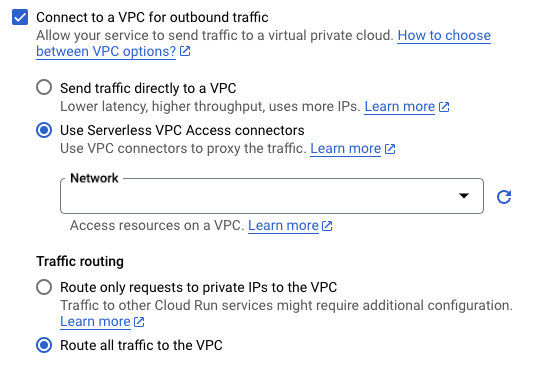
Click Connect to a VPC for outbound traffic.
Click Send traffic directly to a VPC.
In the Network field, select the VPC network that you want to send traffic to.
In the Subnet field, select the subnet where your service receives IP addresses from. You can deploy multiple services on the same subnet.
Optional: Enter the names of the network tags that you want to associate with your service or services. Network tags are specified at the revision-level. Each service revision can have different network tags, such as
network-tag-2.For Traffic routing, select one of the following:
- Route only requests to private IPs to the VPC to send only traffic to internal addresses through the VPC network.
- Route all traffic to the VPC to send all outbound traffic through the VPC network.
Click Create or Deploy.
To verify that your service is on your VPC network, click the service, then click the Networking tab. The network and subnet are listed in the VPC card.
You can now send requests from your Cloud Run service to any resource on the VPC network, as allowed by your firewall rules.
gcloud
To deploy a Cloud Run service without a connector from the Google Cloud CLI:
Update
gcloudcomponents to the latest version:gcloud components update
Ensure that the Compute Engine API is enabled for your project:
gcloud services enable compute.googleapis.com
Deploy your Cloud Run service with the following command:
gcloud run deploy SERVICE_NAME \
--image=IMAGE_URL \
--network=NETWORK \
--subnet=SUBNET \
--network-tags=NETWORK_TAG_NAMES \
--vpc-egress=EGRESS_SETTING \
--region=REGION
Replace:
- SERVICE_NAME with the name of your Cloud Run service.
- IMAGE_URL: a reference to the container image, for
example,
us-docker.pkg.dev/cloudrun/container/hello:latest. If you use Artifact Registry, the repository REPO_NAME must already be created. The URL follows the format ofLOCATION-docker.pkg.dev/PROJECT_ID/REPO_NAME/PATH:TAG - Optional: NETWORK with the name of your VPC network. Specify either a VPC network or a subnet, or both. If you specify only a network, the subnet uses the same name as the network.
- Optional:
SUBNET with the name of your subnet. The subnet must be
/26or larger. Direct VPC egress supports IPv4 ranges RFC 1918, RFC 6598, and Class E. You can deploy or execute multiple services or jobs on the same subnet, but the subnet cannot be shared by any existing connectors. - Optional: NETWORK_TAG_NAMES with the comma-separated names
of the network tags
you want to associate with a service. For services, network tags are
specified at the revision-level. Each service revision can have
different network tags, such as
network-tag-2. - EGRESS_SETTING with an
egress setting value:
all-traffic: Sends all outbound traffic through the VPC network.private-ranges-only: Sends only traffic to internal addresses through the VPC network.
- REGION with a region for your service.
To verify that your service is on your VPC network, run the following command:
gcloud run services describe SERVICE_NAME \
--region=REGION
Replace:
SERVICE_NAMEwith the name of your service.REGIONwith the region for your service that you specified in the previous step.
The output should contain the name of your network, subnet, and egress setting, for example:
VPC access:
  Network:       default
  Subnet:        subnet
  Egress:        private-ranges-only
You can now send requests from your Cloud Run service to any resource on the VPC network, as allowed by your firewall rules.
YAML
If you are creating a new service, skip this step. If you are updating an existing service, download its YAML configuration:
gcloud run services describe SERVICE --format export > service.yaml
Update the following attributes:
apiVersion: serving.knative.dev/v1
  kind: Service
  metadata:
    name: SERVICE_NAME
    labels:
      cloud.googleapis.com/location: REGION
  spec:
    template:
      metadata:
        annotations:
          run.googleapis.com/network-interfaces: '[{"network":"NETWORK","subnetwork":"SUBNET","tags":"NETWORK_TAG_NAMES"}]'
          run.googleapis.com/vpc-access-egress: EGRESS_SETTING
      spec:
        containers:
        - image: IMAGE
Replace:
- SERVICE_NAME with the name of your Cloud Run service. Service names must be 49 characters or less and must be unique per region and project.
- REGION with the region for your Cloud Run service, which must match the region of your subnet.
- Optional: NETWORK with the name of your VPC network. Specify either a VPC network or a subnet, or both. If you specify only a network, the subnet uses the same name as the network.
- Optional:
SUBNET with the name of your subnet. The subnet must be
/26or larger. Direct VPC egress supports IPv4 ranges RFC 1918, RFC 6598, and Class E. You can deploy or execute multiple services or jobs on the same subnet, but the subnet cannot be shared by any existing connectors. - Optional: NETWORK_TAG_NAMES with the names of the
network tags
you want to associate with a service. For services, network tags are
specified at the revision-level. Each service revision can have
different network tags, such as
network-tag-2. - EGRESS_SETTING with an
egress setting value:
all-traffic: Sends all outbound traffic through the VPC network.private-ranges-only: Sends only traffic to internal addresses through the VPC network.
- IMAGE with the URL of your service container image.
You can also specify more configuration, such as environment variables or memory limits.
Create or update the service using the following command:
gcloud run services replace service.yaml
Terraform
To learn how to apply or remove a Terraform configuration, see Basic Terraform commands.
Add the following to your
main.tffile:
Optionally, make your service public if you want to allow unauthenticated access to the service.
Configure your job to use Direct VPC
Direct VPC egress allows your Cloud Run job to send traffic to a VPC network without a Serverless VPC Access connector. You can also add network tags directly on Cloud Run jobs for more granular network security, such as applying VPC firewall rules.
You can configure Direct VPC egress with a job by using the Google Cloud console, Google Cloud CLI, or YAML.
Console
If you are configuring a new job, click the Jobs tab and fill out the initial job settings page as needed. If you are configuring an existing job, click the job, then click Edit.
Click Container, Variables & Secrets, Connections, Security to expand the job properties page.
Click the Connections tab.
Click Connect to a VPC for outbound traffic.
Click Send traffic directly to a VPC.
In the Network field, select the VPC network that you want to send traffic to.
In the Subnet field, select the subnet where your job receives IP addresses from. You can execute multiple jobs on the same subnet.
For Traffic routing, select one of the following:
- Route only requests to private IPs to the VPC to send only traffic to internal addresses through the VPC network.
- Route all traffic to the VPC to send all outbound traffic through the VPC network.
Optional: Enter the names of the network tags that you want to associate with your service or services. Network tags are specified at the revision-level. Each service revision can have different network tags, such as
network-tag-2.Optional: Enter the names of the network tags that you want to associate with your job or jobs. For jobs, network tags are specified at the execution level. Each job execution can have different network tags, such as
network-tag-2.Click Create or Update.
To verify that your job is on your VPC network, click the job, then click the Configuration tab. The network and subnet are listed in the VPC card.
You can now execute your Cloud Run job and send requests from the job to any resource on the VPC network, as allowed by your firewall rules.
gcloud
To create a Cloud Run job without a connector from the Google Cloud CLI:
Update
gcloudcomponents to the latest version:gcloud components update
Ensure that the Compute Engine API is enabled for your project:
gcloud services enable compute.googleapis.com
Create a Cloud Run job with the following command:
gcloud run jobs create JOB_NAME \
--image=IMAGE_URL \
--network=NETWORK \
--subnet=SUBNET \
--network-tags=NETWORK_TAG_NAMES \
--vpc-egress=EGRESS_SETTING \
--region=REGION
Replace:
- JOB_NAME with the name of your Cloud Run job.
- IMAGE_URL: a reference to the
container image—for
example,
us-docker.pkg.dev/cloudrun/container/job:latest - Optional: NETWORK with the name of your VPC network. Specify either a VPC network or a subnet, or both. If you specify only a network, the subnet uses the same name as the network.
- Optional:
SUBNET with the name of your subnet. The subnet must be
/26or larger. Direct VPC egress supports IPv4 ranges RFC 1918, RFC 6598, and Class E. You can deploy or execute multiple services or jobs on the same subnet, but the subnet cannot be shared by any existing connectors. - Optional: NETWORK_TAG_NAMES with the names of the
network tags
you want to associate with a job. For jobs, network tags are specified
at the execution-level. Each job execution can have different network
tags, such as
network-tag-2. - EGRESS_SETTING with an
egress setting value:
all-traffic: Sends all outbound traffic through the VPC network.private-ranges-only: Sends only traffic to internal addresses through the VPC network.
- REGION with a region for your job.
To verify that the job is on your VPC network, run the following command:
gcloud run jobs describe JOB_NAME \
  --region=REGION
Replace:
JOB_NAMEwith the name of your job.REGIONwith the region for your job that you specified in the previous step.
The output should contain the name of your network and subnet, for example:
VPC network:
  Network:       default
  Subnet:        default
You can now execute your Cloud Run job and send requests from the job to any resource on the VPC network, as allowed by your firewall rules.
YAML
If you are creating a new job, skip this step. If you are updating an existing job, download its YAML configuration:
gcloud run jobs describe JOB_NAME --format export > job.yaml
Update the following attributes:
apiVersion: run.googleapis.com/v1
  kind: Job
  metadata:
    name: JOB_NAME
    labels:
      cloud.googleapis.com/location: REGION
  spec:
    template:
      metadata:
        annotations:
          run.googleapis.com/network-interfaces: '[{"network":"NETWORK","subnetwork":"SUBNET","tags":"NETWORK_TAG_NAMES"}]'
          run.googleapis.com/vpc-access-egress: EGRESS_SETTING
      spec:
        containers:
        - image: IMAGE
Replace:
- JOB_NAME with the name of your Cloud Run job. Job names must be 49 characters or less and must be unique per region and project.
- REGION with the region for your Cloud Run job, which must match the region of your subnet.
- Optional: NETWORK with the name of your VPC network. Specify either a VPC network or a subnet, or both. If you specify only a network, the subnet uses the same name as the network.
- Optional:
SUBNET with the name of your subnet. The subnet must be
/26or larger. Direct VPC egress supports IPv4 ranges RFC 1918, RFC 6598, and Class E. You can deploy or execute multiple services or jobs on the same subnet, but the subnet cannot be shared by any existing connectors. - Optional: NETWORK_TAG_NAMES with the names of the
network tags
you want to associate with a job. For jobs, network tags are specified
at the execution-level. Each job execution can have different network
tags, such as
network-tag-2. - EGRESS_SETTING with an
egress setting value:
all-traffic: Sends all outbound traffic through the VPC network.private-ranges-only: Sends only traffic to internal addresses through the VPC network.
- IMAGE with the URL of your job container image.
Create or update the job using the following command:
gcloud run jobs replace job.yaml
Troubleshooting
Service account permissions
To perform operations in your Google Cloud project, Serverless VPC Access uses the Serverless VPC Access Service Agent service account. This service account's email address has the following form:
service-PROJECT_NUMBER@gcp-sa-vpcaccess.iam.gserviceaccount.com
By default, this service account has the
Serverless VPC Access Service Agent role
(roles/vpcaccess.serviceAgent). Serverless VPC Access
operations may fail if you change this account's permissions.
Poor network performance or high idle CPU utilization
Using a single connector for thousands of instances can cause performance degradation and elevated idle CPU utilization. To fix this, shard your services between multiple connectors.
Issues with custom MTU
If you experience issues with a custom MTU, ensure that you use the default MTU setting for Cloud Run.
Errors
Service account needs Service Agent role error
If you use the Restrict Resource Service Usage
organization policy constraint
to block Cloud Deployment Manager (deploymentmanager.googleapis.com), you
might see the following error message:
Serverless VPC Access service account (service-<PROJECT_NUMBER>@gcp-sa-vpcaccess.iam.gserviceaccount.com) needs Serverless VPC Access Service Agent role in the project.
Set the organization policy to either remove Deployment Manager from the denylist or add it to the allowlist.
Connector creation error
If creating a connector results in an error, try the following:
- Specify an RFC 1918 internal IP range that does not overlap with any existing IP address reservations in the VPC network.
- Grant your project permission to use Compute Engine VM images from the
project with ID
serverless-vpc-access-images. For more information about how to update your organization policy accordingly, see Set image access constraints.
Unable to access resources
If you specified a connector but still cannot access resources in your VPC network, make sure that there are no firewall rules on your VPC network with a priority lower than 1000 that deny ingress from your connector's IP address range.
If you configure a connector in a Shared VPC service project, make sure that your firewall rules allow ingress from your serverless infrastructure to the connector.
Connection refused error
If you receive connection refused or connection timeout errors that degrade
network performance, your connections could be growing without limit across
invocations of your serverless application. To limit the maximum number of
connections used per instance, use a client library that supports connection
pools. For detailed examples of how to use connection pools, see
Manage database connections.
Resource not found error
When deleting a VPC network or a firewall rule, you might see a
message that is similar to the following: The resource
"aet-uscentral1-subnet--1-egrfw" was not found.
For information about this error and its solution, see Resource not found error in the VPC firewall rules documentation.
Next steps
- Monitor admin activity with Serverless VPC Access audit logging.
- Protect resources and data by creating a service perimeter with VPC Service Controls.
- Learn about the Identity and Access Management (IAM) roles associated with Serverless VPC Access. See Serverless VPC Access roles in the IAM documentation for a list of permissions associated with each role.
- Learn how to connect to Memorystore from: