Organiza tus páginas con colecciones
Guarda y categoriza el contenido según tus preferencias.
En esta página, se describe cómo conectarse a una base de datos de Spanner en IntelliJ y otros productos de JetBrains.
IntelliJ IDEA es un entorno de desarrollo integrado para crear software en Java, Kotlin, Groovy y otros lenguajes basados en JVM.
En esta página, se da por sentado que ya tienes IntelliJ o cualquier otro IDE de JetBrains instalado en tu computadora.
Conéctate a Spanner
Conectar IntelliJ a tu base de datos de Spanner te permite ejecutar consultas y otras instrucciones de SQL en tu base de datos de Spanner directamente desde IntelliJ. También habilita la finalización y validación de código para los nombres de las tablas y columnas en tu código.
Para conectarte a bases de datos de dialecto GoogleSQL y de dialecto PostgreSQL, sigue estos pasos:
En IntelliJ, haz clic en la opción de menú File > New > Datasource > Google Spanner.
El controlador Google Spanner se encuentra en el submenú Other si nunca lo usaste.
En la ventana Fuentes de datos, ingresa el ID de tu proyecto, instancia y base de datos.
Opcional: Selecciona un archivo de claves de la cuenta de servicio si deseas autenticarte con una cuenta de servicio. Selecciona No Auth en el menú desplegable Credenciales si quieres
usar tus credenciales predeterminadas.
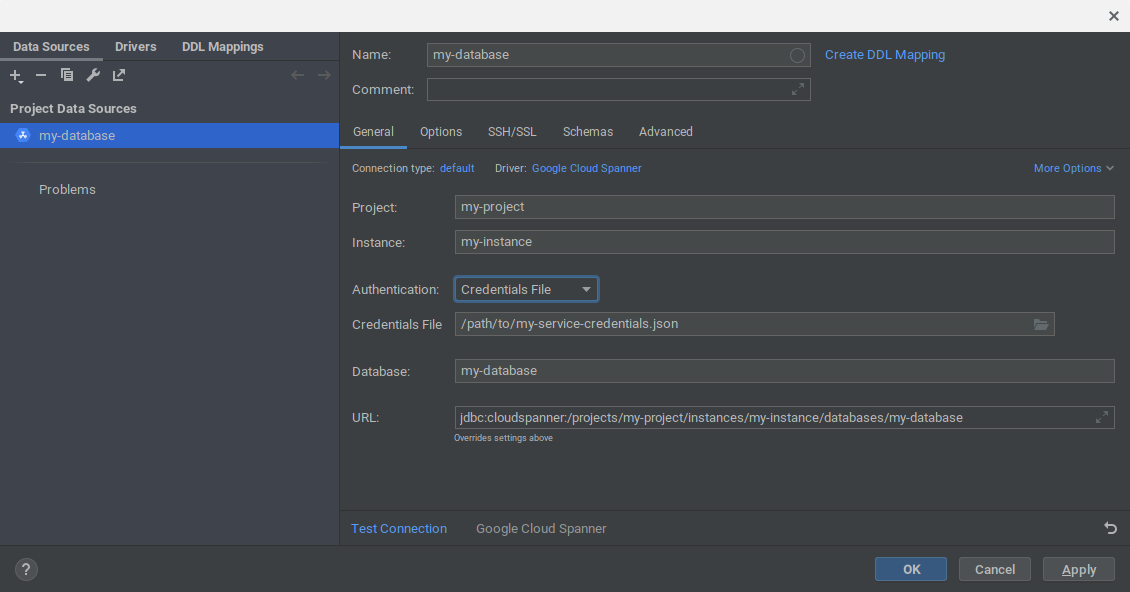
Haz clic en Aceptar para crear la fuente de datos. La base de datos de Spanner se agrega a la ventana Base de datos en IntelliJ.
En la ventana Bases de datos, expande la fuente de datos que acabas de agregar. Luego, haz clic en el botón ... junto al texto No schemas selected.
Selecciona la opción All schemas para indicarle a IntelliJ que inspeccione todos los esquemas de la base de datos. Luego, IntelliJ propagará la vista de la base de datos con todas las tablas y vistas de tu base de datos.
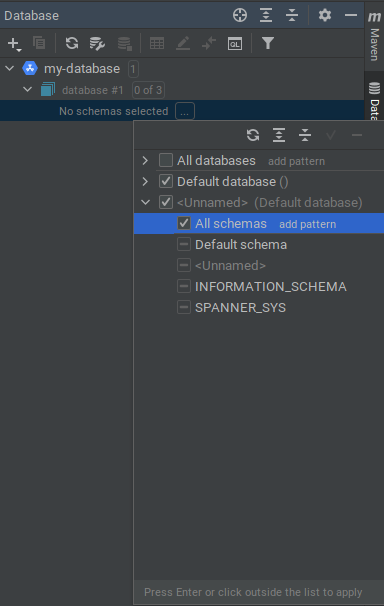
Cómo conectarse al emulador de Spanner
También puedes conectar IntelliJ a una base de datos en el emulador de Spanner:
Primero, inicia el emulador con uno de los siguientes comandos:
gcloud emulators spanner start
docker run -p 9010:9010 -p 9020:9020 gcr.io/cloud-spanner-emulator/emulator
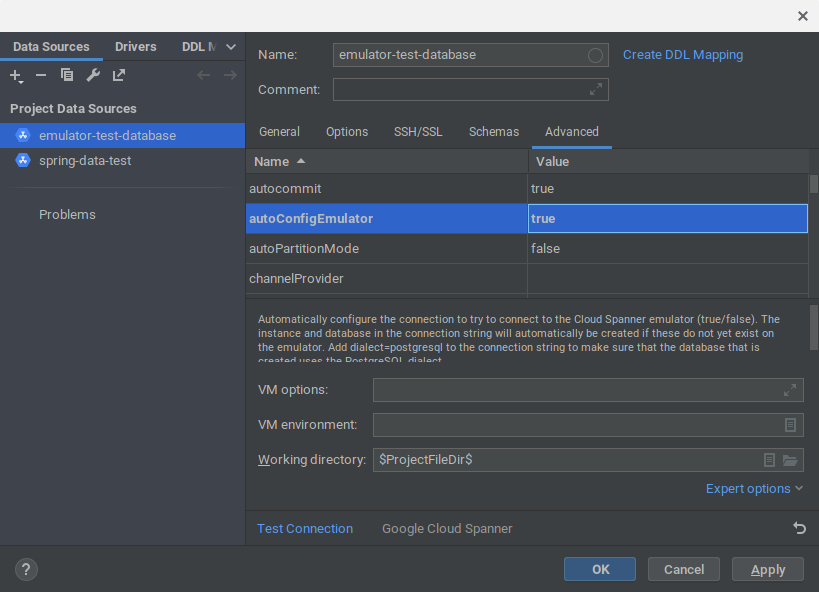
Haz clic en la opción de menú File > New > Datasource > Google Spanner.
El controlador Google Spanner se encuentra en el submenú Other si nunca lo usaste.
Ingresa el ID del proyecto, la instancia y la base de datos. NOTA: No es necesario que el proyecto, la instancia ni la base de datos existan en el emulador.
Selecciona No Auth en el menú desplegable Credenciales.
Haz clic en la pestaña Advanced en la ventana Fuentes de datos.
Modifica el valor de autoConfigEmulator a true.
Haz clic en Aceptar para aceptar todos los cambios. El proyecto, la instancia y la base de datos se crearán en el emulador automáticamente si aún no existen.
En la ventana Bases de datos, expande la fuente de datos que acabas de agregar.
Haz clic en el botón ... junto al texto No schemas selected.
Selecciona la opción All schemas para indicarle a IntelliJ que inspeccione todos los esquemas de la base de datos. Luego, IntelliJ propagará la vista de la base de datos con todas las tablas y vistas de tu base de datos.
¿Qué sigue?
Para obtener más documentación sobre cómo agregar fuentes de datos y trabajar con ellas en IntelliJ, consulta Fuentes de datos de IntelliJ.
[[["Fácil de comprender","easyToUnderstand","thumb-up"],["Resolvió mi problema","solvedMyProblem","thumb-up"],["Otro","otherUp","thumb-up"]],[["Difícil de entender","hardToUnderstand","thumb-down"],["Información o código de muestra incorrectos","incorrectInformationOrSampleCode","thumb-down"],["Faltan la información o los ejemplos que necesito","missingTheInformationSamplesINeed","thumb-down"],["Problema de traducción","translationIssue","thumb-down"],["Otro","otherDown","thumb-down"]],["Última actualización: 2025-09-05 (UTC)"],[],[],null,["# Integrate Spanner with IntelliJ\n\nThis page describes how to connect to a Spanner database in IntelliJ and\nother JetBrains products.\n\n[IntelliJ IDEA](https://www.jetbrains.com/idea/) is an integrated development environment\nfor developing software in Java, Kotlin, Groovy, and other JVM-based languages.\n\nThis page assumes that you already have IntelliJ or another JetBrains IDE\ninstalled on your computer.\n\nConnect to Spanner\n------------------\n\nConnecting IntelliJ to your Spanner database lets you execute queries\nand other SQL statements on your Spanner database directly from\nIntelliJ. It also enables code completion and validation for table and column\nnames in your code.\n\nYou can connect to both GoogleSQL-dialect databases and PostgreSQL-dialect databases by following these steps:\n\n1. In IntelliJ, click the menu option\n `File \u003e New \u003e Datasource \u003e Google Spanner`.\n The `Google Spanner` driver is under the `Other` sub-menu if you have\n not used this driver before.\n\n2. In the Data Sources window, enter your project, instance, and database ID.\n\n3. Optional: Select a service account key file if you want to authenticate using\n a service account. Select `No Auth` in the Credentials drop-down if you want\n to use your default credentials.\n\n4. Click OK to create the data source. The Spanner database is\n added to the Database window in IntelliJ.\n\n5. In the Databases window, expand the data source that you just added. Then\n click the `...` button next to the text `No schemas selected`.\n\n6. Select the option `All schemas` to instruct IntelliJ to introspect all\n schemas in the database. IntelliJ will then populate the database view with\n all tables and views in your database.\n\nConnect to the Spanner Emulator\n-------------------------------\n\nYou can also connect IntelliJ to a database in the\n[Spanner Emulator](https://cloud.google.com/spanner/docs/emulator):\n\n1. First start the emulator with one of the following commands:\n\n 1. `gcloud emulators spanner start`\n 2. `docker run -p 9010:9010 -p 9020:9020 gcr.io/cloud-spanner-emulator/emulator`\n2. Click the menu option `File \u003e New \u003e Datasource \u003e Google Spanner`.\n The `Google Spanner` driver is under the `Other` sub-menu if you have\n not used this driver before.\n\n3. Enter the project, instance, and database ID. **NOTE**: The project, instance\n and database do not need to exist in the emulator.\n\n4. Select `No Auth` in the Credentials drop-down.\n\n5. Click the `Advanced` tab in the Data Sources window.\n\n6. Modify the value of `autoConfigEmulator` to `true`.\n\n7. Click OK to accept all changes. The project, instance, and database will\n be created on the emulator automatically if these do not exist already.\n\n8. In the Databases window, expand the data source that you just added.\n Click the `...` button next to the text `No schemas selected`.\n\n9. Select the option `All schemas` to instruct IntelliJ to introspect all\n schemas in the database. IntelliJ will then populate the database view with\n all tables and views in your database.\n\nWhat's next\n-----------\n\n- For more documentation on how to add and work with data sources in IntelliJ, visit [IntelliJ Data sources](https://www.jetbrains.com/help/idea/managing-data-sources.html).\n- Learn more about the [Spanner Emulator](https://cloud.google.com/spanner/docs/emulator)."]]