Questa pagina mostra come pubblicare un'API da un dominio personalizzato di tua proprietà, ad esempio example.com.
In alternativa all'utilizzo del tuo nome di dominio, puoi utilizzare un nome di dominio gestito da Google. Per ulteriori informazioni, consulta Utilizzare un dominio gestito da Google.
Prima di iniziare
- Se non hai ancora un nome di dominio da utilizzare per la tua API, ottienilo da un registrar di nomi di dominio.
- Verifica la proprietà del dominio.
- Assegna un nome al nome host dell'API con il nome del tuo dominio.
- Se utilizzi SSL con il tuo dominio, ottieni e carica il certificato SSL.
- Esegui il deployment dell'API e Extensible Service Proxy (ESP).
Configura il progetto API in modo che utilizzi il tuo nome di dominio
Segui le istruzioni riportate nella scheda appropriata.
App Engine
Per impostare il progetto API in modo che utilizzi il dominio verificato, segui le istruzioni riportate in Aggiunta di un dominio personalizzato per l'applicazione.
Compute Engine
Il modo consigliato per pubblicare un'API dalle istanze Compute Engine è utilizzare un bilanciatore del carico in un gruppo di istanze. Devi prenotare un indirizzo IP esterno per il nome di dominio e utilizzarlo per il bilanciatore del carico.
Per pubblicare l'API da un nome di dominio:
- Prenota almeno un indirizzo IP esterno statico nel tuo progetto:
- Assegna un nome qualsiasi all'indirizzo IP riservato
- In Tipo, fai clic su Globale.
- In Allegato a, fai clic su Nessuna. L'indirizzo IP verrà collegato a un bilanciatore del carico in un secondo momento.
- Visita l'account del tuo provider di dominio e modifica le impostazioni del dominio. Devi
creare un record A che contenga il nome dell'API, ad esempio
myapi.example.comcon l'indirizzo IP esterno nel relativo campo dati - Crea un gruppo di istanze che includa le istanze che eseguono l'API e
Extensible Service Proxy (ESP):
- Assegna un nome qualsiasi al gruppo e aggiungi una descrizione.
- Nell'elenco Zona, fai clic sulla zona utilizzata dall'istanza API.
- Nell'elenco Definizione istanza, fai clic su Seleziona istanze esistenti.
- Nel campo Istanze VM, aggiungi l'istanza VM che esegue l'API.
- Fai clic su Crea.
- Crea e configura un bilanciatore del carico HTTP(S):
Vai alla pagina Crea un nuovo bilanciatore del carico HTTP(S)
- Fai clic su Definisci un servizio di backend > Crea o seleziona un servizio di backend.
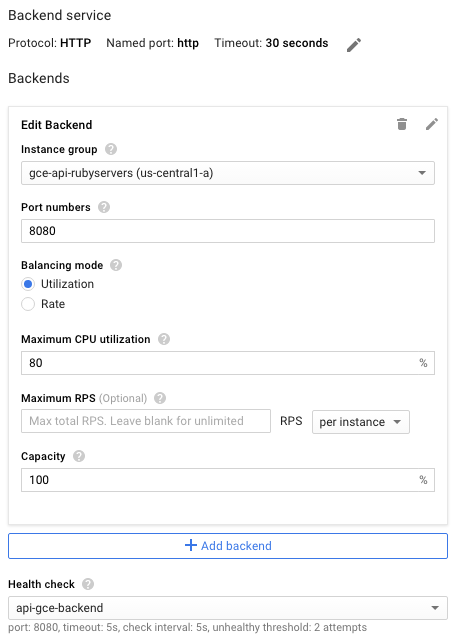
- Assegna il nome e la descrizione che preferisci a questa configurazione del servizio di backend.
- Nel campo Protocollo, seleziona il protocollo da supportare tramite il bilanciatore del carico, HTTP o HTTPS.
- Nell'elenco Gruppo di istanze, fai clic sul gruppo di istanze.
- Nel campo Numeri di porta, inserisci
8080. - Fai clic su Controllo di integrità per configurare i controlli di integrità:
- Inserisci un nome per la configurazione del controllo di integrità.
- Assegna la porta
8080. - Per accettare i valori predefiniti rimanenti, fai clic su Salva.
- Per il momento, accetta i valori predefiniti per il resto della configurazione. Puoi apportare modifiche in un secondo momento, ad esempio aggiungere porte.
- Non è necessario impostare nulla nelle Regole host e percorso. Puoi inoltrare tutto all'API di backend utilizzando i filtri predefiniti Qualsiasi senza corrispondenza. Ciò significa che tutto il traffico inviato al bilanciatore del carico viene indirizzato all'API sulla porta
8080(la porta predefinita) come definito nei passaggi precedenti. - Fai clic su Configurazione frontend.
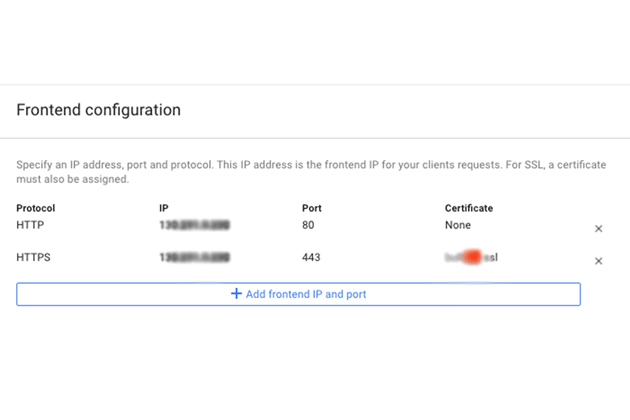
- Nel campo Protocollo, seleziona il protocollo da supportare tramite il bilanciatore del carico, HTTP o HTTPS.
- Nell'elenco IP, fai clic sull'indirizzo IP esterno che hai creato in precedenza.
- Per il protocollo HTTPS, devi utilizzare SSL. Nell'elenco Certificato, fai clic sul certificato che ti interessa.
- Se vuoi supportare un altro protocollo, fai clic su Aggiungi IP e porta frontend, specifica il protocollo, lo stesso indirizzo IP esterno e una porta diversa.
- Per creare il bilanciatore del carico completamente configurato, fai clic su Crea. Se il pulsante Crea non è abilitato, controlla i componenti appena configurati: accanto a ciascun componente di configurazione dovrebbe apparire un segno di spunta. Se manca il segno di spunta, significa che non hai completato la configurazione.
- Dopo la propagazione delle modifiche DNS, le richieste vengono inviate all'API utilizzando il bilanciatore del carico.
GKE
Per pubblicare un'API su un dominio per Google Kubernetes Engine (GKE), devi esporre ESP come servizio utilizzando l'indirizzo IP esterno restituito per le impostazioni DNS del tuo dominio. Tieni presente che GKE esegue automaticamente il bilanciamento del carico per te.
Per esporre l'API come servizio:
- Se non ne hai già uno,
configura un servizio Kubernetes
per i backend dell'API. Crea un file di configurazione del servizio,
service.yaml, con contenuti simili ai seguenti:apiVersion: v1 kind: Service metadata: name: echo spec: ports: - port: 80 targetPort: 8081 protocol: TCP selector: app: echo-app type: LoadBalancer - Modifica l'etichetta
selectorin modo che corrisponda alle etichette di backend (app: echo-appin questo esempio) - Assicurati che
targetPortcorrisponda alla porta utilizzata da ESP configurata nei backend dell'API. L'ESP utilizza la porta8081per impostazione predefinita. - Esegui il deployment del servizio Kubernetes:
kubectl apply -f service.yaml - Visualizza l'indirizzo IP esterno assegnato al servizio esposto:
kubectl get servicesEXTERNAL-IPsimile al seguente:
NAME CLUSTER-IP EXTERNAL-IP PORT(S) AGE hello-node 10.X.XXX.202 10X.XXX.XX.123 8080/TCP 1m - Modifica l'indirizzo IP esterno generato da temporaneo a statico.
- Seleziona il tuo indirizzo IP esterno dall'elenco.
- Nell'elenco Tipo, fai clic su Statico.
- Visita l'account del tuo provider di dominio e modifica le impostazioni del dominio. Devi
creare un record A che contenga il nome dell'API, ad esempio
myapi.example.com, con l'indirizzo IP esterno nel relativo campo dati.