API を使用してユーザー定義指標を作成する

このドキュメントでは、ユーザー定義指標を作成する方法と、Cloud Monitoring API を使用してこの指標データを書き込む方法について説明します。 ユーザー定義指標は、組み込みの Cloud Monitoring 指標と同じ要素を使用します。

  • データポイントのセット。
  • データポイントが何を表しているかを示す指標タイプ情報。
  • モニタリング対象リソース情報。データポイントの発生場所がわかります。

ユーザー定義指標(カスタム指標とも呼ばれます)は、組み込み指標と同じ方法で使用できます。つまり、この指標のデータについて、グラフやアラートを作成できます。

ログベースの指標は、ユーザー定義指標のクラスですが、Cloud Monitoring API を使用して作成できません。ログベースの指標はログエントリから指標データを取得しますが、Monitoring API はログエントリから指標データを抽出する方法を指定できません。代わりに、Cloud Logging を使用してログベースの指標を作成します。ログベースの指標を作成すると、Logging によってこのドキュメントで説明されている構造が作成され、指標データが Cloud Monitoring に送信されます。ログベースの指標の作成については、次のドキュメントをご覧ください。

アプリケーションを計装化する場合は、ベンダー固有またはプロダクト固有の API やクライアント ライブラリではなく、OpenTelemetry などのオープンソースの計装化フレームワークを使用することをおすすめします。アプリケーションの計装の詳細については、計装とオブザーバビリティをご覧ください。

始める前に

すべての指標の基礎となる構造については、指標、時系列、リソースをご覧ください。

Cloud Monitoring を使用するには、課金を有効にした Google Cloud プロジェクトが必要です。必要に応じて、次のことを行います。

  1. In the Google Cloud console, on the project selector page, select or create a Google Cloud project.

    Go to project selector

  2. Make sure that billing is enabled for your Google Cloud project.

  3. Monitoring API が有効になっていることを確認します。詳細については、Monitoring API の有効化をご覧ください。
  4. Google Cloudの外部で実行されているアプリケーションの場合、Google Cloud プロジェクトはローカルのアプリケーションのデフォルト認証情報(ADC)を使用してアプリケーションを認証する必要があります。詳細については、オンプレミスまたは他のクラウド プロバイダの ADC を設定するをご覧ください。

ユーザー定義指標タイプを作成する

ユーザー定義指標を作成するには、指標に関するさまざまな情報を指定する MetricDescriptor オブジェクトを定義するか、指標データを書き込みます。指標データを書き込むと、Monitoring では、提供されたデータの構造に基づいて指標記述子が作成されます。指標記述子の設計については、ユーザー定義指標の指標記述子をご覧ください。

指標記述子の自動作成

該当のユーザー定義指標の指標記述子が存在しない場合に指標データを書き込むと、指標記述子が自動的に作成されます。 ただし、この新しい指標記述子は、必要なものとは正確に一致しない可能性があります。指標記述子の自動作成には、いくつかの仮定とデフォルトが伴います。

timeSeries.create の呼び出しに含まれる TimeSeries オブジェクトが、存在しない 指標タイプ名 を指定する Metric オブジェクトを参照する場合、Cloud Monitoring は新しいMetricDescriptorを作成します。Cloud Monitoring は、次のルールを使用して MetricDescriptor に値を入力します。

  • type: Metric オブジェクトの type フィールドからコピーされます。
  • name: 名前は、メソッド呼び出しで指定されたプロジェクト ID と Metric オブジェクトの type の値から作成されます。
  • labels: Metric オブジェクトで使用されるラベル。新しい指標記述子の各ラベル記述子には次のフィールドがあります。
    • key: Metric オブジェクト内のラベルキー
    • valueType: STRING
    • description: 未設定
  • metricKind: TimeSeries オブジェクトの metricKind パラメータを指定しない限り、指標の種類は GAUGE に設定されます。metricKind を指定すると、新しい指標はその種類になります。GAUGECUMULATIVE の種類のみ指定できます。
  • valueType: 値型は、書き込まれる Point の型指定された値から取得されます。値型は、BOOLINT64DOUBLEDISTRIBUTION のいずれかにする必要があります。TimeSeriesvalueType フィールドで、値型を指定する場合は、その型が Point の型と一致する必要があります。
  • unit: 未設定
  • description: "Auto created custom metric."
  • displayName: 未設定

1 回の timeSeries.create の呼び出しに、存在しない同じ指標タイプを参照する複数の TimeSeries オブジェクトを含めることができます。その場合、新しい指標記述子のラベルは、この create の呼び出しにおけるすべての時系列の Metric オブジェクトのラベルすべてのユニオンになります。

次のステップ: ユーザー定義指標を書き込むをご覧ください。

手動での指標記述子の作成

指標記述子を作成するには、次のようにします。

  1. 指標記述子の構造を決定します。こうした選択では、組み込まれた指標を閲覧することや、その時系列データを見ることが、判断の参考になります。

    1. ユーザー定義指標の指標名を選択します。

    2. 指標の表示名と説明を選択します。表示名は Google Cloud コンソールで使用されます。

    3. ユーザー定義指標を定義してその時系列データを書き込む、対象のプロジェクトを選択し、時系列データを書き込みます。 複数のプロジェクトで同じ指標が必要な場合は、それぞれのプロジェクトに同じ指標の定義を作成します。

    4. 指標の種類、値の型、単位(省略可)を決定します。値の型と指標の種類の中には、ユーザー定義指標ではサポートされないものもあります。これらのフィールドの詳細については、値の型と指標の種類をご覧ください。

    5. 指標のラベル(名前、値の型、説明)を選択します。

  2. 指標データの書き込み対象となるモニタリング対象リソースを決定します。次のリストから選択します。

    • aws_ec2_instance: Amazon EC2 インスタンス。
    • dataflow_job: Dataflow ジョブ。
    • gae_instance: App Engine インスタンス。
    • gce_instance: Compute Engine インスタンス。
    • generic_node: ユーザー指定のコンピューティング ノード。
    • generic_task: ユーザー定義のタスク。
    • gke_container: GKE コンテナ インスタンス。
    • global: 他に適切なリソースタイプがない場合はこのリソースを使用します。ほとんどのケースでは、generic_nodegeneric_task の方が global より適切です。
    • k8s_cluster: Kubernetes クラスタ。
    • k8s_container: Kubernetes コンテナ。
    • k8s_node: Kubernetes ノード。
    • k8s_pod: Kubernetes Pod。
  3. MetricDescriptor オブジェクトを作成して、metricDescriptors.create メソッド呼び出しの引数として渡します。

metricDescriptors.create を呼び出す際に既存の指標記述子と同じタイプ名を使用すると、通常はエラーになります。ただし、新しい MetricDescriptor オブジェクトのすべてのフィールドが既存の記述子のフィールドと完全に一致していればエラーになりませんが、効果はありません。

次の例では、ゲージ指標を作成します。

プロトコル

指標記述子を作成するには、metricDescriptors.create メソッドを使用します。このメソッドは、メソッドのリファレンス ページにある API Explorer ウィジェットを使用して実行できます。詳細については、API Explorer をご覧ください。

metricDescriptors.create のサンプル パラメータを次に示します。

  • 名前 (URL): projects/[PROJECT_ID]
  • リクエスト本文: 次のような MetricDescriptor オブジェクトを渡します。

    {
      "name": "",
      "description": "Daily sales records from all branch stores.",
      "displayName": "Sales",
      "type": "custom.googleapis.com/stores/sales",
      "metricKind": "GAUGE",
      "valueType": "DOUBLE",
      "unit": "{USD}",
      "labels": [
        {
          "key": "store_id",
          "valueType": "STRING",
          "description": "The ID of the store."
        },
      ],
    }
    

[PROJECT_ID] の部分を実際のプロジェクト ID に置き換えて、これらの値をウィジェットのフィールドに入力します。

リクエスト本文を入力したこの API ダイアログを試し、指標記述子を作成します。

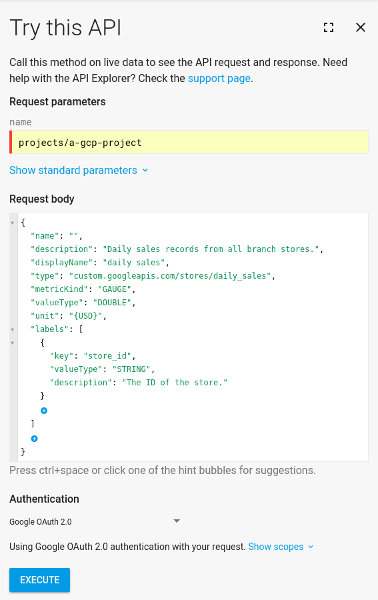
[Execute] ボタンをクリックしてメソッドを実行します。

試してみる

新しい指標を作成する際、MetricDescriptorname フィールドは無視され、省略できます。create メソッドから返される新しい指標記述子では、name フィールドに名前が設定されています。この例では、名前は次のようになります。

"name": "projects/[PROJECT_ID]/metricDescriptors/custom.googleapis.com/stores/daily_sales"

たとえば、指標の記述子を取得する場合などに、この名前を使用します。

C#

Monitoring への認証を行うには、アプリケーションのデフォルト認証情報を設定します。詳細については、ローカル開発環境の認証の設定をご覧ください。

        public static object CreateMetric(string projectId,
            string metricType = "custom.googleapis.com/stores/daily_sales")
        {
            // Create client.
            MetricServiceClient metricServiceClient = MetricServiceClient.Create();

            // Prepare custom metric descriptor.      
            MetricDescriptor metricDescriptor = new MetricDescriptor();
            metricDescriptor.DisplayName = "Daily Sales";
            metricDescriptor.Description = "Daily sales records from all branch stores.";
            metricDescriptor.MetricKind = MetricKind.Gauge;
            metricDescriptor.ValueType = MetricDescriptor.Types.ValueType.Double;
            metricDescriptor.Type = metricType;
            metricDescriptor.Unit = "{USD}";
            LabelDescriptor labels = new LabelDescriptor();
            labels.Key = "store_id";
            labels.ValueType = LabelDescriptor.Types.ValueType.String;
            labels.Description = "The ID of the store.";
            metricDescriptor.Labels.Add(labels);
            CreateMetricDescriptorRequest request = new CreateMetricDescriptorRequest
            {
                ProjectName = new ProjectName(projectId),
            };
            request.MetricDescriptor = metricDescriptor;
            // Make the request.
            MetricDescriptor response = metricServiceClient.CreateMetricDescriptor(request);
            Console.WriteLine("Done creating metric descriptor:");
            Console.WriteLine(JObject.Parse($"{response}").ToString());
            return 0;
        }

Go

Monitoring への認証を行うには、アプリケーションのデフォルト認証情報を設定します。詳細については、ローカル開発環境の認証の設定をご覧ください。


import (
	"context"
	"fmt"
	"io"

	monitoring "cloud.google.com/go/monitoring/apiv3"
	"cloud.google.com/go/monitoring/apiv3/v2/monitoringpb"
	"google.golang.org/genproto/googleapis/api/label"
	"google.golang.org/genproto/googleapis/api/metric"
	metricpb "google.golang.org/genproto/googleapis/api/metric"
)

// createCustomMetric creates a custom metric specified by the metric type.
func createCustomMetric(w io.Writer, projectID, metricType string) (*metricpb.MetricDescriptor, error) {
	ctx := context.Background()
	c, err := monitoring.NewMetricClient(ctx)
	if err != nil {
		return nil, err
	}
	defer c.Close()
	md := &metric.MetricDescriptor{
		Name: "Custom Metric",
		Type: metricType,
		Labels: []*label.LabelDescriptor{{
			Key:         "environment",
			ValueType:   label.LabelDescriptor_STRING,
			Description: "An arbitrary measurement",
		}},
		MetricKind:  metric.MetricDescriptor_GAUGE,
		ValueType:   metric.MetricDescriptor_INT64,
		Unit:        "s",
		Description: "An arbitrary measurement",
		DisplayName: "Custom Metric",
	}
	req := &monitoringpb.CreateMetricDescriptorRequest{
		Name:             "projects/" + projectID,
		MetricDescriptor: md,
	}
	m, err := c.CreateMetricDescriptor(ctx, req)
	if err != nil {
		return nil, fmt.Errorf("could not create custom metric: %w", err)
	}

	fmt.Fprintf(w, "Created %s\n", m.GetName())
	return m, nil
}

Java

Monitoring への認証を行うには、アプリケーションのデフォルト認証情報を設定します。詳細については、ローカル開発環境の認証の設定をご覧ください。

// Your Google Cloud Platform project ID
final String projectId = System.getProperty("projectId");

try (final MetricServiceClient client = MetricServiceClient.create();) {
  ProjectName projectName = ProjectName.of(projectId);

  MetricDescriptor descriptor =
      MetricDescriptor.newBuilder()
          .setType(type)
          .addLabels(
              LabelDescriptor.newBuilder()
                  .setKey("store_id")
                  .setValueType(LabelDescriptor.ValueType.STRING))
          .setDescription("This is a simple example of a custom metric.")
          .setMetricKind(MetricDescriptor.MetricKind.GAUGE)
          .setValueType(MetricDescriptor.ValueType.DOUBLE)
          .build();

  CreateMetricDescriptorRequest request =
      CreateMetricDescriptorRequest.newBuilder()
          .setName(projectName.toString())
          .setMetricDescriptor(descriptor)
          .build();

  descriptor = client.createMetricDescriptor(request);
  System.out.println("Created descriptor " + descriptor.getName());
}

Node.js

Monitoring への認証を行うには、アプリケーションのデフォルト認証情報を設定します。詳細については、ローカル開発環境の認証の設定をご覧ください。

// Imports the Google Cloud client library
const monitoring = require('@google-cloud/monitoring');

// Creates a client
const client = new monitoring.MetricServiceClient();

/**
 * TODO(developer): Uncomment and edit the following lines of code.
 */
// const projectId = 'YOUR_PROJECT_ID';
async function createMetricDescriptor() {
  const request = {
    name: client.projectPath(projectId),
    metricDescriptor: {
      description: 'Daily sales records from all branch stores.',
      displayName: 'Daily Sales',
      type: 'custom.googleapis.com/stores/daily_sales',
      metricKind: 'GAUGE',
      valueType: 'DOUBLE',
      unit: '{USD}',
      labels: [
        {
          key: 'store_id',
          valueType: 'STRING',
          description: 'The ID of the store.',
        },
      ],
    },
  };

  // Creates a custom metric descriptor
  const [descriptor] = await client.createMetricDescriptor(request);
  console.log('Created custom Metric:\n');
  console.log(`Name: ${descriptor.displayName}`);
  console.log(`Description: ${descriptor.description}`);
  console.log(`Type: ${descriptor.type}`);
  console.log(`Kind: ${descriptor.metricKind}`);
  console.log(`Value Type: ${descriptor.valueType}`);
  console.log(`Unit: ${descriptor.unit}`);
  console.log('Labels:');
  descriptor.labels.forEach(label => {
    console.log(`  ${label.key} (${label.valueType}) - ${label.description}`);
  });
}
createMetricDescriptor();

PHP

Monitoring への認証を行うには、アプリケーションのデフォルト認証情報を設定します。詳細については、ローカル開発環境の認証の設定をご覧ください。

use Google\Api\LabelDescriptor;
use Google\Api\MetricDescriptor;
use Google\Cloud\Monitoring\V3\Client\MetricServiceClient;
use Google\Cloud\Monitoring\V3\CreateMetricDescriptorRequest;

/**
 * Create a new metric in Stackdriver Monitoring.
 * Example:
 * ```
 * create_metric($projectId);
 * ```
 *
 * @param string $projectId Your project ID
 */
function create_metric($projectId)
{
    $metrics = new MetricServiceClient([
        'projectId' => $projectId,
    ]);

    $projectName = 'projects/' . $projectId;

    $descriptor = new MetricDescriptor();
    $descriptor->setDescription('Daily sales records from all branch stores.');
    $descriptor->setDisplayName('Daily Sales');
    $descriptor->setType('custom.googleapis.com/stores/daily_sales');
    $descriptor->setMetricKind(MetricDescriptor\MetricKind::GAUGE);
    $descriptor->setValueType(MetricDescriptor\ValueType::DOUBLE);
    $descriptor->setUnit('{USD}');
    $label = new LabelDescriptor();
    $label->setKey('store_id');
    $label->setValueType(LabelDescriptor\ValueType::STRING);
    $label->setDescription('The ID of the store.');
    $labels = [$label];
    $descriptor->setLabels($labels);
    $createMetricDescriptorRequest = (new CreateMetricDescriptorRequest())
        ->setName($projectName)
        ->setMetricDescriptor($descriptor);

    $descriptor = $metrics->createMetricDescriptor($createMetricDescriptorRequest);
    printf('Created a metric: ' . $descriptor->getName() . PHP_EOL);
}

Python

Monitoring への認証を行うには、アプリケーションのデフォルト認証情報を設定します。詳細については、ローカル開発環境の認証の設定をご覧ください。

from google.api import label_pb2 as ga_label
from google.api import metric_pb2 as ga_metric
from google.cloud import monitoring_v3

client = monitoring_v3.MetricServiceClient()
project_name = f"projects/{project_id}"
descriptor = ga_metric.MetricDescriptor()
descriptor.type = "custom.googleapis.com/my_metric" + str(uuid.uuid4())
descriptor.metric_kind = ga_metric.MetricDescriptor.MetricKind.GAUGE
descriptor.value_type = ga_metric.MetricDescriptor.ValueType.DOUBLE
descriptor.description = "This is a simple example of a custom metric."

labels = ga_label.LabelDescriptor()
labels.key = "TestLabel"
labels.value_type = ga_label.LabelDescriptor.ValueType.STRING
labels.description = "This is a test label"
descriptor.labels.append(labels)

descriptor = client.create_metric_descriptor(
    name=project_name, metric_descriptor=descriptor
)
print("Created {}.".format(descriptor.name))

Ruby

Monitoring への認証を行うには、アプリケーションのデフォルト認証情報を設定します。詳細については、ローカル開発環境の認証の設定をご覧ください。

# Your Google Cloud Platform project ID
# project_id = "YOUR_PROJECT_ID"

# Example metric type
# metric_type = "custom.googleapis.com/my_metric"

client = Google::Cloud::Monitoring.metric_service
project_name = client.project_path project: project_id

descriptor = Google::Api::MetricDescriptor.new(
  type:        metric_type,
  metric_kind: Google::Api::MetricDescriptor::MetricKind::GAUGE,
  value_type:  Google::Api::MetricDescriptor::ValueType::DOUBLE,
  description: "This is a simple example of a custom metric."
)

result = client.create_metric_descriptor name:              project_name,
                                         metric_descriptor: descriptor
p "Created #{result.name}"
p result

問題がある場合は、API 呼び出しのトラブルシューティングをご覧ください。

次のステップ: ユーザー定義指標を書き込むをご覧ください。

ユーザー定義指標を書き込む

データを定義することができるのは、ユーザー定義指標の指標タイプのみです。データを書き込むには、timeSeries.createメソッドを使用します。時系列が存在する場合は、このメソッドによって既存の時系列に新しいデータポイントが追加されます。時系列が存在しない場合、このメソッドは、時系列を作成してデータを追加します。

データポイントを書き込むには、TimeSeries オブジェクトのリストを timeSeries.create に渡します。リストの最大サイズは 200 で、リスト内の各オブジェクトに異なる時系列を指定する必要があります。

  • metric フィールドと resource フィールドの値は、特定の TimeSeries オブジェクトを同定します。このフィールドは、データの指標タイプと、データの収集元のモニタリング対象リソースを表します。
  • metricKind フィールドと valueType フィールドは省略します。データポイントを書き込むときには無視されます。
  • TimeSeries オブジェクトには Point オブジェクトを 1 つだけ含める必要があります。

    • ポイントの値と時間間隔は指標タイプの定義と一致していなければなりません。さまざまな種類の指標の時間間隔については、TimeInterval をご覧ください。
    • ポイントの時間間隔は、時系列にすでに存在するすべてのポイントより後である必要があります。
    • 時間間隔の終了時刻は、過去 25 時間以内または未来 5 分以内でなければなりません。
  • 同じ時系列に複数のポイントを書き込むには、それぞれのポイントごとに timeSeries.create メソッドを呼び出します。5 秒ごとに 1 つのポイントよりも速く、1 つの時系列にデータを書き込むことはできません。異なる時系列にデータポイントを追加する場合、レート制限はありません。

プロトコル

指標データを書き込むには、timeSeries.create メソッドを使用します。このメソッドは、メソッドのリファレンス ページにある API Explorer ウィジェットを使用して実行できます。詳細については、API Explorer をご覧ください。

手動での指標記述子の作成で作成した stores/daily_sales 指標にポイントを書き込むには:

  1. timeSeries.create のリファレンス ページに移動します。
  2. 下記のパラメータを API Explorer ウィジェットに供給します。
  3. [Execute] ボタンをクリックします。

次のサンプル パラメータを使用します。

  • 名前: projects/[PROJECT_ID]
  • リクエスト本文: この中に TimeSeries オブジェクトのリストがあります。次のサンプルでは、リストに時系列が 1 つだけ含まれています。

    {
     "timeSeries": [
      {
       "metric": {
        "type": "custom.googleapis.com/my_metric",
        "labels": {
         "my_label": "my_value"
        }
       },
       "resource": {
        "type": "gce_instance",
        "labels": {
         "project_id": "[PROJECT_ID]",
         "instance_id": "1234567890123456789",
         "zone": "us-central1-f"
        }
       },
       "points": [
        {
         "interval": {
          "endTime": "2018-06-01T10:00:00-04:00"
         },
         "value": {
          "doubleValue": 123.45
         }
        }
       ]
      }
     ]
    }
    

試してみる

C#

Monitoring への認証を行うには、アプリケーションのデフォルト認証情報を設定します。詳細については、ローカル開発環境の認証の設定をご覧ください。

        public static object WriteTimeSeriesData(string projectId)
        {
            // Create client.
            MetricServiceClient metricServiceClient = MetricServiceClient.Create();
            // Initialize request argument(s).
            ProjectName name = new ProjectName(projectId);
            // Prepare a data point. 
            Point dataPoint = new Point();
            TypedValue salesTotal = new TypedValue();
            salesTotal.DoubleValue = 123.45;
            dataPoint.Value = salesTotal;
            Timestamp timeStamp = new Timestamp();
            timeStamp.Seconds = (long)(DateTime.UtcNow - s_unixEpoch).TotalSeconds;
            TimeInterval interval = new TimeInterval();
            interval.EndTime = timeStamp;
            dataPoint.Interval = interval;

            // Prepare custom metric.
            Metric metric = new Metric();
            metric.Type = "custom.googleapis.com/stores/daily_sales";
            metric.Labels.Add("store_id", "Pittsburgh");

            // Prepare monitored resource.
            MonitoredResource resource = new MonitoredResource();
            resource.Type = "global";
            resource.Labels.Add("project_id", projectId);

            // Create a new time series using inputs.
            TimeSeries timeSeriesData = new TimeSeries();
            timeSeriesData.Metric = metric;
            timeSeriesData.Resource = resource;
            timeSeriesData.Points.Add(dataPoint);

            // Add newly created time series to list of time series to be written.
            IEnumerable<TimeSeries> timeSeries = new List<TimeSeries> { timeSeriesData };
            // Write time series data.
            metricServiceClient.CreateTimeSeries(name, timeSeries);
            Console.WriteLine("Done writing time series data:");
            Console.WriteLine(JObject.Parse($"{timeSeriesData}").ToString());
            return 0;
        }

Go

Monitoring への認証を行うには、アプリケーションのデフォルト認証情報を設定します。詳細については、ローカル開発環境の認証の設定をご覧ください。


// writeTimeSeriesValue writes a value for the custom metric created
func writeTimeSeriesValue(projectID, metricType string) error {
	ctx := context.Background()
	c, err := monitoring.NewMetricClient(ctx)
	if err != nil {
		return err
	}
	defer c.Close()
	now := &timestamp.Timestamp{
		Seconds: time.Now().Unix(),
	}
	req := &monitoringpb.CreateTimeSeriesRequest{
		Name: "projects/" + projectID,
		TimeSeries: []*monitoringpb.TimeSeries{{
			Metric: &metricpb.Metric{
				Type: metricType,
				Labels: map[string]string{
					"environment": "STAGING",
				},
			},
			Resource: &monitoredres.MonitoredResource{
				Type: "gce_instance",
				Labels: map[string]string{
					"instance_id": "test-instance",
					"zone":        "us-central1-f",
				},
			},
			Points: []*monitoringpb.Point{{
				Interval: &monitoringpb.TimeInterval{
					StartTime: now,
					EndTime:   now,
				},
				Value: &monitoringpb.TypedValue{
					Value: &monitoringpb.TypedValue_Int64Value{
						Int64Value: rand.Int63n(10),
					},
				},
			}},
		}},
	}
	log.Printf("writeTimeseriesRequest: %+v\n", req)

	err = c.CreateTimeSeries(ctx, req)
	if err != nil {
		return fmt.Errorf("could not write time series value, %w ", err)
	}
	return nil
}

Java

Monitoring への認証を行うには、アプリケーションのデフォルト認証情報を設定します。詳細については、ローカル開発環境の認証の設定をご覧ください。

String projectId = System.getProperty("projectId");

// Prepares an individual data point
TimeInterval interval =
    TimeInterval.newBuilder()
        .setEndTime(Timestamps.fromMillis(System.currentTimeMillis()))
        .build();
TypedValue value = TypedValue.newBuilder().setDoubleValue(123.45).build();
Point point = Point.newBuilder().setInterval(interval).setValue(value).build();

List<Point> pointList = new ArrayList<>();
pointList.add(point);

ProjectName name = ProjectName.of(projectId);

// Prepares the metric descriptor
Map<String, String> metricLabels = new HashMap<>();
Metric metric =
    Metric.newBuilder()
        .setType("custom.googleapis.com/my_metric")
        .putAllLabels(metricLabels)
        .build();

// Prepares the monitored resource descriptor
Map<String, String> resourceLabels = new HashMap<>();
resourceLabels.put("instance_id", "1234567890123456789");
resourceLabels.put("zone", "us-central1-f");

MonitoredResource resource =
    MonitoredResource.newBuilder().setType("gce_instance").putAllLabels(resourceLabels).build();

// Prepares the time series request
TimeSeries timeSeries =
    TimeSeries.newBuilder()
        .setMetric(metric)
        .setResource(resource)
        .addAllPoints(pointList)
        .build();

List<TimeSeries> timeSeriesList = new ArrayList<>();
timeSeriesList.add(timeSeries);

CreateTimeSeriesRequest request =
    CreateTimeSeriesRequest.newBuilder()
        .setName(name.toString())
        .addAllTimeSeries(timeSeriesList)
        .build();

// Writes time series data
try (final MetricServiceClient client = MetricServiceClient.create();) {
  client.createTimeSeries(request);
}
System.out.println("Done writing time series value.");

Node.js

Monitoring への認証を行うには、アプリケーションのデフォルト認証情報を設定します。詳細については、ローカル開発環境の認証の設定をご覧ください。

// Imports the Google Cloud client library
const monitoring = require('@google-cloud/monitoring');

// Creates a client
const client = new monitoring.MetricServiceClient();

async function writeTimeSeriesData() {
  /**
   * TODO(developer): Uncomment and edit the following lines of code.
   */
  // const projectId = 'YOUR_PROJECT_ID';

  const dataPoint = {
    interval: {
      endTime: {
        seconds: Date.now() / 1000,
      },
    },
    value: {
      doubleValue: 123.45,
    },
  };

  const timeSeriesData = {
    metric: {
      type: 'custom.googleapis.com/stores/daily_sales',
      labels: {
        store_id: 'Pittsburgh',
      },
    },
    resource: {
      type: 'global',
      labels: {
        project_id: projectId,
      },
    },
    points: [dataPoint],
  };

  const request = {
    name: client.projectPath(projectId),
    timeSeries: [timeSeriesData],
  };

  // Writes time series data
  const result = await client.createTimeSeries(request);
  console.log('Done writing time series data.', result);
}
writeTimeSeriesData();

PHP

Monitoring への認証を行うには、アプリケーションのデフォルト認証情報を設定します。詳細については、ローカル開発環境の認証の設定をご覧ください。

use Google\Api\Metric;
use Google\Api\MonitoredResource;
use Google\Cloud\Monitoring\V3\Client\MetricServiceClient;
use Google\Cloud\Monitoring\V3\CreateTimeSeriesRequest;
use Google\Cloud\Monitoring\V3\Point;
use Google\Cloud\Monitoring\V3\TimeInterval;
use Google\Cloud\Monitoring\V3\TimeSeries;
use Google\Cloud\Monitoring\V3\TypedValue;
use Google\Protobuf\Timestamp;

/**
 * Example:
 * ```
 * write_timeseries($projectId);
 * ```
 *
 * @param string $projectId Your project ID
 */
function write_timeseries($projectId)
{
    $metrics = new MetricServiceClient([
        'projectId' => $projectId,
    ]);

    $projectName = 'projects/' . $projectId;

    $endTime = new Timestamp();
    $endTime->setSeconds(time());
    $interval = new TimeInterval();
    $interval->setEndTime($endTime);

    $value = new TypedValue();
    $value->setDoubleValue(123.45);

    $point = new Point();
    $point->setValue($value);
    $point->setInterval($interval);
    $points = [$point];

    $metric = new Metric();
    $metric->setType('custom.googleapis.com/stores/daily_sales');
    $labels = ['store_id' => 'Pittsburg'];
    $metric->setLabels($labels);

    $resource = new MonitoredResource();
    $resource->setType('global');
    $labels = ['project_id' => $projectId];
    $resource->setLabels($labels);

    $timeSeries = new TimeSeries();
    $timeSeries->setMetric($metric);
    $timeSeries->setResource($resource);
    $timeSeries->setPoints($points);
    $createTimeSeriesRequest = (new CreateTimeSeriesRequest())
        ->setName($projectName)
        ->setTimeSeries([$timeSeries]);

    $metrics->createTimeSeries($createTimeSeriesRequest);

    printf('Done writing time series data.' . PHP_EOL);
}

Python

Monitoring への認証を行うには、アプリケーションのデフォルト認証情報を設定します。詳細については、ローカル開発環境の認証の設定をご覧ください。

from google.cloud import monitoring_v3

client = monitoring_v3.MetricServiceClient()
project_name = f"projects/{project_id}"

series = monitoring_v3.TimeSeries()
series.metric.type = "custom.googleapis.com/my_metric" + str(uuid.uuid4())
series.resource.type = "gce_instance"
series.resource.labels["instance_id"] = "1234567890123456789"
series.resource.labels["zone"] = "us-central1-c"
series.metric.labels["TestLabel"] = "My Label Data"
now = time.time()
seconds = int(now)
nanos = int((now - seconds) * 10**9)
interval = monitoring_v3.TimeInterval(
    {"end_time": {"seconds": seconds, "nanos": nanos}}
)
point = monitoring_v3.Point({"interval": interval, "value": {"double_value": 3.14}})
series.points = [point]
client.create_time_series(name=project_name, time_series=[series])

Ruby

Monitoring への認証を行うには、アプリケーションのデフォルト認証情報を設定します。詳細については、ローカル開発環境の認証の設定をご覧ください。

# Your Google Cloud Platform project ID
# project_id = "YOUR_PROJECT_ID"

# Example metric type
# metric_type = "custom.googleapis.com/my_metric"

client = Google::Cloud::Monitoring.metric_service
project_name = client.project_path project: project_id

series = Google::Cloud::Monitoring::V3::TimeSeries.new
series.metric = Google::Api::Metric.new type: metric_type

resource = Google::Api::MonitoredResource.new type: "global"
resource.labels["project_id"] = project_id
series.resource = resource

point = Google::Cloud::Monitoring::V3::Point.new
point.value = Google::Cloud::Monitoring::V3::TypedValue.new double_value: 3.14
now = Time.now
end_time = Google::Protobuf::Timestamp.new seconds: now.to_i, nanos: now.nsec
point.interval = Google::Cloud::Monitoring::V3::TimeInterval.new end_time: end_time
series.points << point

client.create_time_series name: project_name, time_series: [series]
p "Time series created."

問題がある場合は、API 呼び出しのトラブルシューティングをご覧ください。

ユーザー定義指標を削除する

ユーザー定義指標を削除するには、その指標記述子を削除します。 Google Cloud プロジェクトに保存されている時系列データは削除できません。ただし、指標記述子を削除すると、データにアクセスできなくなります。データは期限切れになり、データ保持ポリシーに従って削除されます。

組み込み指標の指標記述子は削除できません。

指標記述子を削除するには、metricDescriptors.delete メソッドを呼び出します。

プロトコル

指標記述子を削除するには、metricDescriptors.delete メソッドを使用します。このメソッドは、メソッドのリファレンス ページにある API Explorer ウィジェットを使用して実行できます。詳細については、API Explorer をご覧ください。

手動での指標記述子の作成で作成した stores/daily_sales 指標を削除するには、次のようにします。

  1. metricDescriptors.delete のリファレンス ページに移動します。
  2. 指標記述子の名前を API Explorer ウィジェットに供給します。

    名前: projects/[PROJECT_ID]/metricDescriptors/custom.googleapis.com/stores/daily_sales

  3. [Execute] ボタンをクリックします。

試してみる

C#

Monitoring への認証を行うには、アプリケーションのデフォルト認証情報を設定します。詳細については、ローカル開発環境の認証の設定をご覧ください。

public static object DeleteMetric(string projectId, string metricType)
{
    // Create client.
    MetricServiceClient metricServiceClient = MetricServiceClient.Create();
    // Initialize request argument(s).
    MetricDescriptorName name = new MetricDescriptorName(projectId, metricType);
    // Make the request.
    metricServiceClient.DeleteMetricDescriptor(name);
    Console.WriteLine($"Done deleting metric descriptor: {name}");
    return 0;
}

Go

Monitoring への認証を行うには、アプリケーションのデフォルト認証情報を設定します。詳細については、ローカル開発環境の認証の設定をご覧ください。


import (
	"context"
	"fmt"
	"io"

	monitoring "cloud.google.com/go/monitoring/apiv3"
	"cloud.google.com/go/monitoring/apiv3/v2/monitoringpb"
)

// deleteMetric deletes the given metric. name should be of the form
// "projects/PROJECT_ID/metricDescriptors/METRIC_TYPE".
func deleteMetric(w io.Writer, name string) error {
	ctx := context.Background()
	c, err := monitoring.NewMetricClient(ctx)
	if err != nil {
		return err
	}
	defer c.Close()
	req := &monitoringpb.DeleteMetricDescriptorRequest{
		Name: name,
	}

	if err := c.DeleteMetricDescriptor(ctx, req); err != nil {
		return fmt.Errorf("could not delete metric: %w", err)
	}
	fmt.Fprintf(w, "Deleted metric: %q\n", name)
	return nil
}

Java

Monitoring への認証を行うには、アプリケーションのデフォルト認証情報を設定します。詳細については、ローカル開発環境の認証の設定をご覧ください。

final String projectId = System.getProperty("projectId");
try (final MetricServiceClient client = MetricServiceClient.create();) {
  MetricDescriptorName metricName = MetricDescriptorName.of(projectId, type);
  client.deleteMetricDescriptor(metricName);
  System.out.println("Deleted descriptor " + type);
}

Node.js

Monitoring への認証を行うには、アプリケーションのデフォルト認証情報を設定します。詳細については、ローカル開発環境の認証の設定をご覧ください。

// Imports the Google Cloud client library
const monitoring = require('@google-cloud/monitoring');

// Creates a client
const client = new monitoring.MetricServiceClient();

async function deleteMetricDescriptor() {
  /**
   * TODO(developer): Uncomment and edit the following lines of code.
   */
  // const projectId = 'YOUR_PROJECT_ID';
  // const metricId = 'custom.googleapis.com/stores/daily_sales';

  const request = {
    name: client.projectMetricDescriptorPath(projectId, metricId),
  };

  // Deletes a metric descriptor
  const [result] = await client.deleteMetricDescriptor(request);
  console.log(`Deleted ${metricId}`, result);
}
deleteMetricDescriptor();

PHP

Monitoring への認証を行うには、アプリケーションのデフォルト認証情報を設定します。詳細については、ローカル開発環境の認証の設定をご覧ください。

use Google\Cloud\Monitoring\V3\Client\MetricServiceClient;
use Google\Cloud\Monitoring\V3\DeleteMetricDescriptorRequest;

/**
 * Example:
 * ```
 * delete_metric($projectId, $databaseId);
 * ```
 *
 * @param string $projectId Your project ID
 * @param string $metricId  The ID of the Metric Descriptor to delete
 */
function delete_metric($projectId, $metricId)
{
    $metrics = new MetricServiceClient([
        'projectId' => $projectId,
    ]);

    $metricPath = $metrics->metricDescriptorName($projectId, $metricId);
    $deleteMetricDescriptorRequest = (new DeleteMetricDescriptorRequest())
        ->setName($metricPath);
    $metrics->deleteMetricDescriptor($deleteMetricDescriptorRequest);

    printf('Deleted a metric: ' . $metricPath . PHP_EOL);
}

Python

Monitoring への認証を行うには、アプリケーションのデフォルト認証情報を設定します。詳細については、ローカル開発環境の認証の設定をご覧ください。

from google.cloud import monitoring_v3

client = monitoring_v3.MetricServiceClient()
client.delete_metric_descriptor(name=descriptor_name)
print("Deleted metric descriptor {}.".format(descriptor_name))

Ruby

Monitoring への認証を行うには、アプリケーションのデフォルト認証情報を設定します。詳細については、ローカル開発環境の認証の設定をご覧ください。

# Your Google Cloud Platform project ID
# project_id = "YOUR_PROJECT_ID"

# Example metric type
# metric_type = "custom.googleapis.com/my_metric"

client = Google::Cloud::Monitoring.metric_service
metric_name = client.metric_descriptor_path project:           project_id,
                                            metric_descriptor: metric_type

client.delete_metric_descriptor name: metric_name
p "Deleted metric descriptor #{metric_name}."

問題がある場合は、API 呼び出しのトラブルシューティングをご覧ください。

ユーザー定義指標を変更する

ユーザー定義指標を変更するには、指標を定義する MetricDescriptor オブジェクトを更新する必要があります。 サポートされている変更はラベルの追加のみです。

既存のユーザー定義指標にラベルを追加するには、timeSeries.create メソッドを使用して、時系列データを含む新しいラベルを追加します。書き込もうとしているラベルが有効で、ラベルの総数が 30 未満の場合、ラベルは指標記述子に追加されます。

その後は、あたかもそのラベルが最初から存在していたかのように時系列データが書き込まれます。

新しいラベルを追加すること以上の変更を加える場合は、指標記述子を削除して再作成する必要があります。この場合、それまでに収集された古い指標記述子の時系列データはすべて失われます。詳細については、ユーザー定義指標を削除するをご覧ください。

指標の名前は変更できません。

次のステップ