이 가이드에서는 에이전트를 보다 동적으로 사용할 수 있도록 웹훅을 사용하는 방법을 보여줍니다.
Cloud Functions는 단순성으로 인해 웹훅을 호스팅하는 데 사용되지만 웹훅 서비스를 호스팅할 수 있는 여러 다른 방법이 있습니다.
또한 이 예시에서 Go 프로그래밍 언어가 사용되지만 Cloud Functions에서 지원되는 모든 언어를 사용할 수 있습니다.
이 가이드의 코드는 수정할 필요가 없습니다.
URL: 여기에서 복사 버튼을 클릭하고 값을 저장합니다.
웹훅을 구성할 때 이 URL이 필요합니다.
인증: 인증 필요
HTTPS 필요: 체크됨
저장을 클릭합니다.
다음를 클릭합니다(특수 런타임, 빌드, 연결, 보안 설정은 필요하지 않음).
다음 입력란을 설정합니다.
런타임: 최신 Go 런타임 선택
소스 코드: 인라인 편집기
진입점: HandleWebhookRequest
코드를 다음으로 바꿉니다.
//PackagecxwhcontainsanexampleDialogflowCXwebhookpackagecxwhimport("encoding/json""fmt""log""net/http")typefulfillmentInfostruct{Tagstring`json:"tag"`}typesessionInfostruct{Sessionstring`json:"session"`Parametersmap[string]interface{}`json:"parameters"`}typetextstruct{Text[]string`json:"text"`}typeresponseMessagestruct{Texttext`json:"text"`}typefulfillmentResponsestruct{Messages[]responseMessage`json:"messages"`}//webhookRequestisusedtounmarshalaWebhookRequestJSONobject.Notethat//notallmembersneedtobedefined--justthosethatyouneedtoprocess.//Asanalternative,youcouldusethetypesprovidedbytheDialogflowprotocolbuffers://https://pkg.go.dev/google.golang.org/genproto/googleapis/cloud/dialogflow/cx/v3#WebhookRequesttypewebhookRequeststruct{FulfillmentInfofulfillmentInfo`json:"fulfillmentInfo"`SessionInfosessionInfo`json:"sessionInfo"`}//webhookResponseisusedtomarshalaWebhookResponseJSONobject.Notethat//notallmembersneedtobedefined--justthosethatyouneedtoprocess.//Asanalternative,youcouldusethetypesprovidedbytheDialogflowprotocolbuffers://https://pkg.go.dev/google.golang.org/genproto/googleapis/cloud/dialogflow/cx/v3#WebhookResponsetypewebhookResponsestruct{FulfillmentResponsefulfillmentResponse`json:"fulfillmentResponse"`SessionInfosessionInfo`json:"sessionInfo"`}//confirmhandleswebhookcallsusingthe"confirm"tag.funcconfirm(requestwebhookRequest)(webhookResponse,error){//Createatextmessagethatutilizesthe"size"and"color"//parametersprovidedbytheend-user.//Thistextmessageisusedintheresponsebelow.t:=fmt.Sprintf("You can pick up your order for a %s%s shirt in 5 days.",request.SessionInfo.Parameters["size"],request.SessionInfo.Parameters["color"])//Createsessionparametersthatarepopulatedintheresponse.//The"cancel-period"parameterisreferencedbytheagent.//Thisexamplehardcodesthevalue2,butarealsystem//mightlookupthisvalueinadatabase.p:=map[string]interface{}{"cancel-period":"2"}//Buildandreturntheresponse.response:=webhookResponse{FulfillmentResponse:fulfillmentResponse{Messages:[]responseMessage{{Text:text{Text:[]string{t},},},},},SessionInfo:sessionInfo{Parameters:p,},}returnresponse,nil}//handleErrorhandlesinternalerrors.funchandleError(whttp.ResponseWriter,errerror){w.WriteHeader(http.StatusInternalServerError)fmt.Fprintf(w,"ERROR: %v",err)}//HandleWebhookRequesthandlesWebhookRequestandsendstheWebhookResponse.funcHandleWebhookRequest(whttp.ResponseWriter,r*http.Request){varrequestwebhookRequestvarresponsewebhookResponsevarerrerror//ReadinputJSONiferr=json.NewDecoder(r.Body).Decode(&request);err!=nil{handleError(w,err)return}log.Printf("Request: %+v",request)//Getthetagfromtherequest,andcallthecorresponding//functionthathandlesthattag.//Thisexampleonlyhasonepossibletag,//butmostagentswouldhavemany.switchtag:=request.FulfillmentInfo.Tag;tag{case"confirm":response,err=confirm(request)default:err=fmt.Errorf("Unknown tag: %s",tag)}iferr!=nil{handleError(w,err)return}log.Printf("Response: %+v",response)//Sendresponseiferr=json.NewEncoder(w).Encode(&response);err!=nil{handleError(w,err)return}}
배포를 클릭합니다.
상태 표시기에 함수가 성공적으로 배포된 것으로 표시될 때까지 기다립니다.
기다리는 동안 바로 전에 배포한 코드를 검사합니다.
코드 주석에는 중요한 세부정보가 기술되어 있습니다.
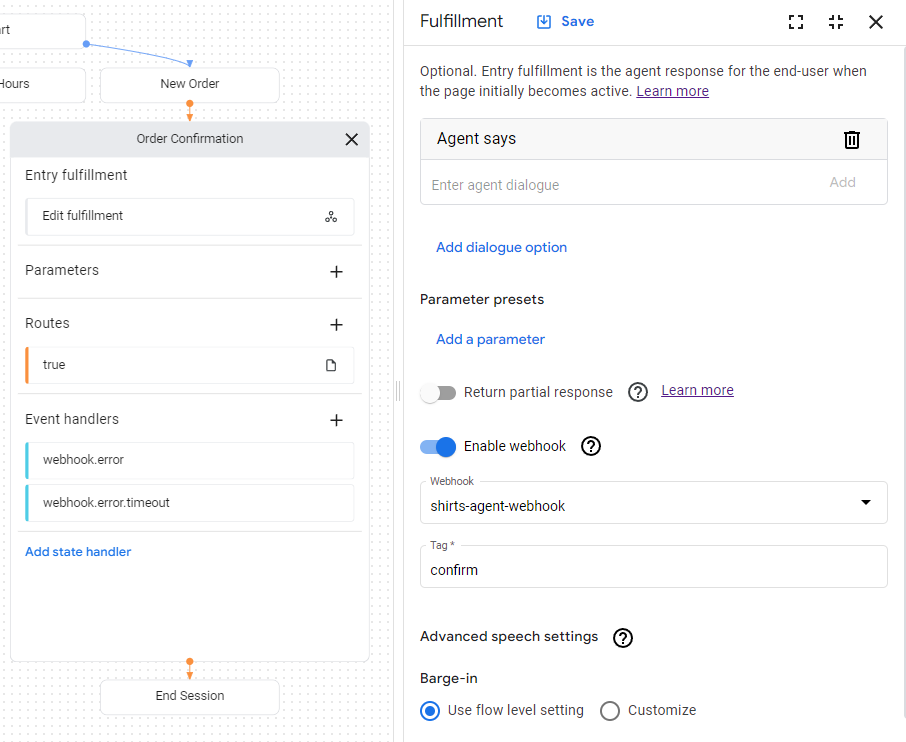
웹훅 만들기
이제 웹훅이 Cloud 함수로 존재하므로, 이 웹훅을 에이전트에 연결합니다.
에이전트에 대해 웹훅을 만들려면 다음 안내를 따르세요.
[[["이해하기 쉬움","easyToUnderstand","thumb-up"],["문제가 해결됨","solvedMyProblem","thumb-up"],["기타","otherUp","thumb-up"]],[["이해하기 어려움","hardToUnderstand","thumb-down"],["잘못된 정보 또는 샘플 코드","incorrectInformationOrSampleCode","thumb-down"],["필요한 정보/샘플이 없음","missingTheInformationSamplesINeed","thumb-down"],["번역 문제","translationIssue","thumb-down"],["기타","otherDown","thumb-down"]],["최종 업데이트: 2025-01-21(UTC)"],[[["\u003cp\u003eThis guide demonstrates how to integrate a webhook with a Dialogflow CX agent to enhance its dynamic capabilities using Cloud Functions for hosting.\u003c/p\u003e\n"],["\u003cp\u003eThe example webhook code, written in Go, is designed to read parameter values from the incoming request, write a parameter value to the response, and deliver a text response.\u003c/p\u003e\n"],["\u003cp\u003eCreating a webhook involves setting up a Cloud Function with specific settings, such as HTTP trigger and authentication, and then associating it with a Dialogflow CX agent through its webhook configuration.\u003c/p\u003e\n"],["\u003cp\u003eThe webhook is utilized within the agent's fulfillment settings by enabling the webhook and specifying a tag, which in this case is "confirm", to trigger the webhook's functionality.\u003c/p\u003e\n"],["\u003cp\u003eBy using a webhook, an agent can provide dynamic responses, such as confirming an order with specific shirt details, and setting session parameters like a "cancel-period" that the agent can then reference.\u003c/p\u003e\n"]]],[],null,["# Create a webhook\n\nThis guide shows you how to use a\n[webhook](/dialogflow/cx/docs/concept/webhook),\nso your agent can be more dynamic.\n[Cloud Functions](/functions/docs)\nare used to host the webhook due to their simplicity,\nbut there are many other ways that you could host a webhook service.\nThe example also uses the Go programming language,\nbut you can use any\n[language supported by Cloud Functions](/functions/docs/concepts/exec).\nYou will not need to edit the code for this guide.\n\nThe example webhook code does the following:\n\n- Reads parameter values from the webhook request.\n- Writes a parameter value to the webhook response.\n- Provides a text response in the webhook response.\n\nBefore you begin\n----------------\n\nIf you don't plan on using webhooks, you can skip this quickstart.\n\nYou should do the following before reading this guide:\n\n1. Read [flow basics](/dialogflow/cx/docs/basics).\n2. Perform [setup steps](/dialogflow/cx/docs/quick/setup).\n3. Perform steps in the [Build an agent using flows](/dialogflow/cx/docs/quick/build-agent) quickstart guide. Steps below continue working on the same agent. If you no longer have that agent, you can [download the agent](/static/dialogflow/cx/docs/data/agent-shirts-1-flow.zip) and [restore it](/dialogflow/cx/docs/concept/agent#export).\n\nCreate the Cloud Function\n-------------------------\n\nCloud Functions can be created with the Google Cloud console ([visit documentation](https://support.google.com/cloud/answer/3465889?ref_topic=3340599), [open console](https://console.cloud.google.com/)).\nTo create a function for this guide:\n\n1. It is important that your Conversational Agents (Dialogflow CX) agent and the function are both in the same project. This is the easiest way for Conversational Agents (Dialogflow CX) to have [secure access to your function](/dialogflow/cx/docs/concept/webhook#cloud-run). To select your project, [go to the project selector](https://console.cloud.google.com/projectselector2/home/dashboard).\n2. Go to the [Cloud Functions overview page](https://console.cloud.google.com/functions/list).\n3. Click **Create Function** , and set the following fields:\n - **Environment**: 1st gen\n - **Function name**: shirts-agent-webhook\n - **Region**: If you specified a region for your agent, use the same region.\n - **HTTP Trigger type**: HTTP\n - **URL**: Click the copy button here and save the value. You will need this URL when configuring the webhook.\n - **Authentication**: Require authentication\n - **Require HTTPS**: checked\n4. Click **Save**.\n5. Click **Next** (You do not need special runtime, build, connections, or security settings).\n6. Set the following fields:\n - **Runtime**: Select the latest Go runtime.\n - **Source code**: Inline Editor\n - **Entry point**: HandleWebhookRequest\n7. Replace the code with the following:\n\n ```python\n // Package cxwh contains an example Dialogflow CX webhook\n package cxwh\n\n import (\n \t\"encoding/json\"\n \t\"fmt\"\n \t\"log\"\n \t\"net/http\"\n )\n\n type fulfillmentInfo struct {\n \tTag string `json:\"tag\"`\n }\n\n type sessionInfo struct {\n \tSession string `json:\"session\"`\n \tParameters map[string]interface{} `json:\"parameters\"`\n }\n\n type text struct {\n \tText []string `json:\"text\"`\n }\n\n type responseMessage struct {\n \tText text `json:\"text\"`\n }\n\n type fulfillmentResponse struct {\n \tMessages []responseMessage `json:\"messages\"`\n }\n\n // webhookRequest is used to unmarshal a WebhookRequest JSON object. Note that\n // not all members need to be defined--just those that you need to process.\n // As an alternative, you could use the types provided by the Dialogflow protocol buffers:\n // https://pkg.go.dev/google.golang.org/genproto/googleapis/cloud/dialogflow/cx/v3#WebhookRequest\n type webhookRequest struct {\n \tFulfillmentInfo fulfillmentInfo `json:\"fulfillmentInfo\"`\n \tSessionInfo sessionInfo `json:\"sessionInfo\"`\n }\n\n // webhookResponse is used to marshal a WebhookResponse JSON object. Note that\n // not all members need to be defined--just those that you need to process.\n // As an alternative, you could use the types provided by the Dialogflow protocol buffers:\n // https://pkg.go.dev/google.golang.org/genproto/googleapis/cloud/dialogflow/cx/v3#WebhookResponse\n type webhookResponse struct {\n \tFulfillmentResponse fulfillmentResponse `json:\"fulfillmentResponse\"`\n \tSessionInfo sessionInfo `json:\"sessionInfo\"`\n }\n\n // confirm handles webhook calls using the \"confirm\" tag.\n func confirm(request webhookRequest) (webhookResponse, error) {\n \t// Create a text message that utilizes the \"size\" and \"color\"\n \t// parameters provided by the end-user.\n \t// This text message is used in the response below.\n \tt := fmt.Sprintf(\"You can pick up your order for a %s %s shirt in 5 days.\",\n \t\trequest.SessionInfo.Parameters[\"size\"],\n \t\trequest.SessionInfo.Parameters[\"color\"])\n\n \t// Create session parameters that are populated in the response.\n \t// The \"cancel-period\" parameter is referenced by the agent.\n \t// This example hard codes the value 2, but a real system\n \t// might look up this value in a database.\n \tp := map[string]interface{}{\"cancel-period\": \"2\"}\n\n \t// Build and return the response.\n \tresponse := webhookResponse{\n \t\tFulfillmentResponse: fulfillmentResponse{\n \t\t\tMessages: []responseMessage{\n \t\t\t\t{\n \t\t\t\t\tText: text{\n \t\t\t\t\t\tText: []string{t},\n \t\t\t\t\t},\n \t\t\t\t},\n \t\t\t},\n \t\t},\n \t\tSessionInfo: sessionInfo{\n \t\t\tParameters: p,\n \t\t},\n \t}\n \treturn response, nil\n }\n\n // handleError handles internal errors.\n func handleError(w http.ResponseWriter, err error) {\n \tw.WriteHeader(http.StatusInternalServerError)\n \tfmt.Fprintf(w, \"ERROR: %v\", err)\n }\n\n // HandleWebhookRequest handles WebhookRequest and sends the WebhookResponse.\n func HandleWebhookRequest(w http.ResponseWriter, r *http.Request) {\n \tvar request webhookRequest\n \tvar response webhookResponse\n \tvar err error\n\n \t// Read input JSON\n \tif err = json.NewDecoder(r.Body).Decode(&request); err != nil {\n \t\thandleError(w, err)\n \t\treturn\n \t}\n \tlog.Printf(\"Request: %+v\", request)\n\n \t// Get the tag from the request, and call the corresponding\n \t// function that handles that tag.\n \t// This example only has one possible tag,\n \t// but most agents would have many.\n \tswitch tag := request.FulfillmentInfo.Tag; tag {\n \tcase \"confirm\":\n \t\tresponse, err = confirm(request)\n \tdefault:\n \t\terr = fmt.Errorf(\"Unknown tag: %s\", tag)\n \t}\n \tif err != nil {\n \t\thandleError(w, err)\n \t\treturn\n \t}\n \tlog.Printf(\"Response: %+v\", response)\n\n \t// Send response\n \tif err = json.NewEncoder(w).Encode(&response); err != nil {\n \t\thandleError(w, err)\n \t\treturn\n \t}\n }\n ```\n8. Click **Deploy**.\n\n9. Wait until the status indicator shows that the function\n has successfully deployed.\n While waiting, examine the code you just deployed.\n Code comments describe important details.\n\nCreate the webhook\n------------------\n\nNow that the webhook exists as a Cloud function,\nyou will associate this webhook with your agent.\nTo create the webhook for your agent:\n\n1. Open the [Dialogflow CX console](https://dialogflow.cloud.google.com/cx/projects).\n2. Choose your Google Cloud project.\n3. Select your agent.\n4. Select the **Manage** tab.\n5. Click **Webhooks**.\n6. Click **Create**.\n7. Complete the following fields:\n - **Display name**: shirts-agent-webhook\n - **Webhook URL**: Provide the webhook URL you saved when creating the function.\n - **Subtype**: Standard.\n - All other fields use default values.\n8. Click **Save**.\n\nUse the webhook\n---------------\n\nNow that the webhook is available to the agent,\nyou will make use of the webhook in\n[fulfillment](/dialogflow/cx/docs/concept/fulfillment).\nThe **Order Confirmation** page has an entry fulfillment,\nwhich currently has a static text response.\nTo update the fulfillment to use your webhook:\n\n1. Select the **Build** tab.\n2. Click the **Order Confirmation** page to expand the page on the agent builder graph.\n3. Click the **Entry Fulfillment** field on the page to open the fulfillment panel.\n4. Delete the existing text response under the **Agent says** heading. When you hover the text, the delete *delete* button appears.\n5. Click **Enable webhook**.\n6. Select the `shirts-agent-webhook` option from the **Webhook** dropdown menu.\n7. Enter `confirm` for the **Tag** field.\n8. Click **Save**.\n9. Close the fulfillment panel.\n\nThe deployed webhook code sends a response\nthat creates a\n[parameter](/dialogflow/cx/docs/concept/parameter)\nnamed `cancel-period`.\nUpdate the agent to reference this parameter in the final agent response\nfor the same **Order Confirmation** page:\n\n1. Click the condition [route](/dialogflow/cx/docs/concept/handler) shown with a `true` condition to open the route panel.\n2. Scroll down to the **Fulfillment** section of the route panel, and add the following text response under the **Agent says** heading: `You can cancel your order within $session.params.cancel-period days. Goodbye.`\n3. Click **Save**.\n4. Close the route panel.\n\nTest the agent in the simulator\n-------------------------------\n\nYour agent and webhook are ready to test with the\n[simulator](/dialogflow/cx/docs/concept/console#simulator):\n\n1. Click **Test Agent**.\n2. Enter `I want to buy a large red shirt` and press enter.\n\nSince you provided both a size and color,\nyou gave the agent everything it needs to create a shirt order,\nso it transitions directly to the **Order Confirmation** page.\n\nThe following describes the agent responses:"]]