Alcuni prodotti e funzionalità sono in fase di rinominazione. Anche le funzionalità di playbook e flusso generativi sono in fase di migrazione a un'unica console consolidata. Consulta i dettagli.
Mantieni tutto organizzato con le raccolte
Salva e classifica i contenuti in base alle tue preferenze.
Questa guida mostra come utilizzare un
webhook,
in modo che l'agente possa essere più dinamico.
Le funzioni Cloud vengono utilizzate per ospitare il webhook per la loro semplicità, ma esistono molti altri modi per ospitare un servizio webhook.
L'esempio utilizza anche il linguaggio di programmazione Go, ma puoi utilizzare qualsiasi linguaggio supportato da Cloud Functions.
Non dovrai modificare il codice per questa guida.
Il codice webhook di esempio esegue le seguenti operazioni:
Legge i valori dei parametri dalla richiesta webhook.
Scrive un valore parametro nella risposta dell'webhook.
Fornisce una risposta di testo nella risposta dell'webhook.
Prima di iniziare
Se non prevedi di utilizzare gli webhook, puoi saltare questa guida rapida.
È importante che l'agente Conversational Agents (Dialogflow CX) e la funzione
si trovino entrambi nello stesso progetto.
Questo è il modo più semplice per Conversational Agents (Dialogflow CX) di avere
accesso sicuro alla tua funzione.
Per selezionare il progetto,
vai al selettore di progetti.
Fai clic su Crea funzione e imposta i seguenti campi:
Ambiente: 1ª generazione.
Nome della funzione: shirts-agent-webhook
Regione: se hai specificato una regione per l'agente, utilizza la stessa regione.
Tipo di trigger HTTP: HTTP
URL: fai clic sul pulsante di copia qui e salva il valore.
Ti servirà questo URL durante la configurazione dell'webhook.
Autenticazione: Richiedi autenticazione
Richiedi HTTPS: selezionato
Fai clic su Salva.
Fai clic su Avanti (non sono necessarie impostazioni di runtime, build, connessioni o sicurezza speciali).
Imposta i seguenti campi:
Runtime: seleziona il runtime Go più recente.
Codice sorgente: editor incorporato
Punto di contatto: HandleWebhookRequest
Sostituisci il codice con quanto segue:
//PackagecxwhcontainsanexampleDialogflowCXwebhookpackagecxwhimport("encoding/json""fmt""log""net/http")typefulfillmentInfostruct{Tagstring`json:"tag"`}typesessionInfostruct{Sessionstring`json:"session"`Parametersmap[string]interface{}`json:"parameters"`}typetextstruct{Text[]string`json:"text"`}typeresponseMessagestruct{Texttext`json:"text"`}typefulfillmentResponsestruct{Messages[]responseMessage`json:"messages"`}//webhookRequestisusedtounmarshalaWebhookRequestJSONobject.Notethat//notallmembersneedtobedefined--justthosethatyouneedtoprocess.//Asanalternative,youcouldusethetypesprovidedbytheDialogflowprotocolbuffers://https://pkg.go.dev/google.golang.org/genproto/googleapis/cloud/dialogflow/cx/v3#WebhookRequesttypewebhookRequeststruct{FulfillmentInfofulfillmentInfo`json:"fulfillmentInfo"`SessionInfosessionInfo`json:"sessionInfo"`}//webhookResponseisusedtomarshalaWebhookResponseJSONobject.Notethat//notallmembersneedtobedefined--justthosethatyouneedtoprocess.//Asanalternative,youcouldusethetypesprovidedbytheDialogflowprotocolbuffers://https://pkg.go.dev/google.golang.org/genproto/googleapis/cloud/dialogflow/cx/v3#WebhookResponsetypewebhookResponsestruct{FulfillmentResponsefulfillmentResponse`json:"fulfillmentResponse"`SessionInfosessionInfo`json:"sessionInfo"`}//confirmhandleswebhookcallsusingthe"confirm"tag.funcconfirm(requestwebhookRequest)(webhookResponse,error){//Createatextmessagethatutilizesthe"size"and"color"//parametersprovidedbytheend-user.//Thistextmessageisusedintheresponsebelow.t:=fmt.Sprintf("You can pick up your order for a %s%s shirt in 5 days.",request.SessionInfo.Parameters["size"],request.SessionInfo.Parameters["color"])//Createsessionparametersthatarepopulatedintheresponse.//The"cancel-period"parameterisreferencedbytheagent.//Thisexamplehardcodesthevalue2,butarealsystem//mightlookupthisvalueinadatabase.p:=map[string]interface{}{"cancel-period":"2"}//Buildandreturntheresponse.response:=webhookResponse{FulfillmentResponse:fulfillmentResponse{Messages:[]responseMessage{{Text:text{Text:[]string{t},},},},},SessionInfo:sessionInfo{Parameters:p,},}returnresponse,nil}//handleErrorhandlesinternalerrors.funchandleError(whttp.ResponseWriter,errerror){w.WriteHeader(http.StatusInternalServerError)fmt.Fprintf(w,"ERROR: %v",err)}//HandleWebhookRequesthandlesWebhookRequestandsendstheWebhookResponse.funcHandleWebhookRequest(whttp.ResponseWriter,r*http.Request){varrequestwebhookRequestvarresponsewebhookResponsevarerrerror//ReadinputJSONiferr=json.NewDecoder(r.Body).Decode(&request);err!=nil{handleError(w,err)return}log.Printf("Request: %+v",request)//Getthetagfromtherequest,andcallthecorresponding//functionthathandlesthattag.//Thisexampleonlyhasonepossibletag,//butmostagentswouldhavemany.switchtag:=request.FulfillmentInfo.Tag;tag{case"confirm":response,err=confirm(request)default:err=fmt.Errorf("Unknown tag: %s",tag)}iferr!=nil{handleError(w,err)return}log.Printf("Response: %+v",response)//Sendresponseiferr=json.NewEncoder(w).Encode(&response);err!=nil{handleError(w,err)return}}
Fai clic su Esegui il deployment.
Attendi che l'indicatore di stato mostri che la funzione è stata dispiegamento correttamente.
Mentre aspetti, esamina il codice che hai appena disegnato.
I commenti al codice descrivono dettagli importanti.
Crea il webhook
Ora che l'webhook esiste come funzione Cloud, lo associerai al tuo agente.
Per creare l'webhook per l'agente:
URL webhook: fornisci l'URL webhook che hai salvato
quando hai creato la funzione.
Sottotipo: standard.
Tutti gli altri campi utilizzano i valori predefiniti.
Fai clic su Salva.
Utilizzare l'webhook
Ora che l'agente può utilizzare il webhook,
lo utilizzerai nel
fulfillment.
La pagina Conferma ordine ha un'elaborazione dell'inserimento, attualmente con una risposta di testo statica.
Per aggiornare il fulfillment in modo che utilizzi il tuo webhook:
Seleziona la scheda Crea.
Fai clic sulla pagina Conferma ordine per espanderla nel grafico del generatore di agenti.
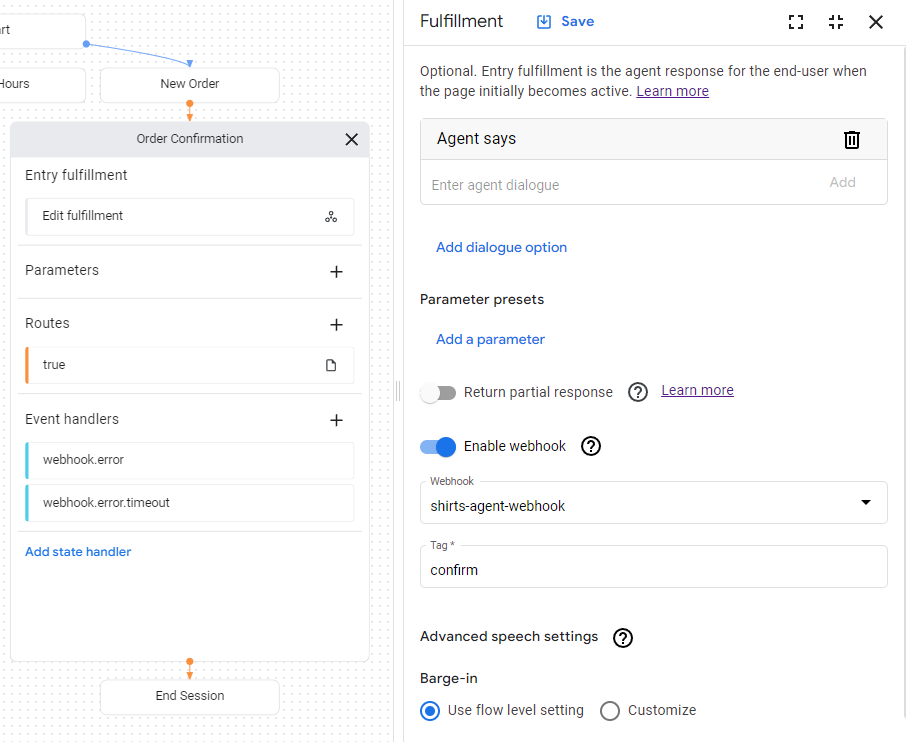
Fai clic sul campo Completamento voce nella pagina per aprire il riquadro di completamento.
Elimina la risposta di testo esistente sotto l'intestazione L'agente dice.
Quando passi il mouse sopra il testo, viene visualizzato il pulsante di eliminazione delete.
Fai clic su Attiva webhook.
Seleziona l'opzione shirts-agent-webhook
dal menu a discesa Webhook.
Inserisci confirm per il campo Tag.
Fai clic su Salva.
Chiudi il riquadro di adempimento.
Il codice webhook di cui è stato eseguito il deployment invia una risposta
che crea un
parametro
denominato cancel-period.
Aggiorna l'agente in modo che faccia riferimento a questo parametro nella risposta finale dell'agente per la stessa pagina Conferma ordine:
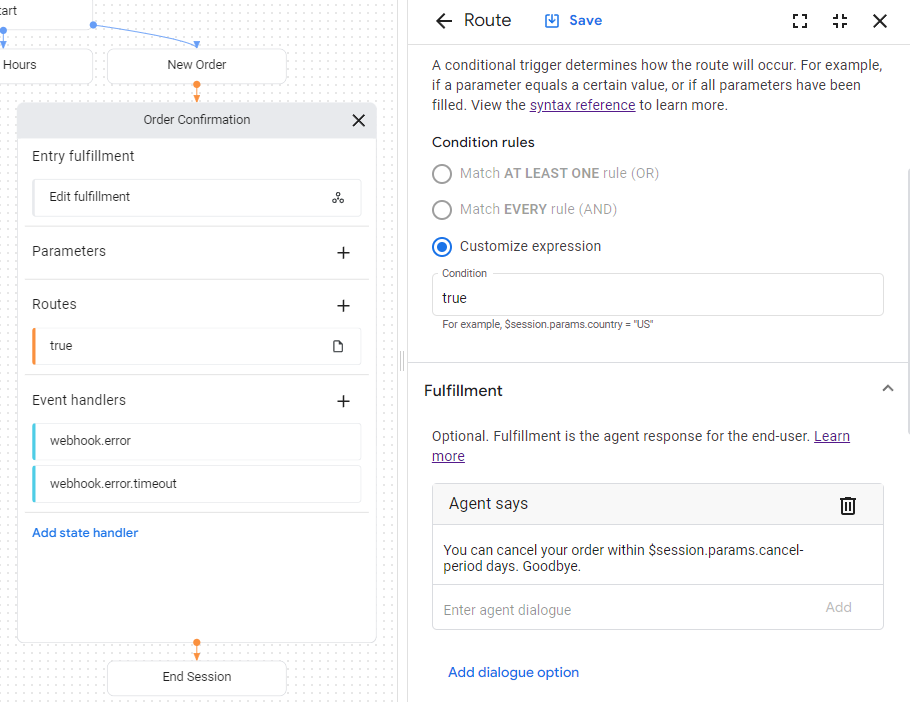
Fai clic sulla condizione
percorso
mostrata con una condizione true per aprire il riquadro del percorso.
Scorri verso il basso fino alla sezione Evasione del riquadro del percorso e aggiungi la seguente risposta di testo sotto l'intestazione L'agente dice:
You can cancel your order within $session.params.cancel-period days. Goodbye.
Fai clic su Salva.
Chiudi il riquadro del percorso.
Testa l'agente nel simulatore
L'agente e l'webhook sono pronti per essere testati con il
simulatore:
Fai clic su Agente di test.
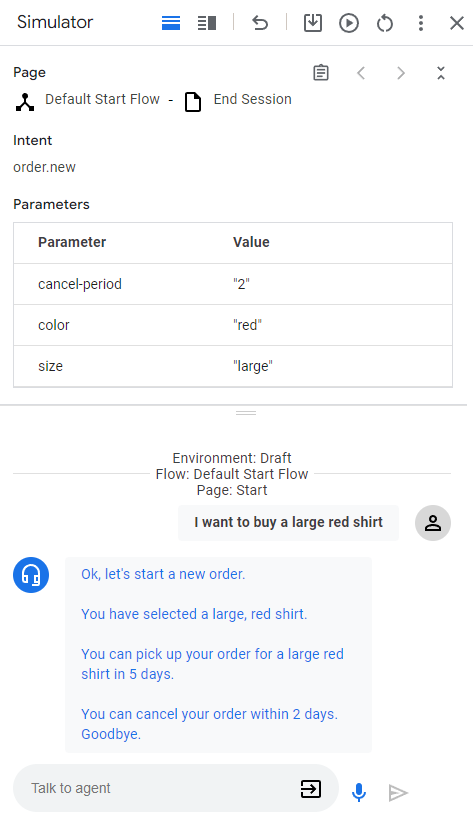
Inserisci I want to buy a large red shirt e premi Invio.
Poiché hai fornito sia la taglia che il colore,
hai fornito all'agente tutto ciò che serve per creare un ordine di camicia,
quindi passa direttamente alla pagina Conferma ordine.
Di seguito sono descritte le risposte dell'agente:
Risposta
Spiegazione
Ok, iniziamo un nuovo ordine.
Quando la pagina Nuovo ordine è diventata attiva, è stato chiamato il completamento dell'inserimento. La risposta è stata attivata da questo adempimento.
Hai selezionato una camicia rossa di taglia grande.
Quando sono stati forniti tutti i parametri del modulo per la pagina Nuovo ordine, viene chiamato il controllo del percorso della condizione per il completamento del modulo. La risposta è stata attivata dall'elaborazione di questo percorso. Questo percorso passa anche alla pagina Conferma ordine.
Puoi ritirare l\'ordine di una camicia rossa di taglia L tra 5 giorni.
Il completamento dell'inserimento per la pagina Conferma ordine chiama il webhook. Visualizza la funzione confirm nel codice del webhook. Questa funzione crea questa risposta di testo e utilizza i parametri forniti nella richiesta webhook.
La pagina Conferma ordine ha un percorso con condizione con una condizione sempre vera. Questa risposta viene attivata dall'elaborazione per quel percorso. Tieni presente che la risposta utilizza il parametro impostato dall'webhook nella risposta dell'webhook.
[[["Facile da capire","easyToUnderstand","thumb-up"],["Il problema è stato risolto","solvedMyProblem","thumb-up"],["Altra","otherUp","thumb-up"]],[["Difficile da capire","hardToUnderstand","thumb-down"],["Informazioni o codice di esempio errati","incorrectInformationOrSampleCode","thumb-down"],["Mancano le informazioni o gli esempi di cui ho bisogno","missingTheInformationSamplesINeed","thumb-down"],["Problema di traduzione","translationIssue","thumb-down"],["Altra","otherDown","thumb-down"]],["Ultimo aggiornamento 2025-09-04 UTC."],[[["\u003cp\u003eThis guide demonstrates how to integrate a webhook with a Dialogflow CX agent to enhance its dynamic capabilities using Cloud Functions for hosting.\u003c/p\u003e\n"],["\u003cp\u003eThe example webhook code, written in Go, is designed to read parameter values from the incoming request, write a parameter value to the response, and deliver a text response.\u003c/p\u003e\n"],["\u003cp\u003eCreating a webhook involves setting up a Cloud Function with specific settings, such as HTTP trigger and authentication, and then associating it with a Dialogflow CX agent through its webhook configuration.\u003c/p\u003e\n"],["\u003cp\u003eThe webhook is utilized within the agent's fulfillment settings by enabling the webhook and specifying a tag, which in this case is "confirm", to trigger the webhook's functionality.\u003c/p\u003e\n"],["\u003cp\u003eBy using a webhook, an agent can provide dynamic responses, such as confirming an order with specific shirt details, and setting session parameters like a "cancel-period" that the agent can then reference.\u003c/p\u003e\n"]]],[],null,["# Create a webhook\n\nThis guide shows you how to use a\n[webhook](/dialogflow/cx/docs/concept/webhook),\nso your agent can be more dynamic.\n[Cloud Functions](/functions/docs)\nare used to host the webhook due to their simplicity,\nbut there are many other ways that you could host a webhook service.\nThe example also uses the Go programming language,\nbut you can use any\n[language supported by Cloud Functions](/functions/docs/concepts/exec).\nYou will not need to edit the code for this guide.\n\nThe example webhook code does the following:\n\n- Reads parameter values from the webhook request.\n- Writes a parameter value to the webhook response.\n- Provides a text response in the webhook response.\n\nBefore you begin\n----------------\n\nIf you don't plan on using webhooks, you can skip this quickstart.\n\nYou should do the following before reading this guide:\n\n1. Read [flow basics](/dialogflow/cx/docs/basics).\n2. Perform [setup steps](/dialogflow/cx/docs/quick/setup).\n3. Perform steps in the [Build an agent using flows](/dialogflow/cx/docs/quick/build-agent) quickstart guide. Steps below continue working on the same agent. If you no longer have that agent, you can [download the agent](/static/dialogflow/cx/docs/data/agent-shirts-1-flow.zip) and [restore it](/dialogflow/cx/docs/concept/agent#export).\n\nCreate the Cloud Function\n-------------------------\n\nCloud Functions can be created with the Google Cloud console ([visit documentation](https://support.google.com/cloud/answer/3465889?ref_topic=3340599), [open console](https://console.cloud.google.com/)).\nTo create a function for this guide:\n\n1. It is important that your Conversational Agents (Dialogflow CX) agent and the function are both in the same project. This is the easiest way for Conversational Agents (Dialogflow CX) to have [secure access to your function](/dialogflow/cx/docs/concept/webhook#cloud-run). To select your project, [go to the project selector](https://console.cloud.google.com/projectselector2/home/dashboard).\n2. Go to the [Cloud Functions overview page](https://console.cloud.google.com/functions/list).\n3. Click **Create Function** , and set the following fields:\n - **Environment**: 1st gen\n - **Function name**: shirts-agent-webhook\n - **Region**: If you specified a region for your agent, use the same region.\n - **HTTP Trigger type**: HTTP\n - **URL**: Click the copy button here and save the value. You will need this URL when configuring the webhook.\n - **Authentication**: Require authentication\n - **Require HTTPS**: checked\n4. Click **Save**.\n5. Click **Next** (You do not need special runtime, build, connections, or security settings).\n6. Set the following fields:\n - **Runtime**: Select the latest Go runtime.\n - **Source code**: Inline Editor\n - **Entry point**: HandleWebhookRequest\n7. Replace the code with the following:\n\n ```python\n // Package cxwh contains an example Dialogflow CX webhook\n package cxwh\n\n import (\n \t\"encoding/json\"\n \t\"fmt\"\n \t\"log\"\n \t\"net/http\"\n )\n\n type fulfillmentInfo struct {\n \tTag string `json:\"tag\"`\n }\n\n type sessionInfo struct {\n \tSession string `json:\"session\"`\n \tParameters map[string]interface{} `json:\"parameters\"`\n }\n\n type text struct {\n \tText []string `json:\"text\"`\n }\n\n type responseMessage struct {\n \tText text `json:\"text\"`\n }\n\n type fulfillmentResponse struct {\n \tMessages []responseMessage `json:\"messages\"`\n }\n\n // webhookRequest is used to unmarshal a WebhookRequest JSON object. Note that\n // not all members need to be defined--just those that you need to process.\n // As an alternative, you could use the types provided by the Dialogflow protocol buffers:\n // https://pkg.go.dev/google.golang.org/genproto/googleapis/cloud/dialogflow/cx/v3#WebhookRequest\n type webhookRequest struct {\n \tFulfillmentInfo fulfillmentInfo `json:\"fulfillmentInfo\"`\n \tSessionInfo sessionInfo `json:\"sessionInfo\"`\n }\n\n // webhookResponse is used to marshal a WebhookResponse JSON object. Note that\n // not all members need to be defined--just those that you need to process.\n // As an alternative, you could use the types provided by the Dialogflow protocol buffers:\n // https://pkg.go.dev/google.golang.org/genproto/googleapis/cloud/dialogflow/cx/v3#WebhookResponse\n type webhookResponse struct {\n \tFulfillmentResponse fulfillmentResponse `json:\"fulfillmentResponse\"`\n \tSessionInfo sessionInfo `json:\"sessionInfo\"`\n }\n\n // confirm handles webhook calls using the \"confirm\" tag.\n func confirm(request webhookRequest) (webhookResponse, error) {\n \t// Create a text message that utilizes the \"size\" and \"color\"\n \t// parameters provided by the end-user.\n \t// This text message is used in the response below.\n \tt := fmt.Sprintf(\"You can pick up your order for a %s %s shirt in 5 days.\",\n \t\trequest.SessionInfo.Parameters[\"size\"],\n \t\trequest.SessionInfo.Parameters[\"color\"])\n\n \t// Create session parameters that are populated in the response.\n \t// The \"cancel-period\" parameter is referenced by the agent.\n \t// This example hard codes the value 2, but a real system\n \t// might look up this value in a database.\n \tp := map[string]interface{}{\"cancel-period\": \"2\"}\n\n \t// Build and return the response.\n \tresponse := webhookResponse{\n \t\tFulfillmentResponse: fulfillmentResponse{\n \t\t\tMessages: []responseMessage{\n \t\t\t\t{\n \t\t\t\t\tText: text{\n \t\t\t\t\t\tText: []string{t},\n \t\t\t\t\t},\n \t\t\t\t},\n \t\t\t},\n \t\t},\n \t\tSessionInfo: sessionInfo{\n \t\t\tParameters: p,\n \t\t},\n \t}\n \treturn response, nil\n }\n\n // handleError handles internal errors.\n func handleError(w http.ResponseWriter, err error) {\n \tw.WriteHeader(http.StatusInternalServerError)\n \tfmt.Fprintf(w, \"ERROR: %v\", err)\n }\n\n // HandleWebhookRequest handles WebhookRequest and sends the WebhookResponse.\n func HandleWebhookRequest(w http.ResponseWriter, r *http.Request) {\n \tvar request webhookRequest\n \tvar response webhookResponse\n \tvar err error\n\n \t// Read input JSON\n \tif err = json.NewDecoder(r.Body).Decode(&request); err != nil {\n \t\thandleError(w, err)\n \t\treturn\n \t}\n \tlog.Printf(\"Request: %+v\", request)\n\n \t// Get the tag from the request, and call the corresponding\n \t// function that handles that tag.\n \t// This example only has one possible tag,\n \t// but most agents would have many.\n \tswitch tag := request.FulfillmentInfo.Tag; tag {\n \tcase \"confirm\":\n \t\tresponse, err = confirm(request)\n \tdefault:\n \t\terr = fmt.Errorf(\"Unknown tag: %s\", tag)\n \t}\n \tif err != nil {\n \t\thandleError(w, err)\n \t\treturn\n \t}\n \tlog.Printf(\"Response: %+v\", response)\n\n \t// Send response\n \tif err = json.NewEncoder(w).Encode(&response); err != nil {\n \t\thandleError(w, err)\n \t\treturn\n \t}\n }\n ```\n8. Click **Deploy**.\n\n9. Wait until the status indicator shows that the function\n has successfully deployed.\n While waiting, examine the code you just deployed.\n Code comments describe important details.\n\nCreate the webhook\n------------------\n\nNow that the webhook exists as a Cloud function,\nyou will associate this webhook with your agent.\nTo create the webhook for your agent:\n\n1. Open the [Dialogflow CX console](https://dialogflow.cloud.google.com/cx/projects).\n2. Choose your Google Cloud project.\n3. Select your agent.\n4. Select the **Manage** tab.\n5. Click **Webhooks**.\n6. Click **Create**.\n7. Complete the following fields:\n - **Display name**: shirts-agent-webhook\n - **Webhook URL**: Provide the webhook URL you saved when creating the function.\n - **Subtype**: Standard.\n - All other fields use default values.\n8. Click **Save**.\n\nUse the webhook\n---------------\n\nNow that the webhook is available to the agent,\nyou will make use of the webhook in\n[fulfillment](/dialogflow/cx/docs/concept/fulfillment).\nThe **Order Confirmation** page has an entry fulfillment,\nwhich currently has a static text response.\nTo update the fulfillment to use your webhook:\n\n1. Select the **Build** tab.\n2. Click the **Order Confirmation** page to expand the page on the agent builder graph.\n3. Click the **Entry Fulfillment** field on the page to open the fulfillment panel.\n4. Delete the existing text response under the **Agent says** heading. When you hover the text, the delete *delete* button appears.\n5. Click **Enable webhook**.\n6. Select the `shirts-agent-webhook` option from the **Webhook** dropdown menu.\n7. Enter `confirm` for the **Tag** field.\n8. Click **Save**.\n9. Close the fulfillment panel.\n\nThe deployed webhook code sends a response\nthat creates a\n[parameter](/dialogflow/cx/docs/concept/parameter)\nnamed `cancel-period`.\nUpdate the agent to reference this parameter in the final agent response\nfor the same **Order Confirmation** page:\n\n1. Click the condition [route](/dialogflow/cx/docs/concept/handler) shown with a `true` condition to open the route panel.\n2. Scroll down to the **Fulfillment** section of the route panel, and add the following text response under the **Agent says** heading: `You can cancel your order within $session.params.cancel-period days. Goodbye.`\n3. Click **Save**.\n4. Close the route panel.\n\nTest the agent in the simulator\n-------------------------------\n\nYour agent and webhook are ready to test with the\n[simulator](/dialogflow/cx/docs/concept/console#simulator):\n\n1. Click **Test Agent**.\n2. Enter `I want to buy a large red shirt` and press enter.\n\nSince you provided both a size and color,\nyou gave the agent everything it needs to create a shirt order,\nso it transitions directly to the **Order Confirmation** page.\n\nThe following describes the agent responses:"]]