Panduan ini menunjukkan cara menggunakan webhook, sehingga agen Anda dapat menjadi lebih dinamis. Cloud Functions digunakan untuk menghosting webhook karena kesederhanaannya, tetapi ada banyak cara lain untuk menghosting layanan webhook. Contoh ini juga menggunakan bahasa pemrograman Go, tetapi Anda dapat menggunakan bahasa apa pun yang didukung oleh Cloud Functions. Anda tidak perlu mengedit kode untuk panduan ini.
Contoh kode webhook melakukan hal berikut:
- Membaca nilai parameter dari permintaan webhook.
- Menulis nilai parameter ke respons webhook.
- Memberikan respons teks dalam respons webhook.
Sebelum memulai
Jika tidak berencana menggunakan webhook, Anda dapat melewati panduan memulai ini.
Anda harus melakukan hal berikut sebelum membaca panduan ini:
- Baca dasar-dasar alur.
- Lakukan langkah-langkah penyiapan.
- Lakukan langkah-langkah dalam panduan memulai Mem-build agen menggunakan alur. Langkah-langkah di bawah ini akan terus bekerja pada agen yang sama. Jika tidak lagi memiliki agen tersebut, Anda dapat mendownload agen dan memulihkannya.
Membuat Cloud Function
Cloud Functions dapat dibuat dengan konsol Google Cloud (kunjungi dokumentasi, buka konsol). Untuk membuat fungsi untuk panduan ini:
- Agen Agen Percakapan (Dialogflow CX) dan fungsi Anda harus berada di project yang sama. Ini adalah cara termudah bagi Agen Percakapan (Dialogflow CX) untuk memiliki akses aman ke fungsi Anda. Untuk memilih project, buka pemilih project.
- Buka halaman ringkasan Cloud Functions.
- Klik Create Function, lalu tetapkan kolom berikut:
- Environment: generasi ke-1
- Nama fungsi: shirts-agent-webhook
- Region: Jika Anda menentukan region untuk agen, gunakan region yang sama.
- HTTP Trigger type: HTTP
- URL: Klik tombol salin di sini dan simpan nilainya. Anda akan memerlukan URL ini saat mengonfigurasi webhook.
- Autentikasi: Wajibkan autentikasi
- Wajibkan HTTPS: dicentang
- Klik Simpan.
- Klik Berikutnya (Anda tidak memerlukan runtime, build, koneksi, atau setelan keamanan khusus).
- Tetapkan kolom berikut:
- Runtime: Pilih runtime Go terbaru.
- Kode sumber: Editor Inline
- Titik entri: HandleWebhookRequest
Ganti kode dengan kode berikut:
// Package cxwh contains an example Dialogflow CX webhook
package cxwh

import (
	"encoding/json"
	"fmt"
	"log"
	"net/http"
)

type fulfillmentInfo struct {
	Tag string `json:"tag"`
}

type sessionInfo struct {
	Session    string                 `json:"session"`
	Parameters map[string]interface{} `json:"parameters"`
}

type text struct {
	Text []string `json:"text"`
}

type responseMessage struct {
	Text text `json:"text"`
}

type fulfillmentResponse struct {
	Messages []responseMessage `json:"messages"`
}

// webhookRequest is used to unmarshal a WebhookRequest JSON object. Note that
// not all members need to be defined--just those that you need to process.
// As an alternative, you could use the types provided by the Dialogflow protocol buffers:
// https://pkg.go.dev/google.golang.org/genproto/googleapis/cloud/dialogflow/cx/v3#WebhookRequest
type webhookRequest struct {
	FulfillmentInfo fulfillmentInfo `json:"fulfillmentInfo"`
	SessionInfo     sessionInfo     `json:"sessionInfo"`
}

// webhookResponse is used to marshal a WebhookResponse JSON object. Note that
// not all members need to be defined--just those that you need to process.
// As an alternative, you could use the types provided by the Dialogflow protocol buffers:
// https://pkg.go.dev/google.golang.org/genproto/googleapis/cloud/dialogflow/cx/v3#WebhookResponse
type webhookResponse struct {
	FulfillmentResponse fulfillmentResponse `json:"fulfillmentResponse"`
	SessionInfo         sessionInfo         `json:"sessionInfo"`
}

// confirm handles webhook calls using the "confirm" tag.
func confirm(request webhookRequest) (webhookResponse, error) {
	// Create a text message that utilizes the "size" and "color"
	// parameters provided by the end-user.
	// This text message is used in the response below.
	t := fmt.Sprintf("You can pick up your order for a %s %s shirt in 5 days.",
		request.SessionInfo.Parameters["size"],
		request.SessionInfo.Parameters["color"])

	// Create session parameters that are populated in the response.
	// The "cancel-period" parameter is referenced by the agent.
	// This example hard codes the value 2, but a real system
	// might look up this value in a database.
	p := map[string]interface{}{"cancel-period": "2"}

	// Build and return the response.
	response := webhookResponse{
		FulfillmentResponse: fulfillmentResponse{
			Messages: []responseMessage{
				{
					Text: text{
						Text: []string{t},
					},
				},
			},
		},
		SessionInfo: sessionInfo{
			Parameters: p,
		},
	}
	return response, nil
}

// handleError handles internal errors.
func handleError(w http.ResponseWriter, err error) {
	w.WriteHeader(http.StatusInternalServerError)
	fmt.Fprintf(w, "ERROR: %v", err)
}

// HandleWebhookRequest handles WebhookRequest and sends the WebhookResponse.
func HandleWebhookRequest(w http.ResponseWriter, r *http.Request) {
	var request webhookRequest
	var response webhookResponse
	var err error

	// Read input JSON
	if err = json.NewDecoder(r.Body).Decode(&request); err != nil {
		handleError(w, err)
		return
	}
	log.Printf("Request: %+v", request)

	// Get the tag from the request, and call the corresponding
	// function that handles that tag.
	// This example only has one possible tag,
	// but most agents would have many.
	switch tag := request.FulfillmentInfo.Tag; tag {
	case "confirm":
		response, err = confirm(request)
	default:
		err = fmt.Errorf("Unknown tag: %s", tag)
	}
	if err != nil {
		handleError(w, err)
		return
	}
	log.Printf("Response: %+v", response)

	// Send response
	if err = json.NewEncoder(w).Encode(&response); err != nil {
		handleError(w, err)
		return
	}
}
Klik Deploy.
Tunggu hingga indikator status menunjukkan bahwa fungsi telah berhasil di-deploy. Sambil menunggu, periksa kode yang baru saja Anda deploy. Komentar kode menjelaskan detail penting.
Membuat webhook
Setelah webhook ada sebagai fungsi Cloud, Anda akan mengaitkan webhook ini dengan agen Anda. Untuk membuat webhook bagi agen Anda:
- Buka konsol Dialogflow CX.
- Pilih project Google Cloud Anda.
- Pilih agen Anda.
- Pilih tab Kelola.
- Klik Webhook.
- Klik Buat.
- Lengkapi kolom berikut:
- Nama tampilan: shirts-agent-webhook
- Webhook URL: Berikan URL webhook yang Anda simpan saat membuat fungsi.
- Subjenis: Standar.
- Semua kolom lainnya menggunakan nilai default.
- Klik Simpan.
Menggunakan webhook
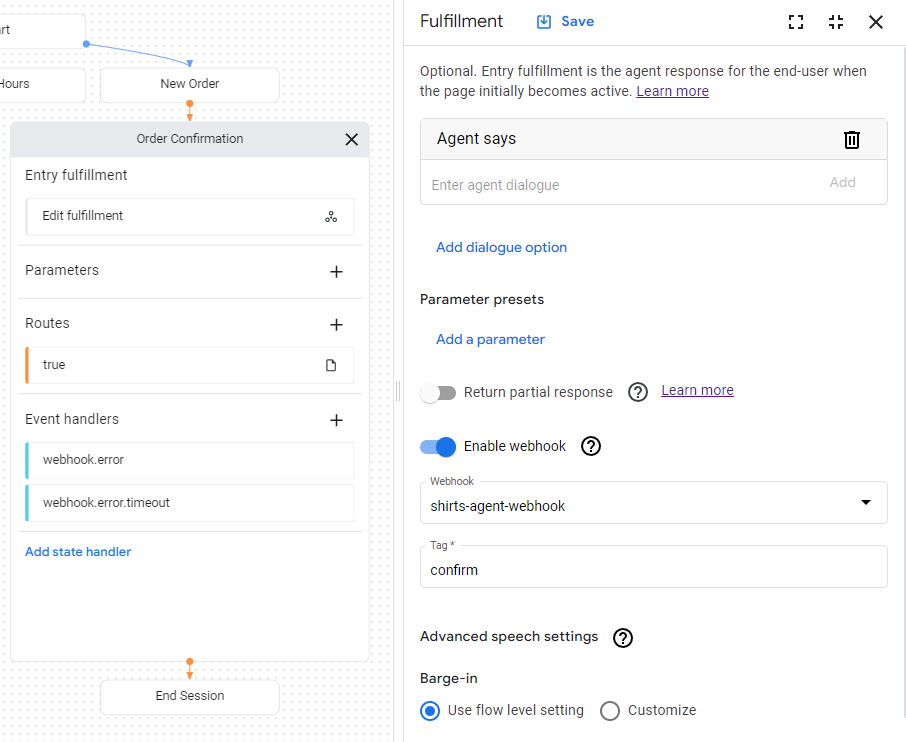
Setelah webhook tersedia untuk agen, Anda akan menggunakan webhook dalam fulfillment. Halaman Konfirmasi Pesanan memiliki fulfillment entri, yang saat ini memiliki respons teks statis. Untuk memperbarui fulfillment agar dapat menggunakan webhook Anda:
- Pilih tab Build.
- Klik halaman Konfirmasi Pesanan untuk meluaskan halaman di grafik pembuat agen.
- Klik kolom Entry Fulfillment di halaman untuk membuka panel fulfillment.
- Hapus respons teks yang ada di bawah judul Agent says. Saat Anda mengarahkan kursor ke teks, tombol hapus delete akan muncul.
- Klik Enable webhook.
- Pilih opsi
shirts-agent-webhookdari menu dropdown Webhook. - Masukkan
confirmuntuk kolom Tag. - Klik Simpan.
- Tutup panel fulfillment.
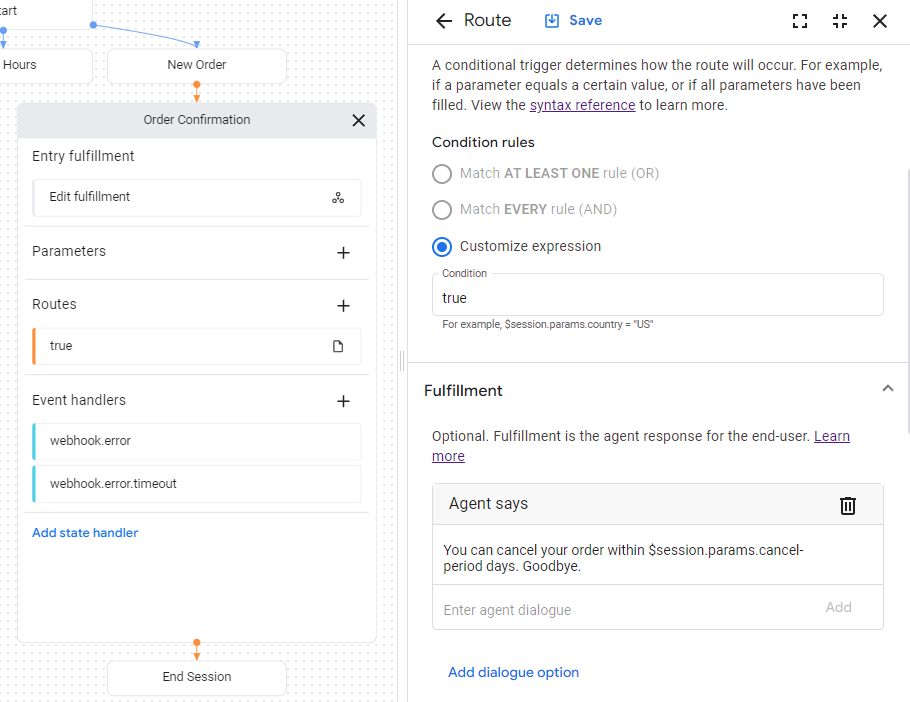
Kode webhook yang di-deploy mengirimkan respons
yang membuat
parameter
bernama cancel-period.
Perbarui agen untuk mereferensikan parameter ini dalam respons agen akhir
untuk halaman Konfirmasi Pesanan yang sama:
- Klik kondisi
route
yang ditampilkan dengan kondisi
trueuntuk membuka panel rute. - Scroll ke bawah ke bagian Fulfillment di panel rute,
dan tambahkan respons teks berikut di bawah judul Agent says:
You can cancel your order within $session.params.cancel-period days. Goodbye. - Klik Simpan.
- Tutup panel rute.
Menguji agen di simulator
Agen dan webhook Anda siap diuji dengan simulator:
- Klik Test Agent.
- Masukkan
I want to buy a large red shirtdan tekan enter.
Karena Anda memberikan ukuran dan warna, Anda telah memberi agen semua yang diperlukan untuk membuat pesanan kemeja, sehingga agen akan langsung beralih ke halaman Konfirmasi Pesanan.
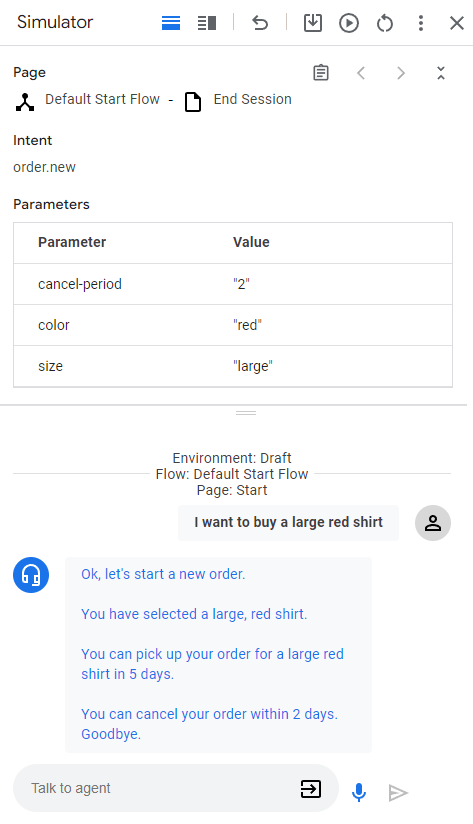
Berikut ini penjelasan respons agen:
| Respons | Penjelasan |
|---|---|
| Oke, mari kita mulai pesanan baru. | Saat halaman Pesanan Baru menjadi aktif, fulfillment entri dipanggil. Respons dipicu dari fulfillment ini. |
| Anda telah memilih kemeja merah besar. | Jika semua parameter formulir telah disediakan untuk halaman Pesanan Baru, pemeriksaan rute kondisi untuk penyelesaian formulir akan dipanggil. Respons dipicu dari fulfillment untuk rute ini. Rute ini juga bertransisi ke halaman Konfirmasi Pesanan. |
| Anda dapat mengambil pesanan kemeja merah besar dalam 5 hari. | Fulfillment entri untuk halaman Konfirmasi Pesanan memanggil webhook. Lihat fungsi confirm dalam kode webhook. Fungsi tersebut membuat respons teks ini, dan menggunakan parameter yang diberikan dalam permintaan webhook. |
| Anda dapat membatalkan pesanan dalam waktu 2 hari. Sampai jumpa. | Halaman Konfirmasi Pesanan memiliki rute kondisi dengan kondisi yang selalu benar. Respons ini dipicu oleh fulfillment untuk rute tersebut. Perhatikan bahwa respons menggunakan parameter yang ditetapkan oleh webhook dalam respons webhook. |