Mit Sammlungen den Überblick behalten
Sie können Inhalte basierend auf Ihren Einstellungen speichern und kategorisieren.
Auf dieser Seite wird beschrieben, wie Sie mit der QuelleMulti Table mehrere Tabellen aus einer Microsoft SQL Server-Datenbank auslesen können.
Verwenden Sie die Quelle für mehrere Tabellen, wenn Ihre Pipeline aus mehreren Tabellen lesen soll. Informationen zum Lesen der Pipeline aus einer einzelnen Tabelle finden Sie unter Aus einer SQL Server-Tabelle lesen.
Die Quelle „Multi-Table“ gibt Daten mit mehreren Schemas aus und enthält ein Tabellennamenfeld, das die Tabelle angibt, aus der die Daten stammen. Verwenden Sie bei Verwendung der Quelle „Multi-Table“ eine der Multi-Table-Senken, BigQuery Multi Table oder GCS Multi File.
Hinweise
Sign in to your Google Cloud account. If you're new to
Google Cloud,
create an account to evaluate how our products perform in
real-world scenarios. New customers also get $300 in free credits to
run, test, and deploy workloads.
In the Google Cloud console, on the project selector page,
select or create a Google Cloud project.
Bei Verwendung von Cloud Data Fusion verwenden Sie sowohl die Google Cloud Console als auch die separate Cloud Data Fusion-UI. In der Google Cloud Console können Sie ein Google Cloud -Projekt erstellen sowie Cloud Data Fusion-Instanzen erstellen und löschen. In der Benutzeroberfläche von Cloud Data Fusion können Sie die verschiedenen Seiten wie Studio oder Wrangler nutzen, um Features von Cloud Data Fusion zu nutzen.
Rufen Sie in der Google Cloud Console die Seite „Cloud Data Fusion“ auf.
Wenn Sie die Instanz in Cloud Data Fusion Studio öffnen möchten, klicken Sie auf Instanzen und dann auf Instanz anzeigen.
SQL Server-Passwort als sicheren Schlüssel speichern
Fügen Sie Ihr SQL Server-Passwort als sicheren Schlüssel hinzu, um Ihre Cloud Data Fusion-Instanz zu verschlüsseln. Später in diesem Leitfaden sorgen Sie dafür, dass Ihr Passwort mit Cloud KMS abgerufen wird.
Klicken Sie rechts oben auf einer beliebigen Seite von Cloud Data Fusion auf Systemadministrator.
Klicken Sie auf den Tab Configuration (Konfiguration).
Klicken Sie auf HTTP-Aufrufe ausführen.
Wählen Sie im Drop-down-Menü PUT aus.
Geben Sie im Feld Pfad namespaces/NAMESPACE_ID/securekeys/PASSWORD ein.
Geben Sie im Feld Body den Wert {"data":"SQL_SERVER_PASSWORD"} ein.
Klicken Sie auf Senden.
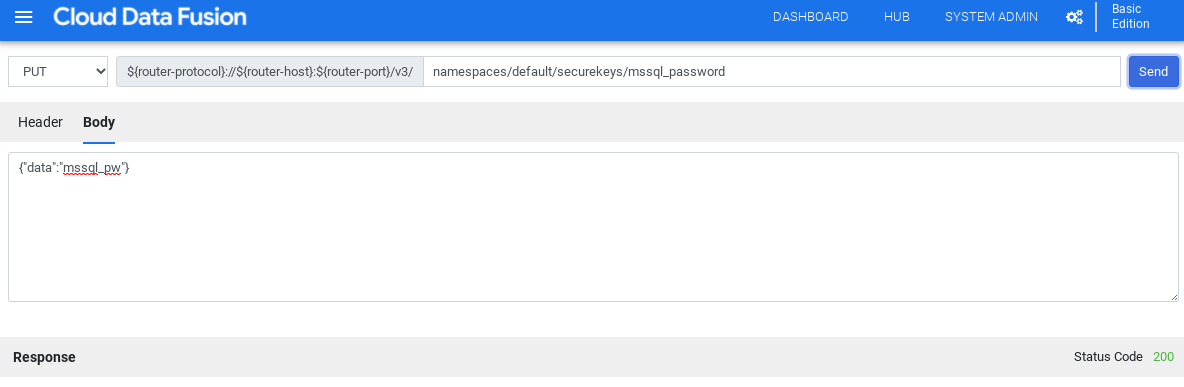
Achten Sie darauf, dass die Antwort, die Sie erhalten, der Statuscode 200 ist.
JDBC-Treiber für SQL Server abrufen
Hub verwenden
Klicken Sie in der Cloud Data Fusion-UI auf Hub.
Geben Sie in der Suchleiste Microsoft SQL Server JDBC Driver ein.
Klicken Sie auf Microsoft SQL Server JDBC-Treiber.
Klicken Sie auf Herunterladen. Führen Sie die angezeigten Schritte aus.
Klicken Sie auf Bereitstellen. Laden Sie die JAR-Datei aus dem vorherigen Schritt hoch.
Wählen Sie einen Download aus und klicken Sie auf Herunterladen.
Klicken Sie in der Cloud Data Fusion-UI auf menuMenü und rufen Sie die Seite Studio auf.
Klicken Sie auf addHinzufügen.
Klicken Sie unter Treiber auf Hochladen.
Laden Sie die in Schritt 2 heruntergeladene JAR-Datei hoch.
Klicken Sie auf Weiter.
Konfigurieren Sie den Treiber. Geben Sie einen Namen ein.
Geben Sie im Feld Klassennamecom.microsoft.sqlserver.jdbc.SQLServerDriver ein.
Klicken Sie auf Beenden.
Multiple Table-Plug-ins bereitstellen
Klicken Sie in der Web-UI von Cloud Data Fusion auf Hub.
Geben Sie in der Suchleiste Multiple table plugins ein.
Klicken Sie auf Multiple Table-Plug-ins.
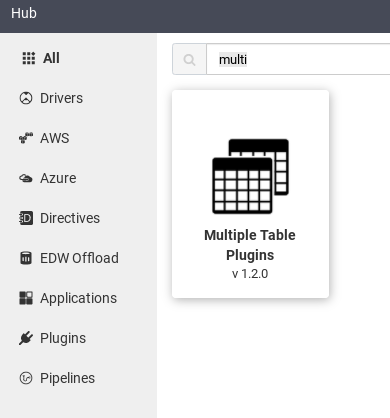
Klicken Sie auf Deploy.
Klicken Sie auf Beenden.
Klicken Sie auf Pipeline erstellen.
Mit SQL Server verbinden
Klicken Sie in der Cloud Data Fusion-UI auf menuMenü und rufen Sie die Seite Studio auf.
Maximieren Sie in Studio das Menü Quelle.
Klicken Sie auf Multiple Database Tables.
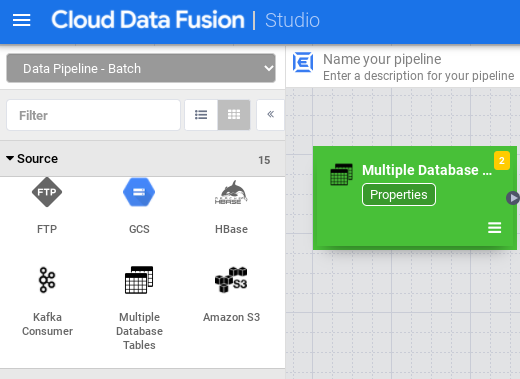
Bewegen Sie den Mauszeiger auf den Knoten Multiple Database Tables und klicken Sie auf Properties.
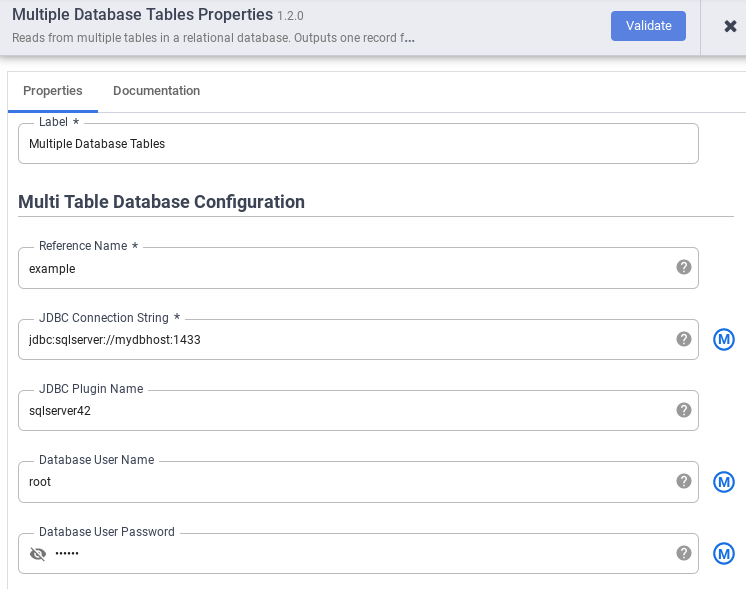
Geben Sie im Feld Referenzname einen Referenznamen an, der zur Identifizierung Ihrer SQL Server-Quelle verwendet wird.
Geben Sie im Feld JDBC Connection String den JDBC-Verbindungsstring ein. Beispiel: jdbc:sqlserver://mydbhost:1433 Weitere Informationen finden Sie unter Verbindungs-URL erstellen.
Geben Sie den Name des JDBC-Plug-ins, den Datenbanknutzername und das Datenbanknutzerpasswort ein.
Klicke auf Validieren.
Klicken Sie auf closeSchließen.
Mit BigQuery oder Cloud Storage verbinden
Klicken Sie in der Cloud Data Fusion-UI auf menuMenü und rufen Sie die Seite Studio auf.
Maximieren Sie Sink.
Klicken Sie auf BigQuery Multi Table oder GCS Multi File.
Verbinden Sie den Knoten Multiple Database Tables (Mehrere Datenbanktabellen) mit BigQuery Multi Table (BigQuery-Tabelle mit mehreren Tabellen) oder GCS Multi File (GCS-Datei mit mehreren Dateien).
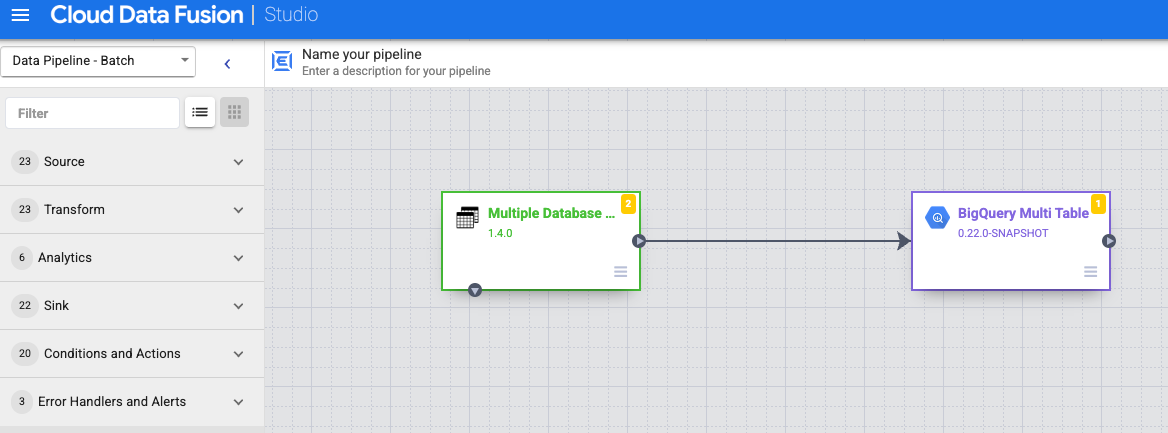
Halten Sie den Mauszeiger auf den Knoten BigQuery Multi Table oder GCS Multi File, klicken Sie auf Properties und konfigurieren Sie die Senke.
[[["Leicht verständlich","easyToUnderstand","thumb-up"],["Mein Problem wurde gelöst","solvedMyProblem","thumb-up"],["Sonstiges","otherUp","thumb-up"]],[["Schwer verständlich","hardToUnderstand","thumb-down"],["Informationen oder Beispielcode falsch","incorrectInformationOrSampleCode","thumb-down"],["Benötigte Informationen/Beispiele nicht gefunden","missingTheInformationSamplesINeed","thumb-down"],["Problem mit der Übersetzung","translationIssue","thumb-down"],["Sonstiges","otherDown","thumb-down"]],["Zuletzt aktualisiert: 2025-09-04 (UTC)."],[[["\u003cp\u003eThis guide outlines the process of reading data from multiple Microsoft SQL Server tables using the Cloud Data Fusion Multi Table source.\u003c/p\u003e\n"],["\u003cp\u003eThe Multi Table source is used when a pipeline needs to read from multiple tables, in contrast to using a single table source, and it outputs data with multiple schemas while providing a table name field.\u003c/p\u003e\n"],["\u003cp\u003eTo use the Multi Table source, you will need to utilize one of the compatible multi table sinks, either BigQuery Multi Table or GCS Multi File.\u003c/p\u003e\n"],["\u003cp\u003eThe process involves enabling APIs, creating a Cloud Data Fusion instance, securely storing your SQL Server password, getting the appropriate JDBC driver, and deploying multiple table plugins.\u003c/p\u003e\n"],["\u003cp\u003eConnecting to SQL Server and the chosen sink (BigQuery or Cloud Storage) is done through the Cloud Data Fusion Studio, and the guide provides steps to run a preview and deploy the pipeline.\u003c/p\u003e\n"]]],[],null,["# Read from multiple Microsoft SQL Server tables\n\n*** ** * ** ***\n\nThis page describes how to read multiple tables from a Microsoft SQL Server\ndatabase, using the **Multi Table** [source](/data-fusion/docs/concepts/overview#source).\nUse the Multi Table source when you want your pipeline to read from\nmultiple tables. If you want your pipeline to read from a single table, see\n[Reading from a SQL Server table](/data-fusion/docs/how-to/reading-from-sqlserver).\n\nThe Multi Table source outputs data with multiple schemas and includes a\ntable name field that indicates the table from which the data came. When\nusing the Multi Table source, use one of the multi table [sinks](/data-fusion/docs/concepts/overview#sink),\n**BigQuery Multi Table** or **GCS Multi File**.\n\nBefore you begin\n----------------\n\n- Sign in to your Google Cloud account. If you're new to Google Cloud, [create an account](https://console.cloud.google.com/freetrial) to evaluate how our products perform in real-world scenarios. New customers also get $300 in free credits to run, test, and deploy workloads.\n- In the Google Cloud console, on the project selector page,\n select or create a Google Cloud project.\n\n | **Note**: If you don't plan to keep the resources that you create in this procedure, create a project instead of selecting an existing project. After you finish these steps, you can delete the project, removing all resources associated with the project.\n\n [Go to project selector](https://console.cloud.google.com/projectselector2/home/dashboard)\n-\n [Verify that billing is enabled for your Google Cloud project](/billing/docs/how-to/verify-billing-enabled#confirm_billing_is_enabled_on_a_project).\n\n-\n\n\n Enable the Cloud Data Fusion, Cloud Storage, BigQuery, and Dataproc APIs.\n\n\n [Enable the APIs](https://console.cloud.google.com/flows/enableapi?apiid=datafusion.googleapis.com,bigquery.googleapis.com,storage.googleapis.com,dataproc.googleapis.com)\n\n- In the Google Cloud console, on the project selector page,\n select or create a Google Cloud project.\n\n | **Note**: If you don't plan to keep the resources that you create in this procedure, create a project instead of selecting an existing project. After you finish these steps, you can delete the project, removing all resources associated with the project.\n\n [Go to project selector](https://console.cloud.google.com/projectselector2/home/dashboard)\n-\n [Verify that billing is enabled for your Google Cloud project](/billing/docs/how-to/verify-billing-enabled#confirm_billing_is_enabled_on_a_project).\n\n-\n\n\n Enable the Cloud Data Fusion, Cloud Storage, BigQuery, and Dataproc APIs.\n\n\n [Enable the APIs](https://console.cloud.google.com/flows/enableapi?apiid=datafusion.googleapis.com,bigquery.googleapis.com,storage.googleapis.com,dataproc.googleapis.com)\n\n1.\n\n\n Enable the Cloud Data Fusion, Cloud Storage, BigQuery, and Dataproc APIs.\n\n\n [Enable the APIs](https://console.cloud.google.com/flows/enableapi?apiid=datafusion.googleapis.com,bigquery.googleapis.com,storage.googleapis.com,dataproc.googleapis.com)\n2. [Create a Cloud Data Fusion instance](/data-fusion/docs/how-to/create-instance).\n3. Ensure that your SQL Server database can accept connections from Cloud Data Fusion. To do this securely, we recommend that you [create a private\n Cloud Data Fusion instance](/data-fusion/docs/how-to/create-private-ip).\n\n### View your Cloud Data Fusion instance\n\nWhen using Cloud Data Fusion, you use both the Google Cloud console\nand the separate Cloud Data Fusion UI. In the Google Cloud console, you\ncan create a Google Cloud project, and create and delete\nCloud Data Fusion instances. In the Cloud Data Fusion UI, you can use\nthe various pages, such as **Studio** or **Wrangler**, to use\nCloud Data Fusion features.\n\n1. In the Google Cloud console, go to the Cloud Data Fusion page.\n\n2. To open the instance in the Cloud Data Fusion Studio,\n click **Instances** , and then click **View instance**.\n\n[Go to Instances](https://console.cloud.google.com/data-fusion/locations/-/instances) \n\nStore your SQL Server password as a secure key\n----------------------------------------------\n\nAdd your SQL Server password as a secure key to encrypt on your\nCloud Data Fusion instance. Later in this guide, you will ensure that\nyour password is retrieved using [Cloud KMS](/kms/docs).\n\n1. In the top-right corner of any Cloud Data Fusion page, click **System\n Admin**.\n\n2. Click the **Configuration** tab.\n\n3. Click **Make HTTP Calls**.\n\n \u003cbr /\u003e\n\n4. In the dropdown menu, choose **PUT**.\n\n5. In the path field, enter `namespaces/`\u003cvar translate=\"no\"\u003eNAMESPACE_ID\u003c/var\u003e`/securekeys/`\u003cvar translate=\"no\"\u003ePASSWORD\u003c/var\u003e.\n\n6. In the **Body** field, enter `{\"data\":\"`\u003cvar translate=\"no\"\u003eSQL_SERVER_PASSWORD\u003c/var\u003e`\"}`.\n\n7. Click **Send**.\n\nEnsure that the **Response** you get is status code `200`.\n\nGet the JDBC driver for SQL Server\n----------------------------------\n\n### Using the Hub\n\n1. In the Cloud Data Fusion UI, click **Hub**.\n\n2. In the search bar, enter `Microsoft SQL Server JDBC Driver`.\n\n3. Click **Microsoft SQL Server JDBC Driver**.\n\n4. Click **Download**. Follow the download steps shown.\n\n5. Click **Deploy**. Upload the JAR file from the previous step.\n\n6. Click **Finish**.\n\n### Using Studio\n\n1. Visit [Microsoft.com](https://www.microsoft.com/en-us/download/details.aspx?id=11774).\n\n2. Choose your download and click **Download**.\n\n3. In the Cloud Data Fusion UI, click menu\n **Menu** and navigate to the **Studio** page.\n\n4. Click add **Add**.\n\n5. Under **Driver** , click **Upload**.\n\n6. Upload the JAR file downloaded in step 2.\n\n7. Click **Next**.\n\n8. Configure the driver by entering a **Name**.\n\n9. In the **Class name** field, enter `com.microsoft.sqlserver.jdbc.SQLServerDriver`.\n\n10. Click **Finish**.\n\nDeploy the Multiple Table Plugins\n---------------------------------\n\n1. In the Cloud Data Fusion web UI, click **Hub**.\n\n2. In the search bar, enter `Multiple table plugins`.\n\n3. Click **Multiple Table Plugins**.\n\n4. Click **Deploy**.\n\n5. Click **Finish**.\n\n6. Click **Create a Pipeline**.\n\nConnect to SQL Server\n---------------------\n\n1. In the Cloud Data Fusion UI, click menu\n **Menu** and navigate to the **Studio** page.\n\n2. In **Studio** , expand the **Source** menu.\n\n3. Click **Multiple Database Tables**.\n\n4. Hold the pointer over the **Multiple Database Tables** node and click\n **Properties**.\n\n5. In the **Reference name** field, specify a reference name that will be used to\n identify your SQL Server source.\n\n6. In the **JDBC Connection String** field, enter the JDBC connection string. For\n example, `jdbc:sqlserver://mydbhost:1433`. For more information, see\n [Building the connection URL](https://docs.microsoft.com/en-us/sql/connect/jdbc/building-the-connection-url).\n\n7. Enter the **JDBC Plugin Name** , **Database User Name** , and\n **Database User Password**.\n\n8. Click **Validate**.\n\n9. Click close **Close**.\n\nConnect to BigQuery or Cloud Storage\n------------------------------------\n\n1. In the Cloud Data Fusion UI, click menu\n **Menu** and navigate to the **Studio** page.\n\n2. Expand **Sink**.\n\n3. Click **BigQuery Multi Table** or **GCS Multi File**.\n\n4. Connect the **Multiple Database Tables** node with **BigQuery Multi Table**\n or **GCS Multi File**.\n\n5. Hold the pointer over the **BigQuery Multi Table**\n or **GCS Multi File** node, click **Properties**, and configure the sink.\n\n For more information, see [Google BigQuery Multi Table Sink](https://cdap.atlassian.net/wiki/spaces/DOCS/pages/464912385/Google+BigQuery+Multi+Table+Sink) and [Google Cloud Storage Multi File Sink](https://cdap.atlassian.net/wiki/spaces/DOCS/pages/464945223/Google+Cloud+Storage+Multi+File+Sink).\n6. Click **Validate**.\n\n7. Click close **Close**.\n\nRun preview of the pipeline\n---------------------------\n\n1. In the Cloud Data Fusion UI, click menu\n **Menu** and navigate to the **Studio** page.\n\n2. Click **Preview**.\n\n3. Click **Run**. Wait for the preview to finish successfully.\n\nDeploy the pipeline\n-------------------\n\n1. In the Cloud Data Fusion UI, click menu\n **Menu** and navigate to the **Studio** page.\n\n2. Click **Deploy**.\n\nRun the pipeline\n----------------\n\n1. In the Cloud Data Fusion UI,\n click menu **Menu**.\n\n2. Click **List**.\n\n3. Click the pipeline.\n\n4. On the pipeline details page, click **Run**.\n\nWhat's next\n-----------\n\n- Learn more about [Cloud Data Fusion](/data-fusion/docs/concepts/overview).\n- Follow one of the [tutorials](/data-fusion/docs/tutorials)."]]