Mantieni tutto organizzato con le raccolte
Salva e classifica i contenuti in base alle tue preferenze.
Questa pagina spiega come modificare e configurare le origini dati già create da te o da un altro utente. Per scoprire come creare nuove origini dati, consulta Aggiungere dati a un report.
Come modificare un'origine dati
Per modificare un'origine dati incorporata, modifica il report in cui è incorporata.
Modificare un'origine dati da un report
Durante la modifica di un report, puoi visualizzare tutte le origini dati utilizzate da questo report nel menu Risorse:
Modifica il report.
Nei menu, seleziona Risorsa > Gestisci origini dati aggiunte.
Individua l'origine dati nell'elenco. Poi, a destra, fai clic su Modifica.
Puoi anche modificare l'origine dati di un componente specifico seguendo questa procedura:
Nella parte superiore della home page di Looker Studio, fai clic su Origini dati.
Sfoglia o cerca l'origine dati che vuoi modificare.
Fai clic sull'origine dati scelta nell'elenco.
Come orientarsi nell'editor dell'origine dati
L'editor dell'origine dati include diversi elementi e opzioni:
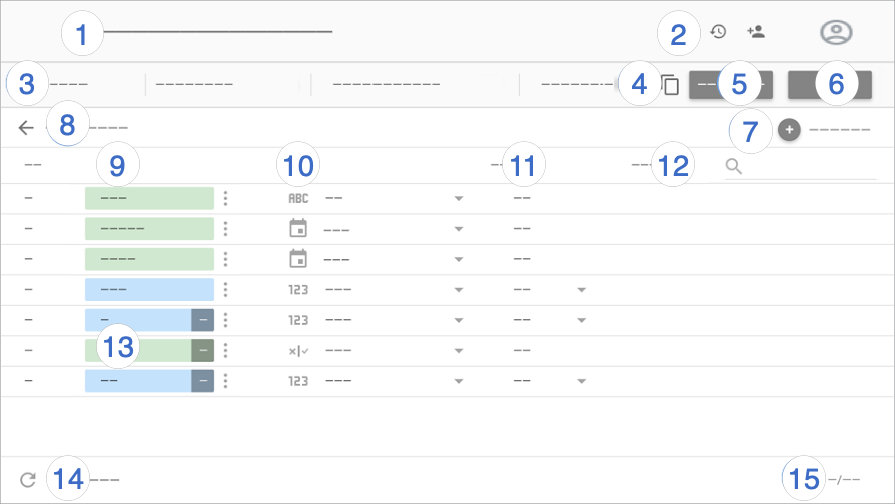
Legenda dell'editor dell'origine dati:
Nome origine dati. Fai clic per modificare il nome.
Cronologia delle versioni. Visualizza e ripristina le versioni precedenti dell'origine dati.
Accanto alla cronologia delle versioni è presente il pulsante Condividi, che ti consente di condividere questa origine dati con altre persone.
Opzioni dell'origine dati:
Credenziali dei dati. Determina chi può visualizzare i dati forniti da questa origine dati.
Aggiornamento dei dati. Trova un giusto equilibrio tra gli aggiornamenti dei dati e il rendimento dei report.
Modifica campi nei report. Consente agli editor dei report di modificare i nomi dei campi e le aggregazioni, applicare funzioni analitiche e impostare le opzioni di visualizzazione dei campi senza dover modificare l'origine dati.
Campi. Le dimensioni sono visualizzate in chip verdi, le metriche in chip blu e i parametri in chip viola. Fai clic su un campo per assegnargli un nuovo nome. Per eseguire altre azioni sul campo, fai clic su Altro.
Tipo di campo. Determina il tipo di dati contenuti nel campo. Fai clic sul menu a discesa per modificare il tipo.
Aggregazione. Determina in che modo viene riepilogato il campo. Fai clic sul menu a discesa per modificare l'aggregazione. I campi con aggregazione AUTOMATICA non possono essere modificati.
Descrizione. Aggiungi una descrizione a un campo. Per i collegamenti di Looker e Search Ads 360, la descrizione viene compilata automaticamente dall'origine dati.
Quando l'opzione di stile Mostra descrizioni dei campi è attivata per i grafici a tabella, gli utenti possono visualizzare la descrizione del campo in una descrizione comando. L'opzione Mostra descrizioni dei campi viene attivata automaticamente per i grafici collegati a un'origine dati Looker o Search Ads 360.
Aggiorna campi. Fai clic per aggiornare l'origine dati con eventuali modifiche strutturali apportate al set di dati sottostante.
Conteggio dei campi. Mostra il numero di campi nell'origine dati.
Chi può modificare un'origine dati
Per modificare un'origine dati riutilizzabile, devi esserne il proprietario o disporre dell'autorizzazione di accesso Può modificare per l'origine dati.
Per modificare un'origine dati incorporata, devi essere il proprietario del report o disporre dell'autorizzazione di accesso Può modificare per il report.
[[["Facile da capire","easyToUnderstand","thumb-up"],["Il problema è stato risolto","solvedMyProblem","thumb-up"],["Altra","otherUp","thumb-up"]],[["Difficile da capire","hardToUnderstand","thumb-down"],["Informazioni o codice di esempio errati","incorrectInformationOrSampleCode","thumb-down"],["Mancano le informazioni o gli esempi di cui ho bisogno","missingTheInformationSamplesINeed","thumb-down"],["Problema di traduzione","translationIssue","thumb-down"],["Altra","otherDown","thumb-down"]],["Ultimo aggiornamento 2025-09-04 UTC."],[],[],null,["# Edit a data source\n\nThis page explains how to edit and configure data sources you, or someone else, has already created. To learn how to create new data sources, see [Add data to a report](/looker/docs/studio/add-data-to-a-report).\n\nHow to edit a data source\n-------------------------\n\nTo edit an embedded data source, [edit the report](/looker/docs/studio/edit-a-report) in which it's embedded.\n\n### Edit a data source from within a report\n\nWhile you're editing a report, you can see all data sources that are used by that report in the **Resources** menu:\n\n1. Edit your report.\n2. In the menus, select **Resource \\\u003e Manage added data sources**.\n3. Locate the data source in the list. Then, to the right, click **Edit**.\n\nYou can also edit the data source for a specific component by following these steps:\n\n1. [Edit your report](/looker/docs/studio/edit-a-report).\n2. Select a component.\n3. In the **Properties** panel, select the **SETUP** tab.\n4. In the **Data Source** section, edit the data source by clicking **Edit**.\n\n| **Note:** These methods work for both embedded and reusable data sources.\n\n### Edit a data source from the home page\n\nYou can find and edit all your reusable data sources in the Data sources list on the home page by following these steps:\n\n1. [Sign in to Looker Studio.](https://lookerstudio.google.com)\n2. At the top of the Looker Studio home page, click **Data Sources**.\n3. Browse or search for the data source that you want to edit.\n4. Click that data source in the list.\n\n| **Note:** Only reusable data sources appear in this list. To edit an embedded data source, follow the steps [shown previously](#how-to-edit-a-data-source).\n\nFind your way around the data source editor\n-------------------------------------------\n\nThe **Data source editor** includes several elements and options:\n\n**Data source editor legend:**\n\n1. **Data source name**. Click to change the name.\n2. **[Version history](/looker/docs/studio/see-whats-changed-in-reports-and-data-sources)** . View and restore previous versions of the data source. Next to version history is the **[Share](/looker/docs/studio/ways-to-share-your-reports)** button, which lets you share this data source with other people.\n3. Data source options:\n 1. **[Data credentials](/looker/docs/studio/data-credentials)**. Determines who can view the data that is provided by this data source.\n 2. **[Data freshness](/looker/docs/studio/manage-data-freshness).** Balances data updates with report performance.\n 3. **[Community visualizations access](/looker/docs/studio/community-visualizations-developer-preview).** Allows this data source to provide data to community visualizations.\n 4. **[Field editing in reports](/looker/docs/studio/edit-fields-in-your-reports)**. Lets report editors change field names and aggregations, apply analytical functions, and set field display options without needing to edit the data source.\n4. **[Make a copy](/looker/docs/studio/copy-a-data-source)** of this data source.\n5. [**Create report**](/looker/docs/studio/tutorial-create-a-new-report). Create a new report from this data source.\n6. **[Explore](/looker/docs/studio/about-the-looker-studio-explorer-labs)**. Create a new exploration from this data source.\n7. [**Add a field**](/looker/docs/studio/about-calculated-fields). Create a calculated field, add a custom bin, or add a custom group.\n8. [**Edit connection**](/looker/docs/studio/edit-the-data-source-connection). The data source owner can reconnect the data source.\n\n **[Filter by email address](/looker/docs/studio/filter-by-email-address)**. Add row-level security to your data.\n9. [**Fields**](/looker/docs/studio/model-your-data). Dimensions appear in green chips, metrics in blue chips, and parameters in purple chips. Click a field to give it a new name. To perform other field actions, click **More**.\n\n10. [**Field type**](/looker/docs/studio/edit-fields-in-your-reports). Determines the kind of data that is contained in the field. Click the drop-down menu to change the type.\n\n | **Important:** Changing field types can have a big impact on your reports.\n11. [**Aggregation**](/looker/docs/studio/edit-fields-in-your-reports). Determines how the field is summarized. Click the drop-down menu to change the aggregation. Fields with AUTO aggregation can't be changed.\n\n12. **Description** . Add a description to any field. For [Looker](/looker/docs/studio/connect-to-looker) and [Search Ads 360](/looker/docs/studio/connect-to-search-ads-360-deprecated) connections, the description is automatically populated from the data source.\n\n When the [**Show field descriptions**](/looker/docs/studio/table-reference) style option is enabled for table charts, users can view the field description in a tooltip. **Show field descriptions** is automatically enabled for charts that are connected to a [Looker](/looker/docs/studio/connect-to-looker) or [Search Ads 360](/looker/docs/studio/connect-to-search-ads-360-deprecated) data source.\n13. **[Calculated fields](/looker/docs/studio/about-calculated-fields), [custom bins](/looker/docs/studio/create-a-custom-bin), and [custom groups](/looker/docs/studio/create-a-custom-group)** . Click **fx** to edit the field formula.\n\n14. [**Refresh fields**](/looker/docs/studio/refresh-data-source-fields). Click to update the data source with any structural changes that were made to the underlying dataset.\n\n15. **Field count**. Displays the number of fields in the data source.\n\nWho can edit a data source\n--------------------------\n\nTo edit a **reusable data source** , you must either be the owner of the data source or have *Can Edit* access permission to the data source.\n\nTo edit an **embedded data source** , you must either be the owner of the report or have *Can Edit* access permission to the report.\n\nWhat you can edit\n-----------------\n\nData source editors can do the following:\n\n- [Share](/looker/docs/studio/invite-others-to-your-reports) the data source\n- [Rename the data source](/looker/docs/studio/add-data-to-a-report)\n- [Rename and duplicate fields](/looker/docs/studio/create-rename-copy-hide-and-remove-fields)\n- Create [calculated fields](/looker/docs/studio/about-calculated-fields), [custom bins](/looker/docs/studio/create-a-custom-bin), and [custom groups](/looker/docs/studio/create-a-custom-group)\n- Create [parameters](/looker/docs/studio/parameters)\n- Change [field aggregations](/looker/docs/studio/model-your-data)\n- Add field descriptions\n- Change [field data types](/looker/docs/studio/data-types)\n- [Refresh](/looker/docs/studio/refresh-data-source-fields) data source fields\n- [Edit the data source connection](/looker/docs/studio/edit-the-data-source-connection)\n- Change the [data credentials](/looker/docs/studio/data-credentials-article)\n- Enable [native functions](/looker/docs/studio/nativedimension)\n\nIf you are the owner of the data source, you can also perform the following tasks:\n\n- [Remove and restore](/looker/docs/studio/delete-a-data-source) the data source\n- [Make someone else the owner](/looker/docs/studio/transfer-ownership) of that data source\n\nIf you are the owner of the data credentials that are used by the data source, you can also [revoke](/looker/docs/studio/data-credentials-article) the data credentials."]]