This document shows you how to accelerate loading the large AI model weights from Cloud Storage by using Run:ai Model Streamer with the vLLM inference server on Google Kubernetes Engine (GKE).
The solution in this document assumes that you have your AI model and weights in safetensors format already loaded in a Cloud Storage bucket.
By adding the --load-format=runai_streamer flag to your vLLM deployment, you can use the Run:ai Model Streamer to improve model download efficiency for your AI workloads on GKE.
This document is intended for the following users:
- Machine learning (ML) engineers who need to load large AI models from object storage into GPU/TPU nodes as quickly as possible.
- Platform admins and operators who automate and optimize model serving infrastructure on GKE.
- Cloud architects who evaluate specialized data loading tools for AI/ML workloads.
To learn more about common roles and example tasks referenced in Google Cloud content, see Common GKE user roles and tasks.
Overview
The solution described in this document uses three core components—Run:ai Model Streamer, vLLM, and the safetensors file format—to accelerate the process of loading model weights from Cloud Storage onto GPU nodes.
Run:ai Model Streamer
Run:ai Model Streamer is an open-source Python SDK that speeds up loading large AI models onto GPUs. It streams model weights directly from storage, like Cloud Storage buckets, to your GPU's memory. The model streamer is particularly suitable for accessing safetensors files located in Cloud Storage.
safetensors
safetensors is a file format to store tensors, the core data structures in AI models, in a way that enhances both security and speed. safetensors is designed as an alternative to Python's pickle format, and it enables fast loading times through a zero-copy approach. This approach lets the tensors be directly accessible from the source without needing to load the entire file into the local memory first.
vLLM
vLLM is an open-source library for LLM inference and serving. It's a high-performance inference server that's optimized for rapidly loading large AI models. In this document, vLLM is the core engine that runs your AI model on GKE and handles incoming inference requests. Run:ai Model Streamer's built-in authentication support for Cloud Storage requires vLLM version 0.11.1 or later.
How Run:ai Model Streamer accelerates model loading
When you start an LLM-based AI application for inference, a significant delay often occurs before the model is ready to use. This delay, known as a cold start, happens because the entire multi-gigabyte model file must be downloaded from a storage location, like a Cloud Storage bucket, to your machine's local disk. The file is then loaded into your GPU's memory. During this loading period, the expensive GPU is sitting idle, which is inefficient and costly.
Instead of the download-then-load process, the model streamer streams the model directly from your Cloud Storage to the GPU's memory. The streamer uses a high-performance backend to read multiple parts of the model, called tensors, in parallel. Reading tensors concurrently is significantly faster than loading the file sequentially.
Architecture overview
The Run:ai Model Streamer integrates with vLLM on GKE to accelerate model loading by streaming model weights directly from Cloud Storage to GPU memory, bypassing local disk.
The following diagram shows this architecture:
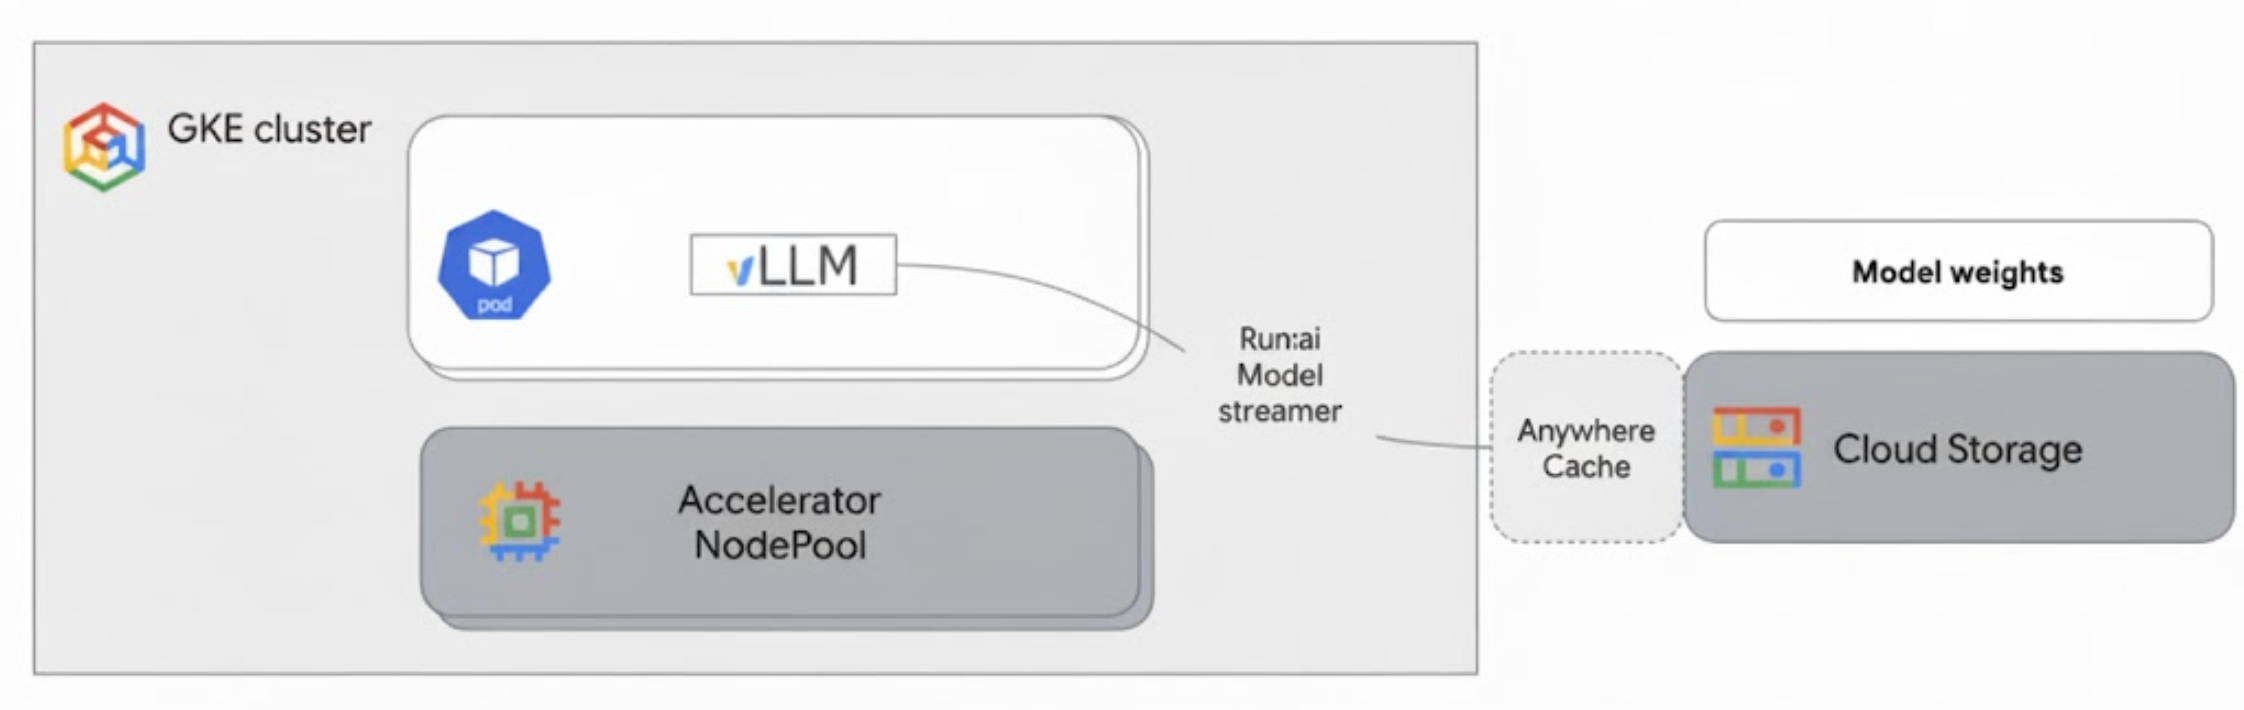
This architecture includes the following components and workflow:
- Cloud Storage bucket: stores the AI model weights in
safetensorsformat. - GKE Pod with GPU: runs the vLLM inference server.
- vLLM inference server: configured with the
--load-format=runai_streamerflag, which enables the model streamer functionality. - Run:ai Model Streamer: when vLLM starts, the model streamer reads model weights from the specified
gs://path in the Cloud Storage bucket. Instead of downloading files to disk, it streams tensor data directly into the GPU memory of the GKE Pod, where it's immediately available to vLLM for inference. - Cloud Storage Anywhere Cache (Optional): if enabled, Anywhere Cache caches bucket data in the same zone as the GKE nodes, further accelerating data access for the streamer.
Benefits
- Reduced cold start times: the model streamer significantly reduces the time it takes for models to start. It loads the model weights up to six times faster compared to conventional methods. For more information, see Run:ai Model Streamer benchmarks
- Enhanced GPU utilization: by minimizing model loading delays, GPUs can dedicate more time to actual inference tasks, boosting overall efficiency and processing capacity.
- Streamlined workflow: the solution described in this document integrates with GKE, enabling inference servers like vLLM or SGLang to directly access models in Cloud Storage buckets.
Before you begin
Make sure to complete the following prerequisites.
Select or create a project and enable the APIs
In the Google Cloud console, on the project selector page, select or create a Google Cloud project.
Roles required to select or create a project
- Select a project: Selecting a project doesn't require a specific IAM role—you can select any project that you've been granted a role on.
-
Create a project: To create a project, you need the Project Creator role
(
roles/resourcemanager.projectCreator), which contains theresourcemanager.projects.createpermission. Learn how to grant roles.
Verify that billing is enabled for your Google Cloud project.
Enable the Kubernetes Engine, Cloud Storage, Compute Engine, IAM APIs.
Roles required to enable APIs
To enable APIs, you need the Service Usage Admin IAM
role (roles/serviceusage.serviceUsageAdmin), which
contains the serviceusage.services.enable permission. Learn how to grant
roles.
Set up Cloud Shell
This document uses the Google Cloud CLI and kubectl commands to create and manage the resources required for this solution. You can run these
commands in Cloud Shell by clicking Activate Cloud Shell at the top of
the Google Cloud console.
In the Google Cloud console, activate Cloud Shell.
Alternatively, you can install and initialize the gcloud CLI in your local shell environment to run the commands. If you want to use a local shell terminal, run the gcloud auth login command to authenticate with Google Cloud.
Grant IAM roles
Ensure that your Google Cloud account has the following IAM roles on your project so you can create a GKE cluster and manage Cloud Storage:
roles/container.adminroles/storage.admin
To grant these roles, run the following commands:
gcloud projects add-iam-policy-binding PROJECT_ID \
    --member="user:$(gcloud config get-value account)" \
    --role="roles/container.admin"
gcloud projects add-iam-policy-binding PROJECT_ID \
    --member="user:$(gcloud config get-value account)" \
    --role="roles/storage.admin"
Replace PROJECT_ID with your project ID.
Prepare your environment
This section guides you through setting up your GKE cluster and configuring permissions to access your model in Cloud Storage.
Create a GKE cluster with GPUs
The Run:ai Model Streamer can be used with both GKE Autopilot and Standard clusters. Choose the cluster mode that best suits your needs.
Set variables for your project and cluster name:
export PROJECT_ID=PROJECT_ID
export CLUSTER_NAME=CLUSTER_NAME
Replace the following:
PROJECT_ID: your Google Cloud project ID. You can find your project ID by running thegcloud config get-value projectcommand.CLUSTER_NAME: The name of your cluster. For example,run-ai-test.
Create either an Autopilot or a Standard cluster:
Autopilot
Follow these steps to create a GKE Autopilot cluster:
Set the region for your cluster:
export REGION=REGIONReplace
REGIONwith the region where you want to create your cluster. For optimal performance, use the same region as your Cloud Storage bucket.Create the cluster:
gcloud container clusters create-auto $CLUSTER_NAME \
    --project=$PROJECT_ID \
    --location=$REGION
Autopilot clusters automatically provision nodes based on workload requirements. When you deploy the vLLM server in a later step, Autopilot will provision the GPU nodes if required. For more information, see About node pool auto-creation.
Standard
Follow these steps to create a GKE Standard cluster:
Set the zone for your cluster:
export ZONE=ZONEReplace
ZONEwith the zone where you want to create your cluster. For optimal performance, use a zone in the same region as your Cloud Storage bucket.Create the cluster:
gcloud container clusters create $CLUSTER_NAME \
    --project=$PROJECT_ID \
    --zone=$ZONE \
    --workload-pool=$PROJECT_ID.svc.id.goog \
    --num-nodes=1
Create a node pool with one G2 machine (NVIDIA L4 GPU):
gcloud container node-pools create g2-gpu-pool \
    --cluster=$CLUSTER_NAME \
    --zone=$ZONE \
    --machine-type=g2-standard-16 \
    --num-nodes=1 \
    --accelerator=type=nvidia-l4
Configure Workload Identity Federation for GKE
Configure Workload Identity Federation for GKE to allow your GKE workloads to securely access the model in your Cloud Storage bucket.
Set variables for your Kubernetes service account and namespace:
export KSA_NAME=KSA_NAME
export NAMESPACE=NAMESPACE
Replace the following:
NAMESPACE: the namespace that you want your workloads to run on. Make sure to use the same namespace to create all the resources in this document.KSA_NAME: the name of the Kubernetes service account that your Pod can use to authenticate to Google Cloud APIs.
Create a Kubernetes namespace:
kubectl create namespace $NAMESPACECreate a Kubernetes service account (KSA):
kubectl create serviceaccount $KSA_NAME \ --namespace=$NAMESPACEGrant your KSA the necessary permissions:
Set the environment variables:
export BUCKET_NAME=BUCKET_NAME
export PROJECT_ID=PROJECT_ID
export PROJECT_NUMBER=$(gcloud projects describe $PROJECT_ID \
    --format 'get(projectNumber)')
Replace the following:
BUCKET_NAME: the name of your Cloud Storage bucket that contains yoursafetensorsfiles.PROJECT_ID: your Google Cloud project ID.
The
PROJECT_NUMBER,PROJECT_ID,NAMESPACE, andKSA_NAMEwill be used to construct the Workload Identity Federation for GKE principal identifier for your project in the following steps.Grant the
roles/storage.bucketViewerrole to your KSA to view objects in your Cloud Storage bucket:gcloud storage buckets add-iam-policy-binding gs://$BUCKET_NAME \ --member="principal://iam.googleapis.com/projects/$PROJECT_NUMBER/locations/global/workloadIdentityPools/$PROJECT_ID.svc.id.goog/subject/ns/$NAMESPACE/sa/$KSA_NAME" \ --role="roles/storage.bucketViewer"Grant the
roles/storage.objectUserrole to your KSA to read, write, and delete objects in your Cloud Storage bucket:gcloud storage buckets add-iam-policy-binding gs://$BUCKET_NAME \ --member="principal://iam.googleapis.com/projects/$PROJECT_NUMBER/locations/global/workloadIdentityPools/$PROJECT_ID.svc.id.goog/subject/ns/$NAMESPACE/sa/$KSA_NAME" \ --role="roles/storage.objectUser"
You have now set up a GKE cluster with GPUs and configured Workload Identity Federation for GKE, granting a Kubernetes Service Account the necessary permissions to access your AI model in Cloud Storage. With the cluster and permissions in place, you are ready to deploy the vLLM inference server, which will use this service account to stream model weights with the Run:ai Model Streamer.
Deploy vLLM with the Run:ai Model Streamer
Deploy a Pod that runs the vLLM OpenAI-compatible server, and is configured with the --load-format=runai_streamer flag to use the Run:ai Model Streamer. The vLLM version must be 0.11.1 or later.
The following sample manifest shows a vLLM configuration with model streamer enabled for a small size model, like gemma-2-9b-it, using a single NVIDIA L4 GPU.
- If you're using a large model that requires multiple GPUs, increase the
--tensor-parallel-sizevalue to the required number of GPUs. - The
--model-loader-extra-config='{"distributed":true}'flag enables distributed loading of model weights and is a recommended setting for improving model loading performance from object storage.
For more information, see Tensor parallelism and Tunable parameters.
Save the following manifest as
vllm-deployment.yaml. The manifest is designed for flexibility across both Autopilot and Standard clusters.apiVersion: apps/v1 kind: Deployment metadata: name: vllm-streamer-deployment namespace: NAMESPACE spec: replicas: 1 selector: matchLabels: app: vllm-streamer template: metadata: labels: app: vllm-streamer spec: serviceAccountName: KSA_NAME containers: - name: vllm-container image: vllm/vllm-openai:v0.11.1 command: - python3 - -m - vllm.entrypoints.openai.api_server args: - --model=gs://BUCKET_NAME/PATH_TO_MODEL - --load-format=runai_streamer - --model-loader-extra-config={"distributed":true} - --host=0.0.0.0 - --port=8000 - --disable-log-requests - --tensor-parallel-size=1 ports: - containerPort: 8000 name: api # startupProbe allows for longer startup times for large models startupProbe: httpGet: path: /health port: 8000 failureThreshold: 60 # 60 * 10s = 10 minutes timeout periodSeconds: 10 initialDelaySeconds: 30 readinessProbe: httpGet: path: /health port: 8000 failureThreshold: 3 periodSeconds: 10 resources: limits: nvidia.com/gpu: "1" requests: nvidia.com/gpu: "1" volumeMounts: - mountPath: /dev/shm name: dshm nodeSelector: cloud.google.com/gke-accelerator: nvidia-l4 volumes: - emptyDir: medium: Memory name: dshmReplace the following:
NAMESPACE: your Kubernetes namespace.KSA_NAME: your Kubernetes service account name.BUCKET_NAME: your Cloud Storage bucket name.PATH_TO_MODEL: the path to your model directory within the bucket, for example,models/my-llama.
Apply the manifest to create the Deployment:
kubectl create -f vllm-deployment.yaml
You can generate more vLLM manifests using the GKE Inference Quickstart tool.
Verify the Deployment
Check the status of the Deployment:
kubectl get deployments -n NAMESPACEGet the Pod name:
kubectl get pods -n NAMESPACE | grep vllm-streamerNote the name of the Pod starting with
vllm-streamer-deployment.To check if the model streamer downloads the model and weights, view the Pod logs:
kubectl logs -f POD_NAME -n NAMESPACEReplace
POD_NAMEwith the name of the Pod from the previous step. Successful streaming logs look similar to the following:[RunAI Streamer] Overall time to stream 15.0 GiB of all files: 13.4s, 1.1 GiB/s
Optional: Boost performance with Anywhere Cache
Cloud Storage Anywhere Cache can further accelerate model loading by caching data closer to your GKE nodes. Caching is especially beneficial when scaling out multiple nodes in the same zone.
You enable Anywhere Cache for a specific Cloud Storage bucket in a specific Google Cloud zone. To improve performance, the cache's zone must match the zone where your GKE inference Pods run. Your approach depends on whether your Pods run in predictable zones.
For GKE Standard zonal clusters, where you know which zone your Pods will run in, enable Anywhere Cache for that specific zone.
For regional GKE clusters (both Autopilot and Standard), where Pods can be scheduled across multiple zones, you have the following options:
- Enable caching in all zones: Enable Anywhere Cache in every zone within the cluster's region. This ensures a cache is available regardless of where GKE schedules your Pods. Note that you incur costs for each zone where caching is enabled. For more information, see Anywhere Cache pricing.
- Place Pods into a specific zone: Use a
nodeSelectorornodeAffinityrule in your workload manifest to constrain your Pods to a single zone. You can then enable Anywhere Cache in only that zone. This is a more cost-effective approach if your workload tolerates being restricted to a single zone.
To enable Anywhere Cache for the zone where your GKE cluster resides, run the following commands:
# Enable the cache
gcloud storage buckets anywhere-caches create gs://$BUCKET_NAME $ZONE

# Check the status of the cache
gcloud storage buckets anywhere-caches describe $BUCKET_NAME/$ZONE
Clean up
To avoid incurring charges to your Google Cloud account for the resources used in this document, either delete the project that contains the resources, or keep the project and delete the individual resources.
To delete the individual resources, follow these steps:
Delete the GKE cluster. This action removes all nodes and workloads.
gcloud container clusters delete CLUSTER_NAME --location=ZONE_OR_REGIONReplace the following:
CLUSTER_NAME: the name of your cluster.ZONE_OR_REGION: the zone or region of your cluster.
Disable Anywhere Cache, if you enabled it, to avoid ongoing costs. For more information, see Disable a cache.
What's next
- Learn how to Load Hugging Face Models into Cloud Storage (experimental)
- Learn how to Serve LLMs on GKE using GPUs.
- Learn more about GPUs available on GKE.
- Read the GKE Storage overview.
- Learn about Configuring Workload Identity Federation.