This page explains how to manage an App Engine project for your Cloud Endpoints Frameworks API by using Apache Maven. Apache Maven is a software project management and comprehension tool capable of building Web Application Archive (WAR) files for deployment into App Engine. Google provides a plugin and Maven Archetypes that are supported by Maven 3.3.9 or greater.
Maven downloads the Java libraries from the App Engine SDK. You can use Maven to test your app locally and deploy it to App Engine.
Before you start
- Use the Google Cloud console to create and set up your Google Cloud project:
- Select or create a new Google Cloud project.
- If you need to create an App Engine application for your project, follow the prompts to select the region where you want your App Engine application located.
- Download and install the gcloud CLI, and then initialize the
Google Cloud CLI.
If you already have the Google Cloud CLI installed and want to set it to use a different Google Cloud project ID than the one that you initialized it to, see Managing gcloud CLI configurations.
- Install the gcloud CLI
app-engine-javacomponent:gcloud components install app-engine-java
Note: To make sure you have the latest version of the gcloud CLI for Java, run
gcloud components update. - If you don't have Java, download, install, and configure it.
- Set the Java compiler flags in your project's
pom.xmlto specify Java 8 byte code: - You must have Apache Maven version 3.3.9 or greater installed.
To determine your Maven version, run the following command:
mvn -v
- If you don't have the proper version of Maven installed:
Adding the App Engine Maven plugin to an existing project (optional)
To use the
App Engine Maven plugin
in an existing Maven project, add the following to the
plugins section in the project's pom.xml file:
<plugin>
   <groupId>com.google.cloud.tools</groupId>
   <artifactId>appengine-maven-plugin</artifactId>
   <version>2.8.1</version>
</plugin>Choosing an App Engine archetype
Maven archetypes let users create Maven projects by using templates that cover common scenarios. App Engine takes advantage of this Maven feature to provide some useful App Engine archetypes at Maven Central. Select an App Engine archetype appropriate for your app:
| Application type | Artifact | Description |
|---|---|---|
| Endpoints Frameworks for App Engine | endpoints-skeleton-archetype |
Generates a new, empty Endpoints Frameworks for App Engine backend API project ready for your own classes and resources, with required files and directories. |
| Endpoints Frameworks for App Engine | hello-endpoints-archetype |
Generates a starter Endpoints Frameworks for App Engine backend API project, ready to build and run. |
Creating a new project by using Maven
During project creation, Maven prompts you to supply groupId, artifactId,
version, and the package for the project.
| Term | Meaning |
|---|---|
groupId |
A namespace within Maven to keep track of your artifacts. When people consume your project in their own Maven Project, it serves as an attribute of the dependency they end up specifying. |
artifactId |
The name of your project within Maven. It is also specified by consumers of your project when they depend on you in their own Maven projects. |
version |
The initial Maven version you want to have your project generated with. It's a good idea to have version suffixed by -SNAPSHOT because this provides support in the Maven release plugin for versions that are under development. For more information, see the Maven guide to using the release plugin. |
package |
The Java package created during the generation. |
Creating a new Endpoints Frameworks app
This section describes creating a new Endpoints Frameworks version 2.0 project.
The hello-endpoints-archetype provides an example of using plugins,
including the App Engine Maven plugin and
Endpoints Frameworks Maven plugin.
The hello-endpoints-archetype generates an example Greetings API
by using Endpoints Frameworks version 2.0. It also acts as an example
for
migrating
your Endpoints Frameworks version 1.0 applications to
Endpoints Frameworks version 2.0.
The README.md that's generated with the archetype provides information of
where the migration occurred.
To create an Endpoints Frameworks for App Engine backend API archetype project:
Change directory to a directory where you want to build the project.
Run the following Maven command:
mvn archetype:generate -Dgoogle-cloud-project=[YOUR-PROJECT-ID] -Dappengine-plugin=2.8.1 -Dendpoints-frameworks=2.1.0 -Dendpoints-plugin=1.0.2 -Dappengine-sdk=1.9.98 -Dfilter=com.google.appengine.archetypes:Where:
-Dgoogle-cloud-projectis set to your project ID.-Dappengine-pluginis set to the most recent version of the App Engine Maven plugin.-Dendpoints-frameworksis set to the most recent version of the Endpoints Frameworks for App Engine for Maven dependencies.-Dendpoints-pluginis set to the most recent version of the Endpoints Frameworks for App Engine Maven plugin.
Supply the number corresponding to
hello-endpoints-archetype.Select the most recent version from the displayed list of available archetype versions.
When prompted to
Define value for property 'groupId', supply the namespace for your app; for example, supply the valuecom.example.helloendpoints.When prompted to
Define value for property 'artifactId', supply the project name; for example, supply the valuehelloendpoints.When prompted to
Define value for property 'version', accept the default value.When prompted to
Define value for property 'package', accept the default value.When prompted to confirm your choices, accept the default value by entering
Y.Wait for the project to finish generating. then change directories to the new project directory, for example
helloendpoints/.Build the project.
mvn clean packageWait for the project to build. When the project successfully finishes, a message similar to the following is displayed:
[INFO] ------------------------------------------------------------------------
[INFO] BUILD SUCCESS
[INFO] ------------------------------------------------------------------------
[INFO] Total time: 4.062 s
[INFO] Finished at: 2017-02-28T00:28:03-08:00
[INFO] Final Memory: 27M/485M
[INFO] ------------------------------------------------------------------------
To test locally and deploy the project to the App Engine standard environment, review Managing, testing, and deploying a Maven project.
Additionally, you can generate Java client libraries for the Greeting API by using the Endpoints Frameworks Maven Plugin:
mvn endpoints-framework:clientLibs
The following diagram shows the basic project layout of the Greetings API:
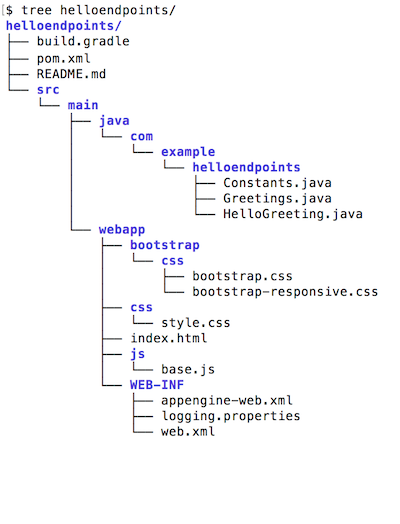
README.mdcontains information about the generated example.Greetings.javacontains an API definition for an example Greetings API.Constants.javacontains constants used in by the example Greetings API.HelloGreeting.javacontains a container for messages received and sent from the example Greetings API.index.htmlcontains simple UI to call the backend Greetings API.base.jscontains necessary JavaScript for the UI to make backend requests.build.gradleonce generated, the example also supports Gradle and more information about this functionality in theREADME.md.
Compiling and building your application
To build an application created with the Maven App Engine archetypes:
Change to the main directory for your project, for example,
guestbook/.Run Maven:
mvn clean packageWait for the project to build. When the project successfully finishes, a message similar to the following is displayed:
BUILD SUCCESS
 Total time: 10.724s
 Finished at: 2016-08-04T16:18:24-07:00
 Final Memory: 24M/213M
Testing your application with the development server
During the development phase, you can run and test your application at any time in the development server by running the App Engine Maven plugin.
To test your Endpoints Frameworks for App Engine app:
If you haven't already done so, build your app:
mvn clean packageRun the example locally:
mvn appengine:runWait for the server to start. When the server is completely started with your application running, a message similar to the following is displayed:
[INFO] GCLOUD: INFO ### devappserver2.py:764] Skipping SDK update check.
[INFO] GCLOUD: INFO ### api_server.py:268] Starting API server at: http://localhost:34199
[INFO] GCLOUD: INFO ### dispatcher.py:199] Starting module "default" running at: http://localhost:8080
[INFO] GCLOUD: INFO ### admin_server.py:116] Starting admin server at: http://localhost:8000
[INFO] GCLOUD: ### com.google.appengine.tools.development.SystemPropertiesManager setSystemProperties
Use your browser to go to
http://localhost:8080/to access your app.Shut down the application and the development server by pressing
Control+C.
Specifying a port for local testing
When you run your application in the local development server, the default port is
8080. You can change this default by modifying the plugin entry for
appengine-maven-plugin. For example, you can specify port and address in the
pom.xml file of your application directory:
<plugins>
   <plugin>
     <groupId>com.google.cloud.tools</groupId>
     <artifactId>appengine-maven-plugin</artifactId>
     <version>2.8.1</version>
     <configuration>
       <devserver.host>0.0.0.0</devserver.host>
       <devserver.port>8181</devserver.port>
     </configuration>
  </plugin>
</plugins>
In this example, the <devserver.port> sets the port to 8181 instead of the
default, and the address 0.0.0.0 is specified, which means the development
server listens for requests coming in from the local network.
The prefix devserver is optional; you can use <port>8181</port> instead.
Debugging on the development server
To debug a locally running application, set the jvmFlags in the plugin
configuration to enable debugging on the underlying JVM, for example:
<configuration>
  <jvmFlags>
    <jvmFlag>-Xdebug</jvmFlag>
    <jvmFlag>-Xrunjdwp:transport=dt_socket,server=y,suspend=y,address=5005</jvmFlag>
  </jvmFlags>
</configuration>
Deploying your application
To deploy your application:
mvn appengine:deploy
The appengine:deploy goal and all other goals in the App Engine Maven
plugin have associated parameters that you can use. For a complete list of goals
and parameters, refer to
App Engine Maven plugin goals and parameters.
What's next
- Explore the App Engine Maven plugin code and report issues on GitHub.
- Learn how to specify parameters for goals by referring to App Engine Maven Goals and Parameters.
- Explore the Endpoints Frameworks Maven plugin code and report issues on GitHub.
- Learn how to specify parameters for goals by referring to Cloud Endpoints Frameworks Maven plugin.