This tutorial describes how to use a GitHub Actions, workflow to deploy an ASP.NET Model-View-Controller (MVC) web application that uses .NET to Google Kubernetes Engine (GKE).
This tutorial is intended for developers and DevOps engineers who have basic knowledge of Microsoft .NET, GitHub Actions, and GKE. You also require a GitHub account to execute this tutorial.
Objectives
Deploy an ASP.NET Core web application that uses .NET 6.0 and runs on Linux to Google Kubernetes Engine.
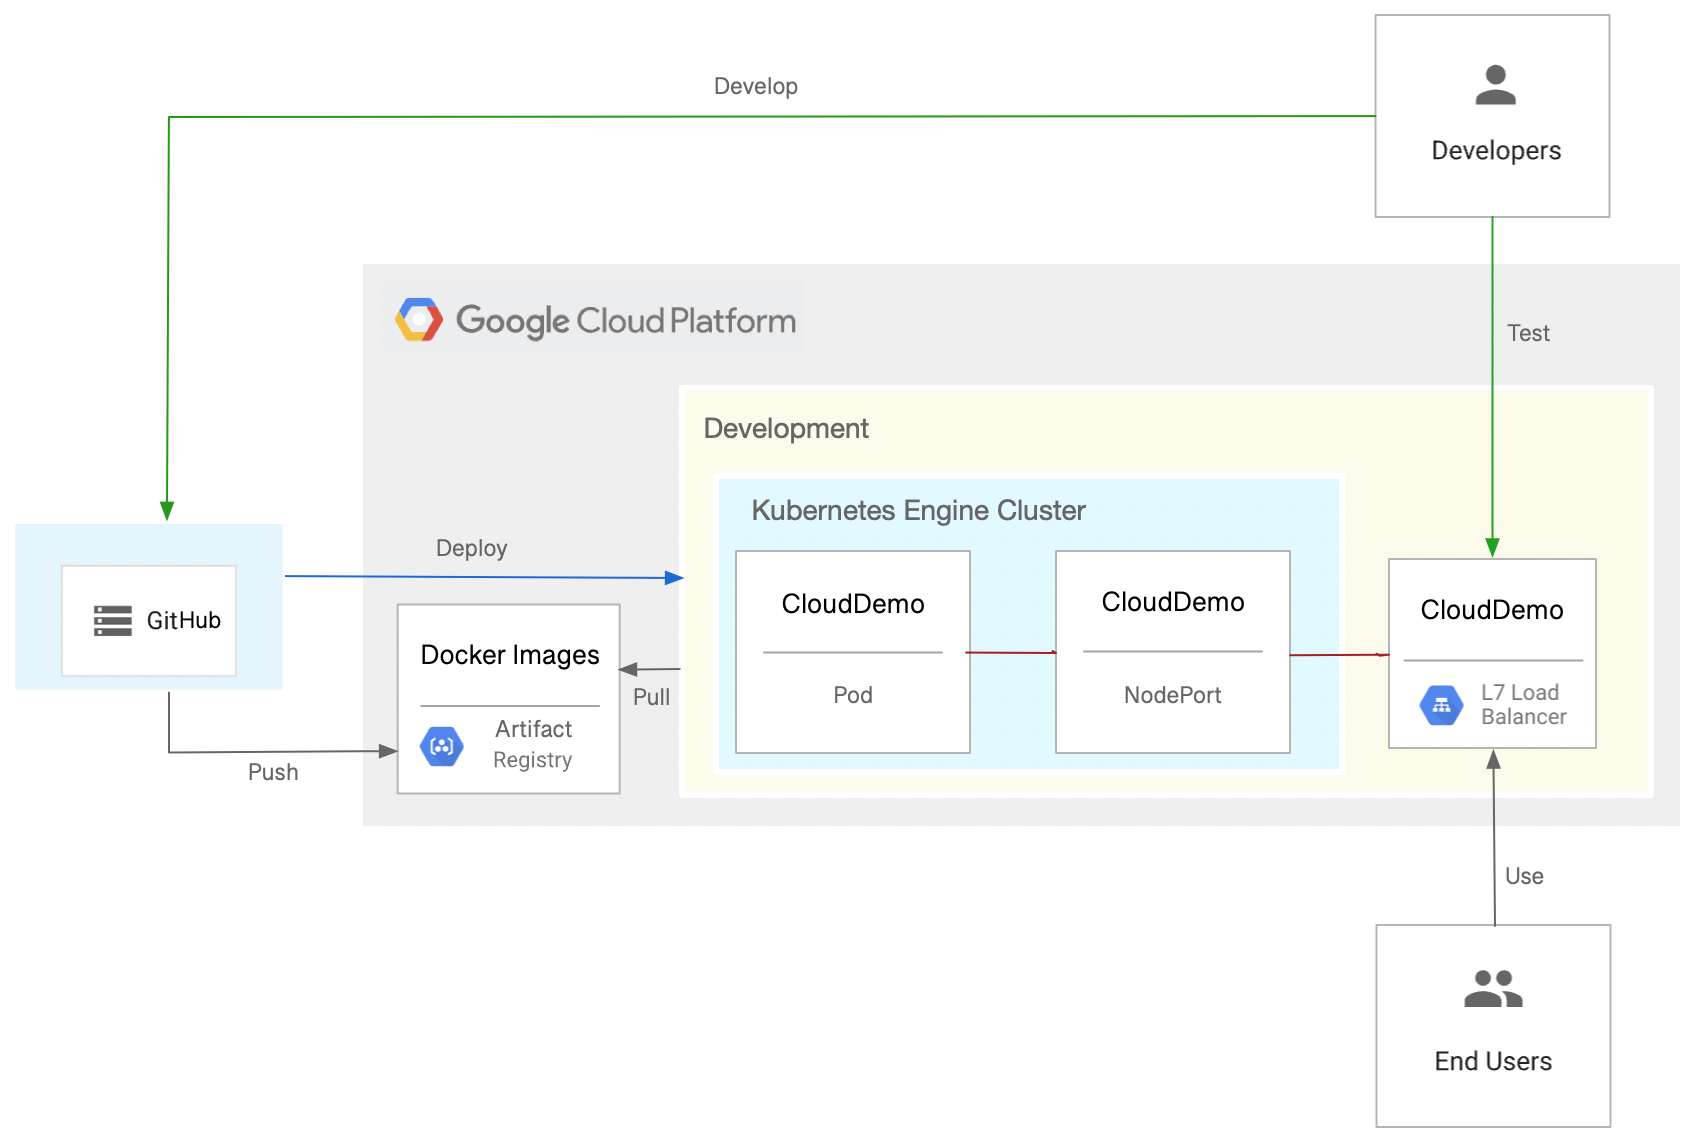
The following diagram shows the GitHub Actions, workflow to deploy an ASP.NET MVC web application to Google Kubernetes Engine (GKE).
This tutorial shows you how to complete the following tasks to reach your objective:
- Create a GitHub repository
- Configure authentication
- Deploy a GKE cluster and an Artifact Registry repository
- Create a GitHub Actions workflow
Costs
In this document, you use the following billable components of Google Cloud:
To generate a cost estimate based on your projected usage,
use the pricing calculator.
When you finish the tasks that are described in this document, you can avoid continued billing by deleting the resources that you created. For more information, see Clean up.
Before you begin
- Sign in to your Google Cloud account. If you're new to Google Cloud, create an account to evaluate how our products perform in real-world scenarios. New customers also get $300 in free credits to run, test, and deploy workloads.
-
In the Google Cloud console, on the project selector page, select or create a Google Cloud project.
Roles required to select or create a project
- Select a project: Selecting a project doesn't require a specific IAM role—you can select any project that you've been granted a role on.
-
Create a project: To create a project, you need the Project Creator
(
roles/resourcemanager.projectCreator), which contains theresourcemanager.projects.createpermission. Learn how to grant roles.
-
Verify that billing is enabled for your Google Cloud project.
-
Enable the Artifact Registry and Google Kubernetes Engine APIs.
Roles required to enable APIs
To enable APIs, you need the Service Usage Admin IAM role (
roles/serviceusage.serviceUsageAdmin), which contains theserviceusage.services.enablepermission. Learn how to grant roles. -
In the Google Cloud console, on the project selector page, select or create a Google Cloud project.
Roles required to select or create a project
- Select a project: Selecting a project doesn't require a specific IAM role—you can select any project that you've been granted a role on.
-
Create a project: To create a project, you need the Project Creator
(
roles/resourcemanager.projectCreator), which contains theresourcemanager.projects.createpermission. Learn how to grant roles.
-
Verify that billing is enabled for your Google Cloud project.
-
Enable the Artifact Registry and Google Kubernetes Engine APIs.
Roles required to enable APIs
To enable APIs, you need the Service Usage Admin IAM role (
roles/serviceusage.serviceUsageAdmin), which contains theserviceusage.services.enablepermission. Learn how to grant roles.
Create a GitHub repository
Create a fork of the dotnet-docs-samples repository in your GitHub account.
This step is necessary because we are building with GitHub Actions.
- Go to the
dotnet-docs-samplesGitHub repository. - Click Fork.
On the Create a new fork page, set the following:
- Owner - Your GitHub account
- Repository name -
dotnet-docs-samples
Click Create fork.
Configure authentication
Prepare your Google Cloud project so that GitHub Actions can authenticate and access resources in the Google Cloud project.
Create a workload identity federation pool and provider
To allow GitHub Actions authenticate Google Cloud and deploy to GKE, use workload identity federation. By using workload identity federation, you can avoid the need to store and manage service account keys for your GitHub Actions workload.
Using workload identity federation requires a workload identity pool and provider. We recommend that you use a dedicated project to manage workload identity pools and providers. In this tutorial, for the sake of simplicity, create the pool and provider in the same project as your GKE cluster:
Open the Google Cloud console.
-
In the Google Cloud console, activate Cloud Shell.
At the bottom of the Google Cloud console, a Cloud Shell session starts and displays a command-line prompt. Cloud Shell is a shell environment with the Google Cloud CLI already installed and with values already set for your current project. It can take a few seconds for the session to initialize.
Create a new workload identity pool:
gcloud iam workload-identity-pools create github-actions \
    --location="global" \
    --description="GitHub Actions tutorial" \
    --display-name="GitHub Actions"
Add GitHub Actions as a workload identity pool provider:
gcloud iam workload-identity-pools providers create-oidc github-actions-oidc \
    --location="global" \
    --workload-identity-pool=github-actions \
    --issuer-uri="https://token.actions.githubusercontent.com/" \
    --attribute-mapping="google.subject=assertion.sub" \
    --attribute-condition="assertion.repository_owner=='ORGANIZATION'"
Replace
ORGANIZATIONwith the name of your GitHub organization.
Create a service account
In Cloud Shell, create a service account that GitHub Actions can use to publish Docker images and deploy to GKE:
SERVICE_ACCOUNT=$(gcloud iam service-accounts create github-actions-workflow \
  --display-name "GitHub Actions workflow" \
  --format "value(email)")
Grant the Artifact Registry writer role (
roles/artifactregistry.writer) to the service account to allow GitHub actions to push to Artifact Registry:gcloud projects add-iam-policy-binding $(gcloud config get-value core/project) \ --member serviceAccount:$SERVICE_ACCOUNT \ --role roles/artifactregistry.writer
Grant the Google Kubernetes Engine developer role (
roles/container.developer) to the service account to allow GitHub actions to push to Artifact Registry:gcloud projects add-iam-policy-binding $(gcloud config get-value core/project) \ --member serviceAccount:$SERVICE_ACCOUNT \ --role roles/container.developer
Allow the GitHub Actions workflow to use the service account
Allow the GitHub Actions workflow to impersonate and use the service account:
Initialize an environment variable that contains the subject used by the GitHub Actions workflow. A subject is similar to a username that uniquely identifies the GitHub repository and branch:
SUBJECT=repo:
OWNER/dotnet-docs-samples:ref:refs/heads/mainReplace
OWNERwith your GitHub username.Grant the subject permission to impersonate the service account:
PROJECT_NUMBER=$(gcloud projects describe $(gcloud config get-value core/project) --format='value(projectNumber)')

gcloud iam service-accounts add-iam-policy-binding $SERVICE_ACCOUNT \
  --role=roles/iam.workloadIdentityUser \
  --member="principal://iam.googleapis.com/projects/$PROJECT_NUMBER/locations/global/workloadIdentityPools/github-actions/subject/$SUBJECT"
Deploy a GKE cluster and an Artifact Registry repository
Create a repository for Docker images:
gcloud artifacts repositories create clouddemo \
  --repository-format=docker \
  --location=us-central1
Allow the Compute Engine default service account to access the repository:
gcloud projects add-iam-policy-binding $(gcloud config get-value core/project) \
  --member=serviceAccount:$PROJECT_NUMBER-compute@developer.gserviceaccount.com \
  --role=roles/artifactregistry.reader
Create the cluster:
gcloud container clusters create clouddemo-linux \
  --enable-ip-alias \
  --zone us-central1-a
This command might take several minutes to complete.
Get the project name and project number of the cluster:
echo "Project ID: $(gcloud config get-value core/project)"
echo "Project Number: $(gcloud projects describe $(gcloud config get-value core/project) --format=value\(projectNumber\))"
You need these values later.
Create a GitHub Actions workflow
You can now use GitHub Actions to set up continuous integration. For each commit that's pushed to the Git repository, a GitHub Actions workflow builds the code and packages the build artifacts into a Docker container. The container is then published to Artifact Registry.
The repository already contains the following Dockerfile:
The repository also contains a Kubernetes manifest:
Create a GitHub Actions workflow that does the following:
- Authenticate to Google Cloud using workload identity federation and the service account that you created earlier.
- Build a Docker image and deploy it to Artifact Registry.
- Deploy the Docker image to GKE.
To create the GitHub Actions workflow, do the following:
- On GitHub, go to your fork of the
dotnet-docs-samplesrepository. - Click Add file > Create new file.
In the Name your file text field, enter the following name:
.github/workflows/deploy-gke.yaml
Copy the following code into the file:
name: Build and Deploy to GKE on: push: branches: - main env: PROJECT_ID:PROJECT_IDPROJECT_NUMBER:PROJECT_NUMBERCLUSTER: clouddemo-linux CLUSTER_ZONE: us-central1-a REPOSITORY: clouddemo REPOSITORY_REGION: us-central1 IMAGE: clouddemo jobs: build: runs-on: ubuntu-latest permissions: id-token: write contents: read steps: - name: Checkout uses: actions/checkout@v3 # # Authenticate to Google Cloud using workload identity federation # - id: 'auth' name: 'Obtain access token by using workload identity federation' uses: 'google-github-actions/auth@v0' with: create_credentials_file: true token_format: access_token workload_identity_provider: projects/${{ env.PROJECT_NUMBER }}/locations/global/workloadIdentityPools/github-actions/providers/github-actions-oidc service_account: github-actions-workflow@${{ env.PROJECT_ID }}.iam.gserviceaccount.com - name: Connect to Artifact Registry run: |- echo ${{ steps.auth.outputs.access_token }} | docker login -u oauth2accesstoken --password-stdin https://${{ env.REPOSITORY_REGION }}-docker.pkg.dev - name: Connect to GKE uses: google-github-actions/get-gke-credentials@v0 with: cluster_name: ${{ env.CLUSTER }} location: ${{ env.CLUSTER_ZONE }} # # Build the .NET code # - name: Build solution run: |- dotnet publish applications/clouddemo/netcore/CloudDemo.MvcCore.sln \ --configuration Release \ --framework net6.0 # # Build the Docker image and push it to Artifact Registry # - name: Create image tag run: echo "IMAGE_TAG=${{ env.REPOSITORY_REGION }}-docker.pkg.dev/${{ env.PROJECT_ID }}/${{ env.REPOSITORY }}/${{ env.IMAGE }}:$GITHUB_SHA" >> $GITHUB_ENV - name: Lock image version in deployment.yaml run: sed -i 's|CLOUDDEMO_IMAGE|${{ env.IMAGE_TAG }}|g' applications/clouddemo/netcore/deployment.yaml - name: Build Docker image run: docker build --tag "${{ env.IMAGE_TAG }}" applications/clouddemo/netcore - name: Publish Docker image to Google Artifact Registry run: docker push "${{ env.IMAGE_TAG }}" # # Deploy to GKE # - name: Deploy to GKE run: kubectl apply -f applications/clouddemo/netcore/deployment.yamlReplace the following values:
PROJECT_ID: the project ID of the project that contains the GKE cluster.PROJECT_NUMBER: the project number of the project that contains the GKE cluster.
In the Commit new file section, enter a commit message, for example,
Add workflowand click Commit new file.In the menu, click Actions and wait for the workflow to complete.
The workflow might take several minutes to complete.
In the Google Cloud console, refresh the Services & Ingress page.
Go to the Ingress tab.
Locate the Ingress service for the clouddemo cluster and wait for its status to switch to Ok. This might take several minutes.
Open the link in the Frontends column of the same row. The load balancer take a few minutes to become available, so the CloudDemo app might not load at first. When the load balancer ready, you'll see the CloudDemo app with the custom title, this time running in the production cluster.
Clean up
After you finish the tutorial, you can clean up the resources that you created so that they stop using quota and incurring charges. The following sections describe how to delete or turn off these resources.
Delete the GitHub repository
To delete the GitHub repository, see Deleting a repository. Deleting the repository causes all source code changes to be lost.
Delete the project
The easiest way to eliminate billing is to delete the project that you created for the tutorial.
Delete a Google Cloud project:
gcloud projects delete PROJECT_ID
What's next
- Deploy, manage, and scale containerized applications on Kubernetes.
- Review the best practices in the Google Cloud Well-Architected Framework.
- Explore reference architectures, diagrams, and best practices about Google Cloud. Take a look at our Cloud Architecture Center.