This tutorial shows how to use Azure Pipelines, Cloud Run, and Container Registry to create a continuous integration/continuous deployment (CI/CD) pipeline for an ASP.NET MVC Core web application.
The CI/CD pipeline uses two Google Cloud projects, one for development and one for production, as the following diagram shows.

At the beginning of the pipeline, developers commit changes to the example codebase. This action triggers the pipeline to create a release and to deploy it to Cloud Run in the development cluster. A release manager then promotes the release so that it's deployed to the production project.
This tutorial is intended for developers and DevOps engineers. It assumes that
you have basic knowledge of .NET Core, Azure Pipelines,
Cloud Run, and git. To complete this tutorial, you need
administrative access to an Azure DevOps account.
Objectives
- Connect Artifact Registry to Azure Pipelines for publishing Docker images.
- Prepare a .NET Core sample app for deployment into Cloud Run.
- Set up authentication between Azure Pipelines and Google Cloud.
- Use Azure Pipelines release management to orchestrate Cloud Run deployments.
Costs
In this document, you use the following billable components of Google Cloud:
To generate a cost estimate based on your projected usage,
use the pricing calculator.
When you finish the tasks that are described in this document, you can avoid continued billing by deleting the resources that you created. For more information, see Clean up.
Check the Azure DevOps pricing page for any fees that might apply to using Azure DevOps.
Before you begin
You use two separate projects in this tutorial, one for development and one for production. Using separate projects lets you test releases before deploying them to production and also lets you individually manage Identity and Access Management (IAM) roles and permissions.
- Create a Google Cloud project for development. The tutorial refers to this project as the development project.
- Create a Google Cloud project for production. The tutorial refers to this project as the production project.
-
Verify that billing is enabled for your Google Cloud project.
- Make sure that you have an Azure DevOps account and that you have administrator access to it. If you don't yet have an Azure DevOps account, you can sign up on the Azure DevOps home page.
Create an Azure DevOps project
You use Azure DevOps to manage the source code, run builds and tests, and orchestrate the deployment to Cloud Run. To begin, you create a project in your Azure DevOps account.
- Go to the Azure DevOps home page (https://dev.azure.com/YOUR_AZURE_DEVOPS_ACCOUNT_NAME).
- Click New Project.
- Enter a project name, such as
CloudDemo. - Set Visibility to Private, and then click Create project.
- After you create the project, in the menu on the left, click Repos.
- Click Import to fork the
dotnet-docs-samplesrepository from GitHub, and then set the following values:- Repository type:
Git - Clone URL:
https://github.com/GoogleCloudPlatform/dotnet-docs-samples.git
- Repository type:
Click Import.
When the import process is done, you see the source code of the
dotnet-docs-samplesrepository.
Connecting Azure Pipelines to Artifact Registry
Before you can set up continuous integration for the CloudDemo app, you must
connect Azure Pipelines to Artifact Registry. This connection
allows Azure Pipelines to publish container images to Artifact Registry.
Set up a service account for publishing images
Create a Google Cloud service account in your production project:
- In the Google Cloud console, switch to the production project.
-
In the Google Cloud console, activate Cloud Shell.
Initialize the following environment variables:
DEV_PROJECT_ID=DEV_PROJECT_ID
PROD_PROJECT_ID=PROD_PROJECT_ID
Replace the following:
DEV_PROJECT_ID: the project ID of your development projectPROD_PROJECT_ID: the project ID of your production project
Enable the Artifact Registry API in the production project:
gcloud services enable artifactregistry.googleapis.com \
    --project=$PROD_PROJECT_ID
Create an Artifact Registry repository to store Docker your images:
gcloud artifacts repositories create docker  \
    --project=$PROD_PROJECT_ID \
    --repository-format=docker \
    --location REGION
Replace
REGIONwith the region of your Artifact Registry repository, for exampleus-central1.Create a service account that Azure Pipelines uses to publish Docker images:
gcloud iam service-accounts create azure-pipelines-publisher \
    --display-name="Azure Pipelines Publisher" \
    --project=$PROD_PROJECT_ID
Grant the Artifact Registry Writer role (
roles/artifactregistry.writer) to the service account to allow Azure Pipelines to push to Artifact Registry:AZURE_PIPELINES_PUBLISHER=azure-pipelines-publisher@$PROD_PROJECT_ID.iam.gserviceaccount.com gcloud projects add-iam-policy-binding $PROD_PROJECT_ID \ --member serviceAccount:$AZURE_PIPELINES_PUBLISHER \ --role roles/artifactregistry.writer \ --project=$PROD_PROJECT_IDGenerate a service account key:
gcloud iam service-accounts keys create azure-pipelines-publisher.json \
    --iam-account $AZURE_PIPELINES_PUBLISHER \
    --project=$PROD_PROJECT_ID

tr -d '\n' < azure-pipelines-publisher.json > azure-pipelines-publisher-oneline.json
View the content of the service account key file:
echo $(<azure-pipelines-publisher-oneline.json)You need the service account key in one of the following steps.
Create a service connection for Artifact Registry
In Azure Pipelines, create a new service connection for Artifact Registry:
- In the Azure DevOps menu, select Project settings, and then select Pipelines > Service connections.
- Click Create service connection.
- From the list, select Docker Registry, and then click Next.
In the dialog, enter values for the following fields:
- Registry type: Others
Docker Registry:
https://REGION-docker.pkg.dev/PROD_PROJECT_ID/docker/Replace the following:
REGION: the region of your Artifact Registry repositoryPROD_PROJECT_ID: the name of your production project
Docker ID:
_json_keyPassword: Paste the content of
azure-pipelines-publisher-oneline.json.Service connection name:
gcr-tutorial
Click Save to create the connection.
Building continuously
You can now use Azure Pipelines to set up continuous integration. For each commit that's pushed to the Git repository, Azure Pipelines builds the code and packages the build artifacts into a Docker container. The container is then published to Artifact Registry.
The repository already contains the following Dockerfile:
You now create a new pipeline that uses YAML syntax:
- Using Visual Studio or a command-line
gitclient, clone your new Git repository. - In the root of the repository, create a file named
azure-pipelines.yml. Copy the following code into the file:
resources:
- repo: self
  fetchDepth: 1
pool:
  vmImage: ubuntu-22.04
trigger:
- master
variables:
  TargetFramework: 'net6.0'
  BuildConfiguration: 'Release'
  DockerImageName: 'PROD_PROJECT_ID/docker/CloudDemo'
steps:
- task: DotNetCoreCLI@2
  displayName: Publish
  inputs:
    projects: 'applications/clouddemo/netcore/CloudDemo.MvcCore.sln'
    publishWebProjects: false
    command: publish
    arguments: '--configuration $(BuildConfiguration) --framework=$(TargetFramework)'
    zipAfterPublish: false
    modifyOutputPath: false
- task: PublishBuildArtifacts@1
  displayName: 'Publish Artifact'
  inputs:
    PathtoPublish: '$(build.artifactstagingdirectory)'
- task: Docker@2
  displayName: 'Login to Container Registry'
  inputs:
    command: login
    containerRegistry: 'gcr-tutorial'
- task: Docker@2
  displayName: 'Build and push image'
  inputs:
    Dockerfile: 'applications/clouddemo/netcore/Dockerfile'
    command: buildAndPush
    repository: '$(DockerImageName)'
Replace
PROJECT_IDwith the name of your production project, and then save the file.Because Cloud Run is a Linux-based environment, the pipeline uses Linux-based build agents.
Commit your changes and push them to Azure Pipelines.
Visual Studio
- Open Team Explorer and click the Home icon.
- Click Changes.
- Enter a commit message like
Add pipeline definition. - Click Commit All and Push.
Command line
Stage all modified files:
git add -ACommit the changes to the local repository:
git commit -m "Add pipeline definition"Push the changes to Azure DevOps:
git push
In the Azure DevOps menu, select Pipelines and then click Create Pipeline.
Select Azure Repos Git.
Select your repository.
On the Review your pipeline YAML page, click Run.
A new build is triggered. It might take about two minutes for the build to complete.
To verify that the image has been published to Artifact Registry, switch to your production project in the Google Cloud console, select Artifact Registry > docker, and then click CloudDemo.
A single image and the tag of this image are displayed. The tag corresponds to the numeric ID of the build that was run in Azure Pipelines.
Deploying continuously
With Azure Pipelines automatically building your code and publishing Docker images for each commit, you can now turn your attention to deployment.
Unlike some other continuous integration systems, Azure Pipelines distinguishes between building and deploying, and it provides a specialized set of tools labeled Release Management for all deployment-related tasks.
Azure Pipelines Release Management is built around these concepts:
- A release refers to a set of artifacts that make up a specific version of your app and that are usually the result of a build process.
- Deployment refers to the process of taking a release and deploying it into a specific environment.
- A deployment performs a set of tasks, which can be grouped in jobs.
- Stages let you segment your pipeline and can be used to orchestrate deployments to multiple environments—for example development and testing environments.
You set up your release pipeline to be triggered whenever a new build is completed. The pipeline consists of two stages: development and production. In each stage, the release pipeline uses the Docker image that the build pipeline produces, and then the pipeline deploys it to Cloud Run.
The build pipeline that you configured previously tags each Docker image with
the build ID before publishing it to Artifact Registry. Therefore, in the
release pipeline, you use the $BUILD_BUILDID variable to identify the right
Docker image to deploy.
Configure Cloud Run
Cloud Run is a fully managed, serverless environment, so you don't need to provision any infrastructure. To help keep your Cloud Run deployments secure, you need to set up IAM.
Deploying and running a Cloud Run service involves multiple identities, as the following diagram shows.

Each of these identities is implemented as a service account and is used for a specific purpose, as the following table describes.
| Service account | Used by | Purpose | Roles required |
|---|---|---|---|
| Azure Pipelines Publisher | Build pipeline | Publish Docker images to Artifact Registry | roles/artifactregistry.writer (production project only) |
| Azure Pipelines Deployer | Release pipeline | Initiate Cloud Run deployments | roles/run.admin |
| Launch CloudDemo service | roles/iam.serviceAccountUser |
||
| Cloud Run service agent | Cloud Run | Pull Docker images from Artifact Registry | roles/artifactregistry.reader (production project only) |
| CloudDemo runner (runtime service account) | CloudDemo service | Access resources on Google Cloud | None |
You created and configured the Azure Pipelines Publisher service account. In the following sections, you create and configure the remaining service accounts.
Configure the Cloud Run service account
Open Cloud Shell.
Initialize the following environment variables:
DEV_PROJECT_ID=DEV_PROJECT_ID
PROD_PROJECT_ID=PROD_PROJECT_ID
Replace the following:
DEV_PROJECT_ID: the project ID of your development projectPROD_PROJECT_ID: the project ID of your production project
Enable the Cloud Run and Compute Engine APIs in both the development and product projects:
gcloud services enable run.googleapis.com --project=$DEV_PROJECT_ID
gcloud services enable run.googleapis.com --project=$PROD_PROJECT_ID
Enabling these APIs causes the Cloud Run service agent accounts to be created in your projects.
Grant the two Cloud Run service agent accounts access to Artifact Registry in the production project where your Docker images are stored:
DEV_PROJECT_NUMBER=$(gcloud projects describe $DEV_PROJECT_ID \
    --format='value(projectNumber)')
PROD_PROJECT_NUMBER=$(gcloud projects describe $PROD_PROJECT_ID \
    --format='value(projectNumber)')

gcloud projects add-iam-policy-binding $PROD_PROJECT_ID \
    --member=serviceAccount:service-$DEV_PROJECT_NUMBER@serverless-robot-prod.iam.gserviceaccount.com \
    --role roles/artifactregistry.reader

gcloud projects add-iam-policy-binding $PROD_PROJECT_ID \
    --member=serviceAccount:service-$PROD_PROJECT_NUMBER@serverless-robot-prod.iam.gserviceaccount.com \
    --role roles/artifactregistry.reader
Configure the CloudDemo runner account
You can now configure the CloudDemo runner account, which is a custom runtime service account for the CloudDemo service:
Create a service account named
CloudDemo-runner:gcloud iam service-accounts create clouddemo-runner \ --display-name="CloudDemo Runner" \ --project=$DEV_PROJECT_ID gcloud iam service-accounts create clouddemo-runner \ --display-name="CloudDemo Runner" \ --project=$PROD_PROJECT_ID DEV_CLOUDDEMO_RUNNER=clouddemo-runner@$DEV_PROJECT_ID.iam.gserviceaccount.com PROD_CLOUDDEMO_RUNNER=clouddemo-runner@$PROD_PROJECT_ID.iam.gserviceaccount.com
Configure the Azure Pipelines Deployer account
Finally, create and configure the Azure Pipelines Deployer account, which the Azure release pipeline uses to deploy to Cloud Run.
Create a service account named
azure-pipelines-deployer:gcloud iam service-accounts create azure-pipelines-deployer \ --display-name="Azure Pipelines Deployer" \ --project=$PROD_PROJECT_ID AZURE_PIPELINES_DEPLOYER=azure-pipelines-deployer@$PROD_PROJECT_ID.iam.gserviceaccount.comAssign the required IAM roles to deploy new Cloud Run services or revisions in the development project:
gcloud projects add-iam-policy-binding $DEV_PROJECT_ID \
    --member serviceAccount:$AZURE_PIPELINES_DEPLOYER \
    --role roles/run.admin

gcloud iam service-accounts add-iam-policy-binding \
    $DEV_CLOUDDEMO_RUNNER \
    --member=serviceAccount:$AZURE_PIPELINES_DEPLOYER \
    --role="roles/iam.serviceAccountUser" \
    --project=$DEV_PROJECT_ID
Assign the same set of roles for the production project:
gcloud projects add-iam-policy-binding $PROD_PROJECT_ID \
    --member serviceAccount:$AZURE_PIPELINES_DEPLOYER \
    --role roles/run.admin

gcloud iam service-accounts add-iam-policy-binding \
    $PROD_CLOUDDEMO_RUNNER \
    --member=serviceAccount:$AZURE_PIPELINES_DEPLOYER \
    --role="roles/iam.serviceAccountUser" \
    --project=$PROD_PROJECT_ID
Generate a service account key:
gcloud iam service-accounts keys create azure-pipelines-deployer.json \
    --iam-account=$AZURE_PIPELINES_DEPLOYER \
    --project=$PROD_PROJECT_ID

cat azure-pipelines-deployer.json | base64 -w 0
You use the output of this command when you configure the release pipeline.
Configure the release pipeline
You can now return to Azure Pipelines to automate the deployment, which includes the following steps:
- Deploying to the development environment.
- Requesting manual approval before initiating a deployment to the production environment.
- Deploying to the production environment.
Create a release definition
First, create a release definition:
- In the Azure DevOps menu, select Pipelines > Releases.
- Click New pipeline.
- From the list of templates, select Empty job.
- When you're prompted for a name for the stage, enter
Development. - At the top of the screen, name the pipeline
CloudDemo. - In the pipeline diagram, next to Artifacts, click Add.
- Select Build, and then add the following settings:
- Source type: Build
- Source (build pipeline): Select the build definition (there should be only one option)
- Default version: Latest
- Source Alias:
build
- Click Add.
- On the Artifact box, click Continuous deployment trigger (the lightning bolt icon) to add a deployment trigger.
- Under Continuous deployment trigger, set the switch to Enabled.
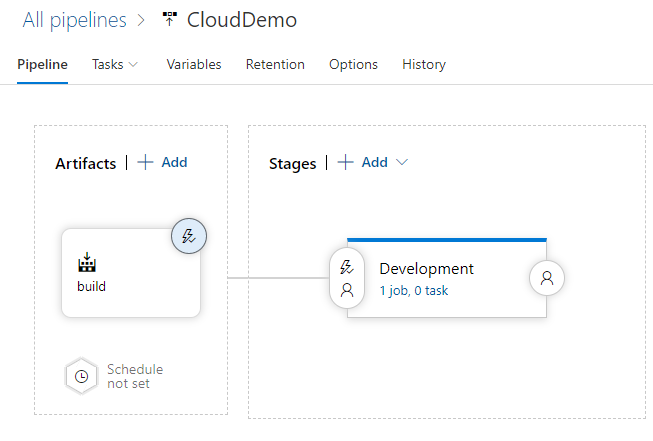
- Click Save.
Enter a comment if you want, and then confirm by clicking OK.
The pipeline displays similar to the following.
Deploy to the development project
With the release definition created, you can now configure the Cloud Run deployment to the development project.
- In the menu, switch to the Tasks tab.
- Click Agent job.
- Set Agent specification to ubuntu-22.04.
- Next to Agent job, click Add a task to agent job to add a step to the phase.
- Select the Command line task and click Add.
Click the newly added task and configure the following settings:
- Display name:
Deploy image to development project Script:
gcloud auth activate-service-account \
    --quiet \
    --key-file <(echo $(ServiceAccountKey) | base64 -d) && \
gcloud run deploy clouddemo \
    --quiet \
    --service-account=clouddemo-runner@$(CloudRun.ProjectId.Development).iam.gserviceaccount.com \
    --allow-unauthenticated \
    --image=$(CloudRun.Region)-docker.pkg.dev/$(ContainerRegistry.ProjectId)/docker/clouddemo:$BUILD_BUILDID \
    --platform=managed \
    --region=$(CloudRun.Region) \
    --project=$(CloudRun.ProjectId.Development)
This command obtains a service account key from an environment variable and then uses the gcloud CLI to deploy the application to Cloud Run. The gcloud CLI is available by default on Azure Pipelines agents.
- Display name:
Switch to the Variables tab and add the following variables.
Name Value Secret ServiceAccountKeyService account key created for azure-pipelines-deployerearlier.Yes ContainerRegistry.ProjectIdProject ID of your production project. CloudRun.RegionRegion you selected earlier to deploy Artifact Registry resources in. CloudRun.ProjectId.DevelopmentProject ID of your development project. CloudRun.ProjectId.ProductionProject ID of your production project. Click Save.
Enter a comment if you want, and then confirm by clicking OK.
Deploy to the production cluster
Finally, you configure the deployment to the production project:
- In the menu, switch to the Pipeline tab.
- In the Stages box, select Add > New stage.
- From the list of templates, select Empty job.
- When you're prompted for a name for the stage, enter
Production. - Click the lightning bolt icon of the newly created stage.
Configure the following settings:
- Select trigger: After stage
- Stages: Development
- Pre-deployment approvals: (enabled)
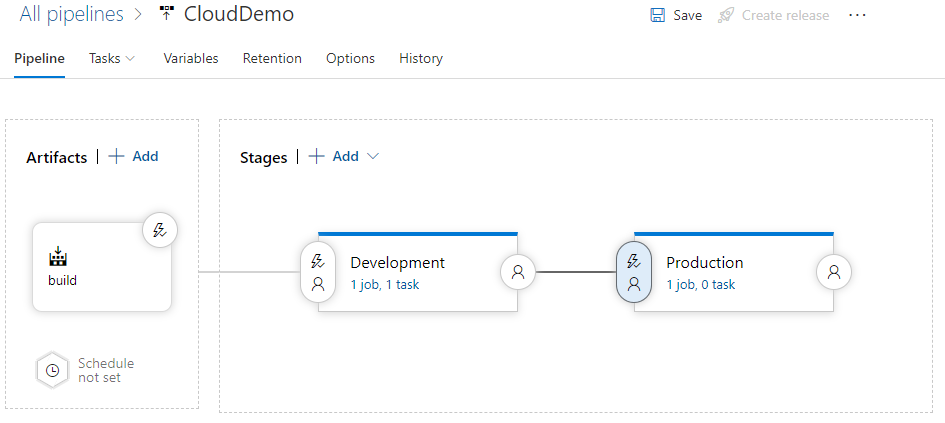
- Approvers: Select your username.
The pipeline displays a view similar to the following.
Switch to the Tasks tab.
Hold the mouse over the Tasks tab and select Tasks > Production.
Click Agent job.
Set Agent specification to ubuntu-22.04.
Click Add a task to agent job to add a step to the phase.
Select the Command line task, and then click Add.
Click the newly added task and configure the following settings:
- Display name:
Deploy image to production project Script:
gcloud auth activate-service-account \
    --quiet \
    --key-file <(echo $(ServiceAccountKey) | base64 -d) && \
gcloud run deploy clouddemo \
    --quiet \
    --service-account=clouddemo-runner@$(CloudRun.ProjectId.Production).iam.gserviceaccount.com \
    --allow-unauthenticated \
    --image=$(CloudRun.Region)-docker.pkg.dev/$(ContainerRegistry.ProjectId)/docker/clouddemo:$BUILD_BUILDID \
    --platform=managed \
    --region=$(CloudRun.Region) \
    --project=$(CloudRun.ProjectId.Production)
- Display name:
Click Save.
Enter a comment if you want, and then confirm by clicking OK.
Run the pipeline
Now that you've configured the entire pipeline, you can test it by performing a source code change:
- On your local computer, open the file
applications\clouddemo\netcore\CloudDemo.MvcCore\Views\Home\Index.cshtmlfrom the Git repository you cloned earlier. - In line 26, change the value of
ViewBag.TitlefromHome PagetoHome Page Cloud Run. Commit your changes, and then push them to Azure Pipelines.
Visual Studio
- Open Team Explorer and click the Home icon.
- Click Changes.
- Enter a commit message like
Change site title. - Click Commit All and Push.
Command line
Stage all modified files:
git add -ACommit the changes to the local repository:
git commit -m "Change site title"Push the changes to Azure Pipelines:
git push
In the Azure DevOps menu, select Pipelines. A build is triggered.
After the build is finished, select Pipelines > Releases. A release process is initiated.
Click Release-1 to open the details page, and wait for the status of the Development stage to switch to Succeeded.
In the Google Cloud console, switch to the development project.
In the menu, select Compute > Cloud Run.
The clouddemo service is deployed successfully.
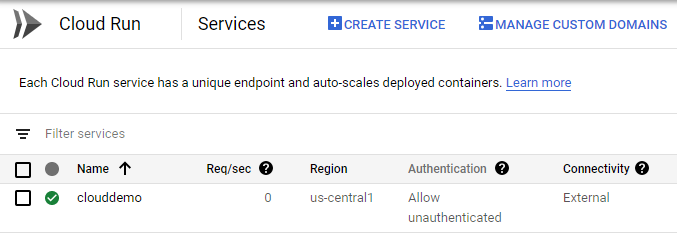
Click clouddemo to view more details.
A URL is displayed which shows that Cloud Run provisioned the service.
Open the URL in a new browser tab to verify that the CloudDemo app is deployed and uses the custom title.
In Azure Pipelines, click Approve (adjacent to the Production stage) to promote the deployment to the production environment.
(Optional) Enter a comment.
Confirm by clicking Approve, and wait for the status of the Production environment to switch to Succeeded.
In the Google Cloud console, switch to the production project.
In the menu, select Compute > Cloud Run.
The clouddemo service is deployed to the production project.
Click clouddemo to view more details.
A URL displays which shows that Cloud Run provisioned the service.
Open the URL in a new browser tab to verify that the CloudDemo app is deployed to production and that it uses the custom title.
Clean up
To avoid incurring further costs after you complete this tutorial, delete the entities that you created.
Delete the Azure Pipelines project
To delete the Azure Pipelines project, see the Azure DevOps Services documentation. Deleting the Azure Pipelines project causes all source code changes to be lost.
Delete the Google Cloud development and production projects
- In the Google Cloud console, go to the Manage resources page.
- In the project list, select the project that you want to delete, and then click Delete.
- In the dialog, type the project ID, and then click Shut down to delete the project.
What's next
- Configure a custom domain for your Cloud Run service.
- Learn how you can use Azure Pipelines to deploy the same app to Google Kubernetes Engine instead.
- Read more about deploying Deploying .NET apps on Google Cloud.
- Explore reference architectures, diagrams, and best practices about Google Cloud. Take a look at our Cloud Architecture Center.